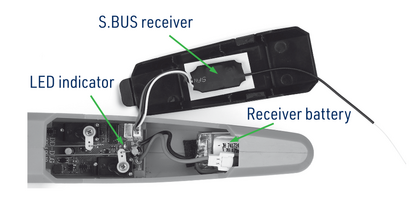
Connect the receiver battery to the on-board electronics and insert it into the nose. The red LED on the decoder/servo board should glow now. If the LED is blinking, there is no valid signal from your receiver (e.g. because of your receiver and transmitter have not been paired).
Note: The 2.4GHz RC system requires a procedure called “pairing” or “binding” in order to let the receiver recognise the ID code that is a part of the transmitter signal. During the binding procedure, the code is recognised and stored in the receiver memory. From this moment on, the receiver only responds to the signal of “its own” transmitter containing the correct ID. Follow the instruction manual of your radio and receiver to perform binding.
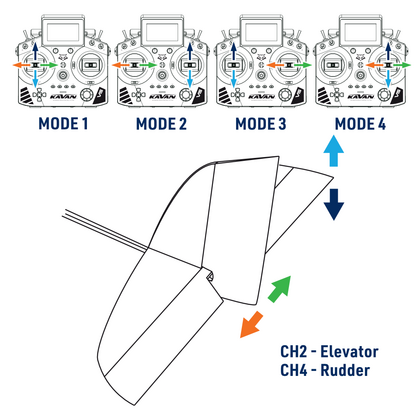
Set the default neutral (centre) positions of the control surfaces: check the transmitter first. Ensure the elevator and rudder sticks are centred as well as the trims. Now check the plane. The elevator and rudder have to be in the neutral position too - the axis of the control surface has to be the same as the axis of the horizontal stabiliser or the fin. The elevator (CH2) may not be deflected up or down; the rudder (CH4) may not be deflected right or left (refer to the pictures below). If the control surfaces are not exactly in the neutral position, and shorten or lengthen the push rod by changing the shape of the “Z” bend of the push rod using a pair of small pliers until the correct neutral position is reached.
Note: Neutral positions of the control surfaces are to be adjusted mechanically; the transmitter trims are here for the fine in-flight adjustment only.
Move the elevator stick on the transmitter forward and back to check elevator deflections. With the elevator stick pulled back, the elevator should move up.
When the stick is pushed forward, the elevator should move down.
Move the rudder stick left and right to check the rudder control. With the rudder stick pushed right, the servo should push the rudder to the right (when viewing the aeroplane from behind).
When the stick is pushed to the left, the rudder must move to the left.
Each time before you fly, you should ALWAYS turn the transmitter ON before connecting the receiver battery to the receiver board. Never connect the receiver battery to the model before turning on the transmitter. After each flight, be sure that you always disconnect the receiver battery from the model before shutting your transmitter off.
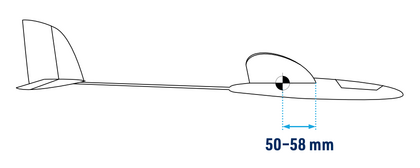
Centre of gravity (CG) Support your model with your thumb and index finger (refer to the figure). The model should be level (or with the nose slightly down) when supported at 50-58 mm behind the leading edge of the wing. You should achieve that with the model as it is, right out of the box. You may correct the centre of gravity location by moving the position of the receiver pack. If necessary, add some lead to the nose or tail. It will not spoil the performance of your SLING mini, but she will recognise an incorrect centre of gravity immediately. An incorrectly balanced model is difficult to fly, and might not fly at all!
Control surface travel volumes The travel volumes of the control surfaces are influenced by the setting of your transmitter (if it features EPA/ATV function) and the position of the push rods on the respective servo arms and elevator/rudder horns. Fitting the push rods closer to the control surface increases the travel volume, whilst attaching the push rod to the outer hole decreases the travel volume. Fitting the push rods closer to the servo shaft decreases the travel volume, whilst attaching the push rod to the outer hole increases the travel volume. Using your transmitter EPA/ATV or mechanically on your model, set the recommended default travel rates.