KAVAN GRE-24 - Instruction manual: Difference between revisions
No edit summary |
m (Protected "KAVAN GRE-24 - Instruction manual" ([Edit=Allow only administrators] (indefinite) [Move=Allow only administrators] (indefinite)) [cascading]) |
||
| (7 intermediate revisions by 2 users not shown) | |||
| Line 1: | Line 1: | ||
<languages/> | |||
<translate> | |||
<!--T:1--> | |||
== Introduction == | == Introduction == | ||
Thank you for purchasing the '''KAVAN GRE-24''' 1/24th crawler. Engineered to be one of the most realistic, capable and dependable trucks in its class, the KAVAN 1/24th series is ready to tackle any terrain right out of the box. | Thank you for purchasing the RTR set of the '''KAVAN GRE-24''' 1/24th crawler. Engineered to be one of the most realistic, capable and dependable trucks in its class, the KAVAN 1/24th series is ready to tackle any terrain right out of the box. | ||
<!--T:2--> | |||
{{Image frame|content=[[File:KAVAN GRE-24 - yellow.png|300px|KAV06.GRE24Y GRE-24 - yellow]][[File:KAVAN GRE-24 - sand.png|300px|KAV06.GRE24S KAVAN GRE-24 - sand]]|align=center|pos=bot|caption=<br>[https://kavanrc.com/item/kavan-gre-24-rtr-crawler-1-24-yellow-148911 '''KAV06.GRE24Y'''] '''KAVAN GRE-24 - {{font color | #daed07 | yellow }}'''   {{!}}   [https://kavanrc.com/item/kavan-gre-24-rtr-crawler-1-24-sand-148910 '''KAV06.GRE24S'''] '''KAVAN GRE-24 - {{font color | #b8b06c | sand}}'''}} | {{Image frame|content=[[File:KAVAN GRE-24 - yellow.png|300px|KAV06.GRE24Y GRE-24 - yellow]][[File:KAVAN GRE-24 - sand.png|300px|KAV06.GRE24S KAVAN GRE-24 - sand]]|align=center|pos=bot|caption=<br>[https://kavanrc.com/item/kavan-gre-24-rtr-crawler-1-24-yellow-148911 '''KAV06.GRE24Y'''] '''KAVAN GRE-24 - {{font color | #daed07 | yellow }}'''   {{!}}   [https://kavanrc.com/item/kavan-gre-24-rtr-crawler-1-24-sand-148910 '''KAV06.GRE24S'''] '''KAVAN GRE-24 - {{font color | #b8b06c | sand}}'''}} | ||
<!--T:3--> | |||
=== Warnings === | === Warnings === | ||
* This is not a toy! This vehicle is not intended for those under 14 years of age without proper adult supervision. | * This is not a toy! This vehicle is not intended for those under 14 years of age without proper adult supervision. | ||
| Line 19: | Line 24: | ||
* Never shorten the receiver antenna; this may affect the operational range of your radio system. | * Never shorten the receiver antenna; this may affect the operational range of your radio system. | ||
<!--T:4--> | |||
=== Charging the battery === | === Charging the battery === | ||
[[File:GRE-24 - Charging.png|right|frameless|480x480px]] | [[File:GRE-24 - Charging.png|right|frameless|480x480px]] | ||
Before you start, get four fresh AAA alkaline batteries or fully charged NiMH batteries (not supplied in the kit) for your transmitter and charge the LiPo power pack supplied with your model using the USB charger. | Before you start, get four fresh AAA alkaline batteries or fully charged NiMH batteries (not supplied in the kit) for your transmitter and charge the LiPo power pack supplied with your model using the USB charger. | ||
<!--T:5--> | |||
# Connect the charger to a USB port then connect your battery to the charger. | # Connect the charger to a USB port then connect your battery to the charger. | ||
# When charging, the status LED is red. Once fully charged, the status LED goes off. | # When charging, the status LED is red. Once fully charged, the status LED goes off. | ||
| Line 28: | Line 35: | ||
# If the battery or charger is hot, disconnect the battery and charger immediately as this may be caused by an internal short-circuit. | # If the battery or charger is hot, disconnect the battery and charger immediately as this may be caused by an internal short-circuit. | ||
<!--T:6--> | |||
==== Lithium Polymer Battery Warning ==== | ==== Lithium Polymer Battery Warning ==== | ||
* Never charge a lithium polymer battery with a charger designed for NiCd, NIMH, or any other type of battery than LiPo. Use ONLY a charger designed for LiPo batteries. | * Never charge a lithium polymer battery with a charger designed for NiCd, NIMH, or any other type of battery than LiPo. Use ONLY a charger designed for LiPo batteries. | ||
| Line 46: | Line 54: | ||
* Do not short-circuit the LiPo battery. | * Do not short-circuit the LiPo battery. | ||
* Avoid direct contact with a leaky/damaged battery. | * Avoid direct contact with a leaky/damaged battery. | ||
* Do not charge the battery out of the recommended temperature range ( | * Do not charge the battery out of the recommended temperature range (0–45 °C). | ||
{{Note|type=error|text='''Caution:''' Cells may become hot after usage. Allow the pack to cool to room temperature before recharging.}} | {{Note|type=error|text='''Caution:''' Cells may become hot after usage. Allow the pack to cool to room temperature before recharging.}} | ||
<!--T:7--> | |||
=== Transmitter controls === | === Transmitter controls === | ||
[[File:GRE-24 - Controls.png|frameless|960x960px]] | [[File:GRE-24 - Controls.png|frameless|960x960px]] | ||
| Line 56: | Line 65: | ||
{{Note|type=info|text='''Note:''' Please replace batteries when the power indicator blinks or the buzzer beeps.}} | {{Note|type=info|text='''Note:''' Please replace batteries when the power indicator blinks or the buzzer beeps.}} | ||
<!--T:8--> | |||
=== Specification === | === Specification === | ||
==== Transmitter ==== | ==== Transmitter ==== | ||
| Line 63: | Line 73: | ||
* Output Power: <20dBm | * Output Power: <20dBm | ||
<!--T:9--> | |||
==== Receiver ==== | ==== Receiver ==== | ||
* Input Voltage: 3.7 V (1S LiPo) | * Input Voltage: 3.7 V (1S LiPo) | ||
| Line 69: | Line 80: | ||
* Output Power: - | * Output Power: - | ||
<!--T:10--> | |||
{{Note|type=error|text='''Warning:''' please don’t reverse the battery, or it will damage the transmitter. When not in use, remove the AAA batteries to prevent the transmitter PCB from electrical damage.}} | {{Note|type=error|text='''Warning:''' please don’t reverse the battery, or it will damage the transmitter. When not in use, remove the AAA batteries to prevent the transmitter PCB from electrical damage.}} | ||
<!--T:11--> | |||
=== Transmitter and receiver binding === | === Transmitter and receiver binding === | ||
[[File:GRE-24 - Binding.png|center|frameless|960x960px]] | [[File:GRE-24 - Binding.png|center|frameless|960x960px]] | ||
| Line 77: | Line 90: | ||
# The LED on the receiver should now turn on and remain solid, indicating that the binding process is complete. | # The LED on the receiver should now turn on and remain solid, indicating that the binding process is complete. | ||
<!--T:12--> | |||
{{Note|type=info|text='''Note:''' slow blinking of the receiver LED (ca once per second) means your receiver is not receiving any signal from your transmitter. Rapid blinking (ca twice per second) means the binding mode.}} | {{Note|type=info|text='''Note:''' slow blinking of the receiver LED (ca once per second) means your receiver is not receiving any signal from your transmitter. Rapid blinking (ca twice per second) means the binding mode.}} | ||
<!--T:13--> | |||
=== Transmitter function === | === Transmitter function === | ||
[[File:GRE-24 - Transmitter.png|right|frameless|480x480px]] | [[File:GRE-24 - Transmitter.png|right|frameless|480x480px]] | ||
| Line 84: | Line 99: | ||
# Pull the trigger backward to accelerate. | # Pull the trigger backward to accelerate. | ||
<!--T:14--> | |||
{{Note|type=error|text='''Caution:''' Keep the transmitter and receiver at least 40 cm apart when operating.}} | {{Note|type=error|text='''Caution:''' Keep the transmitter and receiver at least 40 cm apart when operating.}} | ||
'''Throttle trim:''' If the vehicle inches forward or backwards without throttle input, adjust the trim to set the neutral throttle position. | '''Throttle trim:''' If the vehicle inches forward or backwards without throttle input, adjust the trim to set the neutral throttle position. | ||
<!--T:15--> | |||
'''Steering trim:''' If the vehicle veers left or right without any steering input, use the steering trim to adjust the steering servo until the vehicle tracks straight. | '''Steering trim:''' If the vehicle veers left or right without any steering input, use the steering trim to adjust the steering servo until the vehicle tracks straight. | ||
<!--T:16--> | |||
==== Operating procedure ==== | ==== Operating procedure ==== | ||
* Always turn the transmitter on before turning on the vehicle. | * Always turn the transmitter on before turning on the vehicle. | ||
| Line 94: | Line 112: | ||
[[File:GRE-24 - Rate 1.png|right|frameless|480x480px]] | [[File:GRE-24 - Rate 1.png|right|frameless|480x480px]] | ||
<!--T:17--> | |||
==== Channel reverse ==== | ==== Channel reverse ==== | ||
# '''Steering:''' if your car turns right whilst turning the steering wheel left (or vice versa) - turn the steering wheel to its maximum deflection in either direction and hold; simultaneously press and hold the steering REV button and the steering channel will be reversed. | # '''Steering:''' if your car turns right whilst turning the steering wheel left (or vice versa) - turn the steering wheel to its maximum deflection in either direction and hold; simultaneously press and hold the steering REV button and the steering channel will be reversed. | ||
| Line 99: | Line 118: | ||
[[File:GRE-24 - Rate 2.png|right|frameless|480x480px]] | [[File:GRE-24 - Rate 2.png|right|frameless|480x480px]] | ||
<!--T:18--> | |||
==== Control rate ==== | ==== Control rate ==== | ||
# '''Steering:''' turn the steering wheel to its maximum deflection in either direction and hold; press the ST trim + or - buttons to increase or decrease the steering rate. If the steering is unresponsive, keep pressing the steering trim+ button while holding the steering wheel at maximum deflection. | # '''Steering:''' turn the steering wheel to its maximum deflection in either direction and hold; press the ST trim + or - buttons to increase or decrease the steering rate. If the steering is unresponsive, keep pressing the steering trim+ button while holding the steering wheel at maximum deflection. | ||
# '''Throttle:''' with the car inverted (Wheels not touching the ground), press the throttle trigger down to its maximum position and hold; press the TH trim + or - buttons to increase or decrease the throttle rate. If the throttle is unresponsive, keep pressing the throttle trim + button while holding the throttle trigger down at its maximum point. | # '''Throttle:''' with the car inverted (Wheels not touching the ground), press the throttle trigger down to its maximum position and hold; press the TH trim + or - buttons to increase or decrease the throttle rate. If the throttle is unresponsive, keep pressing the throttle trim + button while holding the throttle trigger down at its maximum point. | ||
<!--T:19--> | |||
{{Note|type=info|text='''Note:''' If your vehicle has steering but no throttle or vice versa, this setting is the likely culprit. Following instructions above, you should make the vehicle to function normally again.}} | {{Note|type=info|text='''Note:''' If your vehicle has steering but no throttle or vice versa, this setting is the likely culprit. Following instructions above, you should make the vehicle to function normally again.}} | ||
<!--T:20--> | |||
=== Car electronics diagram === | === Car electronics diagram === | ||
[[File:GRE-24 - Electronics.png|frameless|960x960px]] | [[File:GRE-24 - Electronics.png|frameless|960x960px]] | ||
<!--T:21--> | |||
=== Maintenance === | === Maintenance === | ||
Proper maintenance is very important. Make sure to always perform appropriate maintenance after driving so that you can enjoy driving without problems next time. | Proper maintenance is very important. Make sure to always perform appropriate maintenance after driving so that you can enjoy driving without problems next time. | ||
<!--T:22--> | |||
* Completely remove all dirt and debris from the vehicle, especially in the suspension, drive shafts and steering parts. | * Completely remove all dirt and debris from the vehicle, especially in the suspension, drive shafts and steering parts. | ||
* Inspect each part and screw for loosening, missing parts or damages. | * Inspect each part and screw for loosening, missing parts or damages. | ||
| Line 116: | Line 140: | ||
* Do not use aggressive chemicals or solvents for cleaning, otherwise the electronics and plastic parts might be damaged. Use compressed air for cleaning, a soft paintbrush or toothbrush. | * Do not use aggressive chemicals or solvents for cleaning, otherwise the electronics and plastic parts might be damaged. Use compressed air for cleaning, a soft paintbrush or toothbrush. | ||
=== Exploded views === <!--T:23--> | |||
<!--T:24--> | |||
==== Main chassis ==== | |||
==== [[File:GRE-24 - Chassis.png|frameless|1280x1280px]] ==== | |||
<!--T:25--> | |||
==== Front axle ==== | |||
==== [[File:GRE-24 - Front axle.png|frameless|960x960px]] ==== | |||
<!--T:26--> | |||
==== Rear axle ==== | |||
==== [[File:GRE-24 - Rear axle.png|frameless|960x960px]] ==== | |||
<!--T:27--> | |||
=== Recycling and waste disposal note (European Union) === | === Recycling and waste disposal note (European Union) === | ||
[[File:WEEE.svg|right|frameless|50x50px]] | [[File:WEEE.svg|right|frameless|50x50px]] | ||
Electrical equipment marked with the crossed-out waste bin symbol must not be discarded in the domestic waste; it should be disposed of via the appropriate specialised disposal system. In the countries of the EU (European Union) electrical devices must not be discarded via the normal domestic waste system (WEEE - Waste of Electrical and Electronic Equipment, Directive 2012/19/EU). You can take your unwanted equipment to your nearest public collection point or recycling centre, where it will be disposed of in the proper manner at no charge to you. By disposing of your old equipment in a responsible manner you make an important contribution to the safeguarding of the environment. | Electrical equipment marked with the crossed-out waste bin symbol must not be discarded in the domestic waste; it should be disposed of via the appropriate specialised disposal system. In the countries of the EU (European Union) electrical devices must not be discarded via the normal domestic waste system (WEEE - Waste of Electrical and Electronic Equipment, Directive 2012/19/EU). You can take your unwanted equipment to your nearest public collection point or recycling centre, where it will be disposed of in the proper manner at no charge to you. By disposing of your old equipment in a responsible manner you make an important contribution to the safeguarding of the environment. | ||
<!--T:28--> | |||
=== EU declaration of conformity (European Union) === | === EU declaration of conformity (European Union) === | ||
[[File:CE.svg|right|frameless|50x50px]] | [[File:CE.svg|right|frameless|50x50px]] | ||
Hereby, '''KAVAN Europe s.r.o.''' declares that the equipment '''KAVAN GRE-24''' model car with an RC kit are in compliance with the essential requirements as laid down in the EU directive(s) concerning electromagnetic compatibility. The full text of the EU Declaration of Conformity is available at [http://www.kavanrc.com/doc www.kavanrc.com/doc]. | Hereby, '''KAVAN Europe s.r.o.''' declares that the equipment '''KAVAN GRE-24''' model car with an RC kit are in compliance with the essential requirements as laid down in the EU directive(s) concerning electromagnetic compatibility. The full text of the EU Declaration of Conformity is available at [http://www.kavanrc.com/doc www.kavanrc.com/doc]. | ||
<!--T:29--> | |||
=== Guarantee === | === Guarantee === | ||
The KAVAN Europe s.r.o. products are covered by a guarantee that fulfils the currently valid legal requirements in your country. If you wish to make a claim under guarantee, please contact the retailer from whom you first purchased the equipment. The guarantee does not cover faults which were caused in the following ways: crashes, improper use, incorrect connection, reversed polarity, maintenance work carried out late, incorrectly or not at all, or by unauthorised personnel, use of other than genuine KAVAN Europe s.r.o. accessories, modifications or repairs which were not carried out by KAVAN Europe s.r.o. or an authorised KAVAN Europe s.r.o., accidental or deliberate damage, defects caused by normal wear and tear, operation outside the Specification, or in conjunction with equipment made by other manufacturers. Please be sure to read the appropriate information sheets in the product documentation. | The KAVAN Europe s.r.o. products are covered by a guarantee that fulfils the currently valid legal requirements in your country. If you wish to make a claim under guarantee, please contact the retailer from whom you first purchased the equipment. The guarantee does not cover faults which were caused in the following ways: crashes, improper use, incorrect connection, reversed polarity, maintenance work carried out late, incorrectly or not at all, or by unauthorised personnel, use of other than genuine KAVAN Europe s.r.o. accessories, modifications or repairs which were not carried out by KAVAN Europe s.r.o. or an authorised KAVAN Europe s.r.o., accidental or deliberate damage, defects caused by normal wear and tear, operation outside the Specification, or in conjunction with equipment made by other manufacturers. Please be sure to read the appropriate information sheets in the product documentation. | ||
</translate> | |||
Latest revision as of 06:48, 9 September 2024
Introduction
Thank you for purchasing the RTR set of the KAVAN GRE-24 1/24th crawler. Engineered to be one of the most realistic, capable and dependable trucks in its class, the KAVAN 1/24th series is ready to tackle any terrain right out of the box.
Warnings
- This is not a toy! This vehicle is not intended for those under 14 years of age without proper adult supervision.
- Failure to operate or maintain this vehicle safely can result in bodily harm.
- Replace damaged components with original factory parts only. Pay special attention to the polarity of all vehicle wiring.
- Only use approved single-cell (1S, 3.7 V) lithium polymer batteries. Do not overcharge or overdischarge the battery as doing so may cause the battery to become a fire hazard. If the battery should become hot during charging, discontinue charging immediately and disconnect the battery from the charger. Never leave the battery unattended while charging. If you are unsure of how to charge this battery, please seek the advice of experienced RC users. Never let children charge the battery without adult supervision.
- The motor will become hot during use. Allow 10–15 minutes between runs for the vehicle to cool down. Doing so will prolong the life of your vehicle.
- Use common sense when selecting the environment to operate your vehicle. Do not run it in the streets, car parks etc. - wherever you can run into a full-size car, people or animals. Do not operate near power cables, cellular/radio towers, deep water or unstable terrain. The operator is solely responsible for their actions.
- The product is composed of precision electrical components. It is critical to keep the product away from moisture and other contaminants. If exposed to a humid environment, make sure the electronics are fully dried before using them again.
- Always check the radio range of the vehicle before operation to prevent damage to your model due to radio loss or interference.
- Operate this product to your ability. If the vehicle is dangerous to retrieve from a place, it’s never worth the risk.
- Always turn on the transmitter before connecting the battery to the model. When turning off the model, turn off the receiver switch and then always disconnect the battery - only then turn off the transmitter. If this order is reversed, the model may become out of control and cause serious damage.
- Never allow transmitter batteries to run low as it may cause loss of vehicle control.
- Plastics on the vehicle are flammable and susceptible to damage or deformation due to extreme heat and cold climates. Do not store the model near any source of heat such as an oven or heater. Store the model indoors, in a dry, room-temperature environment.
- Never shorten the receiver antenna; this may affect the operational range of your radio system.
Charging the battery
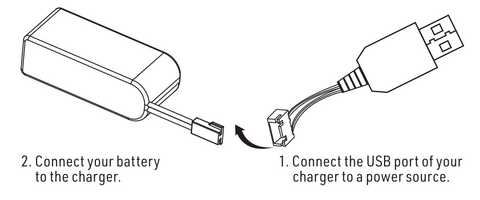
Before you start, get four fresh AAA alkaline batteries or fully charged NiMH batteries (not supplied in the kit) for your transmitter and charge the LiPo power pack supplied with your model using the USB charger.
- Connect the charger to a USB port then connect your battery to the charger.
- When charging, the status LED is red. Once fully charged, the status LED goes off.
- Do not leave the battery unattended when charging!
- If the battery or charger is hot, disconnect the battery and charger immediately as this may be caused by an internal short-circuit.
Lithium Polymer Battery Warning
- Never charge a lithium polymer battery with a charger designed for NiCd, NIMH, or any other type of battery than LiPo. Use ONLY a charger designed for LiPo batteries.
- Do not leave the LiPo battery unattended during charging.
- Do not overcharge the battery.
- Always charge LiPo batteries placed on non-flammable, heat-resistant surfaces.
- Use of a LiPo-safe bag or container while charging is strongly recommended. Do not allow LiPo cells to overheat at any time. Cells which reach greater than 60 °C will usually become damaged and will catch fire.
- Do not charge the LiPo pack while it is still in the model. Never charge or store battery packs in a vehicle.
- Do not over-discharge LiPo; doing so will damage the battery.
- Do not expose LiPo cells to water or moisture at any time.
- Do not store battery near open flame or heater.
- Do not assemble LiPo cells or pre-assembled packs together with other LiPo cells or packs.
- Always store LiPo batteries in a secure location away from children.
- Always remove the LiPo battery if the model is involved in any kind of crash.
- Carefully inspect the battery and connectors for even the smallest damage.
- Do not allow the electrolyte to get into the eyes or on the skin. Wash affected areas immediately if they come into contact with electrolytes. Do not alter or modify the connectors or wires of a LiPo battery pack.
- Always inspect the condition of the battery before charging and operating.
- Do not short-circuit the LiPo battery.
- Avoid direct contact with a leaky/damaged battery.
- Do not charge the battery out of the recommended temperature range (0–45 °C).
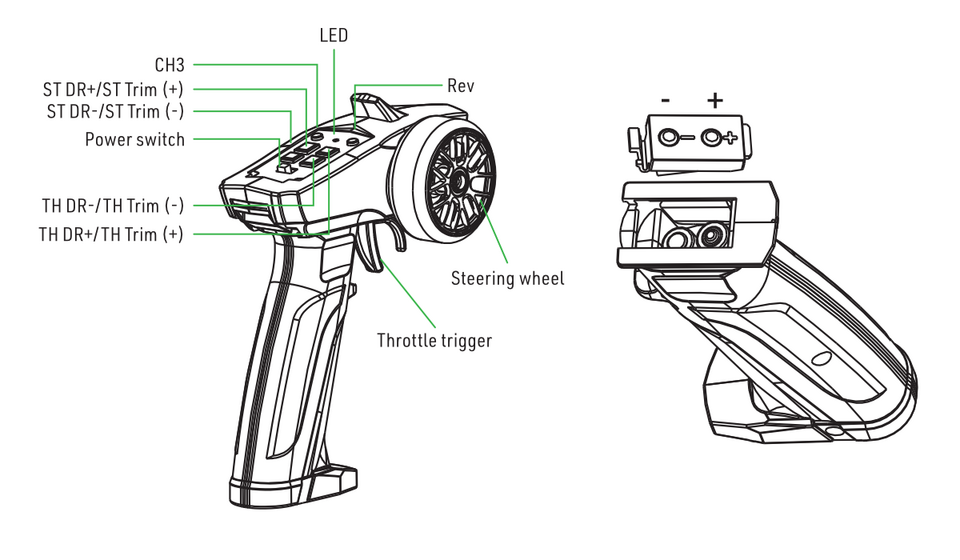
Transmitter controls
Install the transmitter batteries
- Remove the battery compartment cover.
- Replace the used batteries with new AAA-size batteries.
Specification
Transmitter
- Input Voltage: 4× 1.2/1.5 V AAA
- Modulation: FHSS
- Frequency Range: 2.405–2.478 GHz
- Output Power: <20dBm
Receiver
- Input Voltage: 3.7 V (1S LiPo)
- Modulation: FHSS
- Frequency Range: 2.405–2.478 GHz
- Output Power: -
Transmitter and receiver binding
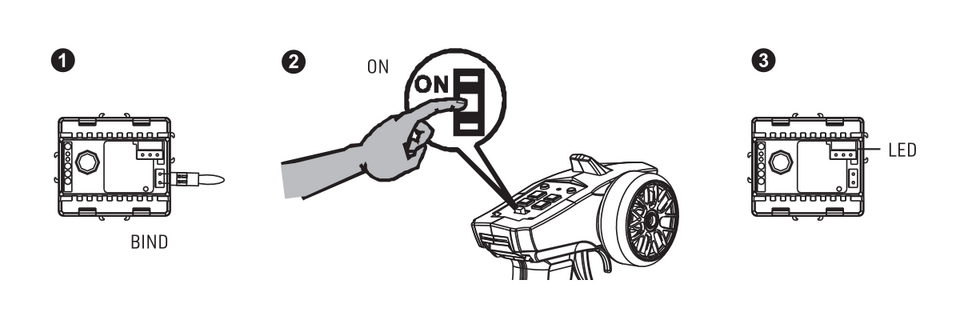
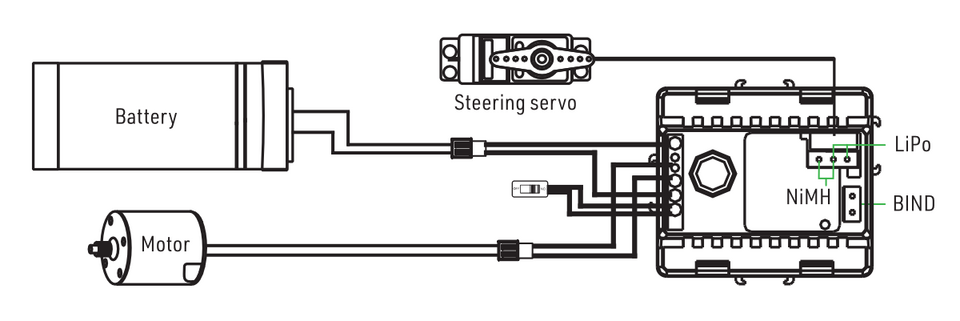
- Connect the receiver to the battery. Place the bind plug into the port labelled "BIND". Turn on the receiver switch. The LED will flash very shortly, go off and then blink again. Immediately before it goes on again, remove the binding plug. The LED will start blinking rapidly.
- Turn on the transmitter.
- The LED on the receiver should now turn on and remain solid, indicating that the binding process is complete.
Transmitter function
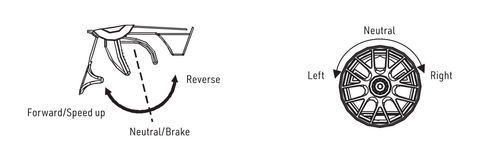
- Push the trigger forward to slow down or brake.
- Pull the trigger backward to accelerate.
Throttle trim: If the vehicle inches forward or backwards without throttle input, adjust the trim to set the neutral throttle position.
Steering trim: If the vehicle veers left or right without any steering input, use the steering trim to adjust the steering servo until the vehicle tracks straight.
Operating procedure
- Always turn the transmitter on before turning on the vehicle.
- Always switch off the vehicle and disconnect the battery BEFORE turning off the transmitter.
Channel reverse
- Steering: if your car turns right whilst turning the steering wheel left (or vice versa) - turn the steering wheel to its maximum deflection in either direction and hold; simultaneously press and hold the steering REV button and the steering channel will be reversed.
- Throttle: if your car runs back whilst pulling the throttle trigger - with the car inverted (wheels not touching the ground), press the throttle trigger down to its maximum position and hold; simultaneously press and hold the throttle REV button and the throttle channel will be reversed.
Control rate
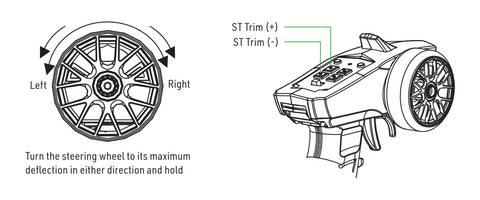
- Steering: turn the steering wheel to its maximum deflection in either direction and hold; press the ST trim + or - buttons to increase or decrease the steering rate. If the steering is unresponsive, keep pressing the steering trim+ button while holding the steering wheel at maximum deflection.
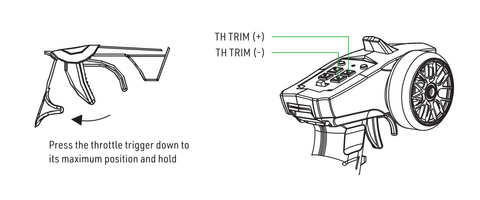
- Throttle: with the car inverted (Wheels not touching the ground), press the throttle trigger down to its maximum position and hold; press the TH trim + or - buttons to increase or decrease the throttle rate. If the throttle is unresponsive, keep pressing the throttle trim + button while holding the throttle trigger down at its maximum point.
Car electronics diagram
Maintenance
Proper maintenance is very important. Make sure to always perform appropriate maintenance after driving so that you can enjoy driving without problems next time.
- Completely remove all dirt and debris from the vehicle, especially in the suspension, drive shafts and steering parts.
- Inspect each part and screw for loosening, missing parts or damages.
- You should always make sure your wheels are tight and parts move freely after and before use. Apply fine grease for plastic gears wherever needed.
- Do not use aggressive chemicals or solvents for cleaning, otherwise the electronics and plastic parts might be damaged. Use compressed air for cleaning, a soft paintbrush or toothbrush.
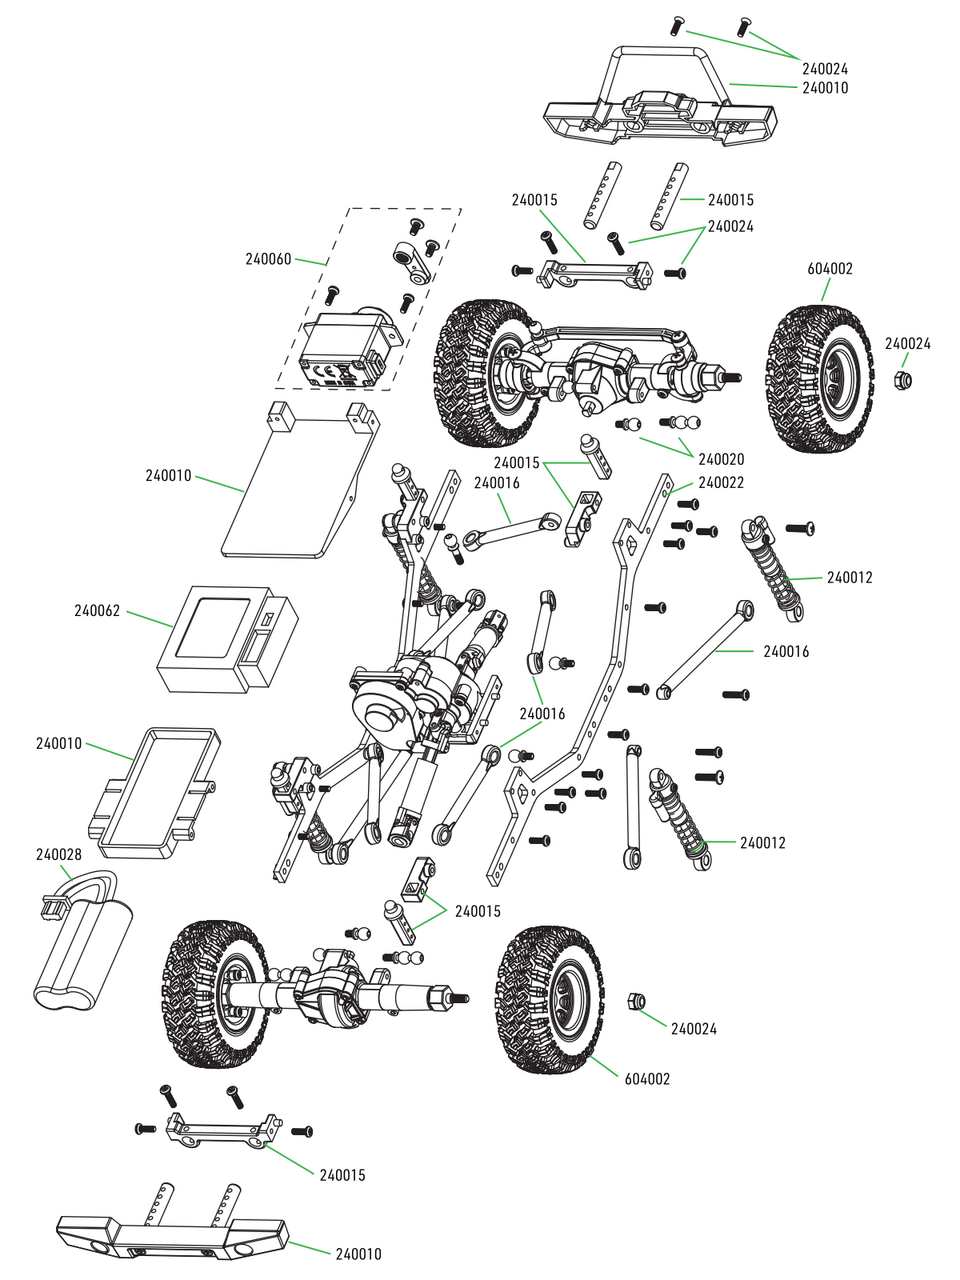
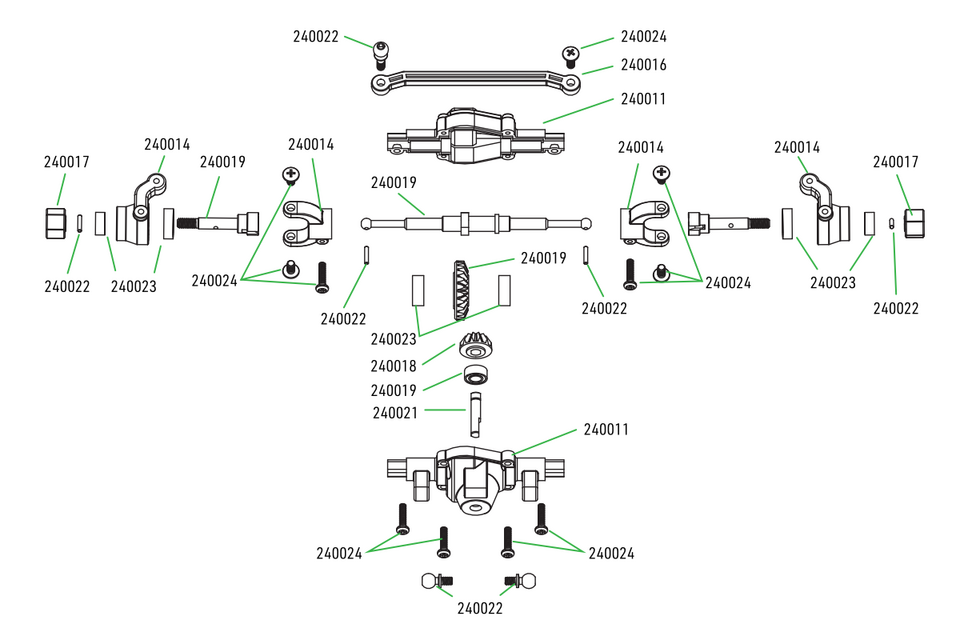
Exploded views
Main chassis
Front axle
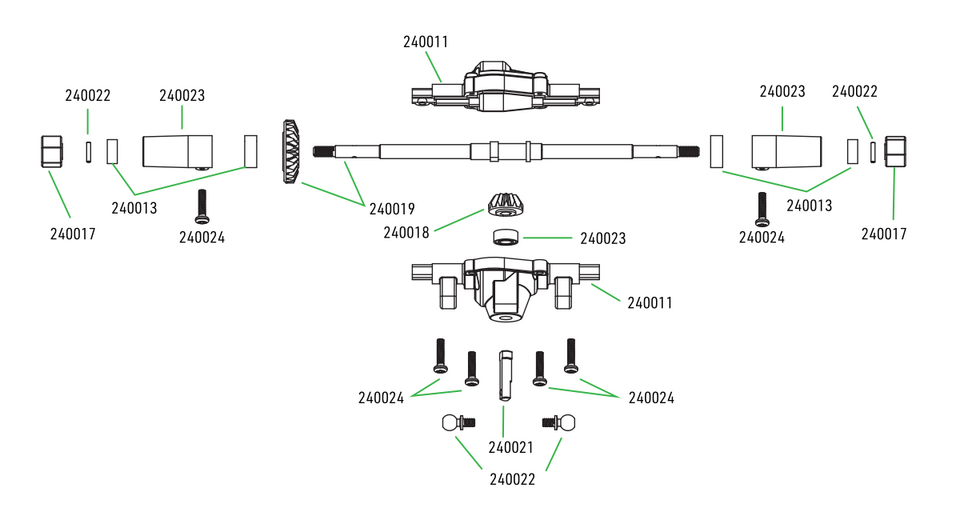
Rear axle
Recycling and waste disposal note (European Union)

Electrical equipment marked with the crossed-out waste bin symbol must not be discarded in the domestic waste; it should be disposed of via the appropriate specialised disposal system. In the countries of the EU (European Union) electrical devices must not be discarded via the normal domestic waste system (WEEE - Waste of Electrical and Electronic Equipment, Directive 2012/19/EU). You can take your unwanted equipment to your nearest public collection point or recycling centre, where it will be disposed of in the proper manner at no charge to you. By disposing of your old equipment in a responsible manner you make an important contribution to the safeguarding of the environment.
EU declaration of conformity (European Union)

Hereby, KAVAN Europe s.r.o. declares that the equipment KAVAN GRE-24 model car with an RC kit are in compliance with the essential requirements as laid down in the EU directive(s) concerning electromagnetic compatibility. The full text of the EU Declaration of Conformity is available at www.kavanrc.com/doc.
Guarantee
The KAVAN Europe s.r.o. products are covered by a guarantee that fulfils the currently valid legal requirements in your country. If you wish to make a claim under guarantee, please contact the retailer from whom you first purchased the equipment. The guarantee does not cover faults which were caused in the following ways: crashes, improper use, incorrect connection, reversed polarity, maintenance work carried out late, incorrectly or not at all, or by unauthorised personnel, use of other than genuine KAVAN Europe s.r.o. accessories, modifications or repairs which were not carried out by KAVAN Europe s.r.o. or an authorised KAVAN Europe s.r.o., accidental or deliberate damage, defects caused by normal wear and tear, operation outside the Specification, or in conjunction with equipment made by other manufacturers. Please be sure to read the appropriate information sheets in the product documentation.


