KAVAN HPH 304TS TwinShark - Instruction manual
Introduction
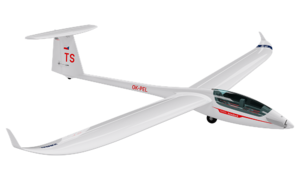
Congratulations on your purchase of the semi-scale model of the HPH 304TS Twin Shark sailplane. You are about to start assembling a model manufactured from virtually unbreakable EPO (expanded polyolefin) foam powered by a mighty brushless motor and lightweight LiPo battery. Everybody who has already mastered flying a "full house" trainer – with aileron, elevator, rudder, and throttle control – will enjoy this beautiful high-performance glider.
KAV02.8077 KAVAN 304TS TwinShark
HPH 304TS Twin Shark
A Czech sailplane with German roots
In 1962 Eugen Hänle founded the Glasflügel Segelflugzeugbau GmbH, which soon became famous as the first company to produce fiberglass sailplanes in large numbers. Glasflügel’s designs have always been known for innovative solutions becoming standard features of modern sailplanes: quick assembly systems for wings and tailplanes, trailing edge air brake-flap combinations, highly practical cockpit and control system design and many more. Unfortunately, after the untimely death of the founder in a flight accident in 1975, the company encountered financial difficulties. It was finally dissolved in 1982.
In the middle of 1990, a young Czech company called HPH s.r.o. (already established as a museum quality scale model manufacturer) restored the production of one of the latest sailplanes designed by the Glasflügel – Type 304. The manufacturing plant in Kutná Hora (central Bohemia) started with the HPH 304CZ built using the original moulds and jigs, later upgraded to 15 metres FAI class HPH 304C Wasp. In 2006 they introduced a brand new 18-metre-class design named HPH 304S Shark and finally the 20-metre two-seater class sailplane HPH 304TS Twin Shark in 2017.
Specification
- Wingspan: 20 m
- Wing area: 15.3 m²
- Length: 8.95 m
- Weight: 495 kg (empty), 850 kg (max. take-off)
- Never exceed speed: 275 km/h
- Stall speed: 68 km/h
- Wing loading: min. 39 kg/m², max. 55.5 kg/m²
For more info about the aircraft visit: https://hph.cz/products/hph-304ts-twin-shark/
Before you start
- If you are not an experienced RC pilot, plan to have a fully competent pilot check your completed model and help you with your first flights. Even though we have tried to provide you with a thorough instruction manual, RC models are rather complicated and an experienced modeller can quickly check over your model to make sure your first flights are successful.
- Please assemble your model exactly according to these instructions. Do not attempt to modify or change your model in any way as doing so may adversely change its flying characteristics.
- Before you begin, please check the entire contents of this kit to make sure that no parts are missing or damaged. This will also help you to become familiar with each component of your plane. If you find that any of the parts are either missing or damaged, please contact your dealer immediately for replacement.Note: Your dealer cannot accept kits for return if construction has begun.
- Trial fit each part before glueing it in place. Make sure you are using the correct part and that it fits well before assembling. No amount of glue can make up for a poorly fitting part.
- The manual contains a drawing showing the default position of the Centre of Gravity (CG) and recommended control surface throws. Please note it is essential to keep the recommended CG position for the first flight otherwise the model could be unstable, hard to control or even unable to fly at all! Later you can fine-tune the CG position to suit your flying style and skills.
Precautions
This RC model is not a toy. Use it with care and strictly follow the instructions in this manual.
Assemble this model following strictly these instructions. DO NOT modify or alter the model. Failure to do so, the warranty will lapse automatically. Follow the instructions to obtain a safe and solid model at the end of the assembly.
Children under the age of 14 must operate the model under the supervision of an adult.
Assure that the model is in perfect condition before every flight, taking care that all the equipment works correctly and that the model is undamaged in its structure.
Fly only on days with a light breeze and in a safe place away from any obstacles.
Safety precautions and warnings
- An RC aeroplane is not a toy! If misused, it can cause serious bodily harm and damage to property. Fly only in a safe place following all instructions and recommendations in this manual. Beware of the propeller! Keep loose items that can get entangled in the propeller away from the spinning propeller, including loose clothing, or other objects such as pencils and screwdrivers. Ensure that your and other people’s hands and faces are kept away from the rotating propeller.
- As the user of this product, you are solely responsible for operating it in a manner that does not endanger yourself and others or result in damage to the product or the property of others. This model is controlled by a radio signal, that is subject to interference from many sources outside your control. This interference can cause momentary loss of control, so it is advisable to always keep a safe distance in all directions around your model, as this margin will help to avoid collisions or injury.
- Never operate your model with low transmitter batteries.
- Always operate your model in an open area away from power lines, cars, traffic, or people. Avoid operating your model in populated areas where injury or damage can occur.
- Carefully follow the directions and warnings for this and any optional support equipment (chargers, rechargeable batteries, etc.) which you use.
- Keep all chemicals, small parts and anything electrical out of the reach of children.
- Moisture causes damage to electronics. Avoid water exposure to all equipment not specifically designed and protected for this purpose.
- The model is mostly made of plastics – it is not fireproof. It may not be exposed to higher temperatures otherwise severe distortion of the foam airframe or other damage may occur.
Specification
| Wingspan | 2700 mm |
| Length | 1285 mm |
| Wing area | 45 dm² |
| Weight | 1680 g |
| All–up weight | 1950–2050 g |
| Motor | C3548-750 |
| ESC | KAVAN R–50SB SBEC |
| Propeller | 11×8" |
Set contents
- Almost ready-to-fly model of a sailplane with the brushless motor, speed controller and servos installed, instruction manual.
You will also need
- At least 7-channel RC set, 14.8 V 2600–3300 mAh LiPo flight pack.
- Regular modeller’s tools – precision knife (KAV66.770), screwdrivers, pliers etc.
Model assembly
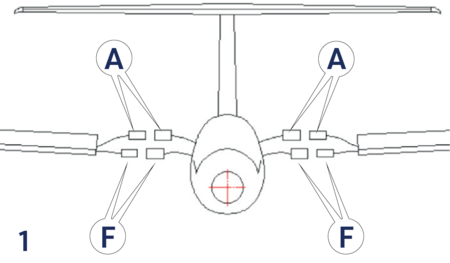
- Connect the aileron (A) and flap (F) servo cables to the corresponding extension cables in the wing opening in the fuselage. Double-check the correct connection. (Fig. 1)Note: The kit is supplied with Y-cables for ailerons and flaps so you can use even the most basic 6-channel radios to control your TwinShark. If you intend to use independent control of aileron and flap servos and an advanced computer radio, you will have to replace the default Y-cables with four 25–30 cm extension cables.
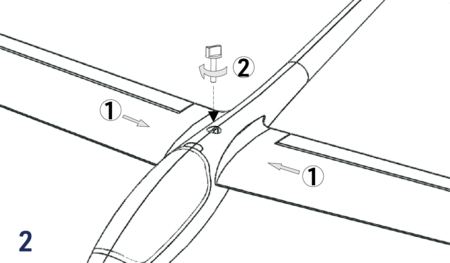
- Insert the wing halves into the fuselage and secure with the M6 nylon bolt. (Fig. 2)
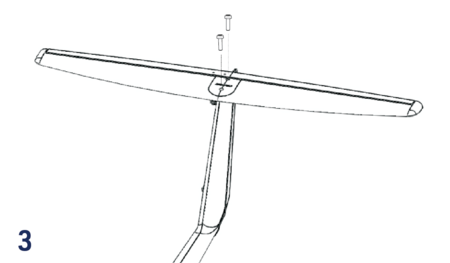
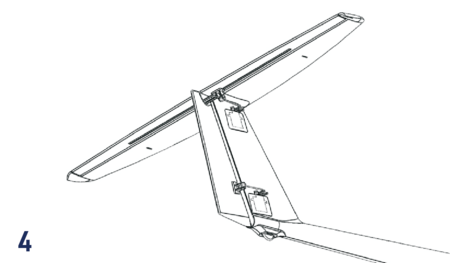
- Attach the horizontal tailplane to the top of the fin and secure with two M3×10 mm screws. (Fig. 3)
- Attach the elevator push rod (the elevator servo is installed in the fin) to the elevator horn. (Fig. 4)
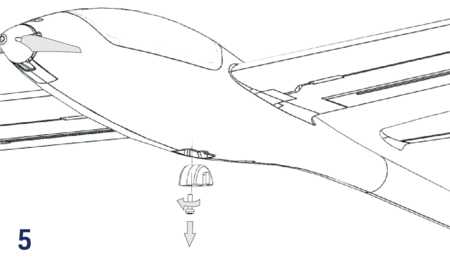
Your TwinShark is fitted for the belly landing as supplied. You might wish to add the undercarriage. - Remove the screw and the foam filler from the landing wheel bay. (Fig. 5)
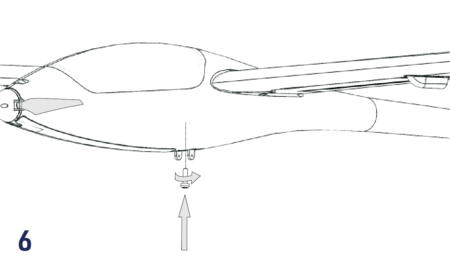
- Install the wheel yoke using the same screw into the wheel bay. (Fig. 6)
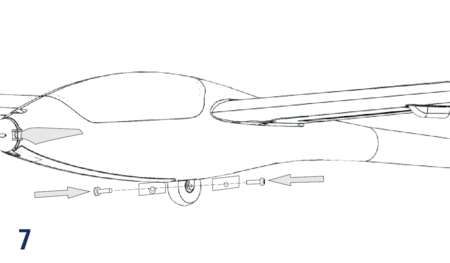
- Insert the wheel into the yoke, attach the dummy undercarriage doors from both sides of the yoke and secure with two screws. (Fig. 7)
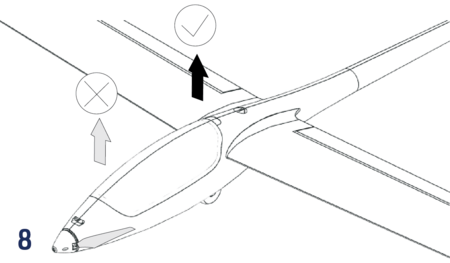
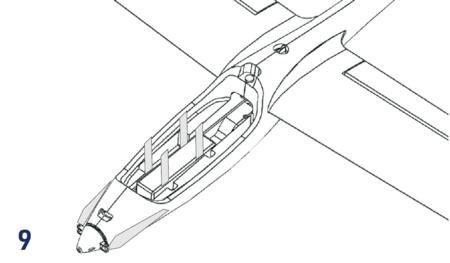
- The flight pack is to be placed in the bay in the centre of the cockpit. Use a hook-and-loop tie to fasten it. You can place your receiver (secured with a strip of hook-and-loop or double-sided foam tape) behind the flight pack. The ESC is to be secured in the same way along the flight pack. Connect the servos and your ESC to the receiver. Deploy the antennas so their active parts are square to each other (if you are using a receiver featuring diversity antennas). With your radio on, set the servos to the neutral position (sticks and trims centred) and fasten the setting screws of the pushrod connectors on the elevator and rudder servo arms. Perform the throttle range calibration of the ESC as described in the attachment of this manual. (Fig. 8+9)
- Attach the canopy.
RC set installation and preflight check
- Referring to the instruction manual of your radio carefully hook up the onboard electronics.
- Once everything has been correctly connected, turn on your transmitter and plug in the flight pack. Check the neutral positions and throws of all control surfaces. If you need to make the control surface throws smaller, simply move the pushrod closer to the centre on the servo arm or move it far from the control surface on the control horn. And vice versa.
| Low rate | High rate | |
| Ailerons | 15 mm up/8 mm down | 20 mm up/ 10 mm down |
| Ailerons (Butterfly) | 20 mm up | 20 mm up |
| Ailerons (Thermal) | 3 mm down | 3 mm down |
| Ailerons (Speed) | 3 mm up | 3 mm up |
| Elevator | ± 9 mm | ± 12 mm |
| Elevator (Butterfly) | 1–3 mm down | 1–3 mm down |
| Rudder | ± 25 mm | ± 35 mm |
| Flaps | 8 mm up/15 mm down | 8 mm up/15 mm down |
| Flaps as Ailerons | 7 mm up/3.5 mm down | 10 mm up/5 mm down |
| Flaps (Butterfly) | 20 mm down | 20 mm down |
| Flaps (Thermal) | 4 mm down | 4 mm down |
| Flaps (Speed) | 3 mm up | 3 mm up |
- The "Low rate" recommended control surface throws are suitable for a less skilled pilot and regular soaring. The "High rate" setting allows an experienced pilot to explore the full capabilities of his model. The aileron differential (aileron down deflection reduced to 50% of up deflection) is only possible with a computer radio.
- Check the direction of rotation of the propeller. If it was incorrect, simply swap two of the three wires between the ESC and motor or program the ESC (refer to the ESC manual).
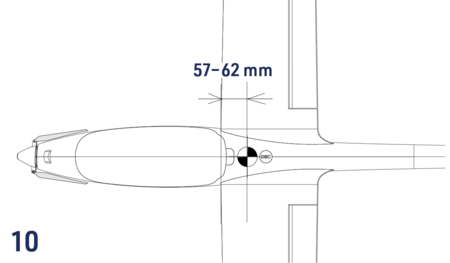
- Check the correct position of the centre of gravity (CG): 57–62 mm behind the leading edge of the wing (Fig. 10). Adjust the CG position by moving the flight pack - if you could not reach the recommended position, do not hesitate to add an appropriate amount of lead to the nose or tail. An extra couple of grams won’t spoil the flying characteristics - but the incorrect CG position is a killer.
- Fully charge your flight pack and transmitter batteries, check the proper function of your radio and perform the range check of your radio according to its instruction manual. The range has to be almost the same with the motor off and at full throttle (no more than a 10% decrease is acceptable). DO NOT try to fly unless the range check is 100% successful.
Flying
The test flying and fine-tuning is pretty much straightforward, there will be no surprise for a medium-advanced pilot who is supposed to fly this model.
Recycling and Waste Disposal Note (European Union)

Electrical equipment marked with the crossed-out waste bin symbol must not be discarded in the domestic waste; it should be disposed of via the appropriate specialised disposal system. In the countries of the EU (European Union) electrical devices must not be discarded via the normal domestic waste system (WEEE - Waste of Electrical and Electronic Equipment, Directive 2012/19/EU). You can take your unwanted equipment to your nearest public collection point or recycling centre, where it will be disposed of in the proper manner at no charge to you. By disposing of your old equipment in a responsible manner you make an important contribution to the safeguarding of the environment!
EU Declaration of Conformity (European Union)

Hereby, KAVAN Europe s.r.o. declares that this HPH 304TS TwinShark model and the included electronic and electric devices are in compliance with the requirements of relevant European directives and harmonized norms. The full text of the Declaration of Conformity is available at www.kavanrc.com/doc/.
Guarantee
The KAVAN Europe s.r.o. products are covered by a guarantee that fulfils the currently valid legal requirements in your country. If you wish to make a claim under guarantee, please contact the retailer from whom you first purchased the equipment. The guarantee does not cover faults which were caused in the following ways: crashes, improper use, incorrect connection, reversed polarity, maintenance work carried out late, incorrectly or not at all, or by unauthorised personnel, use of other than genuine KAVAN Europe s.r.o. accessories, modifications or repairs which were not carried out by KAVAN Europe s.r.o. or an authorised KAVAN Europe s.r.o., accidental or deliberate damage, defects caused by normal wear and tear, operation outside the Specification, or in conjunction with equipment made by other manufacturers. Please be sure to read the appropriate information sheets in the product documentation.
