KAVAN Smart PRO AMS Alti motor switch - Instruction manual
Introduction
Congratulations on purchasing the KAVAN Smart PRO AMS Alti motor switch, a versatile device suitable for several competition categories where the altitude or motor run is limited. It can also be used as a standalone telemetric variometer. The sensor is usually connected between the receiver throttle channel and the appropriate signal input of the electronic speed controller. The AMS contains a sensitive barometric altimeter/variometer that uses the latest MEMS technology to achieve a high accuracy level while preserving miniature dimensions. The sensor is able to detect tiny changes in atmospheric pressure to indicate the altitude change with a resolution of 0.1 metres. Using the integrated high-power cables, you can directly power the receiver and servos through the AMS from a BEC circuit of the speed controller.
Features
- Small dimensions.
- Possibility to power the receiver and servos through the AMS.
- Accurate measurement of absolute/relative altitude and climb/sink rate.
- Automatic telemetry detection: FPort, Duplex EX, Graupner Hott, Multiplex MSB, Futaba S.Bus2.
- Configurable alarms on altitude and climb rate.
- Configurable shutdown altitude.
- Configuration through the transmitter.
- Firmware updates.
- Supported competition categories: FAI F5J, ALES (altitude limited electric soaring), LMR (limited motor runtime) and all possible derivatives.
Technical specifications
- Dimensions: 27×11×5 mm (L*W*H)
- Weight: 7 g
- Connection: Male/female JR 3×0.5 mm² (3x 20AWG)
- Pressure range: 300÷1200 hPa
- Altitude resolution: 0.1 m
- Typical variometer noise ratio: ±0.02 m/s
- Operating current: 15 mA
- Operating temperature: (-20)–85 °C
- Supply Voltage: 3.5–12 V
- Telemetry: FPort, Duplex EX, Multiplex MSB, Graupner Hott, Futaba S.Bus2
- Status LED: Yes
Installation
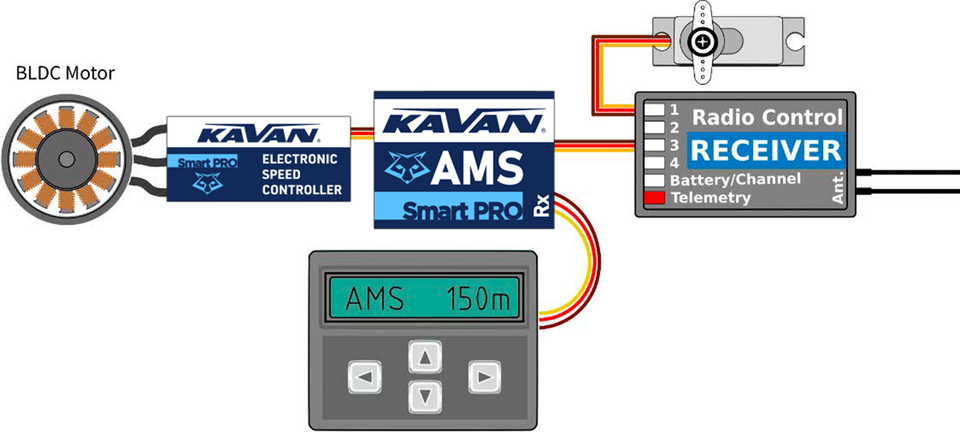
Connect the AMS between the receiver and the electronic speed controller. To control the motor, select the appropriate channel on the receiver. Note that the sensor has high sensitivity to changes in atmospheric pressure and mechanical stress. Try to avoid any mechanical stress on the sensor. To achieve the most accurate altitude measurement, pay attention to the placement of the sensor. The device should not be exposed to direct airflow and close contact with heat-emitting objects (e.g. motors or speed controllers). As an additional function, the telemetry output can be used for setting or wireless data reading. Connect an extension cable with JR connectors between the telemetry port of the receiver and the “Data” port on the sensor.
Connection without telemetry

Connection with telemetry

Competition flight
- Switch on the transmitter and pull the throttle to the off position. The pulse on the throttle channel must be shorter than 1.2 ms.
- Switch on the receiver (e.g. by connecting the flight battery pack).
- The AMS initializes the zero initial height for approximately 3 s after startup (indicated by the LED). During this time it does not accept any commands to start the motor.
- After initialization the LED turns off and you can fly. After starting the motor (pulse above 1.2 ms), the automatic countdown starts. The engine shuts down in any of the following cases:
- The pilot pulls the throttle below the decision level.
- The configured motor running time (F5J = 30 s) after start has elapsed.
- The model exceeds the configured shutdown altitude (altitude limiter mode).
- The motor can be restarted during flight if the appropriate option in the menu is configured. However, if the engine is restarted, all the data from the previous flight are discarded and the AMS shows “---.-m” for the rest of the flight. The new flight attempt can be entered after turning the altimeter off and back on.
Telemetry and settings
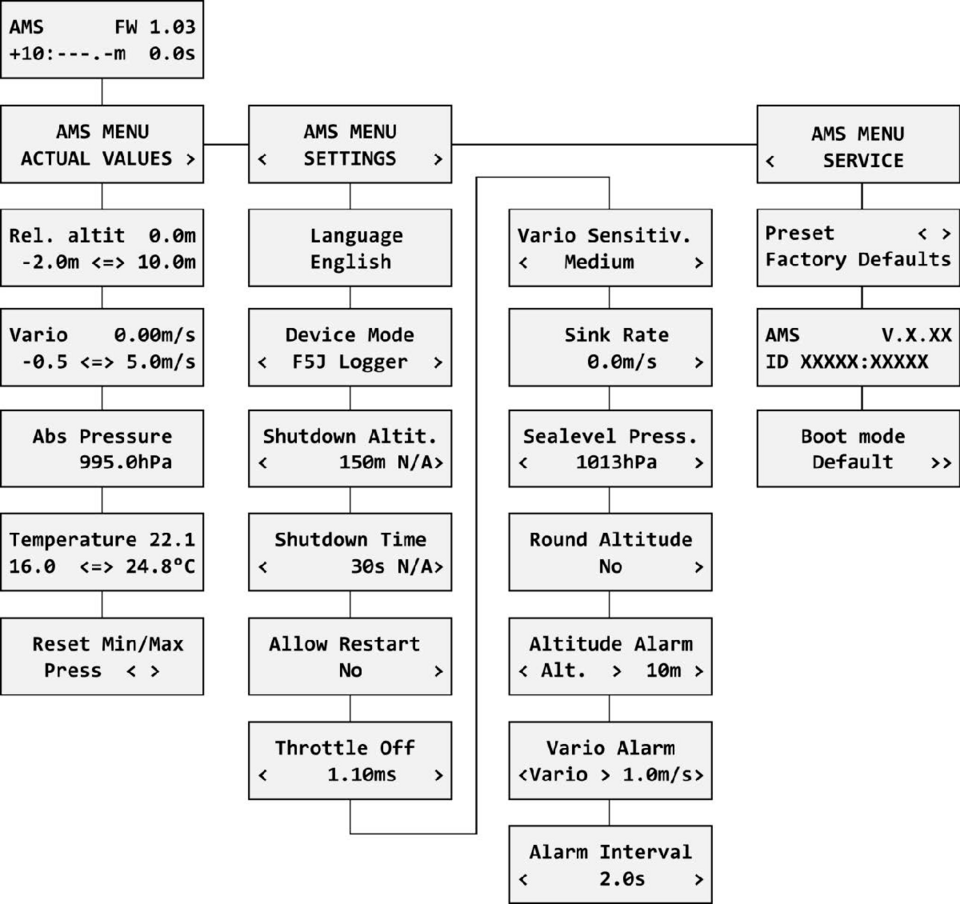
The device is compatible with JETIBOX and SMART BOX for programming. The JETIBOX menu is divided into three sections:
- Actual values – displays the latest telemetry values (altitude, vario, pressure, temperature) including minimums and maximums.
- Reset Min/Max - simultaneously press the Left and Right buttons to reset all minimums and maximums.
- Settings – basic settings of the sensor
- Language – choose the language of the JETIBOX screen.
- Device Mode – select the competition type in a single step:
- Vario - the competition features (altitude/motor switch) are disabled and the sensor acts as a standard telemetry sensor. Motor input is copied to the output without any change.
- F5J Logger - the training mode for the F5J category. The sensor limits the motor runtime (30 s) and records the “Start Height” as it is defined in the FAI F5J rules. All telemetry functions remain active in this mode. For a competition flight, activate a special F5J firmware with fixed settings and disabled telemetry.
- ALES Limiter - the altitude and motor switch functions are active. You can specify the shutdown altitude and time according to local rules. All telemetry functions remain active and if needed, they may be disabled simply by disconnecting the telemetry cable from the “Data” port.
- RC-E7 Limiter – a competition category originated in Austria. The shutdown altitude is fixed to 120 m and the maximum motor time is set to 240 s. During this period, the motor can be turned on and off arbitrarily. After 240 s it is no longer possible to turn on the motor.
- Shutdown Altitude – specify the cut-off altitude for the motor (ALES only).
- Shutdown Time – specify the maximum running time for the motor (ALES only, F5J applies a fixed value of 30 s).
- Allow Restart - enabling this option will allow you to turn on the motor more than once during the flight (ALES and F5J training).
- Not allow – motor restart isn't possible during the flight. A new flight is available after the power cycle.
- Emergency only – in this case, if you experience a critical situation, such as long distances at a low altitude, you can save your model by running the motor and raising the altitude. However, all the recorded flight data (“Start Height” and motor running time) will be discarded.
- Auto Reinitialization/8m – motor restart is allowed if the model altitude is below 8 m (26 ft). Restarting the motor also immediately reinitiates a new competition flight. This mode is useful in case of training - after landing you can start a new round immediately without the need to power cycle the receiver/AMS.
- Throttle Idle – you can set the signal threshold where the motor stops.
- Vario Sensitivity – sets the amount of filtering for the pressure sensor data. By increasing the sensitivity you will get a faster response to altitude changes. Please note that the indicated noise may be increased as well. (Default value: Medium)
- Sink Rate – the rate of an aeroplane's descent when there aren't thermal effects. The value of the sink rate is added to the climb rate. This will result in locating thermal streams more precisely. Example: When the model flies at its nominal sink rate of 0.5 m/s, the vario is silent. As soon as the model enters any thermal upstream, the vario will start beeping (although the aeroplane may still be descending).
- Sealevel Pressure – the sea level pressure is used as a reference to calculate the absolute altitude. To calculate the altitude most accurately, set the pressure at your location adjusted to the sea level. The International Standard Atmosphere Model defines the sea level pressure as 1013 hPa (Vario mode only).
- Round Altitude – permits or denies rounding the altitude values displayed on the transmitter. Relative and absolute altitude round to full meters, the decimal part is omitted.
- Altitude Alarm – you can set a high altitude alarm. *)
- Vario Alarm – you can set an alarm for excessive climb or sink rate. *)
- Alarm Interval – sets the time between alarm announcements.
- Service – In this menu you can view the device version and reset it to the default factory configuration.
- Boot Mode – allows you to select one of the following firmware contained in the device:
- Default – firmware with all options unlocked. It can be used for general purpose or training flights.
- F5J Contest/F – a special mode for F5J first-class competition events (typically world championships or World Cup events). Motor restart is not allowed.
- F5J Contest/S – a special mode for F5J second-class competition events (national or local events). Emergency motor restart is enabled. However, the competition flight is invalidated when the motor is restarted.
- ERES Contest (F3-ERES) – altitude is limited to the value specified by the pilot. Maximum motor time is set to 30 s without the possibility of restarting.
- If you change any settings in the competition firmware, you have to restart the device to perform the next flight with the settings applied correctly.
- Boot Mode – allows you to select one of the following firmware contained in the device:
*) The alarm setting is compatible with Duplex and Hott systems.
JETIBOX or SMART BOX Connection
Plug the AMS into the sensor slot of the JETIBOX/SMART-BOX. Power it up using a battery with appropriate voltage (4.5–8.4 V). Now you can configure the device using the arrows on the JETIBOX/SMART-BOX.

F5J Competition Firmware
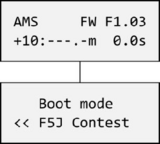
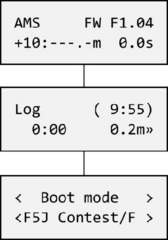
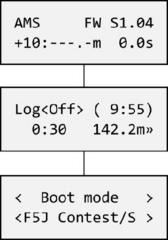
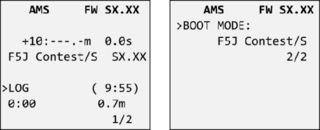
The competition firmware shows the version in the “FX.XX” or “SX.XX” format. In the “F” (first-class) version, it isn't possible to restart the motor. On the contrary, the “S” (second-class) version allows an emergency motor restart. The competition firmware displays the “Start Height” on the second line according to the CIAM FAI specifications. If the empty value “---.-“ is displayed, no start height has been recorded during the present or last flight. The motor running time is displayed as well.
Within this firmware, the telemetry function is disabled (only JETIBOX and SMART-BOX terminal connections remain active).
You can enter or leave the competition firmware by editing the “Boot mode” parameter. After changing the boot mode, all previously recorded flight data will be discarded and the new setting will be applied after restarting the AMS.
 |
 |
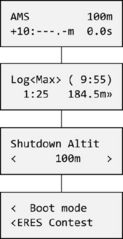 |
| AMS F5J First-class competition menu. | AMS F5J Second-class competition menu. | ERES competition menu with configurable altitude. |
Altitude logging
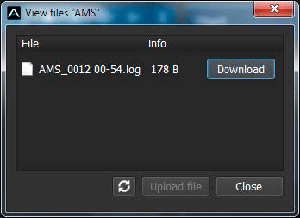
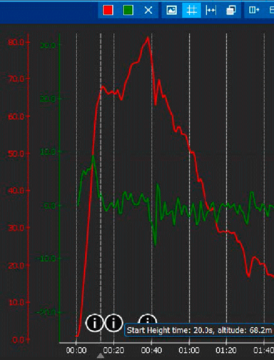
The logging automatically starts together with the motor and stops once the climb rate is constantly zero and the model lies on the ground. The transmitter announces successfully creating the log file with the status message “Log file created”.
Altitude is stored in 1s intervals with a resolution of 0.1 m. The device can store up to 16 min of flight data, which can be later displayed on JETIBOX, SMART BOX or MAV Manager PC software version 1.1.0 or newer.
Additional information is stored in the log file:
- Motor shutdown altitude and time, marked <Off>.
- F5J-defined “Start Height” altitude and time, marked <+10>.
- Maximum reached altitude together with time, marked <Max>.
PC configuration
It is possible to use the MAV Manager software (1.6.0 and later) to conveniently configure all device settings, display real-time telemetry and make a backup of the configuration. The configuration menu contains four buttons in the top toolbar:
- Refresh – forces the configuration to be reloaded from the device.
- Import – imports the settings from a file. If you have several devices and want all of them with identical settings, import the same settings to each device.
- Export – exports the settings from the device to a file. You can easily create a backup configuration stored on your PC. After creating a backup, you may easily experiment with the settings and later revert back to the original configuration by pressing the “Import” button and choosing the original exported file.
- Reset default – resets the device to factory defaults and reloads all the settings.
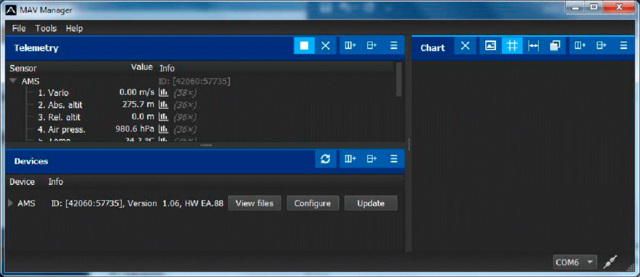
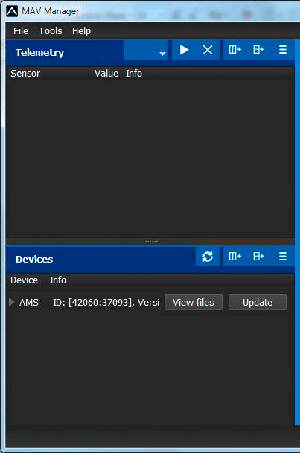
Connect the AMS to your PC using the USB interface. The device will be automatically detected by the MAV Manager. The device properties are available after pressing the “Configure” button.
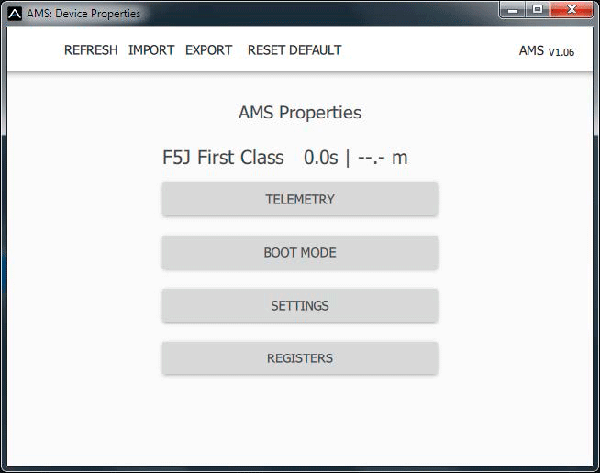
The initial sensor menu shows the main device mode and links to alter the competition mode or modify the sensor settings.
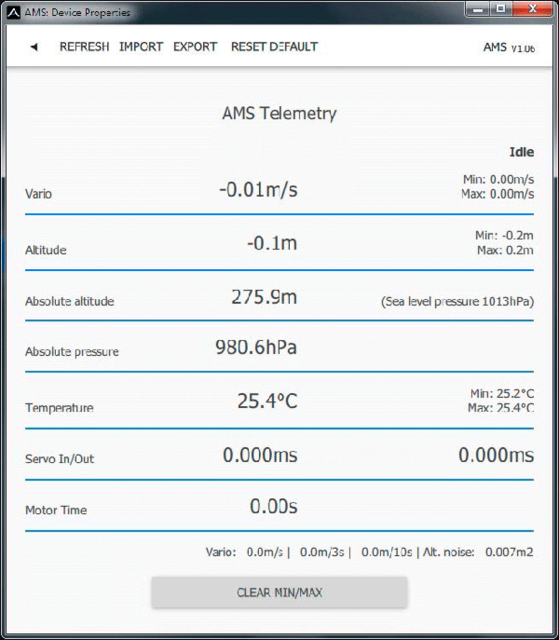
Real-time telemetry with min/max values. The MAV Manager is also able to create a log file from the real-time telemetry data, which can be viewed, analyzed, imported and exported.
Setting competition modes using the “Boot Mode” menu. After confirming the mode change, the AMS must be disconnected from the power supply.
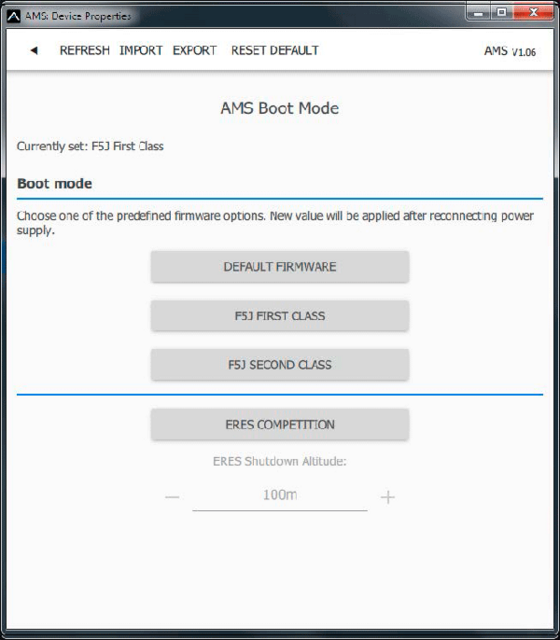
Every time you make any change in the configuration, the new value is immediately transferred to the device and saved to memory. There is no need for additional confirmation.
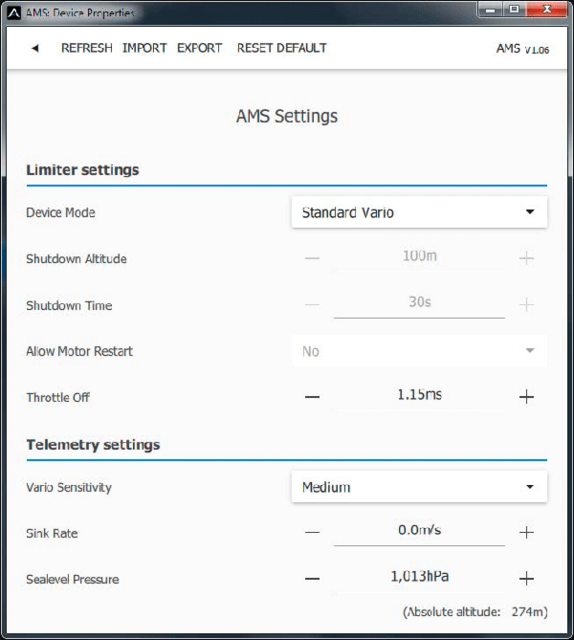
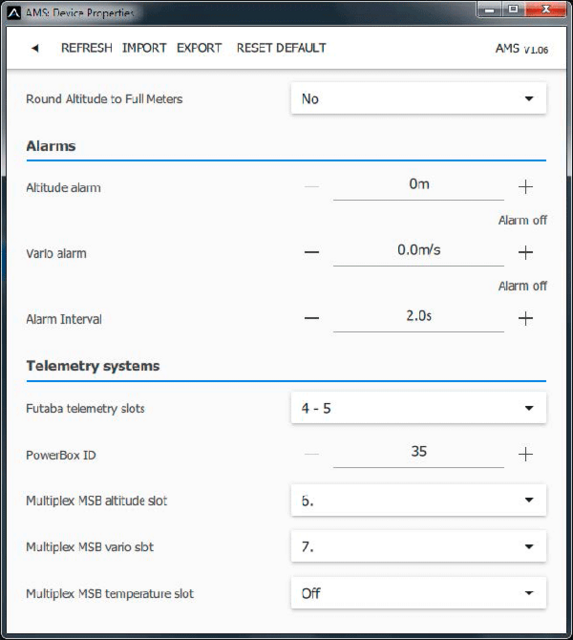
AMS settings - default firmware. It is also possible to adjust some telemetry parameters.
Graupner Hott Menu Structure
The AMS offers telemetry as a standard VARIO telemetry module.
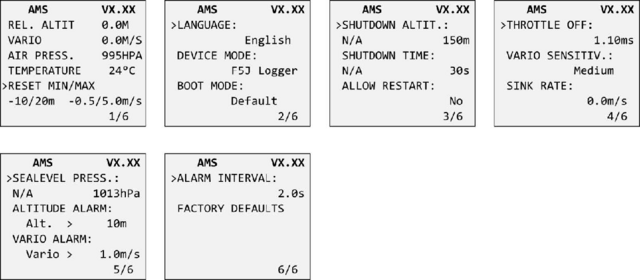
Graupner Hott menu when using the competition firmware:
Futaba and Multiplex connection
Futaba and Multiplex systems don't offer the option of wireless device configuration. However, sending telemetry is possible using the following fixed sensor slots:
| Futaba S.Bus2 | Multiplex MSB | |
|---|---|---|
| Height | 19 | 6 |
| Vario | 18 | 7 |
| Note | Manual detection in the Linkage – Sensor menu. Choose the vario F1672 on the slot 18. | Automatically detected by the transmitter. |
Safety information
- Operate the AMS always in a dry environment and within the device limits stated in this guide. Never expose the device to excessive heat or cold.
- Never apply mechanical stress or excessive force to the AMS. The sensing element can measure imprecisely or be damaged if a force is applied.
- Do not remove the heat shrink tube from the device and do not try to implement any changes or modifications. It may result in damage to the product and denial of any warranty claims.
- Always check the polarity of the connection. Never inverse the polarity – this could lead to total destruction.
Manufacturer
KAVAN Smart PRO AMS Alti motor switch is made in Czechia by MAV Sense s.r.o.
E-mail: info@mavsense.com | Web: www.mavsense.com
Recycling and waste disposal note (European Union)

Electrical equipment marked with the crossed-out waste bin symbol must not be discarded in the domestic waste; it should be disposed of via the appropriate specialised disposal system. In the countries of the EU (European Union) electrical devices must not be discarded via the normal domestic waste system (WEEE - Waste of Electrical and Electronic Equipment, Directive 2012/19/EU). You can take your unwanted equipment to your nearest public collection point or recycling centre, where it will be disposed of in the proper manner at no charge to you. By disposing of your old equipment in a responsible manner you make an important contribution to the safeguarding of the environment.
EU declaration of conformity (European Union)

Hereby, KAVAN Europe s.r.o. declares that the KAVAN Smart PRO AMS Alti motor switch is in compliance with the essential requirements as laid down in the EU directive(s) concerning electromagnetic compatibility. The full text of the EU Declaration of Conformity is available at www.kavanrc.com/doc.
Guarantee
The KAVAN Europe s.r.o. products are covered by a guarantee that fulfils the currently valid legal requirements in your country. If you wish to make a claim under guarantee, please contact the retailer from whom you first purchased the equipment. The guarantee does not cover faults which were caused in the following ways: crashes, improper use, incorrect connection, reversed polarity, maintenance work carried out late, incorrectly or not at all, or by unauthorised personnel, use of other than genuine KAVAN Europe s.r.o. accessories, modifications or repairs which were not carried out by KAVAN Europe s.r.o. or an authorised KAVAN Europe s.r.o., accidental or deliberate damage, defects caused by normal wear and tear, operation outside the Specification, or in conjunction with equipment made by other manufacturers. Please be sure to read the appropriate information sheets in the product documentation.
