KAVAN Smart PRO SE6 6ch BUS servo decoder - Instruction manual
Introduction
Congratulations on purchasing the KAVAN Smart PRO SE6 6ch BUS servo decoder, a device that converts serial bus signals to standard PWM servo outputs. It offers up to six configurable servo outputs with optional period and fail-safe settings. The SE6 is a perfect choice for models with complex wing or tail mechanics where multiple servos may be connected to a primary receiver using just a single cable. In addition, if you are running out of receiver channels simply connect the SE6 to the receiver serial line and freely assign its own output channels.
Supported protocols:
- Futaba: S.Bus/S.Bus2
- Graupner: SUMD, Hott telemetry for setting
- JETI: EX Bus
- Multiplex: SRXL 12ch, SRXL 16ch
- PowerBox: P²Bus
Features
- Small dimensions and high current throughput via the integrated MR30 power connector
- Up to 6-channel servo expander
- Automatic detection of serial data/telemetry after startup
- Configuration through the transmitter, external terminal (JETIBOX/SMART-BOX) or MAV Manager PC software
- Firmware updates via USB interface
Technical specifications
| SE4 | SE6 | |
|---|---|---|
| Dimensions (including connectors) | 34×14×9 mm | 34×19×8 mm |
| Weight (including connectors) | 4 g | 4,5 g |
| Servo output channels | 3 or 4 | 5 or 6 |
| Operating current | 15 mA | 15 mA |
| Operating temperature | (-20)–85 °C | (-20)–85 °C |
| Supply voltage | 4–14 V (recommended 5–8.4 V) | 4–14 V (recommended 5–8.4 V) |
| Continuous current | 15 A | 15 A |
| Peak current | 60 A (2 s) | 60 A (2 s) |
| Supported protocols | JETI Duplex, Multiplex, Graupner Hott, Futaba S.Bus, PowerBox P²Bus | |
| Status LED | Yes | Yes |
| Sensor expander | EX Bus: up to 4 sensors | No |
Installation
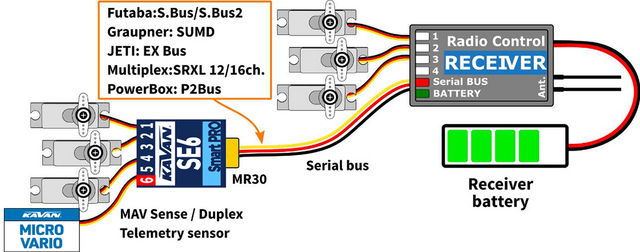
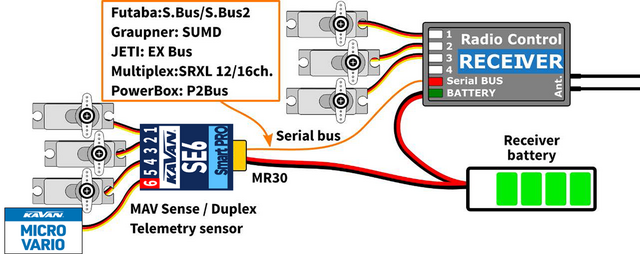
Attach the required servos to the SE6 servo expander. Connect the receiver – use its output port with the serial data option. The SE6 uses the MR30 connector for primary data input.
Turn on the transmitter and apply the appropriate power source to the receiver. The status LED starts blinking as soon as the SE6 detects the signal on the serial line.
Basic installation
High power installation
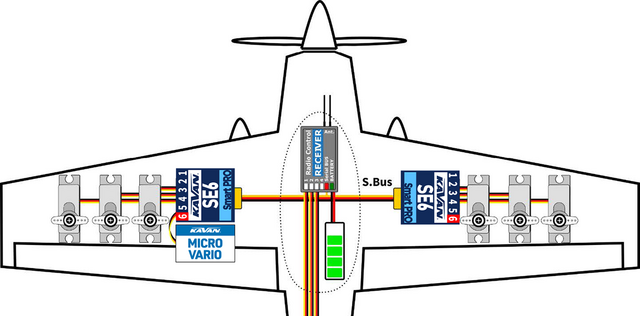
Multiple installation in a complex wing
Telemetry and settings
The device is compatible with JETIBOX for programming. The JETIBOX menu is divided into three sections:
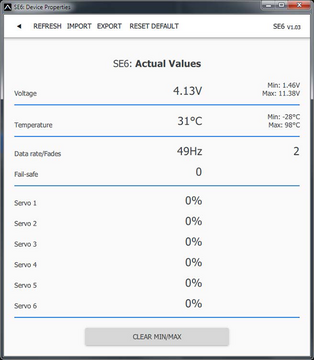
- Actual values - Displays the latest telemetry values (voltage, temperature, system status) including minimums and maximums.
- System - Shows the detected serial protocol and its average frame rate.
- Fadeouts/FS - Number of frame misses and time spent in fail-safe mode. The number of frame misses increases every time the interval between two consecutive servo frames noticeably exceeds the average period.
- Reset Min/Max - Press left+right buttons together to reset all minimums and maximums.
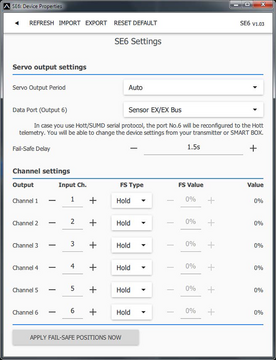
- Settings - Basic settings of the sensor.
- Language - You can choose the language of the JETIBOX screen.
- Period - You can specify a fixed servo output rate (5ms – 30ms), or automatic output rate synchronous to the serial input.
- Data Port (6) - Specify a function of the data port – either servo or sensor/terminal can be set.
- Fail-safe delay - Set the time that must elapse before entering the fail-safe mode if there is no signal on the serial line.
- Ch.1–Ch.6 - Here you can set the properties of each output channel. You can modify the receiver channel assignment to the outputs of the SE6. By pressing both left+right buttons you can change the behaviour if there is no signal on the serial line:
- <Hold> (default) - Repeat the last known servo position.
- <FS XX> - Set the servo position to a fixed value XX%.
- Set fail-safe now - By pressing both left+right buttons the actual servo positions will be stored as fail-safe values.
- Service - In this menu you can view the device version and reset it to the default factory configuration.
JETIBOX or SMART BOX Connection
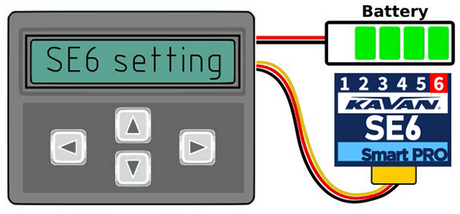
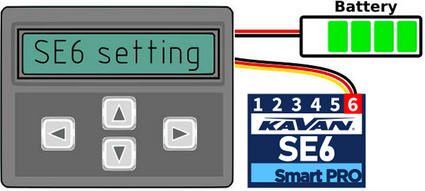
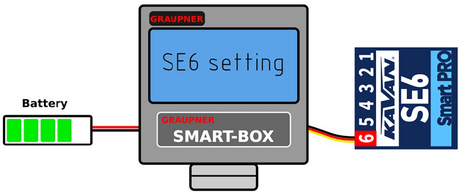
Plug the SE6 into the sensor slot of the JETIBOX/SMART-BOX. Power it up using a battery with appropriate voltage (4.5–8.4V). Now you can configure the device using the arrows on the JETIBOX/SMART-BOX.
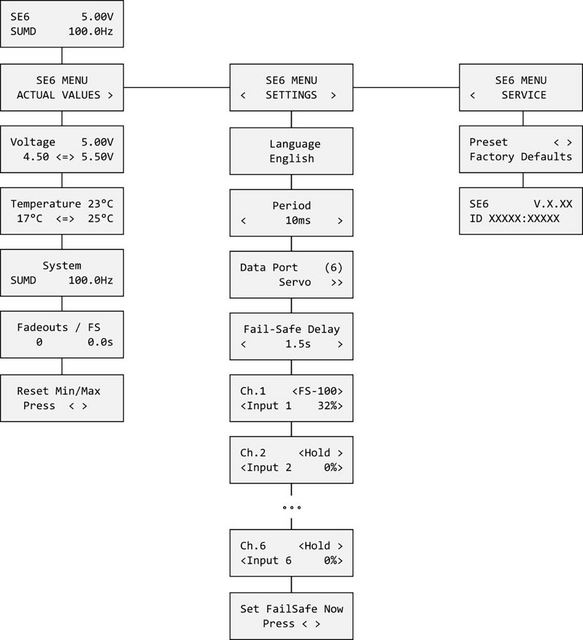
Graupner Hott Menu Structure
SE6 offers text telemetry as a standard EAM telemetry module.

Safety information
- Operate the SE6 always in a dry environment and within the device limits stated in this guide. Never expose the device to excessive heat or cold.
- Do not remove the heat shrink tube from the device and do not try to implement any changes or modifications. This can result in damage to the product and denial of any warranty claims.
- Always check the polarity of the connection. Never inverse the polarity – this could result in damage to the product.
- Always use a sufficient power source according to the consumption of the attached servos. Never exceed the maximum allowed operating voltage of the attached servos.
- If you use analogue servos, please make sure the servo output period is not below 15 ms. Otherwise, the servos may behave unexpectedly.
Firmware update
Firmware updates for the SE6 are transferred from a PC via the USB interface. The required programs and files are available at www.mavsense.com..
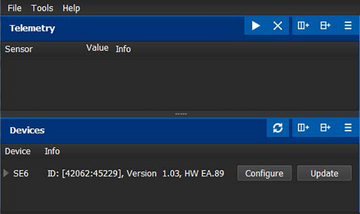
Install the MAV Manager software and the USB drivers on your computer. Check the system requirements.
- Disconnect all servos from SE6.
- Connect the USB interface to your PC, run MAV Manager and select the correct COM Port.
- Connect the SE6 according to the picture below.
- Select the correct *.BIN file and press the Update button.

PC configuration
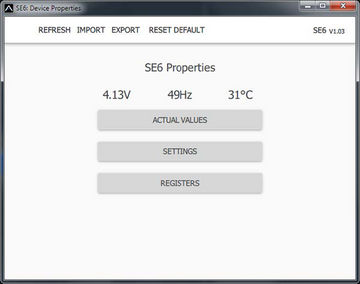
It is possible to use the MAV Manager software (1.6.0 and later) to conveniently configure all device settings, display real-time telemetry and make a configuration backup. The configuration menu contains four buttons in the top toolbar:
- Refresh - Forces the configuration to be reloaded from the device.
- Import - Imports the settings from a file. If you have several devices and want identical settings, simply import the same settings to each device.
- Export - Exports the settings from the device to a file. You can easily create a backup configuration stored on your PC. After creating a backup, you may easily experiment with the settings and later revert back to the original configuration by pressing the “Import” button and choosing the original exported file.
- Reset default - Resets the device to factory defaults and reloads all the settings.
Manufacturer
KAVAN Smart PRO SE6 6ch BUS servo decoder is made in Czechia by MAV Sense s.r.o.
E-mail: info@mavsense.com | Web: www.mavsense.com
Recycling and waste disposal note (European Union)

Electrical equipment marked with the crossed-out waste bin symbol must not be discarded in the domestic waste; it should be disposed of via the appropriate specialised disposal system. In the countries of the EU (European Union) electrical devices must not be discarded via the normal domestic waste system (WEEE - Waste of Electrical and Electronic Equipment, Directive 2012/19/EU). You can take your unwanted equipment to your nearest public collection point or recycling centre, where it will be disposed of in the proper manner at no charge to you. By disposing of your old equipment in a responsible manner you make an important contribution to the safeguarding of the environment.
EU declaration of conformity (European Union)

Hereby, KAVAN Europe s.r.o. declares that the KAVAN Smart PRO SE6 6ch BUS servo decoder is in compliance with the essential requirements as laid down in the EU directive(s) concerning electromagnetic compatibility. The full text of the EU Declaration of Conformity is available at www.kavanrc.com/doc.
Guarantee
The KAVAN Europe s.r.o. products are covered by a guarantee that fulfils the currently valid legal requirements in your country. If you wish to make a claim under guarantee, please contact the retailer from whom you first purchased the equipment. The guarantee does not cover faults which were caused in the following ways: crashes, improper use, incorrect connection, reversed polarity, maintenance work carried out late, incorrectly or not at all, or by unauthorised personnel, use of other than genuine KAVAN Europe s.r.o. accessories, modifications or repairs which were not carried out by KAVAN Europe s.r.o. or an authorised KAVAN Europe s.r.o., accidental or deliberate damage, defects caused by normal wear and tear, operation outside the Specification, or in conjunction with equipment made by other manufacturers. Please be sure to read the appropriate information sheets in the product documentation.
