KAVAN Smart PRO T75 Doppelbatterie-Weiche mit Telemetrie-Expander - Bedienungsanleitung
Einleitung
Herzlichen Glückwunsch zum Kauf des Produkts KAVAN Smart PRO T75, einer leistungsstarken digitalen Doppelbatterie-Weiche mit fortschrittlichen Telemetrie-Funktionen. Sie beinhaltet eine Ladeschaltung und eine Touch-Switch-Funktion. Das Gerät ist ideal für mittelgroße Modelle, die Hochvolt-Servos ohne Spannungsstabilisierung verwenden.
Die Batterieweiche ist für Modelle geeignet, die entweder mit zwei Empfängerbatterien oder einem Spannungsregler (BEC) in Kombination mit einer kleinen Backup-Batterie ausgestattet sind. Das Gerät bevorzugt seinen primären Batterie-Eingang und schaltet bei einem Spannungsabfall automatisch auf den sekundären Eingang um. Die Ladeschaltung kann optional aktiviert werden, um die Backup-Batterie über den primären Eingang/BEC-Schaltung zu laden.
Die Batterieweiche dient zum Ein- und Ausschalten der Elektronik in Ihrem Modell und kann den mechanischen Schalter vollständig ersetzen. Das Gerät merkt sich seinen letzten Betriebszustand und wenn die Batterie versehentlich abgeklemmt wird, startet es automatisch, wenn die Batterie wieder angeschlossen wird.
Merkmale
- Intelligente Doppelbatterieweiche/Multiplexer mit konfigurierbarer Spannungsumschaltschwelle.
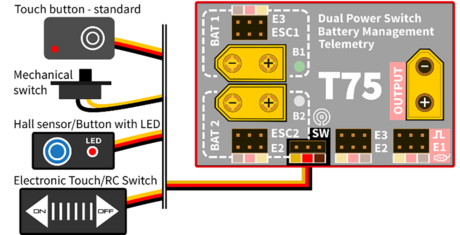
- Touch-Switch-Funktion. Optionale Anschlussmöglichkeit eines magnetischen, mechanischen oder elektronischen Schalters oder Tasters.
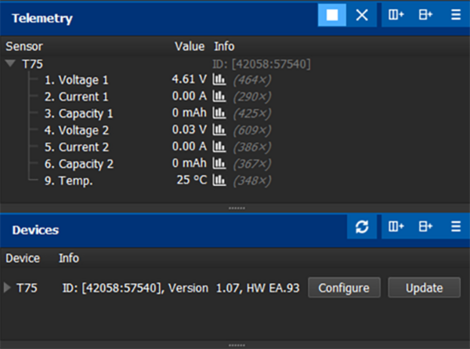
- Telemetrieunterstützung FPort, Duplex EX, S.Bus2, MSB, Hott, P²Bus(Strom, Spannung, Kapazität der beiden Stromeingänge).
- Optionales Laden der Backup-Batterie.
- Speichert den letzten Betriebszustand.
- Zwei Erweiterungsports für den Anschluss zusätzlicher Duplex EX/EX-Bus-Sensoren, die auch als digitale Ein- und Ausgänge verwendet werden können.
- Konfiguration über den Sender oder die PC-Software MAV Manager.
- Firmware-Updates.
Technische Daten
| T75 | |
|---|---|
| Abmessungen | 56×36×16 mm |
| Gewicht (inkl. Kabel) | 55 g |
| Stecker | XT60 |
| Dauerstrom | 20 A |
| Spitzenstrom (2 s) | 40 A |
| Standby-Strom | 100 μA |
| Betriebsstrom | 40 mA |
| Ladestrom für Batt.2 | bis zu 200 mA |
| Betriebstemperatur | (-20)–85 °C |
| Versorgungsspannung | 4–12.6 V |
| Empfohlene Betriebsspannung | 5–8.4 V |
| Telemetrie | FrSky FPort, JETI Duplex EX, Multiplex MSB, Graupner Hott, Futaba S.Bus2, PowerBox P²Bus |
| Telemetrie-Expander | 2 Erweiterungsports: Duplex EX/EX Bus |
| Touch-Switch-Unterstützung | Ja |
| BEC | Nein |
| Optionaler Touch/Mechanischer Schalter/RC-Schalter | Ja |
| Status-LED | Ja |
Installation
Schließen Sie das Gerät zwischen den Empfänger und die Primärbatterie/BEC an. Schließen Sie die Backup-Batterie an den Eingang B2 an. Wählen Sie die entsprechende Installationsart und beachten Sie das entsprechende Anschlussschema.
Backup-Batterie-Funktion
Die Batterieweiche verwendet in der Regel seinen primären Batterieeingang B1 als Hauptstromquelle. Fällt die Spannung an B1 unter die eingestellte Spannungsschwelle, kann er auf den Eingang B2 umschalten. In diesem Fall wird eine Quelle mit höherer Spannung verwendet. Sobald die Spannung an B1 wieder über den Schwellenwert (+ zusätzliche Hysterese) steigt, schaltet T75 automatisch wieder auf B1 um, unabhängig von der Spannung am Eingang B2. Es gibt mehrere Situationen, in denen Sie die Vorteile von T75 nutzen können:
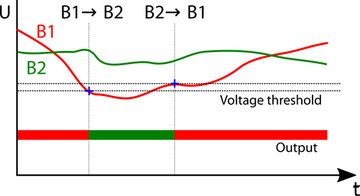
- Regler-Batterie-Kombination: Stellen Sie den Spannungsschwellenwert unter der Spannung der BEC-Schaltung. In diesem Fall wird ausschließlich der BEC-Ausgang verwendet, während der sekundäre Eingang (B2) nur als Backup-Batterie dient. Bitte beachten Sie, dass sowohl das Regler-BEC als auch die Backup-Batterie die volle Belastung der angeschlossenen Servos schaffen müssen.
- Gleichmäßiges Entladen von zwei Batterien: Stellen Sie den Spannungsschwellenwert über die maximale Batteriespannung ein. Beide Batterien werden gleichermaßen entladen, wobei die Spannung gleich bleibt. Die Batterien müssen die gleiche Chemie, Zellenzahl und ähnliche Kapazität haben. Stellen Sie den Spannungshysteresewert so ein, dass er den Eigenschaften der Batterie entspricht (LiPo/Li-Ion - hoch oder mittel, LiFe - mittel oder niedrig).
Die Batterieweiche T75 bezieht den Strom immer von einem Batterieeingang. Diese Lösung ist resistent gegen versehentliche Batteriekurzschlüsse. Der aktive Batterieeingang wird durch eine rote LED angezeigt.
Batterieladeschaltung
Die Batterieweiche enthält eine einfache Batterieladeschaltung, die für 2S Li-XXX ohne Balancer ausgelegt ist. Die Ladung kann optional aktiviert werden, um die Backup-Batterie (B2) immer bereit zu halten, ohne sie aus dem Modell entfernen zu müssen (wir empfehlen jedoch, die Batterie mindestens einmal im Monat mit einem Balancer zu laden). Während des Ladevorgangs werden mehrere Sicherheitsbedingungen eingehalten:
- Die B1-Spannung muss höher sein als die B2-Spannung und B1 muss durch die LED ausgewählt/angezeigt werden.
- Die B2-Spannung muss innerhalb der angegebenen Grenzen liegen (5,5-8,3 V für LiPo/LiIon; 5,0-7,1 V für LiFe).
- Die Batterieweiche lädt nie bis zur vollen Kapazität.
- Die Spannungsdifferenz muss kleiner als 5 V sein.
- Die Temperatur muss unter 70 °C liegen.
Erweiterungsports
Die Batterieweiche bietet zwei zusätzliche konfigurierbare Erweiterungsports des Typs JR. Diese Ports ermöglichen es Ihnen, die Gerätefunktionalität in Kombination mit einigen RC-Systemen zu erweitern.
- Expander EX - nützlich, wenn Sie zusätzliche Duplex EX/EX Bus-Sensoren an die Batterieweiche anschließen möchten.
- Digitaler Eingang - der Zustand des Signalpins wird über den Telemetriekanal an den Sender zurück übertragen.
- Digitaler Ausgang - der Zustand des Signalpins ist abhängig vom Wert des entsprechenden Buskanals (log.1 über 1,5 ms).
| Erweiterungsport | Expander EX | Digitaler Eingang | Digitaler Ausgang |
|---|---|---|---|
| E1 | Duplex EX/EX Bus | Duplex EX/EX Bus, P²Bus Telemetrie | EX Bus, S.Bus2, P²Bus |
| E2 | Duplex EX/EX Bus | Duplex EX/EX Bus, P²Bus Telemetrie | EX Bus, S.Bus2, P²Bus |
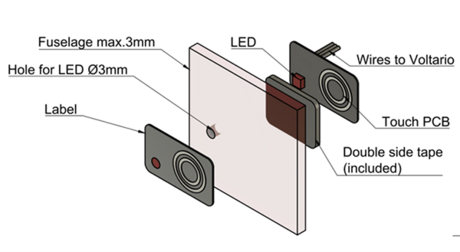
Touch switch
 |
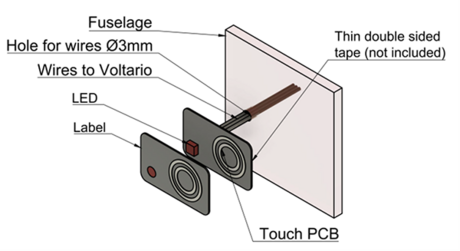 |
| Installation innerhalb des Rumpfes. | Installation an der Rumpfoberseite. |
Touch-Switch-Funktionen
- Platzieren Sie die Touch-Taste an einer beliebigen Stelle Ihres Modells auf einer Oberfläche aus nicht leitendem Material. Sie können die Touch-Taste auch innerhalb des Rumpfes mit einer maximalen Dicke von bis zu 3 mm anbringen.
- Machen Sie die Status-LED von der Außenseite des Rumpfes sichtbar und kleben Sie den “Touch“-Aufkleber auf die Touch-Oberfläche.
- Schließen Sie die Empfängerbatterie an die Batterieweiche an und berühren Sie kurz die Taste. Die Status-LED sollte einmal blinken. Falls nicht, erhöhen Sie bitte den Parameter für die Berührungsempfindlichkeit in der Konfiguration.
- Berühren Sie die Taste und halten Sie sie für ca. 2 Sekunden gedrückt. Nach dem ersten Blinken beginnt die LED erneut zu blinken. Lassen Sie in diesem Moment die Taste los. Der Hauptspannungsausgang wird aktiviert:

Telemetrie und Einstellungen

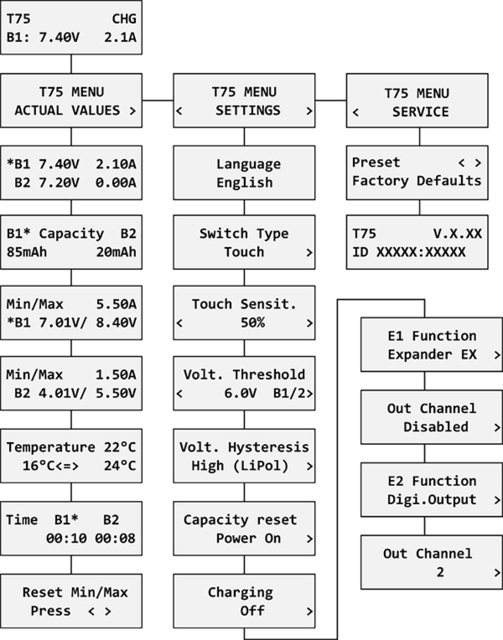
Die Batterieweiche ist mit den Terminals der JETIBOX/SMART-BOX kompatibel, die Sie zur Einstellung verwenden können. Das Menü der JETIBOX ist in drei Bereiche unterteilt:
- Aktuelle Werte - zeigt die aktuellen Telemetriewerte (Strom, Spannung, Kapazität, Temperatur) einschließlich der Minimal- und Maximalwerte an.
- Der Hauptbildschirm zeigt die Gerätetemperatur sowie die Spannung und den Strom der aktiven Batterie an. Wenn der Ladevorgang aktiviert und aktiv ist, wird der Status “CHG“ angezeigt.
- Auf dem Kapazitätsbildschirm können Sie die Tasten links und rechts gleichzeitig drücken, um die gemessene Kapazität zurückzusetzen. Das Sternchen kennzeichnet den aktiven Batterieeingang.
- Der Bildschirm “Zeit“ zeigt die gesamte Zeit des primären und sekundären Batterieeingangs an, d. h. wie lange jede Quelle zur Stromversorgung des Geräts verwendet wurde.
- Reset Min/Max - drücken Sie gleichzeitig die Tasten links und rechts, um alle Minimal- und Maximalwerte zurückzusetzen.
- Einstellungen - Grundeinstellungen des Sensors
- Sprache - Sie können die Sprache des JETIBOX-Bildschirms wählen.
- Switch-Typ (Touch/elektronisch/mechanisch/Hall/Taster). Sie können festlegen, welcher Schaltertyp zum Ein- und Ausschalten des Geräts verwendet wird. Wenn Sie die Option “Elektronisch“ wählen, können Sie einen beliebigen elektronischen Schalter mit Spannungsausgang anschließen (z. B. einen magnetischen oder RC-Schalter).
- Touch-Empfindlichkeit - wenn der integrierte Berührungsschalter verwendet wird, können Sie seine Empfindlichkeit erhöhen oder senken, indem Sie diesen Wert bearbeiten. Bitte beachten Sie, dass eine Erhöhung der Empfindlichkeit es Ihnen ermöglicht, die Batterieweiche direkt in Rümpfen mit dickerer Beplankung zu installieren. Andererseits kann es auch verursachen, dass der Berührungssensor anfälliger für Fehleingaben wird.
- Spannungsschalter - legt die Umschaltspannung für die Eingänge B1 und B2 fest, siehe Kapitel Backup-Batterie-Funktionen.
- Spannungshysterese - dieser Parameter wird beim Umschalten der Versorgung von einer Batterie zur anderen und zurück berücksichtigt. Es ist wichtig, die Hysterese niedrig zu halten, um eine gleichmäßige Entladung der Batterien zu ermöglichen. Andererseits muss sie hoch genug sein, um ein schnelles Umschalten der Batterien unter Belastung zu verhindern. Es gibt drei Möglichkeiten:
- Hohe Hysterese (LiPol) - ca. 1,2 V. Dies ist die Standardoption und wird für die Kombination LiPo(LiIon)/LiPo(LiIon) oder Regler-LiPo(LiIon) empfohlen. Diese Option kann zusammen mit Batterien mit hohem Innenwiderstand verwendet werden.
- Mittel - ca. 0,5 V. Diese Option kann für die gleichmäßige Entladung von LiPo(LiIon)-Batterien mit niedrigem Innenwiderstand verwendet werden.
- Niedrig (LiFe) - ca. 0,3 V. Verwenden Sie diese Option zusammen mit LiFe-Batterien mit niedrigem Innenwiderstand.
- Kapazitätsrücksetzung - Die Einstellung dieses Parameters legt fest, zu welchem Zeitpunkt die Kapazität auf Null zurückgesetzt wird. Verfügbare Optionen:
- Nach dem Einschalten (Standard) - die Kapazität wird jedes Mal nach dem Anschließen der Batterie zurückgesetzt.
- Spannungsänderung - die Kapazität wird zurückgesetzt, nachdem die Batterie mit einer anderen Spannung (um 15 % oder mehr) angeschlossen wurde. Auf diese Weise kann der Sensor zwischen geladener und entladener Batterie unterscheiden.
- Manuell - die Kapazität wird nie automatisch zurückgesetzt.
- Laden - Sie können die Ladefunktion für die 2S LiIon/LiPo oder 2S LiFe Backup-Batterie (B2) aktivieren.
- E1/E2 Funktion - wählen Sie die bevorzugte Funktion der beiden Erweiterungsports (mögliche Optionen: EX/EX Bus Telemetrieeingang, digitaler Eingang, digitaler Ausgang).
- E1/E2 Ausgangskanal - wenn die Funktion des digitalen Ausgangs gewählt wird, ist es notwendig, den entsprechenden Kanal zu wählen.
- Service - in diesem Menü wird die Geräteversion angezeigt und man kann das Gerät auf die Werkskonfiguration zurücksetzen.
Menüstruktur der JETIBOX
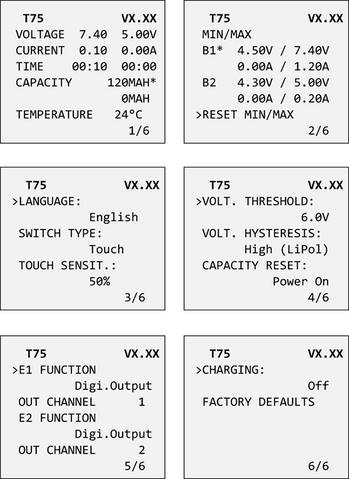
Graupner Hott Menüstruktur
Die Batterieweiche bietet Telemetrie als “Electric Air Module“.
Futaba und Multiplex Systeme
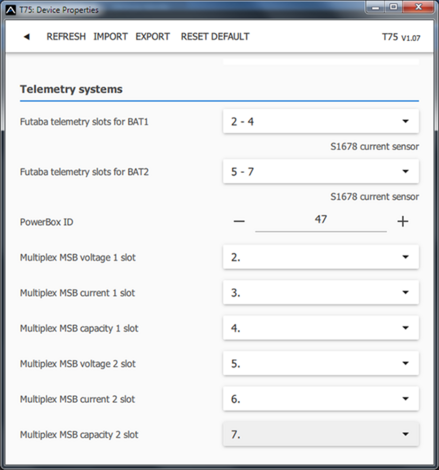
Futaba- und Multiplex-Systeme bieten keine drahtlose Gerätekonfiguration. Die Telemetrieübertragung ist über die folgenden festen Slots für Sensoren möglich:
| Futaba S.Bus2 | Multiplex MSB | |
|---|---|---|
| Strom 1 | 2 | 3 |
| Spannung 1 | 3 | 2 |
| Kapazität 1 | 4 | 4 |
| Strom 2 | 5 | 6 |
| Spannung 2 | 6 | 5 |
| Kapazität 2 | 7 | 7 |
| Hinweis | Manuelle Erkennung im Menü Linkage - Sensor. Wählen Sie den Stromsensor S1678 für die Slots 2 und 5. | Automatisch vom Sender erkannt. |
Firmware-Updates
Firmware-Updates für die Batterieweiche können über das USB-Interface von einem PC hochgeladen werden.
Die erforderlichen Programme und Dateien sind auf der Website www.mavsense.com verfügbar.
Installieren Sie die MAV Manager Software und die Regler für das USB-Interface in Ihren Computer. Überprüfen Sie die Systemanforderungen.
- Trennen Sie alle Geräte, die an die Batterieweiche angeschlossen sind.
- Schließen Sie das USB-Interface an Ihren PC an, starten Sie MAV Manager und wählen Sie den richtigen COM-Port.
- Schließen Sie die Batterieweiche wie in der Abbildung unten gezeigt an.
- Schließen Sie die externe Stromversorgung an die Batterieweiche über die Batterieeingänge B1 oder B2 an.
- Wählen Sie die entsprechende *.BIN-Datei aus und drücken Sie die Schaltfläche Aktualisieren.

PC-Konfiguration
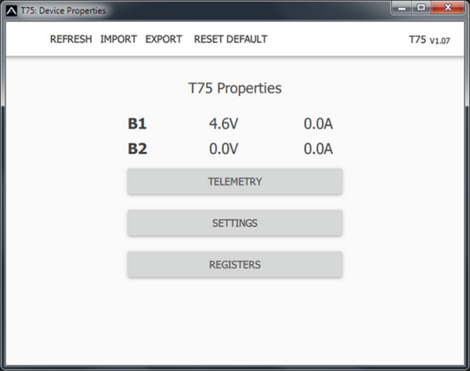
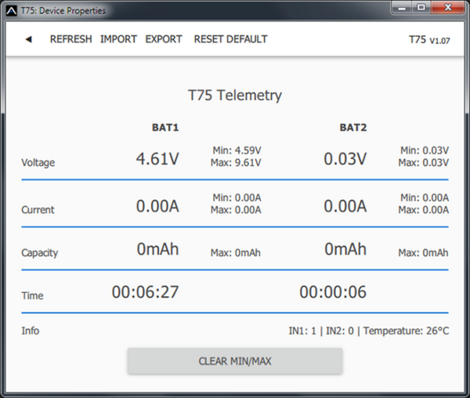
Es ist möglich, die MAV Manager Software (Version 1.7.0 und neuer) zu verwenden, um alle Parameter der Batterieweiche bequem zu konfigurieren, Echtzeit-Telemetrie anzuzeigen oder die Konfiguration zu sichern. Das Programmmenü enthält vier Schaltflächen auf der oberen Symbolleiste:
- Neu laden - erzwingt das erneute Laden der Konfiguration aus dem Gerät.
- Import - importiert Einstellungen aus einer Datei. Wenn Sie mehrere Expander haben und möchten, dass sie alle identisch konfiguriert sind, importieren Sie einfach die gleiche Einstellungsdatei in jedes Gerät.
- Export - exportiert die Einstellungen in eine Datei. Sie können ganz einfach eine Sicherungskopie der Konfiguration erstellen, die Sie in Ihrem PC speichern können. Sobald die Sicherungskopie erstellt ist, können Sie einfach mit den Einstellungen experimentieren und später zur ursprünglichen Konfiguration zurückkehren, indem Sie auf die Schaltfläche “Import“ klicken und die ursprünglich gespeicherte Datei auswählen.
- Standardeinstellungen - setzt die Batterieweiche auf die Werkseinstellungen zurück und lädt die gesamte Konfiguration neu.
 |
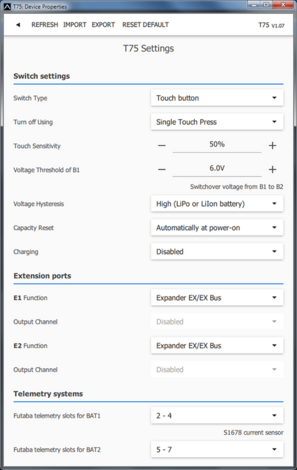 |
| Einstellung der Batterieweiche. Bei jeder Änderung der Konfiguration wird der neue Wert sofort an das Gerät übertragen und gespeichert. Eine zusätzliche Bestätigung ist nicht erforderlich. | |
 |
Sicherheitshinweise
- Verwenden Sie die Batterieweiche immer in einer trockenen Umgebung und innerhalb der in dieser Anleitung angegebenen Gerätegrenzen. Setzen Sie das Gerät niemals übermäßiger Hitze oder Kälte aus.
- Entfernen Sie nicht den Schrumpfschlauch vom Gerät und versuchen Sie nicht, Änderungen oder Modifikationen vorzunehmen. Dies kann zu einer Beschädigung des Geräts und zur Verweigerung jeglicher Garantieansprüche führen.
- Überprüfen Sie immer die Polarität der Kabel. Vertauschen Sie niemals die Polarität - dies kann zu Schäden am Produkt führen.
- Verwenden Sie immer eine ausreichende Stromquelle entsprechend dem Verbrauch der angeschlossenen Servos. Überschreiten Sie niemals ihre maximal zulässige Betriebsspannung.
Hersteller
KAVAN Smart PRO Doppelbatterie-Weiche mit Telemetrie-Expander wird in der Tschechischen Republik von der Firma MAV Sense s.r.o. produziert.
E-mail: info@mavsense.com | Web: www.mavsense.com
Recycling (Europäische Union)

Elektrische Geräte mit dem durchgestrichenen Mülleimersymbol dürfen nicht mit normalem Hausmüll entsorgt werden, stattdessen müssen sie an eine spezialisierte Sammel- und Recyclinganlage gebracht werden. In den Ländern der EU (Europäische Union) dürfen elektrische Geräte nicht mit dem allgemeinen Hausmüll entsorgt werden (WEEE - Waste of Electrical and Electronic Equipment – Entsorgung der Elektro- und Elektronikaltgeräte - Richtlinie 2012/19 /EU). Sie können unerwünschte Geräte zur nächsten Sammelstelle oder zum nächsten Recyclingzentrum bringen. Die Geräte werden dann kostenlos entsorgt oder sicher recycelt. Durch die Abgabe unerwünschter Geräte können Sie einen wichtigen Beitrag zum Umweltschutz leisten.
EU Konformitätserklärung (Europäische Union)

KAVAN Europe s.r.o. erklärt hiermit, dass das KAVAN Smart PRO T75 Doppelbatterie-Weiche mit Telemetrie-Expander mit den Anforderungen der relevanten europäischen Richtlinien und harmonisierten Normen übereinstimmt. Der vollständige Text der EU-Konformitätserklärung ist unter der folgenden Internetadresse verfügbar: www.kavanrc.com/doc.
Garantie
Falls dieses Produkt gewartet werden muss, befolgen Sie bitte die folgenden Grundsätze: Wenn es möglich ist, verwenden Sie die Originalverpackung, um das Produkt einzupacken. Fügen Sie eine Beschreibung der Verwendung des Produkts und des aufgetretenen Problems bei. Datieren Sie den Beleg und vergewissern Sie sich, dass es dort Ihre vollständige Adresse und Telefonnummer gibt. Dieser Garantieschein berechtigt Sie zu einer kostenlosen Garantiereparatur des von der Firma KAVAN Europe s.r.o. gelieferten Produkts innerhalb von 24 Monaten. Die Garantie bezieht sich nicht auf Produkte oder Teile davon, die unsachgemäß installiert wurden (unsachgemäße oder fehlende Befestigung im Modell, mechanische Belastung der Kabel, unzureichende Kühlung, Verwendung von Steckern mit umgekehrter Polarität usw.), grob oder unsachgemäß behandelt wurden, (Belastung über die angegebenen Spezifikationen hinaus, Überschreitung der Versorgungsspannung, Überpolarisierung der Versorgungsspannung usw.) oder durch einen Unfall, eine Naturkatastrophe oder höhere Gewalt beschädigt wurden, oder Teile des Produkts, die von einer nicht autorisierten Person repariert oder verändert wurden. Setzen Sie dieses Produkt nicht hohen Temperaturen, Feuchtigkeit oder staubigen Umgebungen aus, wie dies auch bei anderen Produkten der Feinelektronik der Fall ist. Setzen Sie es nicht für längere Zeit dem direkten Sonnenlicht aus. Bitte beanspruchen Sie die Garantiereparatur im Geschäft, in dem Sie das Produkt gekauft haben.


