KAVAN Pilatus PC-6 Porter - Instruction manual/fr: Difference between revisions
Mr. KAVAN FR (talk | contribs) (Created page with "* Gardez tous les produits chimiques, petites pièces et tout objet électrique hors de portée des enfants.") |
Mr. KAVAN FR (talk | contribs) (Created page with "* L'humidité endommage les composants électroniques. Évitez l'exposition à l'eau pour tout équipement qui n'est pas spécialement conçu et protégé à cet effet.") |
||
| Line 76: | Line 76: | ||
* Gardez tous les produits chimiques, petites pièces et tout objet électrique hors de portée des enfants. | * Gardez tous les produits chimiques, petites pièces et tout objet électrique hors de portée des enfants. | ||
* L'humidité endommage les composants électroniques. Évitez l'exposition à l'eau pour tout équipement qui n'est pas spécialement conçu et protégé à cet effet. | |||
* | |||
<div lang="en" dir="ltr" class="mw-content-ltr"> | <div lang="en" dir="ltr" class="mw-content-ltr"> | ||
Revision as of 15:48, 28 August 2024
Introduction
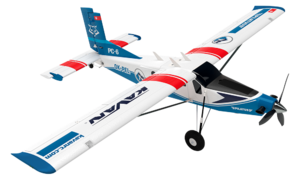
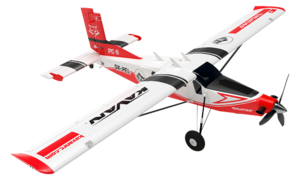
Félicitations pour l'achat de ce modèle semi-maquette de l'avion utilitaire Pilatus PC-6 Porter STOL. Vous allez commencer l'assemblage d'un modèle fabriqué en mousse EPO (polyoléfine expansée), pratiquement incassable, propulsé par un puissant moteur brushless et une batterie LiPo légère. Tous se que maîtrisent déjà le pilotage d'un avion d'entraînement « full house » - avec contrôle des ailerons, gouvernails de profondeur et direction et gaz - apprécieront ce magnifique planeur haut performance.
Pilatus PC-6 Porter/Turbo-Porter
| Caractéristiques (PC-6/B2-H4) | |
|---|---|
| Envergure | 15.87 m |
| Longueur | 10.90 m |
| Poids à vide | 1 250 kg |
| Podis maximal au décollage | 2 800 kg |
| Vitesse de croisière maximale | 232 km/h (125 KTAS) |
| Distance de décollage de 50 ft (15 m) obstacle (STOL) | 440 m |
| Distance d'atterrissage de 50 ft (15 m) obstacle (STOL) | 315 m |
| Moteur | Pratt & Whitney Canada PT6A-27 |
| Visit https://www.pilatus-aircraft.com pour plus d'informations. | |
L'avion utilitaire suisse monomoteur STOL Pilatus PC-6 Porter, initialement équipé d'un moteur à six cylindres à plat Lycoming, a effectué son premier vol en 1959. Rapidement, un Turbo-Porter amélioré propulsé par un turbopropulseur a suivi. Au fil des années, les turbopropulseurs Turbomeca Astazou II, Garret Air Research TPE 331 et finalement Pratt & Whitney Canada PT6A (environ 70 % de tous les PC-6 produits) ont permis à ce magnifique avion de prendre son envol.
Incroyable, les capacités de décollage et d'atterrissage courts presque semblables à celles d'un hélicoptère ont rapidement attiré l'attention des opérateurs militaires et commerciaux. Équipés de trains d'atterrissage à roues, de skis ou de flotteurs, les Portes ont servi de manière fiable et inlassable partout dans le monde - survolant désert, jungles, lacs, montagnes, neige et glace - tout simplement partout. Il n'est donc pas étonnant que le PC-6 détienne le record du monde du plus haut atterrissage réalisé par un avion à voilure fixe, à 18 865 pieds (5 750 m), sur le glacier Dhaulagiri au Népal.
Après 604 livraisons en 63 ans, Pilatus a mis fin à la production en 2022…
Avant de commencer
- Si vous n'êtes pas un pilote expérimenté, prévoyez de faire vérifier votre modèle terminé par un pilote pleinement compétent et de vous faire aider pour vos premiers vols. Même si nous avons essayé de vous fournir un manuel d'instructions complet, les modèles RC sont plutôt compliqués, et un modéliste expérimenté peut rapidement vérifier votre modèle pour s'assurer que vos premiers vols soient réussis.
- Veuillez assembler votre modèle exactement selon ces instructions. N'essayez pas de modifier ou de changer votre modèle de quelque manière que ce soit, car cela pourrait altérer ses caractéristiques de vol.
- Avant de commencer, veuillez vérifier le continue de ce kit pour assurer qu'aucune pièce ne manque ou n'est endommagée. Cela vous aidera également à vous familiariser avec chaque composant de votre avion. Si vous constatez que des pièces manquent ou sont endommagées, veuillez contacter immédiatement votre revendeur pour un remplacement. Note: Votre revendeur ne peut pas accepter de retour de kit si la construction à commencé.
- Essayez chaque pièce avant de la coller en place. Assurez-vous que vous utilisez la pièce correcte et qu'elle s'ajuste bien avant de procéder à l'assemblage. Aucune quantité de colle ne peut compenser une pièce mal ajustée.
- Le manuel contient un schéma montrant la position par défaut du centre de gravité (CG) et les débattements recommandés des gouvernes. Il est essentiel de respecter la position recommandée du CG pour le premier vol, sinon le modèle pourrait être instable, difficile à contrôler, voire incapable de voler ! Plus tard, vous pourrez affiner la position du CG pour l'adapter à votre style de vol et à vos compétences.
Précautions
Ce modèle RC n'est pas un jouet. Utilisez-le avec soin et suivez strictement les instructions de ce manuel.
Assemblez ce modèle en suivant strictement ces instructions. NE modifiez PAS le modèle. Si vous ne respectez pas ces consignes, la garantie sera automatiquement annulée. Suivez les instructions pour obtenir un modèle sûr et solide à la fin de l'assemblage.
Les enfants de moins de 14 ans doivent utiliser le modèle sous la surveillance d'un adulte.
Assurez-vous que le modèle est en parfait état avant chaque vol, en veillant à ce que tout l'équipement fonctionne correctement et que le modèle ne soit pas endommagé dans sa structure.
Ne voler pas que les jours où il y a une légère brise et dans un endroit sûr, éloigné de tout obstacle.
Précautions de sécurité et avertissements
- An avion RC n'est pas un jouet ! En cas de mauvaise utilisation, il peut causer des blessures graves et des dommages matériels. Ne volez que dans un endroit sûr, en suivant toutes les instructions et recommandations de ce manuel. Attention à l'hélice ! Gardez les objects lâches qui pourraient s'emmêler dans l'hélice à l'écart de l'hélice en rotation, y compris les vêtements amples ou d'autres objets tels que des crayons et des tournevis. Assurez-vous que vos mains et celles des autres, ainsi que les visages, sont éloignés de l'hélice en rotation.
- En tant qu'utilisateur de ce produit, vous êtes seul responsable de son utilisation de manière à ne pas mettre en danger votre sécurité ou celle des autres, ni causer de dommages au produit ou aux biens d'autrui. Ce modèle est contrôlé par un signal radio qui peut être sujet à des interférences provenant de nombreuses sources hors de votre contrôle. Ces interférences peuvent entraîner une perte momentanée de contrôle, il est donc conseillé de toujours maintenir une distance de sécurité dans toutes les directions autour de votre modèle, car cette marge aidera à éviter les collisions ou les blessures.
- N'utilisez jamais votre modèle avec des piles d'émetteur faibles.
- Faites toujours fonctionner votre modèle dans un espace ouvert à l'écart des lignes électriques, des voitures, de la circulation ou des personnes. Évitez d'utiliser votre modèle dans des zones peuplées où des blessures ou des dommages peuvent survenir.
- Suivez attentivement les instructions et avertissements pour ce produit ainsi que pour tout équipement de support optionnel (chargeurs, batteries rechargeables, etc.) que vous utilisez.
- Gardez tous les produits chimiques, petites pièces et tout objet électrique hors de portée des enfants.
- L'humidité endommage les composants électroniques. Évitez l'exposition à l'eau pour tout équipement qui n'est pas spécialement conçu et protégé à cet effet.
- The model is made mostly of plastics - it is not fireproof. It may not be exposed to higher temperatures, otherwise severe distortion of the foam airframe or other damage may occur.
Technical specifications
| Wingspan | 1500 mm |
| Length | 1112 mm |
| All-up weight | 700–770 g |
| Wing area | 27.9 dm² |
| All-up weight | 1650–1700 g |
| Motor | C3548-750 |
| ESC | KAVAN R-40SB SBEC |
| Propeller | 10×6" 3-blade |
Set contents
Almost ready to fly model with the brushless motor, speed controller and servos installed, instruction manual.
You will also need
- At least 6-channel RC set, 14.8 V 2600–3300 mAh LiPo flight pack.
- Regular modeller’s tools: modeller‘s knife (KAV66.770), screwdrivers, pliers, No. 10 spanner, 1.5 mm and 2.5 mm Allen keys or screwdrivers, sandpaper etc.
- Glue: Medium or thick cyanoacrylate glue (e.g. KAV56.9952 or KAV56.9953), silicone or MS polymer glue.
Model assembly
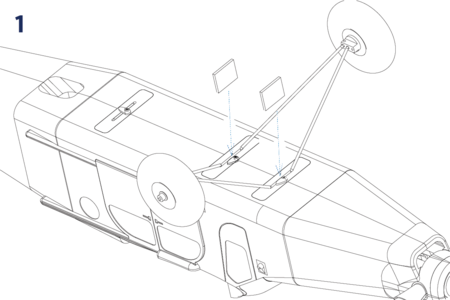
- Push the undercarriage into slots in the bottom of the fuselage until you hear a "Click!", slide in the plastic inserts and secure by rotating the latches.
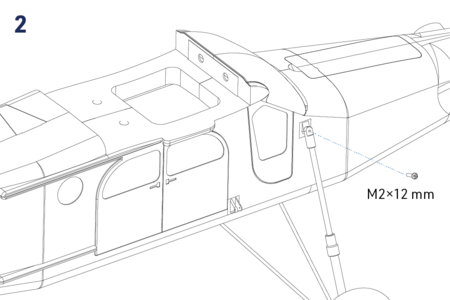
- Secure the upper undercarriage struts using M2×12 mm screws to the fuselage (do not tighten completely).
- Secure the struts to the undercarriage using M3×10 mm screws. Apply a drop of blue threadlocker to the screws but do not tighten completely.
- Slide the wing halves onto the wing tube joiner.
- Connect the wing multi connectors to the corresponding sockets in the wing halves.
- Hook up your receiver, servos and ESC following the wiring diagram (Fig. 6). The receiver is to be secured with a strip of double-sided foam tape or hook-and-loop tape to the rear part of the cockpit. Deploy the antennas so their active parts are square to each other (if you are using a receiver featuring diversity aerials).Note: The kit is supplied with the connection board for ailerons, flaps, rudder and LED lights so you can use even the most basic 6-channel radios to control your PC-6 Porter. If you intend to use independent control of aileron and flap servos and an advanced computer radio, you have to bypass the connection board accordingly.
The LED lights are only powered via the connection board; they are not remote-controlled in any way. - Attach the wing to the fuselage and secure by the wing joiner plate and two M6×40 mm plastic bolts.
- Attach the wing struts and secure them with two clips each.
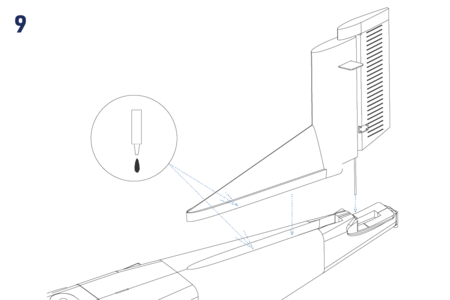
- Trial the fit of the horizontal and vertical tailplane and the fuselage - no glue yet. Double check the parts fit tight and the fin is vertical to the horizontal stabilizer. If necessary sand the parts to fit. Once satisfied, apply medium or rather thick cyano (or clear silicone or MS polymer glue) to the contact area of the fin and attach the fin to the fuselage.
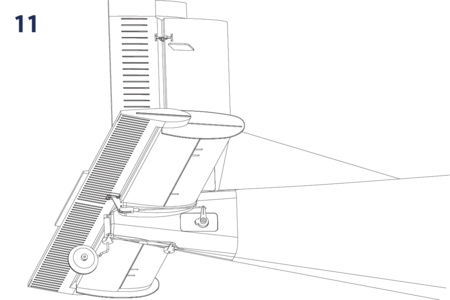
- Insert the horizontal tailplane in place and secure it with the M6×40 mm plastic bolt.
- Install the tail wheel and the rudder/tail wheel linkage. Do not forget to apply a drop of blue threadlocker to the setting screws.
- Attach the propeller to the prop driver and secure it with the propeller nut with a washer; tighten the nut using a No. 10 spanner. (For your safety, you should better leave the propeller installation after your radio is all connected and set and the correct direction of rotation of your motor has been tested.) Secure the spinner using an M2.5×20 mm bolt in place.
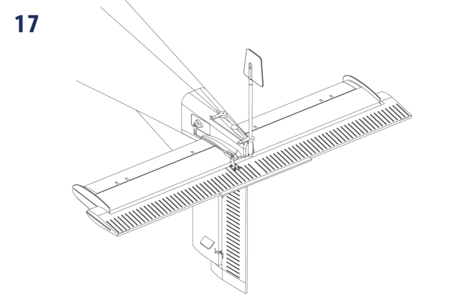
- Use medium cyano to glue the dummy antennas in place.
- Open the battery compartment hatch, and put your flight pack inside. With your radio on, set the servos to the neutral position (sticks and trims centred) and fasten the setting screws of the pushrod connectors on the elevator and rudder servo arms. Perform the throttle range calibration of the ESC as described in the attachment of this manual.
Float Set Installation (optional - sold separately) - Attach the struts to the floats and secure them with plastic braces and 2.0×10 mm self-tapping screws.
- Push the struts into slots in the bottom of the fuselage until you hear a "Click!", slide in the plastic inserts and secure by rotating the latches.
- Install the water rudder in place. Do not forget to apply a drop of blue threadlocker to the setting screw.
RC kit installation and pre-flight check
| Recommended throws | *Low Rate | High Rate | ||
|---|---|---|---|---|
| Rate | Expo | Rate | Expo | |
| Ailerons | ±11 mm | 30 % | ±15 mm | 30 % |
| Elevator | ±11 mm | 30 % | ±20 mm | 30 % |
| Rudder | ±16 mm | 20 % | ±25 mm | 20 % |
| Flaps | Take-off: -10 mm down / Landing: -22 mm down | |||
- Referring to the instruction manual of your radio, carefully hook up the on-board electronics.
- Once everything has been correctly connected, turn on your transmitter and plug in the flight pack. Check the neutral positions and throws of all control surfaces. If you need to make the control surface throws smaller, simply move the pushrod closer to the centre on the servo arm or move it far from the control surface on the control horn. And vice versa.
Especially less experienced pilots might find their Porter easier to fly with some extra mixes on (mix rates for the high rate throws):
- Aileron → Rudder: 12 mm left rudder at full left ailerons, 12 mm right rudder at full right ailerons
- Aileron differential: 15 mm up aileron/8 mm down aileron
- Flap → Elevator: 1 mm down elevator for take-off flaps, 2 mm down elevator for landing flaps setting.
- Check the direction of rotation of the propeller. If it is incorrect, simply swap two of the three wires between the ESC and motor or program the ESC (refer to the ESC manual).
- Check the correct position of the centre of gravity (CG): 56–60 mm behind the leading edge of the wing (Fig. 18). Adjust the CG position by moving the flight pack - if you cannot reach the recommended position, do not hesitate to add an appropriate amount of lead to the nose or tail. An extra couple of grams won’t spoil the flying characteristics - but the incorrect CG position is a killer.
- Fully charge your flight pack and transmitter batteries, check the proper function of your radio and perform the range check of your radio according to its instruction manual. The range has to be almost the same with the motor off and at full throttle (no more than a 10% decrease is acceptable). DO NOT try to fly unless the range check is 100% successful.
Flying
The test flying and fine-tuning is pretty much straightforward. There will be no surprise for a medium-advanced pilot who is supposed to fly this model.
"Sea" Porter
It is a good idea to test-fly your Porter with the wheels first just to make yourself familiar with your new model. Explore the safe take-off and landing approach speed, and learn to use the flaps. Once the floats are installed, check again the CG position; adjust the battery position and/or add ballast if necessary.
For the first test flights, seek an open area of calm water. Try to avoid lakes surrounded by tall trees causing turbulence above water. Tall trees would also force a dangerously steep climb right after your model gets into the air. Choose a fine day with a gentle breeze - the take-off is easier when there are small waves than from a glass-still lake.
Prepare the model as usual and check the RC set and power systems are working properly. Place your model in the water, pull the elevator up and gently open the throttle to taxi away from the bank. The model should be easy to control thanks to the efficient water rudder. Once away enough, switch the motor off, and the model will turn itself directly against the wind thanks to the "weathercock" effect of the fin.
Open the throttle and allow your model to gain speed until it rises onto the step of the floats. Leave the elevator at the neutral position; do not apply the up elevator until the model actually gains the take-off speed (a little bit bigger than with wheels). Gently apply the elevator. Do not force your model into a steep climb or sharp turn. The increased drag caused by the floats makes your Porter respond more slowly. The level flight also requires a higher throttle setting. Allow your model to climb to a safe height (50 m or so), and take your time to get the feel of your new floatplane. You should try a couple of landing approaches - at first at a safe height, and at a low level later.
However, do not get carried away by your beautiful seaplane. Remember you have to spare enough energy not only for a safe landing but also for taxiing back. Allow your model to descend steadily by keeping the throttle a little bit more open than with a land-based plane. Let your model touch down gently and smoothly on the water.
Once "docked", check if there is no water inside your model. Dry it thoroughly with a sponge if necessary. Check for any signs of damage by objects in the water and thoroughly check the water rudders.
At the end of your water flying session, carefully and thoroughly clean and dry your model from outside and inside. It is wise to carry a bottle of fresh water, a sponge and a piece of fine dry cloth with you to the lake. The exposed metal fittings might be happier if protected by a drop of WD-40 spray lube.
Appendix
KAVAN R-40SB instructions
Please refer to the KAVAN ESCs - Instruction manual.
Recycling and Waste Disposal Note (European Union)

Electrical equipment marked with the crossed-out waste bin symbol must not be discarded in the domestic waste; it should be disposed of via the appropriate specialised disposal system. In the countries of the EU (European Union) electrical devices must not be discarded via the normal domestic waste system (WEEE - Waste of Electrical and Electronic Equipment, Directive 2012/19/EU). You can take your unwanted equipment to your nearest public collection point or recycling centre, where it will be disposed of in the proper manner at no charge to you. By disposing of your old equipment in a responsible manner you make an important contribution to the safeguarding of the environment!
EU Declaration of Conformity (European Union)

Hereby, KAVAN Europe s.r.o. declares that this Pilatus PC-6 Porter model and the included electronic and electric devices are in compliance with the requirements of relevant European directives and harmonized norms. The full text of the Declaration of Conformity is available at www.kavanrc.com/doc/.
Guarantee
The KAVAN Europe s.r.o. products are covered by a guarantee that fulfils the currently valid legal requirements in your country. If you wish to make a claim under guarantee, please contact the retailer from whom you first purchased the equipment. The guarantee does not cover faults which were caused in the following ways: crashes, improper use, incorrect connection, reversed polarity, maintenance work carried out late, incorrectly or not at all, or by unauthorised personnel, use of other than genuine KAVAN Europe s.r.o. accessories, modifications or repairs which were not carried out by KAVAN Europe s.r.o. or an authorised KAVAN Europe s.r.o., accidental or deliberate damage, defects caused by normal wear and tear, operation outside the Specification, or in conjunction with equipment made by other manufacturers. Please be sure to read the appropriate information sheets in the product documentation.
