KAVAN GRE-24 - Instruction manual/de: Difference between revisions
Mrs. Kavan (talk | contribs) No edit summary |
Mrs. Kavan (talk | contribs) No edit summary |
||
| Line 22: | Line 22: | ||
* Kürzen Sie niemals die Empfängerantenne, dies könnte die Reichweite Ihres RC-Sets verringern. | * Kürzen Sie niemals die Empfängerantenne, dies könnte die Reichweite Ihres RC-Sets verringern. | ||
=== Laden des antriebsakkus === | |||
[[File:GRE-24 - Charging.png|right|frameless|480x480px]] | [[File:GRE-24 - Charging.png|right|frameless|480x480px]] | ||
Bevor Sie beginnen, bereiten Sie vier frische AAA-Alkali-Batterien oder NiMH-Akkus für den Sender vor (werden nicht mit dem Modell geliefert) und laden Sie den mit dem Modell gelieferten LiPo-Akku auf. | |||
<div lang="en" dir="ltr" class="mw-content-ltr"> | <div lang="en" dir="ltr" class="mw-content-ltr"> | ||
Revision as of 08:52, 2 September 2024
Introduction
Vielen Dank, dass Sie sich für einen Rock Crawler GRE-24 der Reihe KAVAN entschieden haben, einen der realistischsten, leistungsstärksten und zuverlässigsten Trucks in seiner Kategorie. Mit Autos der Reihe KAVAN 1:24 können Sie sofort losfahren.
Achtung
- Es ist kein Spielzeug! Das Modell ist für den selbständigen Betrieb von Personen über 15 Jahren bestimmt.
- Wenn Sie dieses Fahrzeug nicht auf sichere Weise betreiben und warten, kann dies zu Verletzungen führen.
- Ersetzen Sie beschädigte Teile nur durch Originalersatzteile. Achten Sie auf die richtige Polarität aller Kabel im Auto.
- Verwenden Sie nur geeignete 1-Zellen-Lithium-Polymer-Akkus (1S, 3,7 V). Laden Sie die Akkus nicht übermäßig auf oder entladen Sie sie nicht stark, da dies zu ihrer Beschädigung mit Brandgefahr führen kann. Wenn sich der Akku während des Ladevorgangs sehr erwärmt, beenden Sie den Ladevorgang sofort und trennen Sie den Akku vom Ladegerät.
- Lassen Sie den Akku während des Ladevorgangs niemals unbeaufsichtigt. Wenn Sie sich nicht sicher sind, wie Sie den mit Ihrem Modell gelieferten Akku laden sollen, wenden Sie sich an einen erfahrenen Modellbauer. Erlauben Sie Kindern nicht, den Akku ohne Aufsicht von Erwachsenen zu laden.
- Der Motor erwärmt sich während des Betriebs. Lassen Sie das Modell zwischen den Fahrten 10–15 Minuten abkühlen. Das verlängert die Lebensdauer Ihres Autos.
- Benutzen Sie den gesunden Menschenverstand bei der Auswahl des Platzes fürs Fahren. Fahren Sie nicht auf Straßen, Parkplätzen usw. - überall dort, wo Sie einem echten Auto, Menschen oder Tieren begegnen könnten. Fahren Sie nicht in der Nähe von Stromleitungen, Sendeanlagen und Wandlern, tiefem Wasser oder instabilem Gelände. Der Fahrer des Autos ist allein für seine Handlungen verantwortlich.
- Dieses Produkt ist aus feinen elektronischen Bauteilen zusammengesetzt. Es ist von entscheidender Bedeutung, es vor Feuchtigkeit und anderen Verunreini gungen zu schützen. Wenn es einer feuchten Umgebung ausgesetzt war, vergewissern Sie sich, dass die Elektronik vollständig getrocknet ist, bevor Sie damit wieder fahren.
- Prüfen Sie immer die Reichweite des RC-Sets, bevor Sie das Auto auf die Strecke schicken, um Schäden am Modell durch Verbindungsverluste oder Störungen zu vermeiden.
- Berücksichtigen Sie beim Betrieb Ihre Fähigkeiten. Wenn es gefährlich ist, das Modell an einem bestimmten Ort abzuholen, ist es das Risiko nicht wert.
- Schalten Sie immer zuerst den Sender ein, bevor Sie dann den Antriebsakku im Auto anschließen. Nach der Fahrt schalten Sie immer zuerst den Empfängerschalter aus, dann trennen Sie den Antriebsakku - erst zuletzt schalten Sie den Sender aus.
- Wenn Sie umgekehrt vorgehen, kann das Modell außer Kontrolle geraten und schwere Schäden verursachen.
- Lassen Sie niemals zu, dass die Akkus/Batterien im Sender so entladen werden, dass Sie die Kontrolle über das Modell verlieren.
- Die Kunststoffe, aus denen das Modell hergestellt ist, sind brennbar und können durch hohe oder niedrige Temperaturen beschädigt oder verformt werden. Lagern Sie das Modell nicht in der Nähe von Wärmequellen wie Öfen oder Heizelementen. Lagern Sie es in einem trockenen Raum bei Zimmertemperatur.
- Kürzen Sie niemals die Empfängerantenne, dies könnte die Reichweite Ihres RC-Sets verringern.
Laden des antriebsakkus
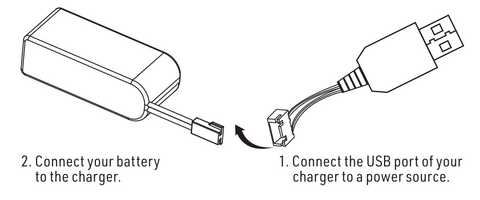
Bevor Sie beginnen, bereiten Sie vier frische AAA-Alkali-Batterien oder NiMH-Akkus für den Sender vor (werden nicht mit dem Modell geliefert) und laden Sie den mit dem Modell gelieferten LiPo-Akku auf.
- Connect the charger to a USB port then connect your battery to the charger.
- When charging, the status LED is red. Once fully charged, the status LED goes off.
- Do not leave the battery unattended when charging!
- If the battery or charger is hot, disconnect the battery and charger immediately as this may be caused by an internal short-circuit.
Lithium Polymer Battery Warning
- Never charge a lithium polymer battery with a charger designed for NiCd, NIMH, or any other type of battery than LiPo. Use ONLY a charger designed for LiPo batteries.
- Do not leave the LiPo battery unattended during charging.
- Do not overcharge the battery.
- Always charge LiPo batteries placed on non-flammable, heat-resistant surfaces.
- Use of a LiPo-safe bag or container while charging is strongly recommended. Do not allow LiPo cells to overheat at any time. Cells which reach greater than 60 °C will usually become damaged and will catch fire.
- Do not charge the LiPo pack while it is still in the model. Never charge or store battery packs in a vehicle.
- Do not over-discharge LiPo; doing so will damage the battery.
- Do not expose LiPo cells to water or moisture at any time.
- Do not store battery near open flame or heater.
- Do not assemble LiPo cells or pre-assembled packs together with other LiPo cells or packs.
- Always store LiPo batteries in a secure location away from children.
- Always remove the LiPo battery if the model is involved in any kind of crash.
- Carefully inspect the battery and connectors for even the smallest damage.
- Do not allow the electrolyte to get into the eyes or on the skin. Wash affected areas immediately if they come into contact with electrolytes. Do not alter or modify the connectors or wires of a LiPo battery pack.
- Always inspect the condition of the battery before charging and operating.
- Do not short-circuit the LiPo battery.
- Avoid direct contact with a leaky/damaged battery.
- Do not charge the battery out of the recommended temperature range (0–45 °C).
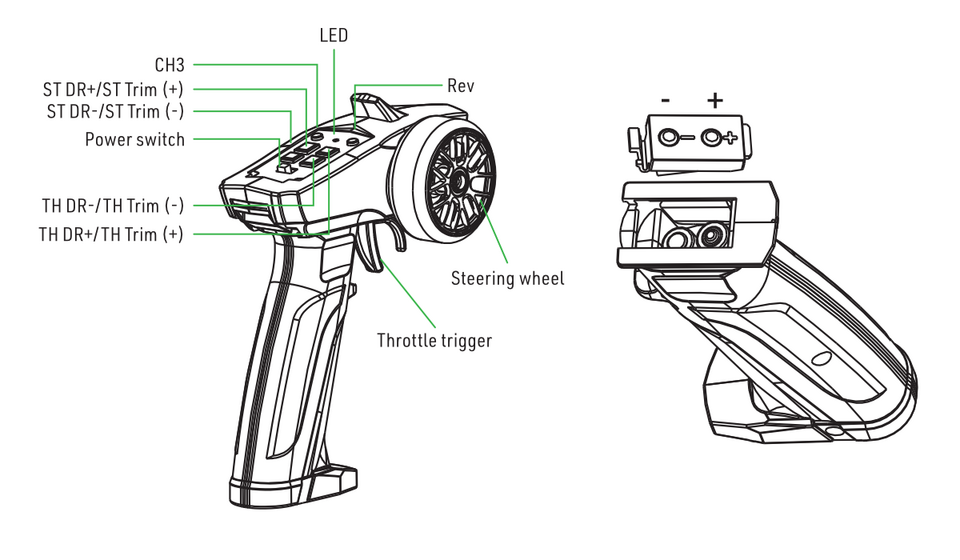
Transmitter controls
Install the transmitter batteries
- Remove the battery compartment cover.
- Replace the used batteries with new AAA-size batteries.
Specification
Transmitter
- Input Voltage: 4× 1.2/1.5 V AAA
- Modulation: FHSS
- Frequency Range: 2.405–2.478 GHz
- Output Power: <20dBm
Receiver
- Input Voltage: 3.7 V (1S LiPo)
- Modulation: FHSS
- Frequency Range: 2.405–2.478 GHz
- Output Power: -
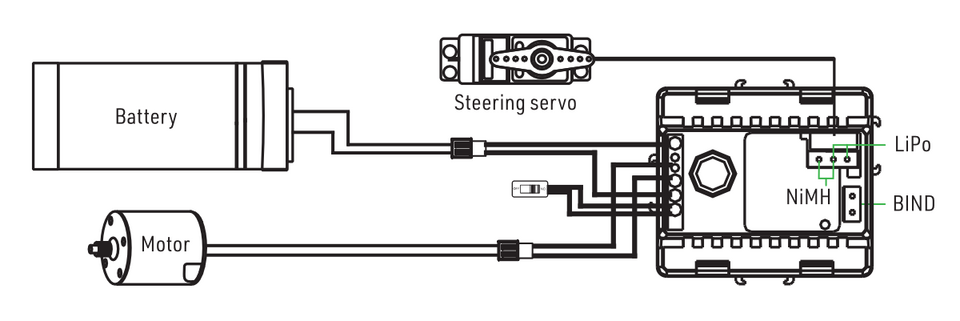
Transmitter and receiver binding
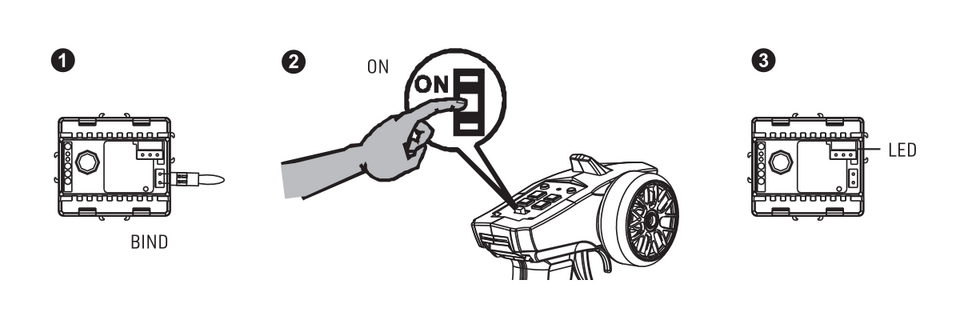
- Connect the receiver to the battery. Place the bind plug into the port labelled "BIND". Turn on the receiver switch. The LED will flash very shortly, go off and then blink again. Immediately before it goes on again, remove the binding plug. The LED will start blinking rapidly.
- Turn on the transmitter.
- The LED on the receiver should now turn on and remain solid, indicating that the binding process is complete.
Transmitter function
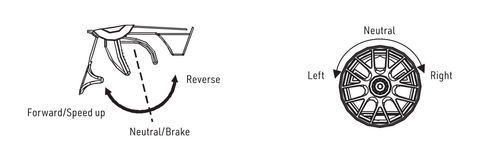
- Push the trigger forward to slow down or brake.
- Pull the trigger backward to accelerate.
Throttle trim: If the vehicle inches forward or backwards without throttle input, adjust the trim to set the neutral throttle position.
Steering trim: If the vehicle veers left or right without any steering input, use the steering trim to adjust the steering servo until the vehicle tracks straight.
Operating procedure
- Always turn the transmitter on before turning on the vehicle.
- Always switch off the vehicle and disconnect the battery BEFORE turning off the transmitter.
Channel reverse
- Steering: if your car turns right whilst turning the steering wheel left (or vice versa) - turn the steering wheel to its maximum deflection in either direction and hold; simultaneously press and hold the steering REV button and the steering channel will be reversed.
- Throttle: if your car runs back whilst pulling the throttle trigger - with the car inverted (wheels not touching the ground), press the throttle trigger down to its maximum position and hold; simultaneously press and hold the throttle REV button and the throttle channel will be reversed.
Control rate
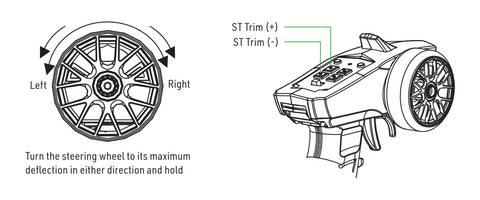
- Steering: turn the steering wheel to its maximum deflection in either direction and hold; press the ST trim + or - buttons to increase or decrease the steering rate. If the steering is unresponsive, keep pressing the steering trim+ button while holding the steering wheel at maximum deflection.
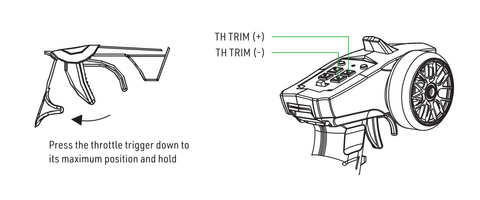
- Throttle: with the car inverted (Wheels not touching the ground), press the throttle trigger down to its maximum position and hold; press the TH trim + or - buttons to increase or decrease the throttle rate. If the throttle is unresponsive, keep pressing the throttle trim + button while holding the throttle trigger down at its maximum point.
Maintenance
Proper maintenance is very important. Make sure to always perform appropriate maintenance after driving so that you can enjoy driving without problems next time.
- Completely remove all dirt and debris from the vehicle, especially in the suspension, drive shafts and steering parts.
- Inspect each part and screw for loosening, missing parts or damages.
- You should always make sure your wheels are tight and parts move freely after and before use. Apply fine grease for plastic gears wherever needed.
- Do not use aggressive chemicals or solvents for cleaning, otherwise the electronics and plastic parts might be damaged. Use compressed air for cleaning, a soft paintbrush or toothbrush.
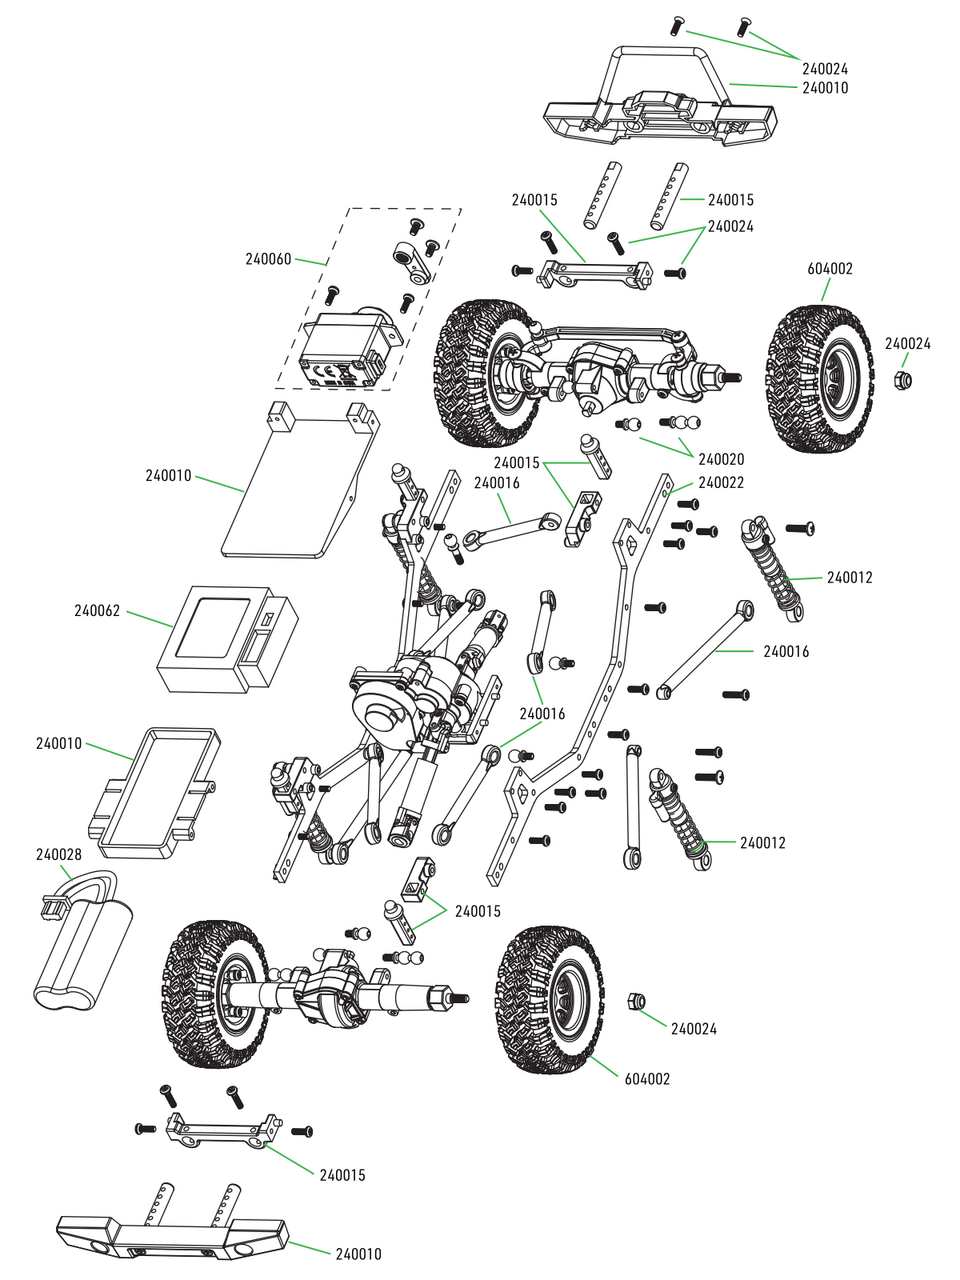
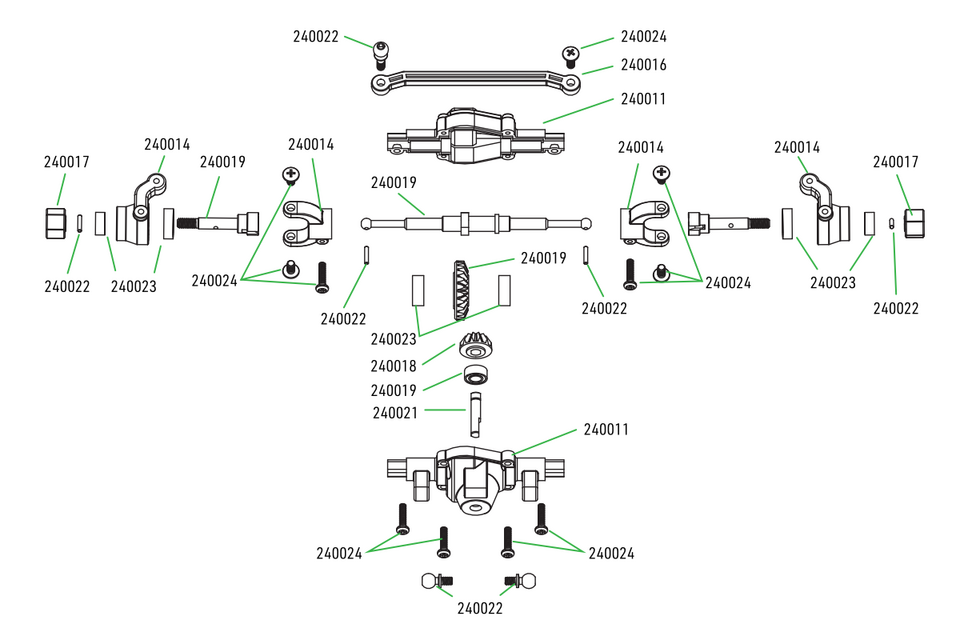
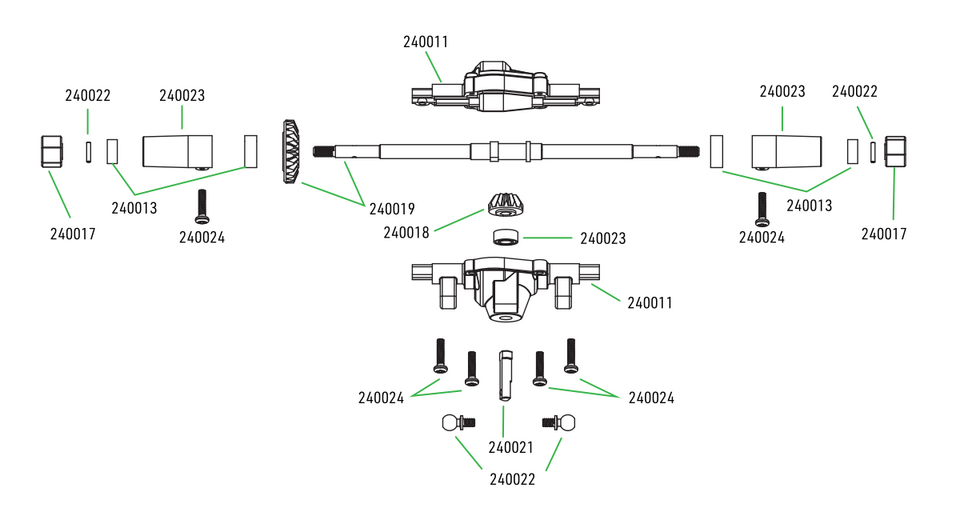
Exploded views
Recycling and waste disposal note (European Union)

Electrical equipment marked with the crossed-out waste bin symbol must not be discarded in the domestic waste; it should be disposed of via the appropriate specialised disposal system. In the countries of the EU (European Union) electrical devices must not be discarded via the normal domestic waste system (WEEE - Waste of Electrical and Electronic Equipment, Directive 2012/19/EU). You can take your unwanted equipment to your nearest public collection point or recycling centre, where it will be disposed of in the proper manner at no charge to you. By disposing of your old equipment in a responsible manner you make an important contribution to the safeguarding of the environment.
EU declaration of conformity (European Union)

Hereby, KAVAN Europe s.r.o. declares that the equipment KAVAN GRE-24 model car with an RC kit are in compliance with the essential requirements as laid down in the EU directive(s) concerning electromagnetic compatibility. The full text of the EU Declaration of Conformity is available at www.kavanrc.com/doc.
Guarantee
The KAVAN Europe s.r.o. products are covered by a guarantee that fulfils the currently valid legal requirements in your country. If you wish to make a claim under guarantee, please contact the retailer from whom you first purchased the equipment. The guarantee does not cover faults which were caused in the following ways: crashes, improper use, incorrect connection, reversed polarity, maintenance work carried out late, incorrectly or not at all, or by unauthorised personnel, use of other than genuine KAVAN Europe s.r.o. accessories, modifications or repairs which were not carried out by KAVAN Europe s.r.o. or an authorised KAVAN Europe s.r.o., accidental or deliberate damage, defects caused by normal wear and tear, operation outside the Specification, or in conjunction with equipment made by other manufacturers. Please be sure to read the appropriate information sheets in the product documentation.


