Programmierkarte KAVAN PRO - Bedienungsanleitung
Einführung
Programmier-Karte für KAVAN PRO/Plus Elektronische Brushless Regler
KAVAN PRO Programmier-Karte für Elektronische Regler ist leicht zu verwenden und bequem mitzunehmen. Alle programmierbaren Funktionen sind in der Programmier-Karte aufgelistet.
Technische Daten
| Eingangs Spannung | 4,8 – 8,4 Volt DC (BEC oder SBEC des Reglers oder 4–5 zellige Empfängerbatterie NiCd/NiMH oder 2S LiPo/Li-ion/LiFe) |
| Abmessungen | 88×58×14 mm |
| Gewicht | 40 g |
Funktionen

Anschluss-reihenfolge
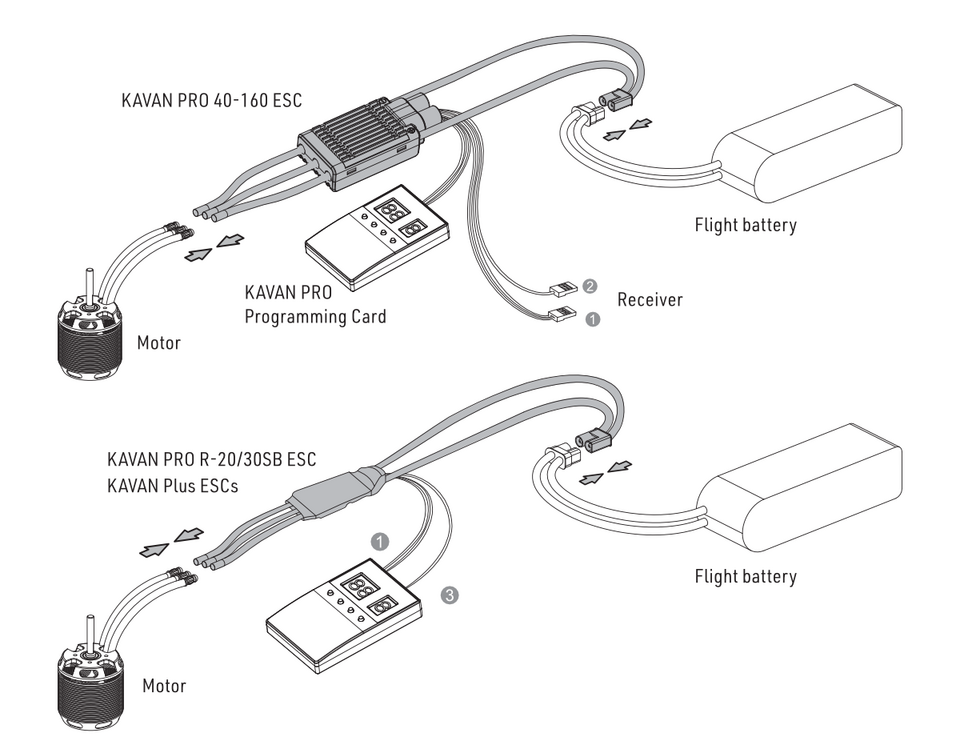
Für den KAVAN PRO Regler (mit dem Programmierkabel, das eine Ausgangsspannung von 5,2–7,4V hat): Stecken Sie das Programmierkabel in den mit "(-)(+)(⎍)" gekennzeichneten Anschluss Ihrer LED-Programmkarte.
Wie man die KAVAN PRO programmkarte arbeitet

Schließen Sie nach allen Verbindungen eine Batterie an Ihren Regler an und schalten Sie ihn ein. Ein paar Sekunden später zeigt die KAVAN PRO Programmier-Karte die aktuellen Einstellungen in Ihrem Regler an. Wenn auf der Programmier-Karte nichts angezeigt wird, überprüfen Sie bitte, ob das Programmierkabel und die Leitung (auf UBEC / dieser zusätzlichen Batterie) zur Stromversorgung der KAVAN PRO Programmier-Karte umgekehrt einge steckt wurden. Nach Bestätigung aller Verbindungen (sind korrekt) Trennen Sie den Akku, 2 Sekunden später verbinden Sie ihn erneut mit Ihrem Regler, um zu sehen, ob auf der KAVAN PRO Programmier-Karte Informationen angezeigt werden.
Programming your KAVAN PRO ESC
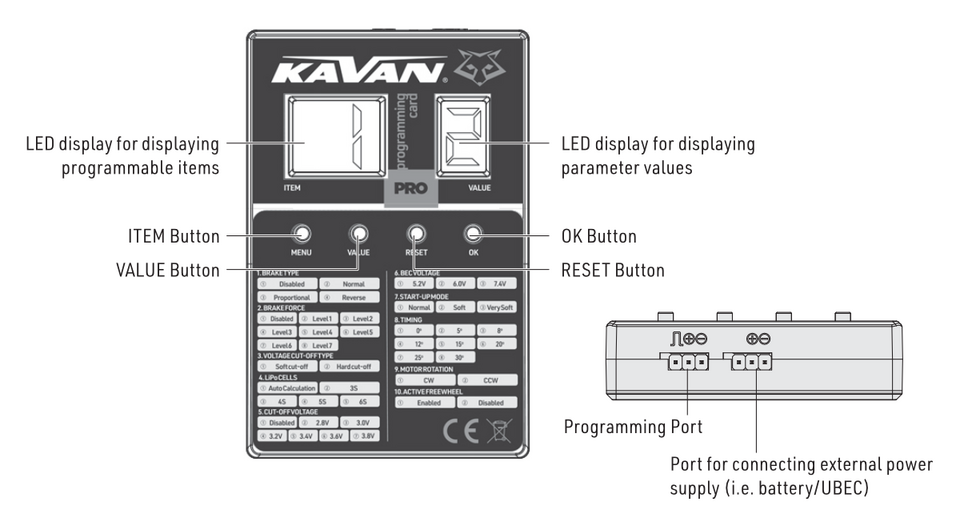
ITEM Button: pressing the ITEM button selects the programmable item(s) you want to adjust/check; the corresponding (item) number of each item will be displayed on the left LED display.
VALUE Button: after selecting a programmable item, the corresponding parameter stored in your ESC will be displayed on the right LED display. Pressing the VALUE button adjusts the parameter values.
OK Button: press the OK button after you adjust all the parameters (you want to adjust). A Red "——" will show up on the right LED display for about 1 or 2 seconds to indicate it’s transferring the new parameter values to your ESC. The red "——" will disappear when the ESC saves all the parameter values.
RESET Button: pressing the RESET button resets your ESC to the factory settings.
Safety precautions
- Do not install the propeller (fixed-wing) or drive pinion (helicopter) on the motor when you test the ESC and motor for the first time to verify the correct settings on your radio. Install your propeller (plane) or pinion (heli) only after confirming the settings on your radio are correct.
- Never use ruptured or punctured battery cells.
- Never short-circuit battery or motor terminals.
- Always use proper insulation material for cable insulation.
- Always use proper cable connectors.
- Incorrect battery polarity will damage the card and ESC and void the warranty.
- Use only batteries supported by the card and ESC and ensure the correct polarity before connecting.
- Handle your model with extreme care once the battery pack is connected and keep away from the propeller at all times. Never stand in line or directly in front of any rotating parts.
- Do not immerse the card under water, do not allow it to get wet while powered up.
Recycling and waste disposal note (European Union)

Electrical equipment marked with the crossed-out waste bin symbol must not be discarded in the domestic waste; it should be disposed of via the appropriate specialised disposal system. In the countries of the EU (European Union) electrical devices must not be discarded via the normal domestic waste system (WEEE - Waste of Electrical and Electronic Equipment, Directive 2012/19/EU). You can take your unwanted equipment to your nearest public collection point or recycling centre, where it will be disposed of in the proper manner at no charge to you. By disposing of your old equipment in a responsible manner you make an important contribution to the safeguarding of the environment.
EU declaration of conformity (European Union)

Hereby, KAVAN Europe s.r.o. declares that the KAVAN Pro Programming Card is in compliance with the essential requirements as laid down in the EU directive(s) concerning electromagnetic compatibility. The full text of the EU Declaration of Conformity is available at www.kavanrc.com/doc/.
Guarantee
The KAVAN Europe s.r.o. products are covered by a guarantee that fulfils the currently valid legal requirements in your country. If you wish to make a claim under guarantee, please contact the retailer from whom you first purchased the equipment. The guarantee does not cover faults which were caused in the following ways: crashes, improper use, incorrect connection, reversed polarity, maintenance work carried out late, incorrectly or not at all, or by unauthorised personnel, use of other than genuine KAVAN Europe s.r.o. accessories, modifications or repairs which were not carried out by KAVAN Europe s.r.o. or an authorised KAVAN Europe s.r.o., accidental or deliberate damage, defects caused by normal wear and tear, operation outside the Specification, or in conjunction with equipment made by other manufacturers. Please be sure to read the appropriate information sheets in the product documentation.