KAVAN V20 - Changer le mode
Introduction
Changer le mode de vol est simple et rapide si vous suivez la bonne procédure. Veuillez vous référer aux étapes ci-dessous pour modifier le mode de vol de votre émetteur, ou si vous souhaitez définir le retour des bâtons.
Description
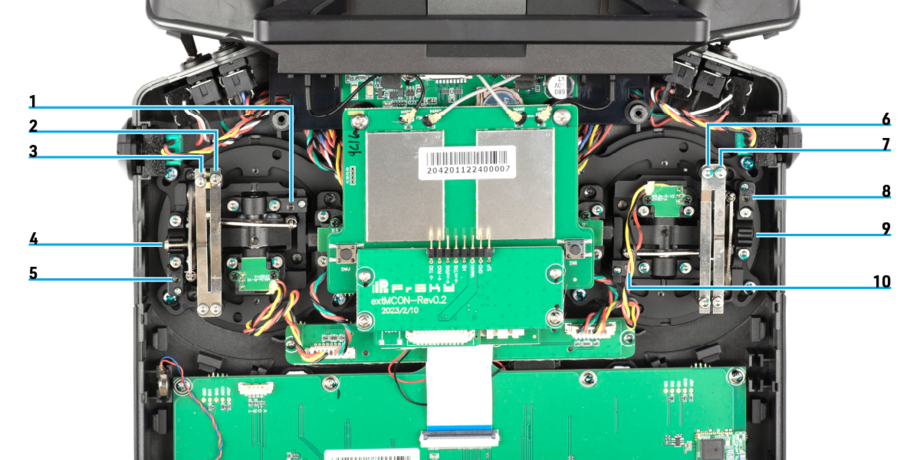
- Ressort de tension de centrage horizontal - cardan droit
- Vis de réglage du cliquet - cardan droit
- Vis de réglage frein/résistance - cardan droit
- Centralisation de la serrure à ressort
- Ressort de tension de centrage vertical - cardan droit
- Vis de réglage à cliquet - cardan gauche
- Vis de réglage du frein/résistance - cardan gauche
- Ressort de tension de centrage vertical - cardan gauche
- Trou pour la serrure à ressort de centrage
- Ressort de tension de centrage horizontal - cardan gauche
Steps
- Remove the battery compartment cover.
- Unplug and remove the battery from the battery compartment.
- Holding the handle in your hands carefully remove the rear cover. Be careful not to pull the antennas.
- Rotate and flip the rear cover to make some space.
- Unscrew the centring spring lock from the current throttle stick.
- On the current throttle side tighten the vertical tension spring counterclockwise so the stick centres.
- On the opposite side loosen the vertical tension spring clockwise.
- Lift the centring arm a little and insert and screw in the centring spring lock on the new throttle stick side.
- Set the feedback of both gimbals to your preference via the steps below.
- Put the rear cover back in place.
- Screw in the 4 screws on the rear cover.
- Plug in and insert the transmitter battery in the battery tray.
- Put the battery tray cover on.
Setting the gimbal feedback
- Screws on the inner side of the strip (2, 6) set the gimbal tension.
- Screws on the outer side of the strip (3, 7) set the ratcheting.
Video tutorial
If you're not feeling confident enough after reading these steps, please follow our video tutorial.
