KAVAN Beta 1400 Kit - Instruction manual
Introduction
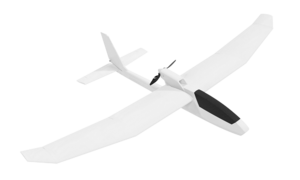
Congratulations on your purchase of the BETA 1400 motor-powered glider. You are about to embark on a magical journey into the fascinating world of electric-powered RC aeroplanes. The BETA 1400 is manufactured of virtually unbreakable EPO foam and packed with the latest 2.4GHz radio technology. It is powered by a mighty brushless motor and LiPo batteries and will help you become an experienced pilot in no time. BETA 1400 is not just an entry-level plane, but really a quite good thermal glider that will please any Sunday pilot – a newcomer as well as a seasoned pro.
KAV02.8086 KAVAN Beta 1400 - kit
Features
- Builder’s kit, EPO foam parts
- Aileron, elevator, rudder and throttle control
- Easy handling and high stability, durable, virtually unbreakable electric motor-powered glider
- Large wing area, low weight
Technical specifications
| Wingspan | 1400 mm |
| Length | 966 mm |
| All-up weight | 700–770 g |
| Wing Area | 24.5 dm² |
| Wing Loading | 28.6–31.4 g/dm² |
| Recommended motor* | C2814-1400 outrunner |
| Recommended ESC* | KAVAN R-20B 20 A with BEC 5 V |
*) Not supplied in the kit.
Precautions
This RC model is not a toy. Use it with care and strictly follow the instructions in this manual.
Assemble this model following strictly these instructions. DO NOT modify or alter the model. Failure to do so, the warranty will lapse automatically. Follow the instructions to obtain a safe and solid model at the end of the assembly.
Children under the age of 14 must operate the model under the supervision of an adult.
Assure that the model is in perfect condition before every flight, taking care that all the equipment works correctly and that the model is undamaged in its structure.
Fly only on days with a light breeze and in a safe place away from any obstacles.
Safety precautions
General warnings
An RC aeroplane is not a toy! If misused, it can cause serious bodily harm and damage to property. Fly only in a safe place, following all instructions and recommendations in this manual. Beware of the propeller! Keep loose items that can get entangled in the propeller away from the spinning propeller, including loose clothing or other objects such as pencils and screwdrivers. Ensure that your and other people’s hands and face are kept away from the rotating propeller.
Note on lithium polymer batteries
Lithium polymer batteries are significantly more vulnerable than alkaline or NiCd/NiMH batteries used in RC applications. All manufacturer’s instructions and warnings must be followed closely. Mishandling of LiPo batteries can result in fire. Always follow the manufacturer’s instructions when disposing of lithium polymer batteries.
Additional safety precautions and warnings
As the user of this product, you are solely responsible for operating it in a manner that does not endanger yourself and others or result in damage to the product or the property of others. This model is controlled by a radio signal subject to interference from many sources outside your control. This interference can cause momentary loss of control, so it is advisable to always keep a safe distance in all directions around your model, as this margin will help to avoid collisions or injury.
Never operate your model with low transmitter batteries.
Always operate your model in an open area away from power lines, cars, traffic, or people.
Avoid operating your model in populated areas where injury or damage can occur.
Carefully follow the directions and warnings for this and any optional support equipment (chargers, rechargeable batteries, etc.) which you use.
Keep all chemicals, small parts and anything electrical out of the reach of children.
Moisture causes damage to electronics. Avoid water exposure to all equipment not specifically designed and protected for this purpose.
Never lick or place any portion of your model in your mouth, as it could cause serious injury or even death.
Kit contents
- EPO foam moulded parts
- Small accessories
- 7×6" folding prop and spinner
- 2 sheets of stickers
You will also need the following accessories and tools (not included in the kit)
RC set, power unit, battery
- At least a 4-channel transmitter and receiver
- LiPo flight pack 11.1 V 1600–2700 mAh
- KAVAN C2814–1400 brushless motor or similar
- KAVAN R–20B 20 A ESC or similar
- 4× KAVAN GO-09 servos or similar
- Short Y-cable or 2× 20–30 cm extension cable
Tools
- Small Phillips and flat screwdrivers
- 1.5 mm Allen key or screwdriver
- Hot melt glue gun
- Sandpaper no.150–200
Glue
- Medium or thick cyanoacrylate glue (e.g. KAV9952 or KAV9953)
- Low or medium-strength thread locker (blue - e.g. KAV9970)
- Hot melt glue or MS polymer glue (e.g. BISON Poly Max®, Soudal T-Rex®)
- Clear sticky tape
Assembly
Fuselage
The fuselage is supplied unassembled (with pre-installed push rods, carbon and plywood reinforcements) in the kit. You are supposed to install the servos and motor and glue the fuselage halves together. Roughen the contact areas with no.150–200 sandpaper before applying glue.
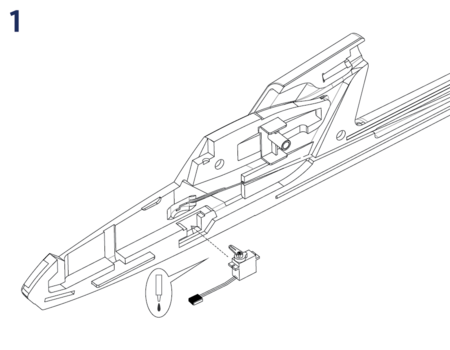
1. Rudder servo installation (Fig. 1)
- Locate the right fuselage half. You will find the KAVAN GO-09-sized bay for the rudder servo in the rear part of the cockpit compartment.
- Prepare the one-sided arm supplied with the KAVAN GO-09 (or cut a two-side arm to one-side arm). Turn on your transmitter, set the rudder stick and trim to the centre (neutral). Connect the rudder servo to the appropriate receiver output (CH4 with the T8FB), plug the ESC’s cable to the throttle channel (CH3 with the T8FB) and connect the flight pack. Insert the Z-bend on the end of the elevator push rod into the middle hole in the servo arm (ca 10 mm from the centre of the arm). Now insert the servo into the servo bay, so the servo output shaft is closer to the nose.
- Now attach the servo arm on the output shaft of the servo - it should be square to the side of the servo case as much as possible. Secure the servo arm with the screw supplied with the servo. Glue the servo with drops of hot melt glue or MS polymer glue over the servo lugs. You can use a medium CA as well, but the hot melt glue or MS polymer glue could be easily removed without damage to your model if you ever needed to get the servo out.
2. Motor mount (Fig. 2+3)
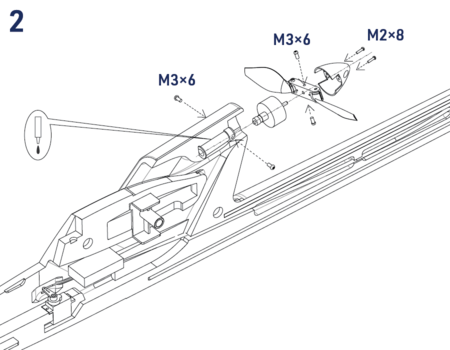
- KAVAN C2814–1400 brushless motor is to be secured to the supplied aluminium mount by two M3 setting screws. Check the correct alignment of the motor mount - the setting screws have to point straight to the access holes in the side of the fuselage. Glue the motor mount using thick cyano or MS polymer glue into the slot in the fuselage.
- Please note the motor is offset up and right. This "up thrust" and "side thrust" is correct and purely intentional. It compensates for the effect of the propeller stream on the fuselage and tail. Check the correct alignment of both two fuselage halves before glueing the motor mount permanently into the right fuselage shell.
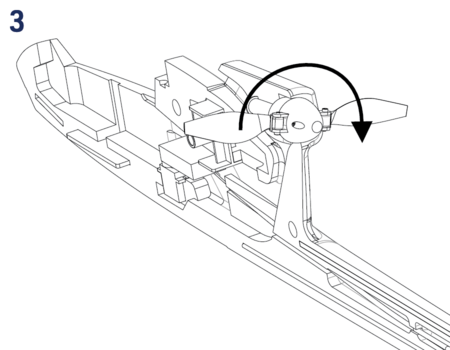
- Motor direction of rotation check: Connect the motor cables to your ESC and secure the motor into the motor mount with two M2×6 mm setting screws. With your radio on, check the direction of rotation of your motor (see Fig. 3) as described in the chapter "RC SET INSTALLATION/7. Testing the power system" in this manual. Once set correctly, remove the motor from the motor mount.
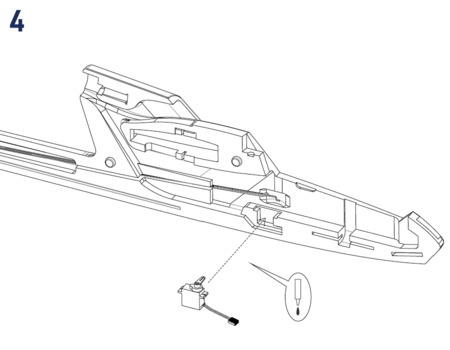
3. Elevator servo installation (Fig. 4)
- Locate the left fuselage half and install the elevator servo in the same way as you did with the rudder servo. Do not forget to set the servo (CH2 with the T8FB) into the neutral position with your radio on.
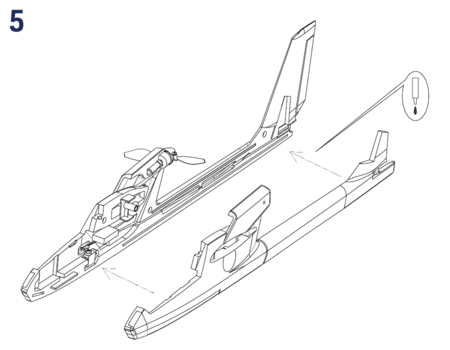
4. Joining the fuselage shells (Fig. 5)
- Attach the left and right fuselage shell together. Take care they are correctly aligned all around. If necessary, sand the contact area flush to create a neat joint. Once satisfied, apply a bead of thick cyano or MS polymer glue on the right fuselage shell. (Slow-setting glue is required here to give you some time to align the fuselage shells correctly - and double-check it). Attach the shells together, check the correct alignment and secure them with modelling pins or masking tape until the glue sets down. Double-check that the fuselage is straight and untwisted; looking along the longitudinal axis of the fuselage, the joint of the fuselage shells must be straight. Take extra care of the good alignment at the wing and tailplane area. This is the most critical step of the entire assembly - now you can make a straight and true fuselage that will give you a pleasant plane to fly - or not.
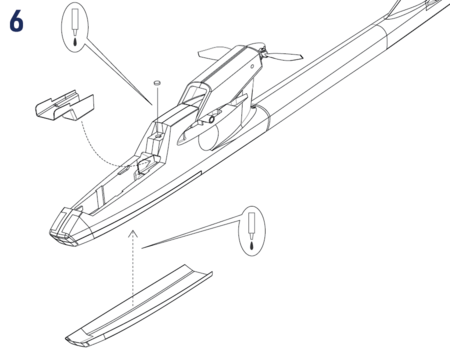
5. Finishing the fuselage (Fig. 6)
- Check the correct polarity of the canopy lock magnets and cyano them into the respective recess on the rear side of the cockpit and canopy. Cover it with a piece of clear sticky tape in the end.
- Cyano (alternatively you can use a thin double-sided sticky tape or contact cement) the plastic reinforcement to the bottom side of the fuselage.
- After the motor (do not forget to apply a blue thread locker to the setting screws) and ESC have been installed, secure the plastic servo cover into the fuselage using drops of hot melt glue, small pieces of hook and loop tape or small magnets (not supplied in the kit). The point is securing the cover in place - yet making it removable to access the servos if needed.
- Install the propeller yoke and secure it with two M3×6 mm setting screws (do not forget to apply a blue thread locker to the screws). Finally, install the spinner using two M2×8 mm screws. Be sure the propeller rotates freely. No matter what, the propeller blades may not graze the fuselage. (Fig. 2)
Wing
1. Releasing the Ailerons
- Deflect the ailerons 10 times up and down carefully to make them move easily.
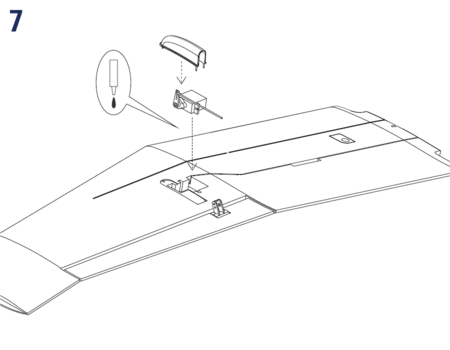
2. Aileron servos installation (Fig. 7)
- You can find moulded servo bays in both two wing halves that fit KAVAN GO-09 servos or similar. Set the aileron servos to neutral with your radio on (in the same way as you did with the elevator and rudder servos). Attach the one-sided servo arms so the arms are square to the side of the servo case as much as possible. Please note you must obtain a mirror image pair - simply lay both servos down on the table, the output shaft pointing towards each other and both the servo sides with servo cables pointing in the same direction. Now attach the servo arms - square to the servo case side, same on both two servos. Check the operation of aileron servos and secure the arms with screws supplied with the servos.
- Insert the servos into the servo bays and secure them with drops of hot melt glue or MS polymer glue over the servo lugs. Connect the supplied extension cables to the aileron servos. Deploy the servo cable (with the connector put neatly into the bay in the wing) in the aileron servo cable groove. The end of the cable should stick out of the wing by 10 cm (4") to allow inserting the cable into the fuselage. Apply a strip of clear sticky tape over the aileron servo cable grooves.
3. Aileron linkage installation
- Locate the two short piano wire pushrods with pre-formed Z-bend on one end in the accessories bag. Insert the Z-bend into the outer hole in the aileron servo arm. Insert the other end of the push rod into the push rod connector in the aileron arm. Repeat for the other wing half.
- (The position of a push rod in holes of a control arm is a way how to adjust control throws with a non-computer radio. Moving the push rod closer to the control surface gives bigger throws whilst moving the push rod to outer holes reduces the throws. You can also move the position of the push rod Z-bend on the servo arm - in this case, moving the push rod closer to the centre of the servo arm reduces the throws - and vice versa.)
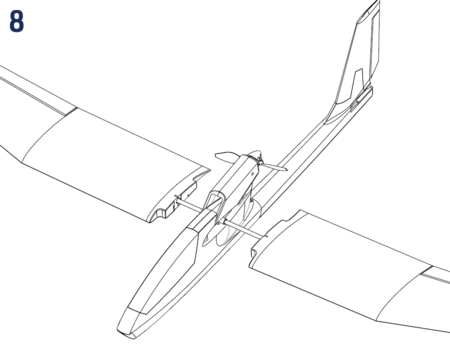
4. Wing joiner (Fig. 8)
- Locate the carbon tube wing joiner, insert it into the housing in the fuselage and slide both wing halves onto the joiner.
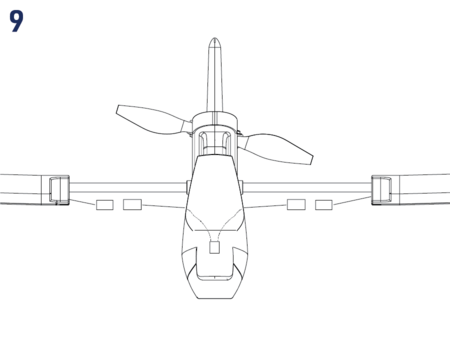
5. Connecting the aileron servos (Fig. 9)
- A. A radio featuring only one aileron channel (like the T8FB supplied in the RTF set): Connect both two aileron servos to a Y-cable (not supplied in the kit). The aileron Y-cable is to be connected to the aileron channel of your receiver (CH1 in the case of T8FB).
- B: A radio featuring 2 independent aileron servo channels: Use two 20–30 cm extension cables (not supplied in the kit) to connect aileron servos to your receiver. Typically, CH1 and CH5 or CH6 – it depends on the transmitter and its setting. Please refer to the instruction manual of your radio.
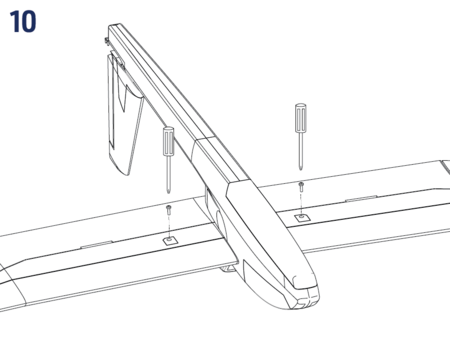
6. Securing the wing
- Secure the wing halves by carefully tightening the M5×10 mm setting screws on the bottom side of the wing. (Fig. 10)
7. Aileron Servo Covers (Fig. 7)
- Once the aileron servo operation and aileron linkage have been set and tested successfully, glue the aileron servo covers in place.
Tail feathers
1. Releasing the elevator and rudder
- Deflect the elevator and rudder 10 times up and down (left and right) carefully to make them move easily.
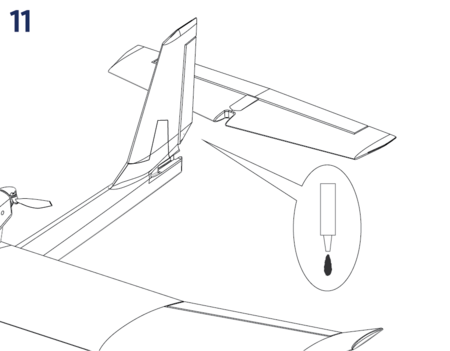
2. Horizontal tailplane installation (Fig. 11+12)
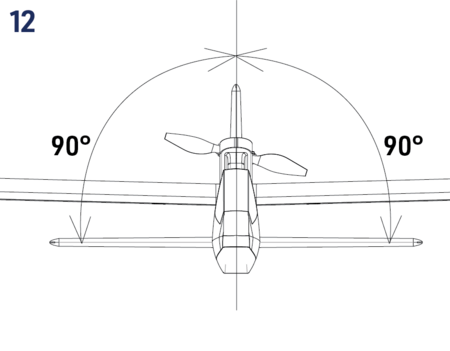
- Glue the horizontal tailplane into the fuselage using medium or thick cyano. Be sure the elevator horn is on the bottom side. Before the glue sets, check the correct alignment of the horizontal tailplane - it has to be square to the fin.
3. Elevator and rudder linkage (Fig. 13)
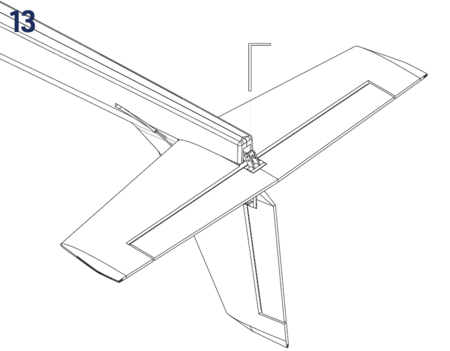
- Insert the elevator and rudder push rods into the push rod connector in the elevator (rudder horn).
Applying the stickers
- Cut the stickers following the printed outlines. Apply them to the surface of your model dampened by water with a few drops of mild dish detergent. It allows re-positioning of the sticker if necessary. Once satisfied with the position, carefully smooth out the sticker with a soft cloth to remove all air bubbles.
RC set installation
Now you have to install/connect your receiver, servos and electronic speed controller (ESC).
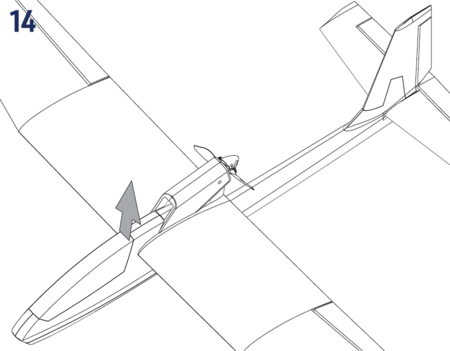
- Remove the canopy: lift the rear part to disengage the magnetic lock.
- Following your radio instruction manual, connect the servos and ESC to your receiver – the table shows the channel assignment of the T8FB radio supplied in the RTF kit.
- Put your receiver into the fuselage (into the rear part of the cockpit). You can secure it using a strip of hook-and-loop tape to the fuselage.
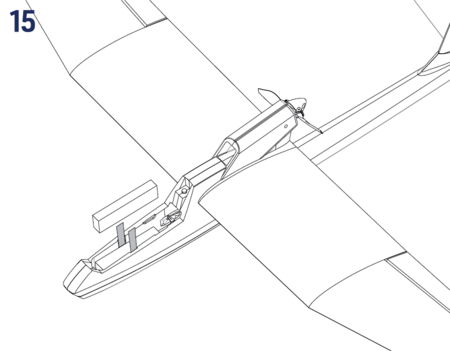
- The flight battery pack is to be inserted into the nose of your BETA 1400 and secured by the hook-and-loop tape to the fuselage - the exact position of the battery pack will be determined later during the centre of gravity (CG) position check.
| Function | Receiver channel (T8FB) |
|---|---|
| Ailerons | CH1 |
| Elevator | CH2 |
| Throttle | CH3 |
| Rudder | CH4 |
Pre-flight check
Checking the current setup
Assure that the transmitter is turned on (both the LEDs are on with the T8FB). Place all the trims in their neutral positions and set the throttle stick into the lowest position. Connect the flight pack to the ESC - the red LED on the receiver must glow. If it blinks or does not glow at all, the receiver and transmitter require establishing their link by the binding procedure - refer to page 6 in this manual.
Checking the control surface neutrals
Please check that all the control surfaces are in the neutral position if the corresponding transmitter sticks and trims are in the centre position. If not, please loosen the setting screw of the corresponding push rod connector and set the control surface to the neutral position. The elevator and rudder have to be flush with the horizontal stabilizer (the fin). Both two ailerons have to be flush with the wing trailing edge. Once satisfied, apply a drop of threadlocker to the setting screw a tighten it.Caution: If the quick link gets loose during flight, your model will become partly or completely uncontrollable. Therefore, you should check the linkage regularly.Testing the ailerons
A. Move the aileron stick to the left; (looking from the tail to the nose) the left aileron must move up and the right aileron must drop down simultaneously.
B. Move the aileron stick to the right; the left aileron must drop down and the right aileron must go up simultaneously.
C. Return the aileron stick to the centre (neutral) - both two ailerons will return to the neutral position.Note: If the ailerons are moving in the opposite direction, you will have to reverse the direction by flipping the aileron reverse switch (AIL) on your transmitter.Testing the rudder
A. Move the rudder stick to the left; (looking from the tail to the nose) the rudder must move to the left.
B. Move the rudder stick to the right; the rudder must move to the right.
C. Return the rudder stick to the centre (neutral) - the rudder will return to the neutral position.Note: If the rudder is moving in the opposite direction, you will have to reverse the direction by flipping the rudder reverse switch (RUD) on your transmitter.Testing the elevator
A. The elevator stick is located on the left side of the Mode 1 transmitter or on the right side of the Mode 2 transmitter. Pull the elevator stick down; the elevator must move up).
B. Push the elevator stick up; the elevator must move down.
C. Return the elevator stick to the centre (neutral) - the elevator will return to the neutral position.Note: If the elevator is moving in the opposite direction, you will have to reverse the direction by flipping the elevator reverse switch (ELE) on your transmitter.- Control surface throws
A. Radio featuring only one aileron channel Control Low rate Normal rate Expo* Aileron 7 mm up and down 10 mm up and down 10–20 % Rudder 10 mm left and right 12 mm left and right 0–10 % Elevator 6 mm up and down 8 mm up and down 20–30 % B. Radio featuring 2 independent aileron servo channels Control Low rate Normal rate Expo* Aileron 8 mm up/4 mm down 10 mm up/5 mm down 10–20 % Aileron (airbrake) 13 mm up 13 mm up – Rudder 10 mm left and right 12 mm left and right 0–10 % Elevator 6 mm up and down 8 mm up and down 20–30 % Elevator (airbrake) 2 mm up 2 mm up – *Expo – set to decrease the sensitivity around the neutral (Futaba, Hitec, Radiolink, Multiplex: -10/-20, Graupner: +10/+20 etc.) If you carefully followed the instructions in the previous sections of this manual, the correct default control surface throws have been set automatically. The control throws are set by the ratio between the length of the servo arm and the control surface throw - the actual throws set this way are listed in the column "Normal rate" in the table below. (The throws are always measured at the widest point of the particular control surface.) It is always better to try to reach the requested throws mechanically, adjusting the arm/horn length ratio - even if you have a fancy computer radio. If you have such a transmitter, you can use the function "Dual rate" (D/R) to get an even more forgiving setup - please refer to the "Low rate" column. You can also do it mechanically - simply move the push rod Z-bends on the servo arms closer to the centre.
- Testing the Power system
KAVAN T8FB/R-20B: Check the throttle channel reverse switch (THR) is in the "N" (up) position on the transmitter. Now perform the throttle range calibration procedure as described in the KAVAN R-20B manual (refer to the attachment) and check the motor brake function has been turned on.
A) Turn on the transmitter, set the throttle stick to the lowest position, and connect the flight pack to the ESC in the model (ESC has to be set to the "Brake OFF" mode - if your ESC features this option). If the prop rotated slowly, please check the position of the throttle stick and throttle trim.
B) Slowly move the throttle stick up, the prop should start to rotate clockwise (looking from behind). If it spins in the opposite direction, pull the throttle stick back, disconnect the flight battery and swap any two of the three cables between the motor and the ESC. The re-check again. Repeat the ESC throttle range calibration. Then re-check again.
Note: If the motor does not respond to the throttle stick advance, check the model power cable connection and the state of charge of your battery.Caution: Keep away from the propeller once the battery is connected to the model. Do not try to stop the propeller with your hands or anything else. - Centre of gravity
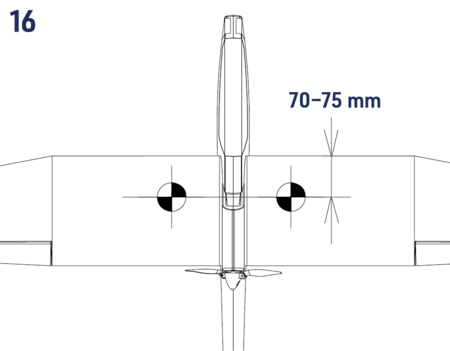
A) The CG has to be located 70–75 mm behind the leading edge of the wing. Balance your BETA 1400 supporting the wing with your fingertips 70 mm behind the leading edge for the first flight.
B) You can fine-tune the CG position later to suit your requirements. Moving the CG forward the model flight will be more stable. Moving backwards, the controls will become more sensitive, also the thermalling performance might improve slightly.Note: Moving back the CG too much could cause your model would be hard to control or even so unstable that you would not be able to control it at all.Now you are ready to fly.
Flying
Choosing the field and weather
Flying Field
The flying field should be a flat grassy area. There should be no cars, persons, animals, buildings, power lines, trees, large stones or any other obstacles that BETA 1400 might collide with within the range of ca 150 m. We highly recommend you join a local model flying club – you will get access to their flying field, along with advice and help to make your first steps into model flying much easier and safer.
Weather
Calm summer evenings are perfect for the maiden flight. Your BETA 1400 is a light thermal glider that is the happiest with wind under 5 m/s. DO NOT fly when it is raining or snowing, on foggy days. Thunderstorms are clearly not the right time to fly either.
Range check
Perform the range check as described in the instruction manual of your radio. Ask a friend to hold the transmitter, and walk away holding the model in a regular flight position at the height of your shoulders. The servos have to respond to control inputs (control stick movements) without any glitching or jitter, with the motor off and at full throttle within the range stated by the radio manufacturer. Only prepare to fly if the range check is 100 % successful.
First flight
Now, the most important advice in this entire manual:
During the first flight, we recommend that you have the support of an experienced RC pilot.
There is no shame in asking for help – new full-size aircraft are test flown by skilled factory test pilots – and only then are regular pilots allowed to take control. RC model control requires some skills and reflexes people are not born with. It is not complicated to gain these skills – it just takes some time. That will vary with your natural talent. Full-size pilots start under the supervision of a skilled instructor; they learn to fly at a safe altitude at first, learn landing and take-off techniques, and only then are they allowed to fly solo. The same principles apply to RC models, too. Please do not expect you will be able to put your model in the air and fly it without any previous RC experience. Many will have gained skills in controlling their favourite computer game character by hammering the control buttons or sticks. For model flying, this skill will have to be unlearnt! The stick movements required to control your model are small & gentle. Many models, including BETA 1400, are happier if you let them "fly by themselves" for most of the time, with small and gentle stick movements to simply guide the model in the required direction. RC flying is not about stick hammering, it is all about small stick movements, and observing the effect of those stick movements. Only later it is possible to anticipate the effect of larger stick movements that can be dangerous to your model in the earlier stages of model flying.
Step 1: Hand launch and initial trimming
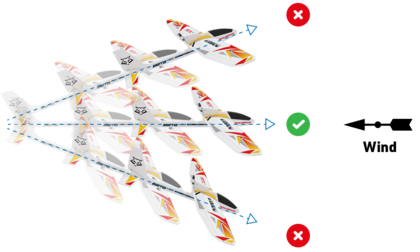
The model must be launched into the wind every time. Throw grass into the air to observe the wind direction.
Turn on your transmitter.
Connect and put the flight pack into the battery compartment and secure the canopy.
Hold your model with the wings and fuselage level (refer to the drawing) – it is better to ask a friend to launch your model than to do everything by yourself – you can then concentrate on the controls.
Give the model full throttle and launch your model with a gentle push straight and level. You will feel the point at which the model is trying to fly naturally. Don't push it too strong. Do not throw your model with the nose up, or greater than 10 degrees down. The model must have a certain minimum speed from the very start to stay airborne. It is not enough to just "put" your model in the air.
Launch the model against the wind.
If everything is OK, BETA 1400 will climb gently. If your BETA 1400 loses altitude, pull the elevator stick very slightly towards you (just a little!) to achieve a steady climb.
Step 2: Flying
Keep your BETA 1400 climbing until she reaches at least 50 m in height, then throttle back the motor enough to maintain the flight level. The real flying fun begins now.
How to control your model?
In contrast to cars or boats, aircraft fly in three-dimensional space making the full control more complex. Turning the steering wheel left or right makes a boat or car turn left or right, applying more throttle the vehicle speeds up – and this is it. Moving the control sticks left or right has more effect than simply turning the model. The aileron and rudder control will be explained later.
Please note that the control is fully proportional – the more you move the stick, the more movement of the control surface. The actual stick movement required is mostly quite small, and rarely from one end stop to the other.
Elevator
The levator controls the model on the vertical axis. Apply the up elevator, and your model’s nose will rise (and the model will climb if it has sufficient power). Apply the up elevator, and your model will descend. Please note that your model can only climb if enough throttle is applied. Your model will not necessarily climb just because you have applied the up elevator and will usually need full power applied for a safe, gentle climb. If the climb angle is too great or the power applied is insufficient, your model will lose flying speed until the minimum (stall) speed. At the stalling speed (when the airflow starts to break away from the upper surface of the wing), your model will start to feel as though it is not responding as normal to control inputs and then drop with little warning – apply the down elevator to regain flying speed and full normal control.
Ailerons
Ailerons control the bank angle. If you gently move the aileron stick to the left, your model will start to bank to the left as long as you are holding the stick. Now, if you return the aileron stick to the centre position (neutral), your model will maintain the bank. If you want to resume a straight flight, move the aileron stick in the opposite direction.
Rudder
The rudder of a model without ailerons (you might be already familiar with) controls the bank angle, which then controls the rate of turn. The natural stability of your model keeps the wings level in normal straight flight. Since your BETA 1400 features "full-house" controls, including ailerons that are the main means to control the bank angle, the use of the rudder is slightly different. You can even start to control your model without using the rudder, but later, you will learn the correct coordinated turn actually requires both aileron and rudder inputs.
Any turn requires an appropriate bank angle – BETA 1400 will fly nice big and safe flat turns with only a small bank angle. During initial flights, never use a bank angle of greater than 45 degrees. By planning the direction that the model will take, normal turns will be made with less than 30 degrees of bank.
Move the rudder to the left a little way, and your model will bank into a gentle turn. Increase the rudder input a little more, and your model will continue turning to the left, but it will also start to descend. This is a good time to move the control stick to the centre to allow your model to recover from the dive!
Why does your model descend when only a rudder is applied?
Once the rudder leaves its exact vertical position, it also starts to behave as an elevator turned down, telling your model to dive. When in a banked turn, to maintain level flight, it is necessary to apply a little up elevator to counter the effect of the down-turned rudder. (Actually, the reason why your model descends in the bank is much more complex - the wing gives less lift in the bank as the vertical projection of the wing is the area that counts, and you also have to beat the inertia that tries to keep your model in the straight flight…) The elevator applied when your model is in a banked turn also works like a rudder - fortunately, it helps to maintain the turn.
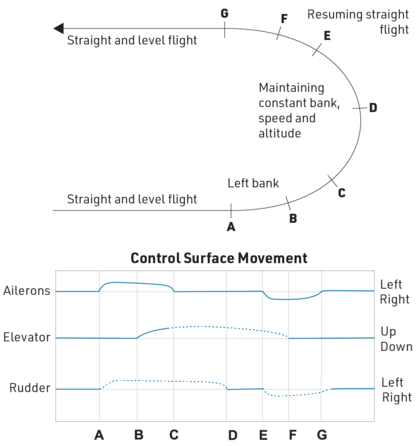
In practice, the ailerons are used to put your model to the desired bank angle. The rudder is used to maintain it. The elevator input helps control the height whilst also increasing the rate of turn.
Alternatively, you can use only the ailerons to bank your model, then turn your model using just the elevator and finally resume the straight and level flight with the opposite deflection of ailerons.
We have got through about 3/4 of the turn and it is the time to think about returning to straight and level flight in the desired direction. Return the controls to the middle position (you may need to correct the turn with little right ailerons and/or rudder). If necessary, give slight elevator input to settle your model into a straight and level flight.
If you take a look at our drawing on the right, you will notice that it takes some time until the model actually starts to turn. And, when leaving the turn, you have to start applying the opposite ailerons and rudder sooner than when the nose of your model is pointing to the desired final direction. The elevator and rudder rates are marked with dotted lines – this is because you cannot tell exactly the track the model will take during a gentle banked turn or entry to a straight and level flight.
Congratulations!
You learnt how to achieve a coordinated turn using the rudder and elevator. Remember that model aircraft control is about guiding your model in the desired direction rather than precise steering. Another complication is the rudder control. It is easy and natural while the model is flying away from you, but when your model is flying towards you, the direction of control commands has to be reversed. A simple trick, when the model is flying towards you, is to move the control stick towards the wing that you want to lift, imagine supporting the wing by moving the stick under that wing – it works!
Appendix
Repairs and maintenance
- Please perform the range check at the beginning of each flying session.
- Before every take-off please check the correct control surface movement.
- After every landing check the plane for any damage, loose push rod connectors or push rods, bent undercarriage, damaged propeller etc. Do not fly again until the damage is repaired.
Although your BETA 1400 is manufactured of the extra tough and virtually unbreakable expanded polyolefin (EPO) foam, damages or broken parts may occur. Minor damage can be repaired simply by glueing the parts together with cyanoacrylate (CA) glue or with clear sticky tape. In case of major damage, it is always better to purchase a brand-new spare part. A wide range of genuine spare parts and accessories is available through the KAVAN dealers.
In the unfortunate event of a crash or heavy landing, no matter how minor or major, you must lower the throttle stick to its lowest position as quickly as possible to prevent damage to the electronic speed controller in the control unit.
Failure to lower the throttle stick and trim to the lowest possible positions in the event of a crash could result in damage to the ESC, which may require replacement of the ESC.
Guarantee
The KAVAN Europe s.r.o. products are covered by a guarantee that fulfils the currently valid legal requirements in your country. If you wish to make a claim under guarantee, please contact the retailer from whom you first purchased the equipment. The guarantee does not cover faults which were caused in the following ways: crashes, improper use, incorrect connection, reversed polarity, maintenance work carried out late, incorrectly or not at all, or by unauthorised personnel, use of other than genuine KAVAN Europe s.r.o. accessories, modifications or repairs which were not carried out by KAVAN Europe s.r.o. or an authorised KAVAN Europe s.r.o., accidental or deliberate damage, defects caused by normal wear and tear, operation outside the Specification, or in conjunction with equipment made by other manufacturers. Please be sure to read the appropriate information sheets in the product documentation.
