
KAVAN Bristell B23 1600mm - Instruction manual
Introduction
Congratulations on your purchase of the semi-scale model of the Bristell B23 two-seat trainer! You are about to start the assembly of a model manufactured from virtually unbreakable EPO (expanded polyolefin) foam, powered by a mighty brushless motor and lightweight LiPo battery. Everybody who has already mastered flying a "full house" trainer – with aileron, elevator, rudder, and throttle control - will enjoy this beautiful semi-scale model.


KAV02.8078 KAVAN Bristell B23 - blue | KAV02.8079 KAVAN Bristell B23 - yellow | KAV02.8081 KAVAN Bristell B23 - white
Bristell B23
In 2009 a renowned Czech aircraft designer Milan Bříštěla together with his son Martin founded the BRM AERO s.r.o.. Their first aeroplane Bristell Classic, an elegant ultra-light low-wing twin-seater with a tricycle undercarriage, turned out to be a stunning success (over 600 sold worldwide). The company has continued to grow and expand their line of products since then.
The latest addition is the Bristell B23, a two-seat all-metal low–wing aeroplane with a composite main undercarriage certified according to the EASA CS–23/U.S. 14 CFR (FAR) Part 23. The "full–size" B23 featuring a modern full–glass cockpit and the latest avionics is a perfect trainer for flying schools as well as a comfortable aeroplane for fun flying and distance travels.
Specification
- Wingspan: 9.274 m
- Length: 6.585 m
- Empty weight: 450 kg
- Max. take-off weight: 750 kg
- Range: 1100 km (125 KTAS)
- Engine: ROTAX® 912S 100 HP
For more info about the aircraft visit: https://www.bristell.com/bristell-b23
Before you start
- If you are not an experienced RC pilot, plan to have a fully competent pilot check your completed model and help you with your first flights. Even though we have tried to provide you with a thorough instruction manual, RC models are rather complicated and an experienced modeller can quickly check over your model to make sure your first flights are successful.
- Please assemble your model exactly according to these instructions. Do not attempt to modify or change your model in any way, as doing so may adversely change its flying characteristics.
- Before you begin, please check the entire contents of this kit to make sure that no parts are missing or damaged. This will also help you to become familiar with each component of your plane. If you find that any of the parts are either missing or damaged, please contact your dealer immediately for replacement.
- Trial fit each part before glueing it in place. Make sure you are using the correct part and that it fits well before assembling. No amount of glue can make up for a poorly fitting part.
- The manual contains a drawing showing the default position of the Centre of Gravity (CG) and recommended control surface throws. Please note it is essential to keep the recommended CG position for the first flight otherwise the model could be unstable, hard to control or even unable to fly at all! Later, you can fine-tune the CG position to suit your flying style and skills.
Precautions
This RC model is not a toy. Use it with care and strictly following the instructions in this manual.
Assemble this model following strictly these instructions. DO NOT modify or alter the model. Failure to do so, the warranty will lapse automatically. Follow the instructions in order to obtain a safe and solid model at the end of the assembly.
Children under the age of 14 must operate the model under the supervision of an adult. Assure that the model is in perfect condition before every flight, taking care that all the equipment works correctly and that the model is undamaged in its structure.
Fly only on days with a light breeze and in a safe place away from any obstacles.
Safety precautions and warnings
- An RC aeroplane is not a toy! If misused, it can cause serious bodily harm and damage to property. Fly only in a safe place and follow all instructions and recommendations in this manual. Beware of the propeller! Keep loose items that can get entangled in the propeller away from the spinning propeller, including loose clothing, or other objects such as pencils and screwdrivers. Ensure that your and other people’s hands and face are kept away from the rotating propeller.
- As the user of this product, you are solely responsible for operating it in a manner that does not endanger yourself and others or result in damage to the product or the property of others. This model is controlled by a radio signal that is subject to interference from many sources outside your control. This interference can cause momentary loss of control, so it is advisable to always keep a safe distance in all directions around your model, as this margin will help to avoid collisions or injury.
- Never operate your model with low transmitter batteries.
- Always operate your model in an open area away from power lines, cars, traffic or people. Avoid operating your model in populated areas where injury or damage can occur.
- Carefully follow the directions and warnings for this and any optional support equipment (chargers, rechargeable batteries, etc.) which you use.
- Keep all chemicals, small parts and anything electrical out of the reach of children.
- Moisture causes damage to electronics. Avoid water exposure to all equipment not specifically designed and protected for this purpose.
- The model is mostly made of plastics – it is not fireproof. It may not be exposed to higher temperatures, otherwise severe distortion of the foam airframe or other damage may occur.
Specification
| Wingspan | 1600 mm |
| Length | 1151 mm |
| Wing area | 36.8 dm² |
| All-up weight | 2100 g |
| Motor | C3548–800 |
| ESC | KAVAN R–50SB SBEC |
| Propeller | 10×6" 3-blade |
Set contents
Almost ready to fly model with the brushless motor, speed controller and servos installed, instruction manual. (Fig. 1a+1b)
You will also need
- At least 6-channel RC set, 14.8 V 2600–3300 mAh LiPo flight pack.
- Regular modeller’s tools: precision knife (KAV66.770), screwdrivers, pliers, No. 10 spanner, sandpaper etc.
- Glue: Medium or thick cyanoacrylate glue (e.g. KAV56.9952 or KAV56.9953), silicone or MS polymer glue.
Model assembly
- Trial the fit of the horizontal and vertical tailplane and the fuselage - no glue yet (Fig. 2+3). Double-check the parts fit tight and the fin is vertical to the horizontal stabilizer (Fig. 4). If necessary, sand the parts to fit.
- Connect the rudder servo to the extension cable in the fuselage (RUDD) and secure the connectors with a piece of heat shrink tube, bind them together with dental floss or secure them with a strip of sticky tape. Apply medium or rather thick cyano (or clear silicone or MS polymer glue) to the contact area of the fin and attach the fin to the fuselage. (Fig. 2)
- Connect the elevator servo to the extension cable in the fuselage (ELEV) and secure the connectors with a piece of heat shrink tube, bind them together with dental floss or secure them with a strip of sticky tape. Apply medium or rather thick cyano (or clear silicone or MS polymer glue) to the contact area of the horizontal tailplane assembly and attach it to the fuselage. (Fig. 3)
- Before the glue sets, double-check the fin is vertical to the horizontal stabilizer. (Fig. 4)
- Slide the wing halves onto the wing tube joiner; arrange the aileron and flap servo cables and the LED light cables onto the upper side of the wing. (Fig. 5)
- Thread the servo and LED light cables into the cockpit and attach the wing to the fuselage. Attach the main undercarriage to the bottom of the wing and secure it together with the wing to the fuselage using two 3.0×40 mm bolts. (Fig. 6)
- Insert the nose gear into the bracket in the fuselage and remove the canopy. Slide the nose gear arm onto the nose gear wire and secure it with an M3.0×10 mm setting screw. (Fig. 7+8+9)
- Attach the propeller to the prop driver and secure it with the propeller nut with a washer. (For your safety, leave the propeller installation after your radio is all connected and set and the correct direction of rotation of your motor has been tested.) Secure the spinner using an M2.5×22 mm bolt in place. (Fig. 10)
- Attach a strip of a hook–and–loop (the loop part, not supplied in the kit) to the bottom of your flight pack and secure it with the hook–and–loop fasteners to the battery seat in the cockpit. (Fig. 11)
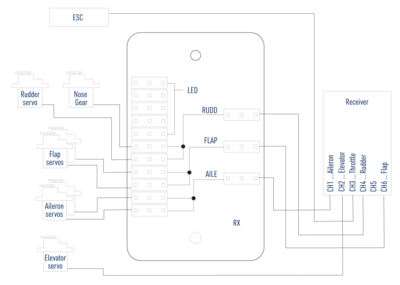
B23 - Receiver connection - Remove the connection board cover and hook up your receiver, servos and ESC following the wiring diagram right. The receiver is to be secured with a strip of double-sided foam tape or hook–and–loop tape to the rear part of the cockpit. Deploy the antennas, so their active parts are square to each other (if you are using a receiver featuring diversity antennas).Note: The kit is supplied with the connection board for ailerons, flaps, rudder and the steerable nose gear, so you can use even the most basic 6-channel radios to control your Bristell B23. If you intend to use independent control of aileron and flap servos and an advanced computer radio, you will have to replace the default Y-cables with four 25–30 cm extension cables.
The LED lights are only powered via the connection board. They are not remotely controlled in any way. - With your radio on, set the servos to the neutral position (sticks and trims centred) and fasten the setting screws of the pushrod connectors on the elevator and rudder servo arms. Perform the throttle range calibration of the ESC as described in the attachment of this manual.
- Attach the canopy.
- Use medium cyano to glue the dummy antennas (Fig. 13) and pitot tube. (Fig. 14)


RC set installation and pre-flight check
- Referring to the instruction manual of your radio, carefully hook up the on-board electronics.
- Once everything has been correctly connected, turn on your transmitter and plug in the flight pack. Check the neutral positions and throws of all control surfaces. If you need to make the control surface throws smaller, simply move the pushrod closer to the centre on the servo arm or move it far from the control surface on the control horn. And vice versa.
| Recommended throws | Low rate | High rate | ||
|---|---|---|---|---|
| Rate | Expo | Rate | Expo | |
| Ailerons | ± 13 mm | 30–40 % | ± 20 mm | 40 % |
| Elevator | ± 13 mm | 30–35 % | ± 20 mm | 35 % |
| Rudder | ± 26 mm | 25–30 % | ± 40 mm | 30 % |
| Flaps | Take–off: -12 mm down / Landing: -30 mm down | |||
- The "Low rate" recommended control surface throws are suitable for a less skilled pilot and regular "scale" flying. The "High rate" setting allows an experienced pilot to explore the full capabilities of this model.
- Check the direction of rotation of the propeller. If it is incorrect, simply swap two of the three wires between the ESC and motor or program the ESC (refer to the ESC manual).
- Check the correct position of the centre of gravity (CG): 75–85 mm behind the leading edge of the wing (Fig. 15). Adjust the CG position by moving the flight pack - if you cannot reach the recommended position, do not hesitate to add an appropriate amount of lead to the nose or tail. An extra couple of grams won’t spoil the flying characteristics - but the incorrect CG position is a killer.
- Fully charge your flight pack and transmitter batteries, check the proper function of your radio and perform the range check of your radio according to its instruction manual. The range has to be almost the same with the motor off and at full throttle (no more than a 10% decrease is acceptable). DO NOT try to fly unless the range check is 100% successful.
Flying
The test flying and fine-tuning is pretty much straightforward. There will be no surprise for a medium-advanced pilot who is supposed to fly this model.
Appendix
KAVAN R-50SB instructions
Please refer to the KAVAN ESCs - Instruction manual.
Recycling and Waste Disposal Note (European Union)

Electrical equipment marked with the crossed-out waste bin symbol must not be discarded in the domestic waste; it should be disposed of via the appropriate specialised disposal system. In the countries of the EU (European Union) electrical devices must not be discarded via the normal domestic waste system (WEEE - Waste of Electrical and Electronic Equipment, Directive 2012/19/EU). You can take your unwanted equipment to your nearest public collection point or recycling centre, where it will be disposed of in the proper manner at no charge to you. By disposing of your old equipment in a responsible manner you make an important contribution to the safeguarding of the environment!
EU Declaration of Conformity (European Union)

Hereby, KAVAN Europe s.r.o. declares that this Bristell B23 model and the included electronic and electric devices are in compliance with the requirements of relevant European directives and harmonized norms. The full text of the Declaration of Conformity is available at www.kavanrc.com/doc/.
Guarantee
The KAVAN Europe s.r.o. products are covered by a guarantee that fulfils the currently valid legal requirements in your country. If you wish to make a claim under guarantee, please contact the retailer from whom you first purchased the equipment. The guarantee does not cover faults which were caused in the following ways: crashes, improper use, incorrect connection, reversed polarity, maintenance work carried out late, incorrectly or not at all, or by unauthorised personnel, use of other than genuine KAVAN Europe s.r.o. accessories, modifications or repairs which were not carried out by KAVAN Europe s.r.o. or an authorised KAVAN Europe s.r.o., accidental or deliberate damage, defects caused by normal wear and tear, operation outside the Specification, or in conjunction with equipment made by other manufacturers. Please be sure to read the appropriate information sheets in the product documentation.