
KAVAN Bristell B23 1600mm - Instruction manual/de: Difference between revisions
Mrs. Kavan (talk | contribs) Created page with "Im Jahr 2009 hat der renommierte tschechische Konstrukteur für Luftfahrt Milan Bříštěla zusammen mit seinem Sohn Martin die Firma BRM AERO s.r.o. gegründet. Ihr allererstes Flugzeug Bristell Classic, der zweisitzige Tiefdecker mit einem Dreibein-Bugfahrwerk der Kategorie Ultralight war ein großer Erfolg (mehr als 600 davon fliegen weltweit) und ermöglichte die Entwicklung und Produktion weiterer Typen." |
Mrs. Kavan (talk | contribs) Created page with "=== Sicherheitsmaßnahmen und Warnungen === '''Dieses RC-Modell ist kein Spielzeug. Benutzen Sie es mit Vorsicht und befolgen Sie die Anweisungen in dieser Anleitung genau.'''" |
||
| Line 44: | Line 44: | ||
=== Bevor Sie beginnen === | === Bevor Sie beginnen === | ||
# Falls Sie kein erfahrener Pilot sind, nehmen Sie die Hilfe eines kompetenten Piloten in Anspruch um ihr zusammengebautes Modell zu überprüfen und bei den Erststarts zu helfen. Obwohl wir Ihnen eine vollständige Anleitung zur Verfügung gestellt haben, so ist ein Modellflugzeug ziemlich kompliziert und ein erfahrener Modellbauer kann schnell ihr Modell überprüfen und somit sicherstellen, dass ihre ersten Flüge erfolgreich werden. | |||
# | # Bevor Sie beginnen prüfen Sie den Inhalt des Bausatzes auf Vollständigkeit und prüfen Sie, dass keine Teile beschädigt sind. Dies hilft auch sich mit den Teilen des Modells vertraut zu machen. Falls Teile fehlen oder beschädigt sind, so wenden Sie sich umgehend an ihren Händler. Berücksichtigen Sie, dass ihr Händler keinen Bausatz zurücknehmen kann bei, dem mit dem Bau bereits begonnen wurde. | ||
# | # Versuchen Sie zuerst die Teile zusammenzufügen bevor Sie sie verkleben. Versichern Sie sich, dass sie die korrekten Teile benutzen und dass sie gut zusammen passen vor dem Zusammenbau. Auch viel Kleber kann schlecht passende Teile nicht zurecht machen. | ||
# Die Anleitung zeigt die Standart Einstellung des Schwerpunktes. (CG) und empfohlene Ruderausschläge. Bitte berücksichtigen Sie, dass es wesentlich ist den empfohlenen Schwerpunkt beizubehalten für die ersten Flüge, ansonsten könnte das Modell unstabil und schwer zu fliegen sein, oder gar nicht fliegen. Sie können den Schwerpunkt später tunen um ihn an ihren Flugstil und ihr Können anzupassen. | |||
# | |||
# | |||
=== Sicherheitsmaßnahmen und Warnungen === | |||
'''Dieses RC-Modell ist kein Spielzeug. Benutzen Sie es mit Vorsicht und befolgen Sie die Anweisungen in dieser Anleitung genau.''' | |||
''' | |||
Sie sich an die Anweisungen in dieser Anleitung. Bauen Sie das Modell gemäß der Anleitung zusammen. Modifizieren und verändern Sie das Modell nicht. Bei Nichteinhaltung erlischt die Garantie. Folgen Sie der Anleitung um ein sicheres und haltbares Modell nach dem Zusammenbau zu erhalten. | |||
Kinder unter 14 Jahren dürfen das Modell nur unter der Aufsicht eines Erwachsenen betreiben. Vergewissern Sie sich vor jedem Flug, dass das Modell in einwandfreiem Zustand ist. Achten Sie darauf, dass die gesamte Ausrüstung korrekt funktioniert und das Modell in seiner Struktur unbeschädigt ist. | |||
Fliegen Sie nur an Tagen mit einer leichten Brise und an einem sicheren Ort, der von Hindernissen entfernt ist. | |||
* Ein ferngesteuertes Modell ist kein Spielzeug! Es kann erhebliche Verletzungen und Sachbeschädigungen anrichten. Fliegen Sie nur an einem sicheren Ort und folgen Sie den Anweisungen und Empfehlungen dieser Anleitung. Bleiben Sie von der Luftschraube weg! Halten Sie lose Teile entfernt von der drehenden Luftschraube, damit sie nicht eingesaugt werden können. Dies schließt lose Kleidung, und andere Sachen wie Kugelschreiber und Schraubendreher mit ein. Gehen Sie sicher, dass ihre und andere Leute Hände und Gesicht vom drehenden Propeller weg sind. | |||
* | * Als Betreiber des Modells sind Sie alleine verantwortlich für die sichere Anwendung, dass weder Sie noch andere verletzt werden, oder das Modell beschädigt wird, oder Schäden an anderen Sachen entstehen. Dieses Modell wird durch eine Funk- Fernsteuerung gelenkt deren Signal durch viele Dinge gestört werden können, die außerhalb Ihrer Kontrolle sind. Diese Störungen können vorübergehenden Verlust der Steuerbarkeit zur Folge haben und es ist deshalb ratsam eine sichere Entfernung in allen Richtungen um ihr Modell herum zu haben um Kollisionen und Verletzungen zu vermeiden. | ||
* | * Betreiben Sie ihr Modell nie mit schwachen Senderbatterien. | ||
* | * Betreiben Sie ihr Modell immer im offenen Gelände entfernt von Stromleitungen, Autos, Verkehr, Menschen. Betreiben Sie ihr Modell nie in bewohnten Gebieten. | ||
* | * Beachten Sie exakt diese Anweisungen und Warnungen. Dies gilt auch für die zusätzliche Ausrüstung, die Sie einsetzen. (Ladegeräte, wieder aufladbare Akkus, usw.) | ||
* | * Halten Sie alle Chemikalien, Kleinteile und jegliche elektrischen Teile außerhalb der Reichweite von Kindern. | ||
* | * Feuchtigkeit verursacht Beschädigungen der Elektronik. Vermeiden Sie Wasser-Kontakt aller Teile, die nicht dafür ausgelegt oder dagegen geschützt sind. | ||
* | * Das Modell ist mehrheitlich aus Kunststoff hergestellt. Es ist nicht feuerfest. Es darf nicht höheren Temperaturen ausgesetzt werden, ansonsten könnten Verformungen oder andere Beschädigungen auftreten. | ||
* | |||
<div lang="en" dir="ltr" class="mw-content-ltr"> | <div lang="en" dir="ltr" class="mw-content-ltr"> | ||
Revision as of 09:23, 6 May 2024
Einführung
Herzlichen Glückwunsch zum Kauf des zweisitzigen Übungs-Flugzeug-Semiscales Bristell B23. Sie sind die Besitzer eines nahezu unzerbrechlichen Schaumstoffmodells aus EPO (extrudiertes Polyolefin) geworden, das mit einem leistungsstarken Brushless-Motor angetrieben wird, der von LiPo-Akkus versorgt wird. Jeder, wer es bereits schafft, mit einem Modell mit Querrudern zu fliegen, wird das Steuern dieses eleganten Semiscale-Modells mit soliden Kunstflugfähigkeiten hundertprozentig genießen!
Bristell B23
| Technische Angaben | |
|---|---|
| Spannweite | 9,274 m |
| Länge | 6,585 m |
| Leergewicht | 450 kg |
| Maximales Startgewicht | 750 kg |
| Reichweite | 1100 km (125 KTAS) |
| Motor | ROTAX® 912S 100 HP |
| Besuchen Sie https://www.pilatus-aircraft.com für weitere Informationen. | |
Im Jahr 2009 hat der renommierte tschechische Konstrukteur für Luftfahrt Milan Bříštěla zusammen mit seinem Sohn Martin die Firma BRM AERO s.r.o. gegründet. Ihr allererstes Flugzeug Bristell Classic, der zweisitzige Tiefdecker mit einem Dreibein-Bugfahrwerk der Kategorie Ultralight war ein großer Erfolg (mehr als 600 davon fliegen weltweit) und ermöglichte die Entwicklung und Produktion weiterer Typen.
Der neueste Zuwachs ist Bristell B23, der zweisitzige Übungstiefdecker mit einer Ganzmetallkonstruktion und einem Komposit-Hauptfahrwerk, der nach EASA CS-23/U.S. 14 CFR (FAR) Part 23 zertifiziert ist. Das echte Flugzeug B23, ausgestattet mit einem modernen Glas-Cockpit und der neuesten Avionik, ist ein ideales Flugzeug für Flugschulen und die Grundausbildung von Piloten, aber auch für Rundflüge und Fliegen zum Spaß.
Bevor Sie beginnen
- Falls Sie kein erfahrener Pilot sind, nehmen Sie die Hilfe eines kompetenten Piloten in Anspruch um ihr zusammengebautes Modell zu überprüfen und bei den Erststarts zu helfen. Obwohl wir Ihnen eine vollständige Anleitung zur Verfügung gestellt haben, so ist ein Modellflugzeug ziemlich kompliziert und ein erfahrener Modellbauer kann schnell ihr Modell überprüfen und somit sicherstellen, dass ihre ersten Flüge erfolgreich werden.
- Bevor Sie beginnen prüfen Sie den Inhalt des Bausatzes auf Vollständigkeit und prüfen Sie, dass keine Teile beschädigt sind. Dies hilft auch sich mit den Teilen des Modells vertraut zu machen. Falls Teile fehlen oder beschädigt sind, so wenden Sie sich umgehend an ihren Händler. Berücksichtigen Sie, dass ihr Händler keinen Bausatz zurücknehmen kann bei, dem mit dem Bau bereits begonnen wurde.
- Versuchen Sie zuerst die Teile zusammenzufügen bevor Sie sie verkleben. Versichern Sie sich, dass sie die korrekten Teile benutzen und dass sie gut zusammen passen vor dem Zusammenbau. Auch viel Kleber kann schlecht passende Teile nicht zurecht machen.
- Die Anleitung zeigt die Standart Einstellung des Schwerpunktes. (CG) und empfohlene Ruderausschläge. Bitte berücksichtigen Sie, dass es wesentlich ist den empfohlenen Schwerpunkt beizubehalten für die ersten Flüge, ansonsten könnte das Modell unstabil und schwer zu fliegen sein, oder gar nicht fliegen. Sie können den Schwerpunkt später tunen um ihn an ihren Flugstil und ihr Können anzupassen.
Sicherheitsmaßnahmen und Warnungen
Dieses RC-Modell ist kein Spielzeug. Benutzen Sie es mit Vorsicht und befolgen Sie die Anweisungen in dieser Anleitung genau.
Sie sich an die Anweisungen in dieser Anleitung. Bauen Sie das Modell gemäß der Anleitung zusammen. Modifizieren und verändern Sie das Modell nicht. Bei Nichteinhaltung erlischt die Garantie. Folgen Sie der Anleitung um ein sicheres und haltbares Modell nach dem Zusammenbau zu erhalten.
Kinder unter 14 Jahren dürfen das Modell nur unter der Aufsicht eines Erwachsenen betreiben. Vergewissern Sie sich vor jedem Flug, dass das Modell in einwandfreiem Zustand ist. Achten Sie darauf, dass die gesamte Ausrüstung korrekt funktioniert und das Modell in seiner Struktur unbeschädigt ist.
Fliegen Sie nur an Tagen mit einer leichten Brise und an einem sicheren Ort, der von Hindernissen entfernt ist.
- Ein ferngesteuertes Modell ist kein Spielzeug! Es kann erhebliche Verletzungen und Sachbeschädigungen anrichten. Fliegen Sie nur an einem sicheren Ort und folgen Sie den Anweisungen und Empfehlungen dieser Anleitung. Bleiben Sie von der Luftschraube weg! Halten Sie lose Teile entfernt von der drehenden Luftschraube, damit sie nicht eingesaugt werden können. Dies schließt lose Kleidung, und andere Sachen wie Kugelschreiber und Schraubendreher mit ein. Gehen Sie sicher, dass ihre und andere Leute Hände und Gesicht vom drehenden Propeller weg sind.
- Als Betreiber des Modells sind Sie alleine verantwortlich für die sichere Anwendung, dass weder Sie noch andere verletzt werden, oder das Modell beschädigt wird, oder Schäden an anderen Sachen entstehen. Dieses Modell wird durch eine Funk- Fernsteuerung gelenkt deren Signal durch viele Dinge gestört werden können, die außerhalb Ihrer Kontrolle sind. Diese Störungen können vorübergehenden Verlust der Steuerbarkeit zur Folge haben und es ist deshalb ratsam eine sichere Entfernung in allen Richtungen um ihr Modell herum zu haben um Kollisionen und Verletzungen zu vermeiden.
- Betreiben Sie ihr Modell nie mit schwachen Senderbatterien.
- Betreiben Sie ihr Modell immer im offenen Gelände entfernt von Stromleitungen, Autos, Verkehr, Menschen. Betreiben Sie ihr Modell nie in bewohnten Gebieten.
- Beachten Sie exakt diese Anweisungen und Warnungen. Dies gilt auch für die zusätzliche Ausrüstung, die Sie einsetzen. (Ladegeräte, wieder aufladbare Akkus, usw.)
- Halten Sie alle Chemikalien, Kleinteile und jegliche elektrischen Teile außerhalb der Reichweite von Kindern.
- Feuchtigkeit verursacht Beschädigungen der Elektronik. Vermeiden Sie Wasser-Kontakt aller Teile, die nicht dafür ausgelegt oder dagegen geschützt sind.
- Das Modell ist mehrheitlich aus Kunststoff hergestellt. Es ist nicht feuerfest. Es darf nicht höheren Temperaturen ausgesetzt werden, ansonsten könnten Verformungen oder andere Beschädigungen auftreten.
Specification
| Wingspan | 1600 mm |
| Length | 1151 mm |
| Wing area | 36,8 dm² |
| All-up weight | 2100 g |
| Motor | C3548–800 |
| ESC | KAVAN R–50SB SBEC |
| Propeller | 10×6" 3–blade |
Set contents
Almost ready to fly model with the brushless motor, speed controller and servos installed, instruction manual. (Fig. 1a+1b)
You will also need
- At least 6-channel RC set, 14.8 V 2600–3300 mAh LiPo flight pack.
- Regular modeller’s tools: modeller’s knife (KAV66.770), screwdrivers, pliers, No. 10 spanner, sandpaper etc.
- Glue: Medium or thick cyanoacrylate glue (e.g. KAV56.9952 or KAV56.9953), silicone or MS polymer glue.
Model assembly
- Trial the fit of the horizontal and vertical tailplane and the fuselage - no glue yet (Fig. 2+3). Double-check the parts fit tight and the fin is vertical to the horizontal stabilizer (Fig. 4). If necessary, sand the parts to fit.
- Connect the rudder servo to the extension cable in the fuselage (RUDD) and secure the connectors with a piece of heat shrink tube, bind them together with dental floss or secure them with a strip of sticky tape. Apply medium or rather thick cyano (or clear silicone or MS polymer glue) to the contact area of the fin and attach the fin to the fuselage. (Fig. 2)
- Connect the elevator servo to the extension cable in the fuselage (ELEV) and secure the connectors with a piece of heat shrink tube, bind them together with dental floss or secure them with a strip of sticky tape. Apply medium or rather thick cyano (or clear silicone or MS polymer glue) to the contact area of the horizontal tailplane assembly and attach it to the fuselage. (Fig. 3)
- Before the glue sets, double-check the fin is vertical to the horizontal stabilizer. (Fig. 4)
- Slide the wing halves onto the wing tube joiner; arrange the aileron and flap servo cables and the LED light cables onto the upper side of the wing. (Fig. 5)
- Thread the servo and LED light cables into the cockpit and attach the wing to the fuselage. Attach the main undercarriage to the bottom of the wing and secure it together with the wing to the fuselage using two 3.0x40 mm bolts. (Fig. 6)
- Insert the nose gear into the bracket in the fuselage and remove the canopy. Slide the nose gear arm onto the nose gear wire and secure it with an M3.0×10 mm setting screw. (Fig. 7+8+9)
- Attach the propeller to the prop driver and secure it with the propeller nut with a washer. (For your safety, leave the propeller installation after your radio is all connected and set and the correct direction of rotation of your motor has been tested.) Secure the spinner using an M2.5×22 mm bolt in place. (Fig. 10)
- Attach a strip of a hook–and–loop (the loop part, not supplied in the kit) to the bottom of your flight pack and secure it with the hook–and–loop fasteners to the battery seat in the cockpit. (Fig. 11)
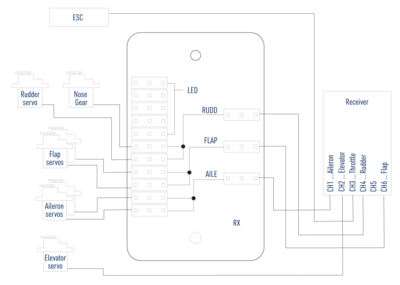
B23 - Receiver connection - Remove the connection board cover and hook up your receiver, servos and ESC following the wiring diagram right. The receiver is to be secured with a strip of double-sided foam tape or hook–and–loop tape to the rear part of the cockpit. Deploy the antennas, so their active parts are square to each other (if you are using a receiver featuring diversity antennas).Note: The kit is supplied with the connection board for ailerons, flaps, rudder and the steerable nose gear, so you can use even the most basic 6-channel radios to control your Bristell B23. If you intend to use independent control of aileron and flap servos and an advanced computer radio, you will have to replace the default Y-cables with four 25–30 cm extension cables.
The LED lights are only powered via the connection board. They are not remotely controlled in any way. - With your radio on, set the servos to the neutral position (sticks and trims centred) and fasten the setting screws of the pushrod connectors on the elevator and rudder servo arms. Perform the throttle range calibration of the ESC as described in the attachment of this manual.
- Attach the canopy.
- Use medium cyano to glue the dummy antennas (Fig. 13) and pitot tube. (Fig. 14)

RC set installation and pre-flight check
- Referring to the instruction manual of your radio, carefully hook up the on-board electronics.
- Once everything has been correctly connected, turn on your transmitter and plug in the flight pack. Check the neutral positions and throws of all control surfaces. If you need to make the control surface throws smaller, simply move the pushrod closer to the centre on the servo arm or move it far from the control surface on the control horn. And vice versa.
| Recommended throws | Low rate | High rate | ||
|---|---|---|---|---|
| Rate | Expo | Rate | Expo | |
| Ailerons | ± 13 mm | 30–40 % | ± 20 mm | 40 % |
| Elevator | ± 13 mm | 30–35 % | ± 20 mm | 35 % |
| Rudder | ± 26 mm | 25–30 % | ± 40 mm | 30 % |
| Flaps | Take–off: -12 mm down / Landing: -30 mm down | |||
- The "Low rate" recommended control surface throws are suitable for a less skilled pilot and regular "scale" flying. The "High rate" setting allows an experienced pilot to explore the full capabilities of this model.
- Check the direction of rotation of the propeller. If it is incorrect, simply swap two of the three wires between the ESC and motor or program the ESC (refer to the ESC manual).
- Check the correct position of the centre of gravity (CG): 75–85 mm behind the leading edge of the wing (Fig. 15). Adjust the CG position by moving the flight pack - if you cannot reach the recommended position, do not hesitate to add an appropriate amount of lead to the nose or tail. An extra couple of grams won’t spoil the flying characteristics - but the incorrect CG position is a killer.
- Fully charge your flight pack and transmitter batteries, check the proper function of your radio and perform the range check of your radio according to its instruction manual. The range has to be almost the same with the motor off and at full throttle (no more than a 10% decrease is acceptable). DO NOT try to fly unless the range check is 100% successful.
Flying
The test flying and fine-tuning is pretty much straightforward. There will be no surprise for a medium-advanced pilot who is supposed to fly this model.
Appendix
KAVAN R-50SB instructions
Please refer to the KAVAN ESCs - Instruction manual.
Recycling and Waste Disposal Note (European Union)

Electrical equipment marked with the crossed-out waste bin symbol must not be discarded in the domestic waste; it should be disposed of via the appropriate specialised disposal system. In the countries of the EU (European Union) electrical devices must not be discarded via the normal domestic waste system (WEEE - Waste of Electrical and Electronic Equipment, Directive 2012/19/EU). You can take your unwanted equipment to your nearest public collection point or recycling centre, where it will be disposed of in the proper manner at no charge to you. By disposing of your old equipment in a responsible manner you make an important contribution to the safeguarding of the environment!
EU Declaration of Conformity (European Union)

Hereby, KAVAN Europe s.r.o. declares that this Bristell B23 model and the included electronic and electric devices are in compliance with the requirements of relevant European directives and harmonized norms. The full text of the Declaration of Conformity is available at www.kavanrc.com/doc/.
Guarantee
The KAVAN Europe s.r.o. products are covered by a guarantee that fulfils the currently valid legal requirements in your country. If you wish to make a claim under guarantee, please contact the retailer from whom you first purchased the equipment. The guarantee does not cover faults which were caused in the following ways: crashes, improper use, incorrect connection, reversed polarity, maintenance work carried out late, incorrectly or not at all, or by unauthorised personnel, use of other than genuine KAVAN Europe s.r.o. accessories, modifications or repairs which were not carried out by KAVAN Europe s.r.o. or an authorised KAVAN Europe s.r.o., accidental or deliberate damage, defects caused by normal wear and tear, operation outside the Specification, or in conjunction with equipment made by other manufacturers. Please be sure to read the appropriate information sheets in the product documentation.