FrSky VANTAC RF007 - Instruction manual: Difference between revisions
No edit summary |
Mrs. Kavan (talk | contribs) |
||
| (17 intermediate revisions by 2 users not shown) | |||
| Line 11: | Line 11: | ||
Thanks to the telemetry connectivity, Rotorflight offers highly intuitive and integrated Lua-based configuration tools to run on ETHOS transmitters. Users can use these tools to tune and change PID settings, servo trims, rates, mixing/geometry, filter settings, and most other Rotorflight settings quickly and easily right from the radio screen. On supported ESCs, the ESC settings can also be configured with the configuration tool. | Thanks to the telemetry connectivity, Rotorflight offers highly intuitive and integrated Lua-based configuration tools to run on ETHOS transmitters. Users can use these tools to tune and change PID settings, servo trims, rates, mixing/geometry, filter settings, and most other Rotorflight settings quickly and easily right from the radio screen. On supported ESCs, the ESC settings can also be configured with the configuration tool. | ||
To download the configuration tool(s), visit: | |||
[[File:VANTACRF007 - Step 01.png|border|700px]] | |||
Rotorflight Lua Script (Text-based, non-touchscreen) https://github.com/rotorflight/rotorflight-lua-ethos/releases | |||
Rotorflight Lua Script (Text-based, non-touchscreen) https://github.com/rotorflight/rotorflight-lua-ethos/releases | |||
[[File:VANTACRF007 - Step 02.png|border|700px]] | |||
Rotorflight Lua Suite (Forms based, touchscreen support) https://github.com/rotorflight/rotorflight-lua-ethos-suite/releases | |||
Rotorflight Lua Suite (Forms based, touchscreen support) https://github.com/rotorflight/rotorflight-lua-ethos-suite/releases | |||
[[File:VANTACRF007 - Step 03.png|border|700px]] | |||
=== Technical specifications === | === Technical specifications === | ||
| Line 39: | Line 38: | ||
|- | |- | ||
|'''Built-in receiver''' | |'''Built-in receiver''' | ||
| | |'''RF007 ARCHER+''': 2.4G Archer Plus RS / '''RF007 TWIN''': Dual 2.4G TW R6 | ||
'''RF007 ARCHER+''': 2.4G Archer Plus RS / '''RF007 TWIN''': Dual 2.4G TW R6 | |||
|- | |- | ||
|'''Operating voltage''' | |'''Operating voltage''' | ||
| Line 93: | Line 91: | ||
* 128MB black box function for tuning/troubleshooting | * 128MB black box function for tuning/troubleshooting | ||
* 9 primary main header pins for flexibility and power distribution | * 9 primary main header pins for flexibility and power distribution | ||
* Multiple JST-GH expansion ports for UART/I2C devices | |||
* JST-GH port for VBAT sensing input Up to 80 V | |||
* Capable of multiple ESC protocols (PWM, Dshot, Oneshot, Multishot) | |||
* Capable of multiple receiver protocols and telemetry | |||
* Supports tail motor or tail ESC | |||
* Supports integrated configuration and setup with ETHOS Lua scripts | |||
=== How to access RF007 configuration by Rotorflight Lua on ETHOS radios === | |||
Preparation: Ensure that the ETHOS system and Rotorflight Lua tools are always updated to the latest version. | |||
[[File:VANTACRF007 - Step 04.png|border|700px]] | |||
Bind the built-in receiver of the RF007 to your transmitter and ensure the Telemetry port is set to FBUS mode. | |||
[[File:VANTACRF007 - Step 05.png|border|700px]] | |||
Download the latest Release version .zip file of the Rotorflight Lua scripts. There are two versions available. The text-based version is a simplified system similar to other integration tools with more dense information, whereas the touchscreen version “Suite” is a more user friendly tool based on the Lua Forms system and offers some additional features. | |||
Rotorflight Lua Script (Text-Based, Non-Touchscreen) <nowiki>https://github.com/rotorflight/rotorflight-lua-ethos/rele</nowiki> ases | |||
Rotorflight Lua Suite (Touchscreen Supported) <nowiki>https://github.com/rotorflight/rotorflight-lua-ethos-suit</nowiki> e/releases | |||
[[File:VANTACRF007 - Step 06.png|border|700px]] | |||
Use Ethos Suite to Install the downloaded .zip file. | |||
[[File:VANTACRF007 - Step 07.png|border|700px]] | |||
Or extract the downloaded Lua files, and place the extracted folder into the Scripts folder of the ETHOS transmitter. | |||
[[File:VANTACRF007 - Step 08.png|border|700px]] | |||
Go to the Lua Tasks menu on the ETHOS transmitter. | |||
[[File:VANTACRF007 - Step 09.png|border|700px]] | |||
Set the installed functions to On under Lua Tasks bar. | |||
[[File:VANTACRF007 - Step 10.png|border|700px]] | |||
Before opening the configuration tools, ensure you have powered the system and Discovered telemetry sensors. | |||
[[File:VANTACRF007 - Step 11.png|border|700px]] | |||
Go to the System menu and access the Rotorflight Lua scripts. | |||
[[File:VANTACRF007 - Step 12.png|border|700px]] | |||
Text-Based Tool. | |||
[[File:VANTACRF007 - Step 13.png|border|700px]] | |||
Touchscreen Tool (RF Suite). | |||
=== How to Flash/Update the FC Firmware === | |||
To update, modify, or reinstall the FC firmware, please follow the detailed instructions on the Rotorflight Wiki: https://www.rotorflight.org/docs/setup/flashing-the-firmware. | |||
[[File:VANTACRF007 - Step 14.png|border|700px]] | |||
Install Rotorflight Configurator: Start by downloading and installing the latest Rotorflight Configurator release download (<nowiki>https://github.com/rotorflight/</nowiki> rotorflight-configurator/releases). This walk-through uses Windows, but it should also work on Linux or macOS. | |||
[[File:VANTACRF007 - Step 15.png|border|700px]] | |||
Install Drivers: On Windows, install the STM USB VCP Drivers from the links on the Rotorflight Configurator page. | |||
{{Note|'''Note.:''' If there are issues connecting to the flight controller please download the ImpulseRC Driver Fixer. (https://impulserc.com/pages/downloads)|type=info}} | |||
[[File:VANTACRF007 - Step 16.png|border|700px]] | |||
Flash Firmware to FC: Connect the FC to your computer with an USB data cable. | |||
Now you are ready to install the Rotorflight firmware to your FC. | |||
Open the Rotorflight configurator and click on Update Firmware. | |||
[[File:VANTACRF007 - Step 17.png|border|700px]] | |||
* Choose All release and Snapshots from the dropdown. (Note: Snapshots are for development and testing purposes. They may contain bugs!! Rotorflight recommends using snapshot firmware with care and to assist the project with testing. Choose "Releases" if you would rather use the latest stable firmware) | |||
* Select the Target you identified in Step 1. You can also click on the "Detect" button to auto detect the target. | |||
* Select Full chip erase, this will remove all previous configurations. | |||
* Click on Load firmware[online] | |||
{{Note|'''Note.:''' If you get the Fail to load remote firmware notice in this process, please try to have the VANTAC RF007 enter into DFU mode by holding the FC Boot button with repowering it then. Or visit the detailed instructions of the Troubleshooting section. https://www.rotorflight.org/docs/setup/flashing-the-firmware#troubleshooting|type=info}} | |||
[[File:VANTACRF007 - Step 18.png|border|700px]] | |||
* Check and confirm the target board is correct. | |||
* Click on Flash Firmware. | |||
[[File:VANTACRF007 - Step 19.png|border|700px]] | |||
* When the programming is successful click on Connect. | |||
Latest revision as of 13:36, 27 March 2025
Introduction[edit | edit source]
The FrSky VANTAC RF007 is a cutting-edge flybarless (FBL) helicopter flight controller, designed to leverage Rotorflight's latest 2.x flight control technology. With its built-in Twin 2.4GHz or Archer receiver, RF007 delivers a comprehensive range of features while providing intuitive configuration, seamless adjustments, and real-time tuning via the ETHOS radio interface.
Rotorflight Technology & Comprehensive Capabilities[edit | edit source]
At the core of RF007 is an STM32F722 MCU processor, supported by a 3-axis gyroscope, a 3-axis accelerometer, and a barometer sensor. Together, these components provide the precision and stability needed for pilots to feel confident with their machines. Additionally, the flight controller supports flight data logging with a large 128MB black box, allowing users to tune and troubleshoot issues with plenty of data at their disposal.
Internal FrSky Receiver & External Receiver Support[edit | edit source]
The RF007 features a built-in FrSky receiver that can directly bind with KAVAN or FrSky transmitters, eliminating the need for an external receiver. The RF007 Archer+ version comes with a built-in 2.4GHz Archer Plus RS receiver operating in ACCESS or ACCST V2 mode. The RF007 TWIN features a built-in dual 2.4GHz TW R6 receiver operating in TW mode. The RF007 TANDEM offers a further long-range capability due to its inside dual-band 2.4GHz&900MHz TD receiver. The internal receiver is interfaced over UART with FBUS operation. For users with other requirements, a receiver can also be connected via the main header or one of the expansion ports. Rotorflight supports a wide range of receiver signal protocols. For a complete list of supported protocols, users can refer to the Rotorflight Configurator tool or visit https://rotorflight.org
Field Programming/Tuning with ETHOS Lua[edit | edit source]
Thanks to the telemetry connectivity, Rotorflight offers highly intuitive and integrated Lua-based configuration tools to run on ETHOS transmitters. Users can use these tools to tune and change PID settings, servo trims, rates, mixing/geometry, filter settings, and most other Rotorflight settings quickly and easily right from the radio screen. On supported ESCs, the ESC settings can also be configured with the configuration tool.
To download the configuration tool(s), visit:
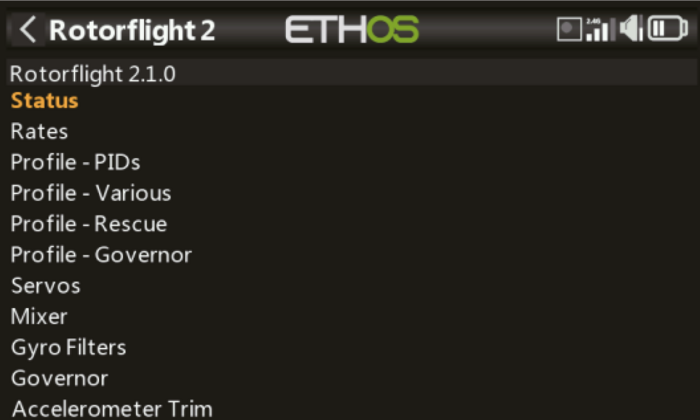 Rotorflight Lua Script (Text-based, non-touchscreen) https://github.com/rotorflight/rotorflight-lua-ethos/releases
Rotorflight Lua Script (Text-based, non-touchscreen) https://github.com/rotorflight/rotorflight-lua-ethos/releases
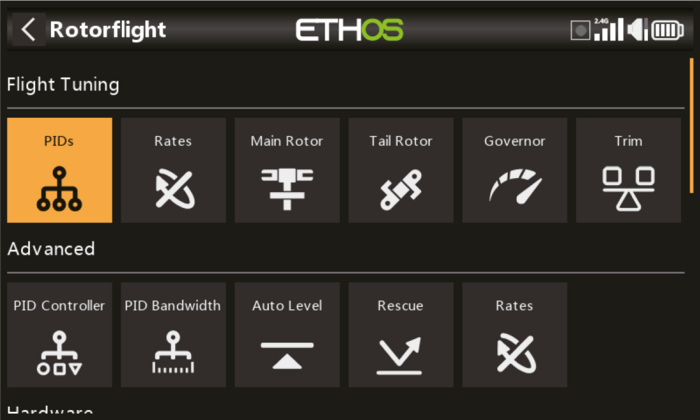 Rotorflight Lua Suite (Forms based, touchscreen support) https://github.com/rotorflight/rotorflight-lua-ethos-suite/releases
Rotorflight Lua Suite (Forms based, touchscreen support) https://github.com/rotorflight/rotorflight-lua-ethos-suite/releases
Technical specifications[edit | edit source]
| Firmware | Rotorflight 2.x |
| Dimensions | 43.5×31.2×13.7 mm |
| Weight | 25.2 g |
| Built-in receiver | RF007 ARCHER+: 2.4G Archer Plus RS / RF007 TWIN: Dual 2.4G TW R6 |
| Operating voltage | 5–16 V |
| Operating current | 125 mA @ 5 V |
| Operating frequency | 2.400–2.4835 GHz |
| Max. radiated power | < 20 dBm |
| Voltage measurement range via AIN (external device) | 0–80 V |
| MCU | STM32F722RET6 |
| Gyroscope (IMU) | ICM-42688P |
| Barometer | SPL06-001 |
| Black box flash | 128 MB |
| MCU | STM32F722RET6 |
| Servo ports | Servo 1, Servo 2, Servo 3, Tail |
| ESC ports | ESC (throttle), RPM (sensor), TLM (ESC telemetry or other functions) |
| Other ports | AUX and SBUS Out/In |
| Expansion ports | Port A, C, and RxUG |
Features[edit | edit source]
- Runs Rotorflight 2.x helicopter control software
- Built-in FrSky FBUS-capable receiver (AP,TW, or TD protocol)
- Robust CNC aluminium case, functional heatsink for MCU
- STM32F722 microcontroller for power and flexibility
- Precision barometer, 3-axis gyroscope and 3-axis accelerometer
- 128MB black box function for tuning/troubleshooting
- 9 primary main header pins for flexibility and power distribution
- Multiple JST-GH expansion ports for UART/I2C devices
- JST-GH port for VBAT sensing input Up to 80 V
- Capable of multiple ESC protocols (PWM, Dshot, Oneshot, Multishot)
- Capable of multiple receiver protocols and telemetry
- Supports tail motor or tail ESC
- Supports integrated configuration and setup with ETHOS Lua scripts
How to access RF007 configuration by Rotorflight Lua on ETHOS radios[edit | edit source]
Preparation: Ensure that the ETHOS system and Rotorflight Lua tools are always updated to the latest version.
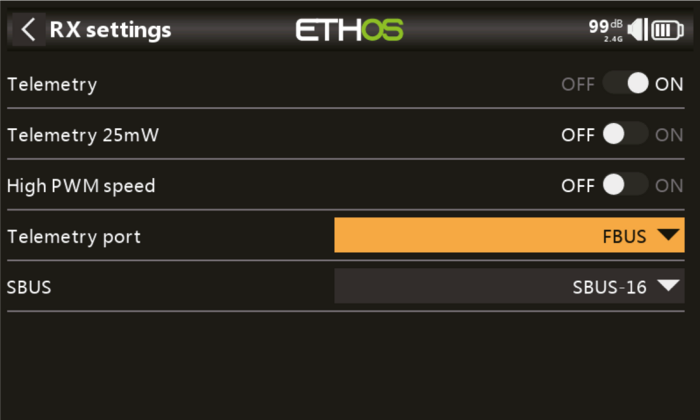
Bind the built-in receiver of the RF007 to your transmitter and ensure the Telemetry port is set to FBUS mode.
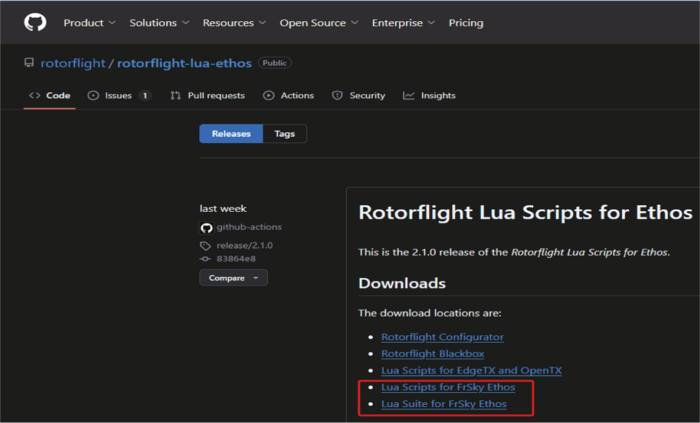
Download the latest Release version .zip file of the Rotorflight Lua scripts. There are two versions available. The text-based version is a simplified system similar to other integration tools with more dense information, whereas the touchscreen version “Suite” is a more user friendly tool based on the Lua Forms system and offers some additional features.
Rotorflight Lua Script (Text-Based, Non-Touchscreen) https://github.com/rotorflight/rotorflight-lua-ethos/rele ases
Rotorflight Lua Suite (Touchscreen Supported) https://github.com/rotorflight/rotorflight-lua-ethos-suit e/releases
Use Ethos Suite to Install the downloaded .zip file.
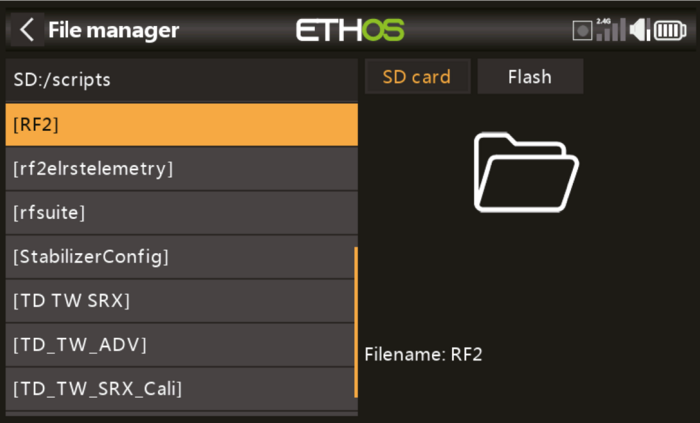
Or extract the downloaded Lua files, and place the extracted folder into the Scripts folder of the ETHOS transmitter.
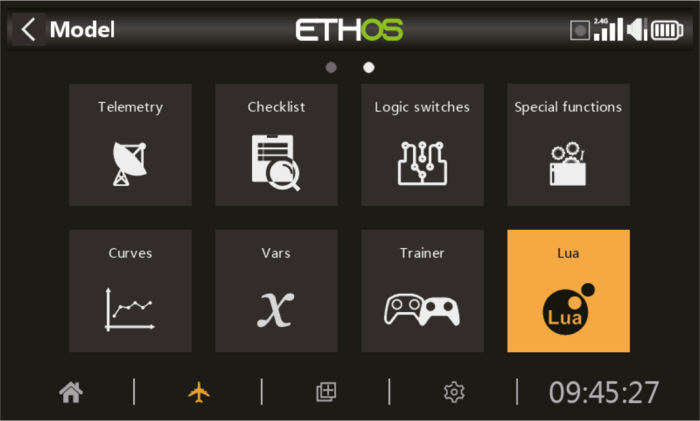
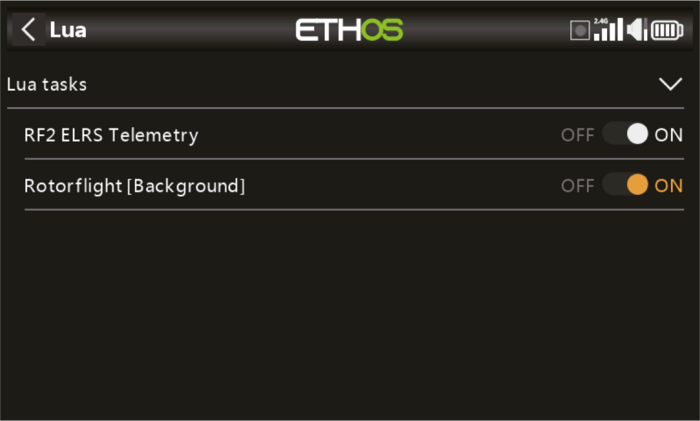
Go to the Lua Tasks menu on the ETHOS transmitter.
Set the installed functions to On under Lua Tasks bar.
Before opening the configuration tools, ensure you have powered the system and Discovered telemetry sensors.
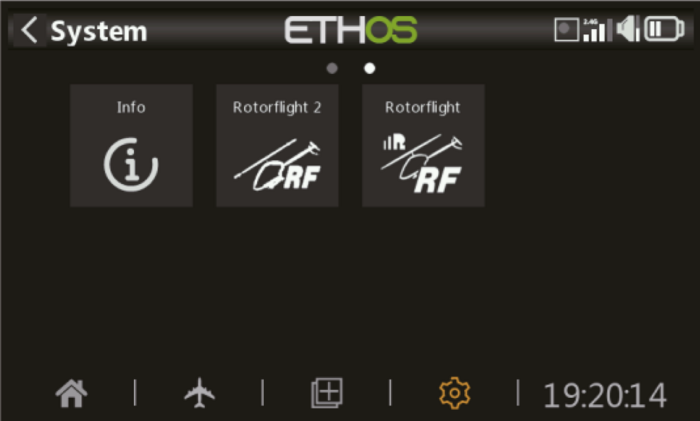
Go to the System menu and access the Rotorflight Lua scripts.
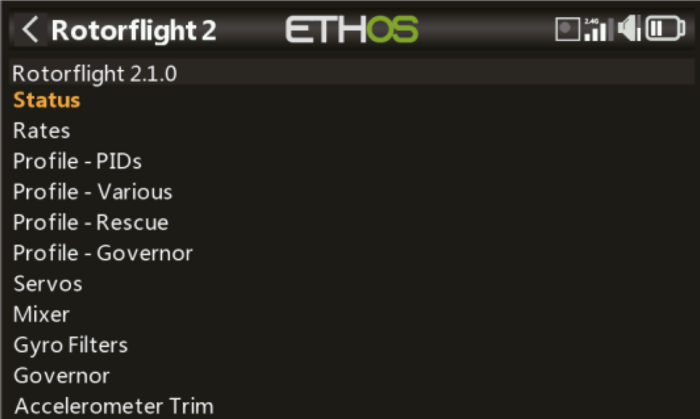
Text-Based Tool.
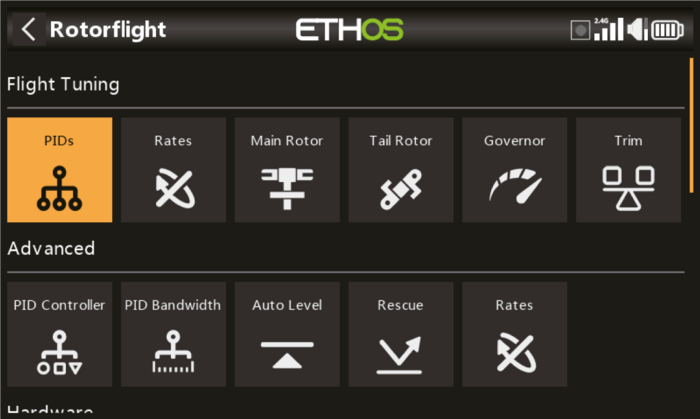
Touchscreen Tool (RF Suite).
How to Flash/Update the FC Firmware[edit | edit source]
To update, modify, or reinstall the FC firmware, please follow the detailed instructions on the Rotorflight Wiki: https://www.rotorflight.org/docs/setup/flashing-the-firmware.
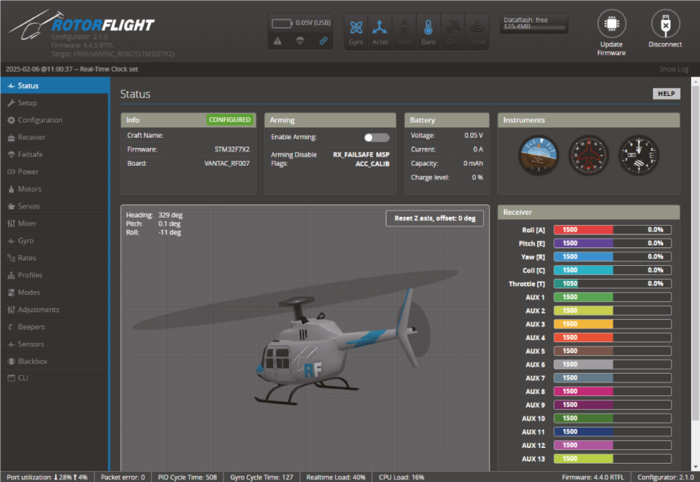
Install Rotorflight Configurator: Start by downloading and installing the latest Rotorflight Configurator release download (https://github.com/rotorflight/ rotorflight-configurator/releases). This walk-through uses Windows, but it should also work on Linux or macOS.
Install Drivers: On Windows, install the STM USB VCP Drivers from the links on the Rotorflight Configurator page.
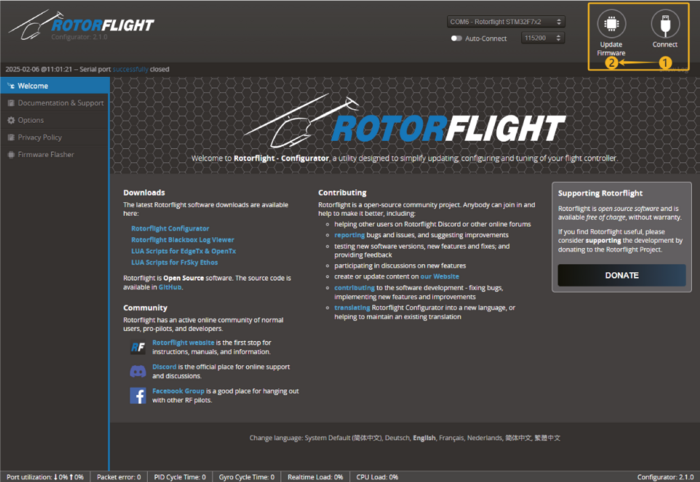
Flash Firmware to FC: Connect the FC to your computer with an USB data cable.
Now you are ready to install the Rotorflight firmware to your FC.
Open the Rotorflight configurator and click on Update Firmware.
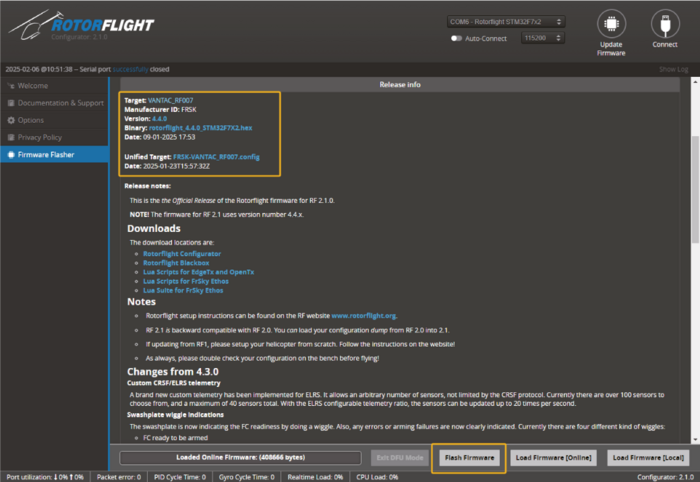
- Choose All release and Snapshots from the dropdown. (Note: Snapshots are for development and testing purposes. They may contain bugs!! Rotorflight recommends using snapshot firmware with care and to assist the project with testing. Choose "Releases" if you would rather use the latest stable firmware)
- Select the Target you identified in Step 1. You can also click on the "Detect" button to auto detect the target.
- Select Full chip erase, this will remove all previous configurations.
- Click on Load firmware[online]
- Check and confirm the target board is correct.
- Click on Flash Firmware.
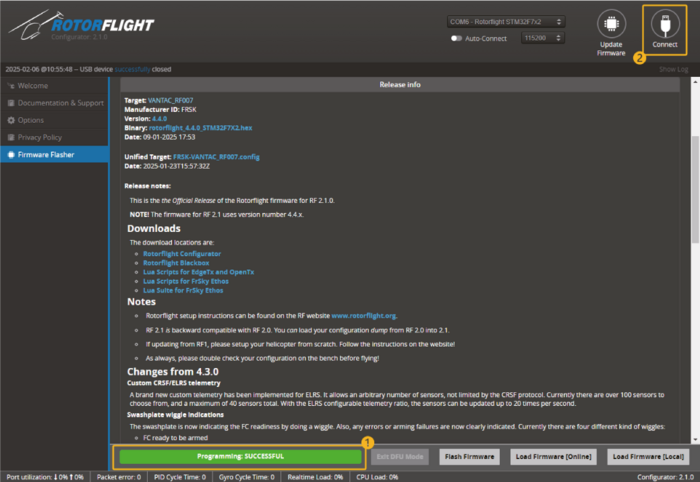
- When the programming is successful click on Connect.

