KAVAN Bristell B23 1600mm - Návod na stavbu
Úvod
Blahoželáme vám k zakúpeniu polomakety dvojmiestného cvičného lietadla Bristell B23. Stali ste sa majiteľmi modelu s konštrukciou z takmer nerozbitného penového EPO (extrudovaný polyolefín) poháňaného výkonným striedavým motorom napájaným z LiPo akumulátorov. Každý, kto už zvláda lietanie s modelom s krídelkami, si stopercentne užije pilotáž tejto elegantnej polomakety so solidnými akrobatickými schopnosťami!


KAV02.8078 KAVAN Bristell B23 - modrá | KAV02.8079 KAVAN Bristell B23 - žltá | KAV02.8081 KAVAN Bristell B23 - biela
Bristell B23
| Specification | |
|---|---|
| Rozpätie | 9,274 m |
| Dľžka | 6,585 m |
| Prázdna hmotnosť | 450 kg |
| Maximálna vzletová hmotnosť | 750 kg |
| Dolet | 1100 km (125 KTAS) |
| Motor | ROTAX® 912S 100 HP |
| Viac informácií nájdete na stránke https://www.bristell.com/bristell-b23. | |
V roku 2009 renomovaný letecký konštruktér Milan Bříštěla spolu so svojim synom Martinom založili firmu BRM AERO s.r.o. Hneď ich prvý stroj Bristell Classic, dvojmiestny dolnoplošník s trojkolesovým predným podvozkom kategórie ultra-light zaznamenal obrovský úspech (po celom svete ich lieta viac ako 600) a umožnil pokračovať vo vývoji a výrobe ďalších typov.
Najnovším prírastkom je Bristell B23, cvičný dvojmiestny dolnoplošník celokovovej konštrukcie s kompozitovým hlavným podvozkom certifikovaný podľa požiadaviek EASA CS-23/U.S. 14 CFR (FAR) Part 23. „Dospelý“ B23 vybavený moderným „skleneným“ kokpitom a najnovšou avionikou je ideálne lietadlo pre letecké školy a výcvik základnej pilotáže, rovnako ako pre leteckú turistiku a lietanie pre zábavu.
Skôr ako začnete
- Ak zatiaľ nie ste skúsený pilot RC modelov, začnite vyhľadávať skúseného modelára, ktorý pred prvým vzletom skontroluje váš nový model, zalieta ho a vytrimuje a poskytne vám pomoc počas prvých letov. RC modely sú predsa len trochu zložité, a skúsený modelár môže rýchlo preveriť váš model - a vy získate istotu, že úspechu vašich prvých letov nestojí nič v ceste.
- Prosíme, model zostavujte presne podľa návodu. Nepokúšajte sa model akýmkoľvek spôsobom upravovať alebo meniť, pretože tým môžete spôsobiť zhoršenie jeho letových vlastností. Ak vykonáte akékoľvek úpravy, ktoré nie sú v súlade s týmto návodom, robíte tak výhradne na svoju vlastnú zodpovednosť.
- Skôr ako začnete, prosím, skontrolujte celý obsah stavebnice podľa návodu, abyste mali istotu, že žiadna časť nechýba alebo nie je poškodená. Pri rozbaľovaní postupujte opatrne, nič zbytočne neroztrhávejte a nerozbíjajte - nepočínejte si, prosím, ako netrpezlivá novomanželka pri rozbaľovaní svadobných darov. Týmto spôsobom sa tiež lepšie zoznámite so všetký mi časťami modelu. Ak zistíte, že nejaký diel chýba alebo je poškodený, prosím, okamžite kontaktujte predajcu, u ktorého ste model zakúpili. Potom, čo si stavebnicu odnesiete domov, a začnete sa s ňou podrobnejšie oboznámovať, môže sa vám stať, že z nejakého dôvodu stratíte pôvodné nadšenie a elán - model môže byť treba príliš veľký, jeho stavba sa môže ukázať zložitejšia a časovo náročnejšia, ako ste čakali. To sa môže stať každému. V tom prípade, prosím, nepokračujte ďalej. Ak budete schopní model vrátiť v pôvodnom, úplnom a neporušenom stave, nebude vám predajca robiť ťažkosti pri jeho vrátení alebo výmene za iný. Majte, prosím, na pamäti, že akonáhle model začnete stavať, predajca ho už nemôže jednoducho vziať späť.
- Návod obsahuje zreteľne vyznačenú polohu ťažiska a odporúčané predvolené veľkosti výchyliek ovládacích plôch. Dodržanie správnej polohy ťažiska je absolútne nutnou podmienkou pre to, aby bol model ovládateľný a letuschopný. Správnu polohu je nutné bezpodmienečne dodržať. Pre prvý vzlet model skompletizujte tak, aby ťažisko zodpovedalo údajom v návode - to je bezpečná hodnota pre skúseného pilota, ktorý je oboznámený so správaním modelu v plnom rozsahu bežných letových rýchlostí. Ťažisko viac vpredu znamená model „hodnejší“ stabilnejší a ľahšie ovládateľný. Zadná poloha ťažiska značí model „živší“, s menšou stabilitou s rýchlejšími reakciami na riadenie a celkovo náročnejší na ovládanie - preto je vhodné začať s prednou polohou ťažiska, a až potom, čo s pilotážou modelu zoznámite a zžijete, môžete začať experimentovať.
Bezpečnostné opatrenia
Tento RC model nie je hračka. Používajte ho opatrne a dodržiavajte pokyny uvedené v tomto návode.
Zostavte model presne podľa týchto pokynov. Model NEMODIFIKUJTE ani neupravujte. V opačnom prípade záruka automaticky zaniká. Postupujte podľa pokynov, aby ste na konci montáže zaistili bezpečný a pevný model.
Children under the age of 14 must operate the model under the supervision of an adult. Assure that the model is in perfect condition before every flight, taking care that all the equipment works correctly and that the model is undamaged in its structure.
Fly only on days with a light breeze and in a safe place away from any obstacles.
Safety precautions and warnings
- An RC aeroplane is not a toy! If misused, it can cause serious bodily harm and damage to property. Fly only in a safe place and follow all instructions and recommendations in this manual. Beware of the propeller! Keep loose items that can get entangled in the propeller away from the spinning propeller, including loose clothing, or other objects such as pencils and screwdrivers. Ensure that your and other people’s hands and face are kept away from the rotating propeller.
- As the user of this product, you are solely responsible for operating it in a manner that does not endanger yourself and others or result in damage to the product or the property of others. This model is controlled by a radio signal that is subject to interference from many sources outside your control. This interference can cause momentary loss of control, so it is advisable to always keep a safe distance in all directions around your model, as this margin will help to avoid collisions or injury.
- Never operate your model with low transmitter batteries.
- Always operate your model in an open area away from power lines, cars, traffic or people. Avoid operating your model in populated areas where injury or damage can occur.
- Carefully follow the directions and warnings for this and any optional support equipment (chargers, rechargeable batteries, etc.) which you use.
- Keep all chemicals, small parts and anything electrical out of the reach of children.
- Moisture causes damage to electronics. Avoid water exposure to all equipment not specifically designed and protected for this purpose.
- The model is mostly made of plastics – it is not fireproof. It may not be exposed to higher temperatures, otherwise severe distortion of the foam airframe or other damage may occur.
Základné technické dáta
| Rozpätie | 1600 mm |
| Dĺžka | 1151 mm |
| Plocha křídla | 36.8 dm² |
| Letová hmotnosť | 2100 g |
| Motor | C3548–800 |
| Regulátor | KAVAN R–50SB SBEC |
| Vrtule | 10×6" 3-listá |
Obsah sady
100% osadený iba krátku montáž vyžadujúci model (serva, striedavý motor, regulátor otáčok, vrtule), návod na stavbu. (Obr. 1a+1b)
You will also need
- At least 6-channel RC set, 14.8 V 2600–3300 mAh LiPo flight pack.
- Regular modeller’s tools: modeller’s knife (KAV66.770), screwdrivers, pliers, No. 10 spanner, sandpaper etc.
- Glue: Medium or thick cyanoacrylate glue (e.g. KAV56.9952 or KAV56.9953), silicone or MS polymer glue.
Model assembly
- Trial the fit of the horizontal and vertical tailplane and the fuselage - no glue yet (Fig. 2+3). Double-check the parts fit tight and the fin is vertical to the horizontal stabilizer (Fig. 4). If necessary, sand the parts to fit.
- Connect the rudder servo to the extension cable in the fuselage (RUDD) and secure the connectors with a piece of heat shrink tube, bind them together with dental floss or secure them with a strip of sticky tape. Apply medium or rather thick cyano (or clear silicone or MS polymer glue) to the contact area of the fin and attach the fin to the fuselage. (Fig. 2)
- Connect the elevator servo to the extension cable in the fuselage (ELEV) and secure the connectors with a piece of heat shrink tube, bind them together with dental floss or secure them with a strip of sticky tape. Apply medium or rather thick cyano (or clear silicone or MS polymer glue) to the contact area of the horizontal tailplane assembly and attach it to the fuselage. (Fig. 3)
- Before the glue sets, double-check the fin is vertical to the horizontal stabilizer. (Fig. 4)
- Slide the wing halves onto the wing tube joiner; arrange the aileron and flap servo cables and the LED light cables onto the upper side of the wing. (Fig. 5)
- Thread the servo and LED light cables into the cockpit and attach the wing to the fuselage. Attach the main undercarriage to the bottom of the wing and secure it together with the wing to the fuselage using two 3.0×40 mm bolts. (Fig. 6)
- Insert the nose gear into the bracket in the fuselage and remove the canopy. Slide the nose gear arm onto the nose gear wire and secure it with an M3.0×10 mm setting screw. (Fig. 7+8+9)
- Attach the propeller to the prop driver and secure it with the propeller nut with a washer. (For your safety, leave the propeller installation after your radio is all connected and set and the correct direction of rotation of your motor has been tested.) Secure the spinner using an M2.5×22 mm bolt in place. (Fig. 10)
- Attach a strip of a hook–and–loop (the loop part, not supplied in the kit) to the bottom of your flight pack and secure it with the hook–and–loop fasteners to the battery seat in the cockpit. (Fig. 11)
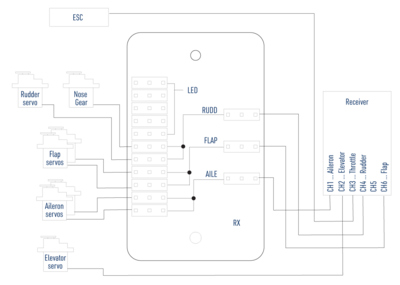
B23 - Receiver connection - Remove the connection board cover and hook up your receiver, servos and ESC following the wiring diagram right. The receiver is to be secured with a strip of double-sided foam tape or hook–and–loop tape to the rear part of the cockpit. Deploy the antennas, so their active parts are square to each other (if you are using a receiver featuring diversity antennas).Note: The kit is supplied with the connection board for ailerons, flaps, rudder and the steerable nose gear, so you can use even the most basic 6-channel radios to control your Bristell B23. If you intend to use independent control of aileron and flap servos and an advanced computer radio, you will have to replace the default Y-cables with four 25–30 cm extension cables.
The LED lights are only powered via the connection board. They are not remotely controlled in any way. - With your radio on, set the servos to the neutral position (sticks and trims centred) and fasten the setting screws of the pushrod connectors on the elevator and rudder servo arms. Perform the throttle range calibration of the ESC as described in the attachment of this manual.
- Attach the canopy.
- Use medium cyano to glue the dummy antennas (Fig. 13) and pitot tube. (Fig. 14)


RC set installation and pre-flight check
- Referring to the instruction manual of your radio, carefully hook up the on-board electronics.
- Once everything has been correctly connected, turn on your transmitter and plug in the flight pack. Check the neutral positions and throws of all control surfaces. If you need to make the control surface throws smaller, simply move the pushrod closer to the centre on the servo arm or move it far from the control surface on the control horn. And vice versa.
| Recommended throws | Low rate | High rate | ||
|---|---|---|---|---|
| Rate | Expo | Rate | Expo | |
| Ailerons | ± 13 mm | 30–40 % | ± 20 mm | 40 % |
| Elevator | ± 13 mm | 30–35 % | ± 20 mm | 35 % |
| Rudder | ± 26 mm | 25–30 % | ± 40 mm | 30 % |
| Flaps | Take–off: -12 mm down / Landing: -30 mm down | |||
- The "Low rate" recommended control surface throws are suitable for a less skilled pilot and regular "scale" flying. The "High rate" setting allows an experienced pilot to explore the full capabilities of this model.
- Check the direction of rotation of the propeller. If it is incorrect, simply swap two of the three wires between the ESC and motor or program the ESC (refer to the ESC manual).
- Check the correct position of the centre of gravity (CG): 75–85 mm behind the leading edge of the wing (Fig. 15). Adjust the CG position by moving the flight pack - if you cannot reach the recommended position, do not hesitate to add an appropriate amount of lead to the nose or tail. An extra couple of grams won’t spoil the flying characteristics - but the incorrect CG position is a killer.
- Fully charge your flight pack and transmitter batteries, check the proper function of your radio and perform the range check of your radio according to its instruction manual. The range has to be almost the same with the motor off and at full throttle (no more than a 10% decrease is acceptable). DO NOT try to fly unless the range check is 100% successful.
Flying
The test flying and fine-tuning is pretty much straightforward. There will be no surprise for a medium-advanced pilot who is supposed to fly this model.
Appendix
KAVAN R-50SB instructions
Please refer to the KAVAN ESCs - Instruction manual.
Recycling and Waste Disposal Note (European Union)

Electrical equipment marked with the crossed-out waste bin symbol must not be discarded in the domestic waste; it should be disposed of via the appropriate specialised disposal system. In the countries of the EU (European Union) electrical devices must not be discarded via the normal domestic waste system (WEEE - Waste of Electrical and Electronic Equipment, Directive 2012/19/EU). You can take your unwanted equipment to your nearest public collection point or recycling centre, where it will be disposed of in the proper manner at no charge to you. By disposing of your old equipment in a responsible manner you make an important contribution to the safeguarding of the environment!
EU Declaration of Conformity (European Union)

Hereby, KAVAN Europe s.r.o. declares that this Bristell B23 model and the included electronic and electric devices are in compliance with the requirements of relevant European directives and harmonized norms. The full text of the Declaration of Conformity is available at www.kavanrc.com/doc/.
Guarantee
The KAVAN Europe s.r.o. products are covered by a guarantee that fulfils the currently valid legal requirements in your country. If you wish to make a claim under guarantee, please contact the retailer from whom you first purchased the equipment. The guarantee does not cover faults which were caused in the following ways: crashes, improper use, incorrect connection, reversed polarity, maintenance work carried out late, incorrectly or not at all, or by unauthorised personnel, use of other than genuine KAVAN Europe s.r.o. accessories, modifications or repairs which were not carried out by KAVAN Europe s.r.o. or an authorised KAVAN Europe s.r.o., accidental or deliberate damage, defects caused by normal wear and tear, operation outside the Specification, or in conjunction with equipment made by other manufacturers. Please be sure to read the appropriate information sheets in the product documentation.