HaoSheng HS-30KT - Instruction manual
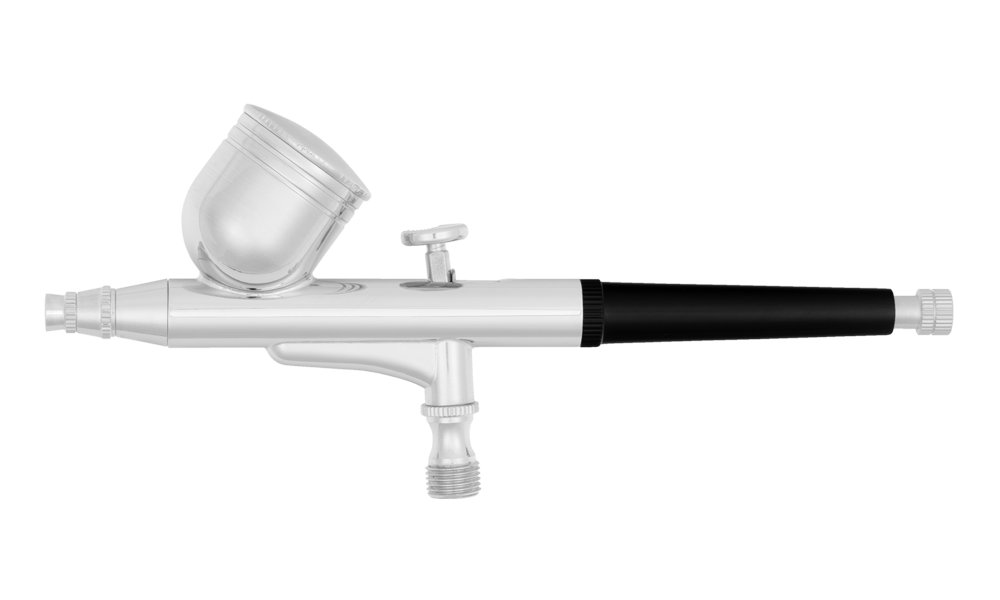
HaoSheng HS-30KT
Introduction
The HaoSheng HS-30KT is a versatile, double-action airbrush with a top-feed (gravity-fed) system, ideal for both detailed and large-area work. Thanks to its interchangeable nozzles and needles, it offers great flexibility for modelers.
Unlike single-action guns (where the trigger controls only the air flow and the paint volume is adjusted manually with a stop), on a double-action gun, pressing the trigger down releases air, while pulling the trigger back dispenses paint. This gives you full control over both air and paint in a single, smooth finger movement.
Technical specifications
| Control | Double action |
|---|---|
| Paint feed | Gravity |
| Needles and nozzles | Ø0.2 mm, Ø0.3 mm, Ø0.5 mm |
| Paint-cup capacity | 7 ml |
| Working air pressure | 15–50 psi (≈ 1.03–3.45 bar) |
| Air intake thread | 1/8" |
| Air supply | Clean, dry compressed air through a pressure regulator |
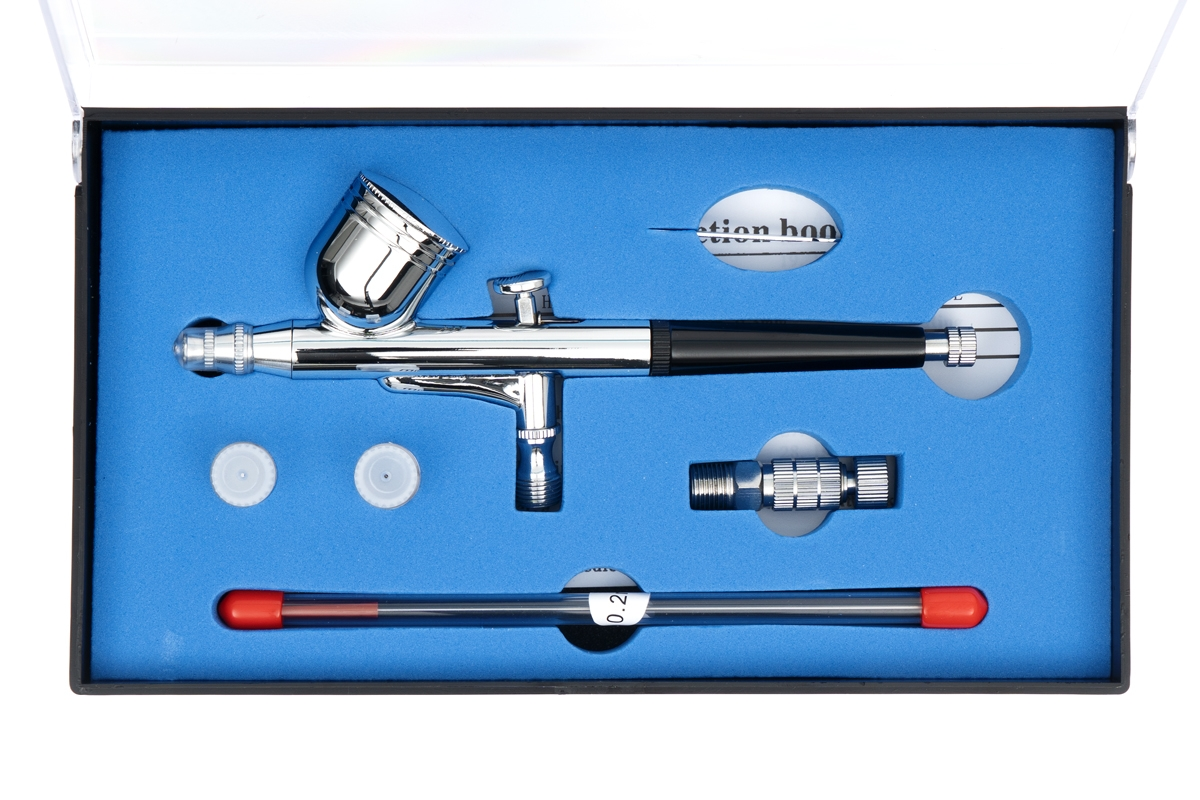
Set contents
- HS-30 airbrush pistol
- 7 ml paint cup with lid
- Needles and nozzles Ø0.2 mm, Ø0.3 mm and Ø0.5 mm
- Nozzle spanner
- Quick-release coupling
You will also need
- A suitable airbrush compressor with a pressure regulator, gauge and moisture trap
- A compatible air hose
- Airbrush paint, its recommended thinner and a compatible cleaner.
- A stable airbrush stand, mixing containers, soft cleaning brushes and lint-free cloths.
- A spray-out cleaning pot, test card and masking materials.
- Suitable ventilation or extraction, eye protection and protective equipment specified for the paint and cleaner.
Safety precautions
Spraying produces airborne paint mist and may release solvent vapours. Work with effective ventilation, protect your eyes and use respiratory protection appropriate to the material. Read the paint, thinner and cleaner labels and safety data sheets before use. Keep flammable materials away from flames, sparks and hot surfaces.
- Keep the airbrush, chemicals and small parts out of the reach of children. This equipment is not a toy.
- Never direct the spray or compressed air at yourself, another person or an animal.
- Supply regulated compressed air only. Do not connect the airbrush to oxygen or a flammable gas supply.
- Keep the pressure within the specified operating range. Observe any lower pressure limit of the hose, coupling or other connected equipment.
- Before disconnecting a hose or removing parts, switch off the compressor, isolate the air supply and release the pressure trapped in the hose.
- Inspect the hose, connections, needle and nozzle before use. Stop if the trigger sticks, a connection leaks or a component is damaged.
- The needle tip is sharp. Protect it when the airbrush is stored, and handle a removed needle where it cannot roll off the bench.
- Keep the compressor and its electrical connections away from paint and cleaning liquid. Follow the compressor’s own instructions.
Use only media and cleaners compatible with the airbrush materials and seals. A paint being suitable for airbrushing does not establish that every thinner or cleaning solvent is suitable for this airbrush. If compatibility is uncertain, check with your dealer before use.
Main section
Prepare the equipment
- Unpack the set on a clean, well-lit bench. Check for missing parts, damage and a bent needle tip before connecting air.
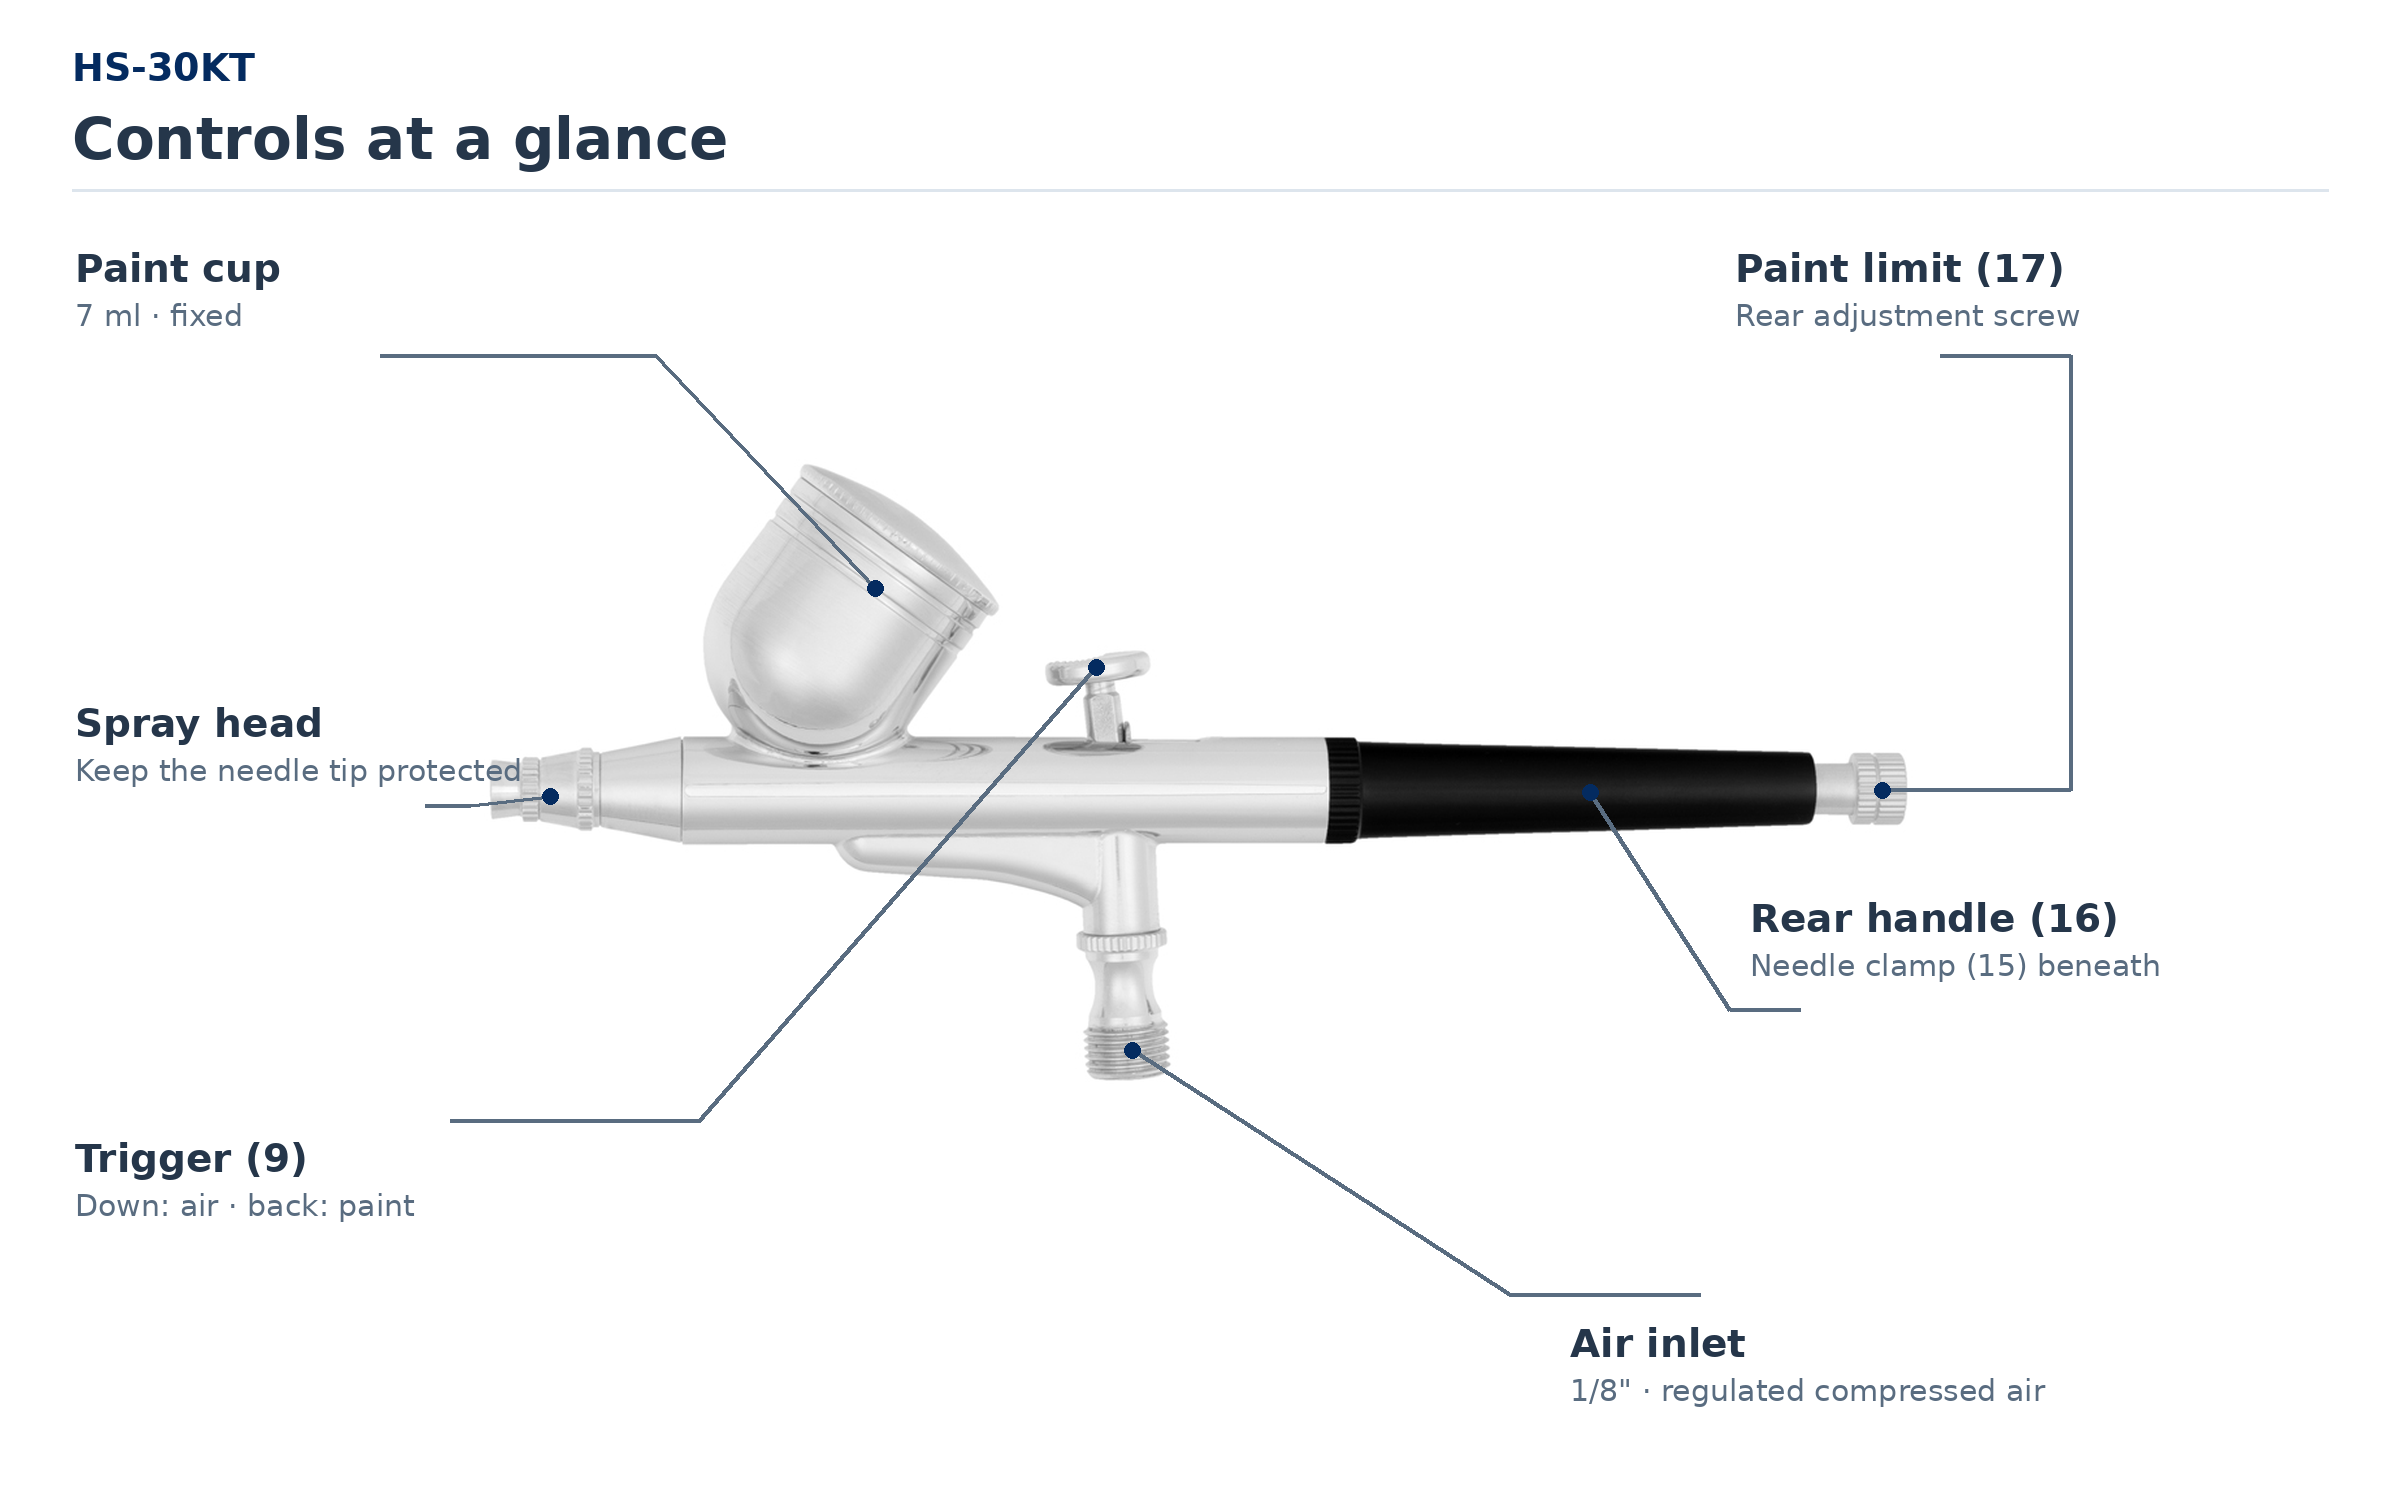
- Identify the controls and front components. (Fig. 1)
- Check that the fixed paint cup is clean and its lid fits. Do not try to unscrew the cup from the body.
- Check that the trigger moves freely and returns when released. Leave the needle and nozzle assembled for the first test unless a nozzle change is necessary.
- Place the airbrush stand and waste container within easy reach. Cover nearby surfaces and arrange the hose so it cannot pull the airbrush off the bench.
| Control / component | Function |
|---|---|
| Top trigger (9) | Press down to open the air valve; pull back to increase paint flow. |
| Rear adjustment screw (17) | Limits how far the trigger can pull the needle back. |
| Needle chucking nut (15) | Clamps the needle to the mechanism; loosen only for maintenance. |
| Paint cup; lid (8) | Hold the paint above the airbrush body for gravity feed. |
| Air connection | Connects the airbrush to the regulated compressed-air supply. |
Connect and set the air supply
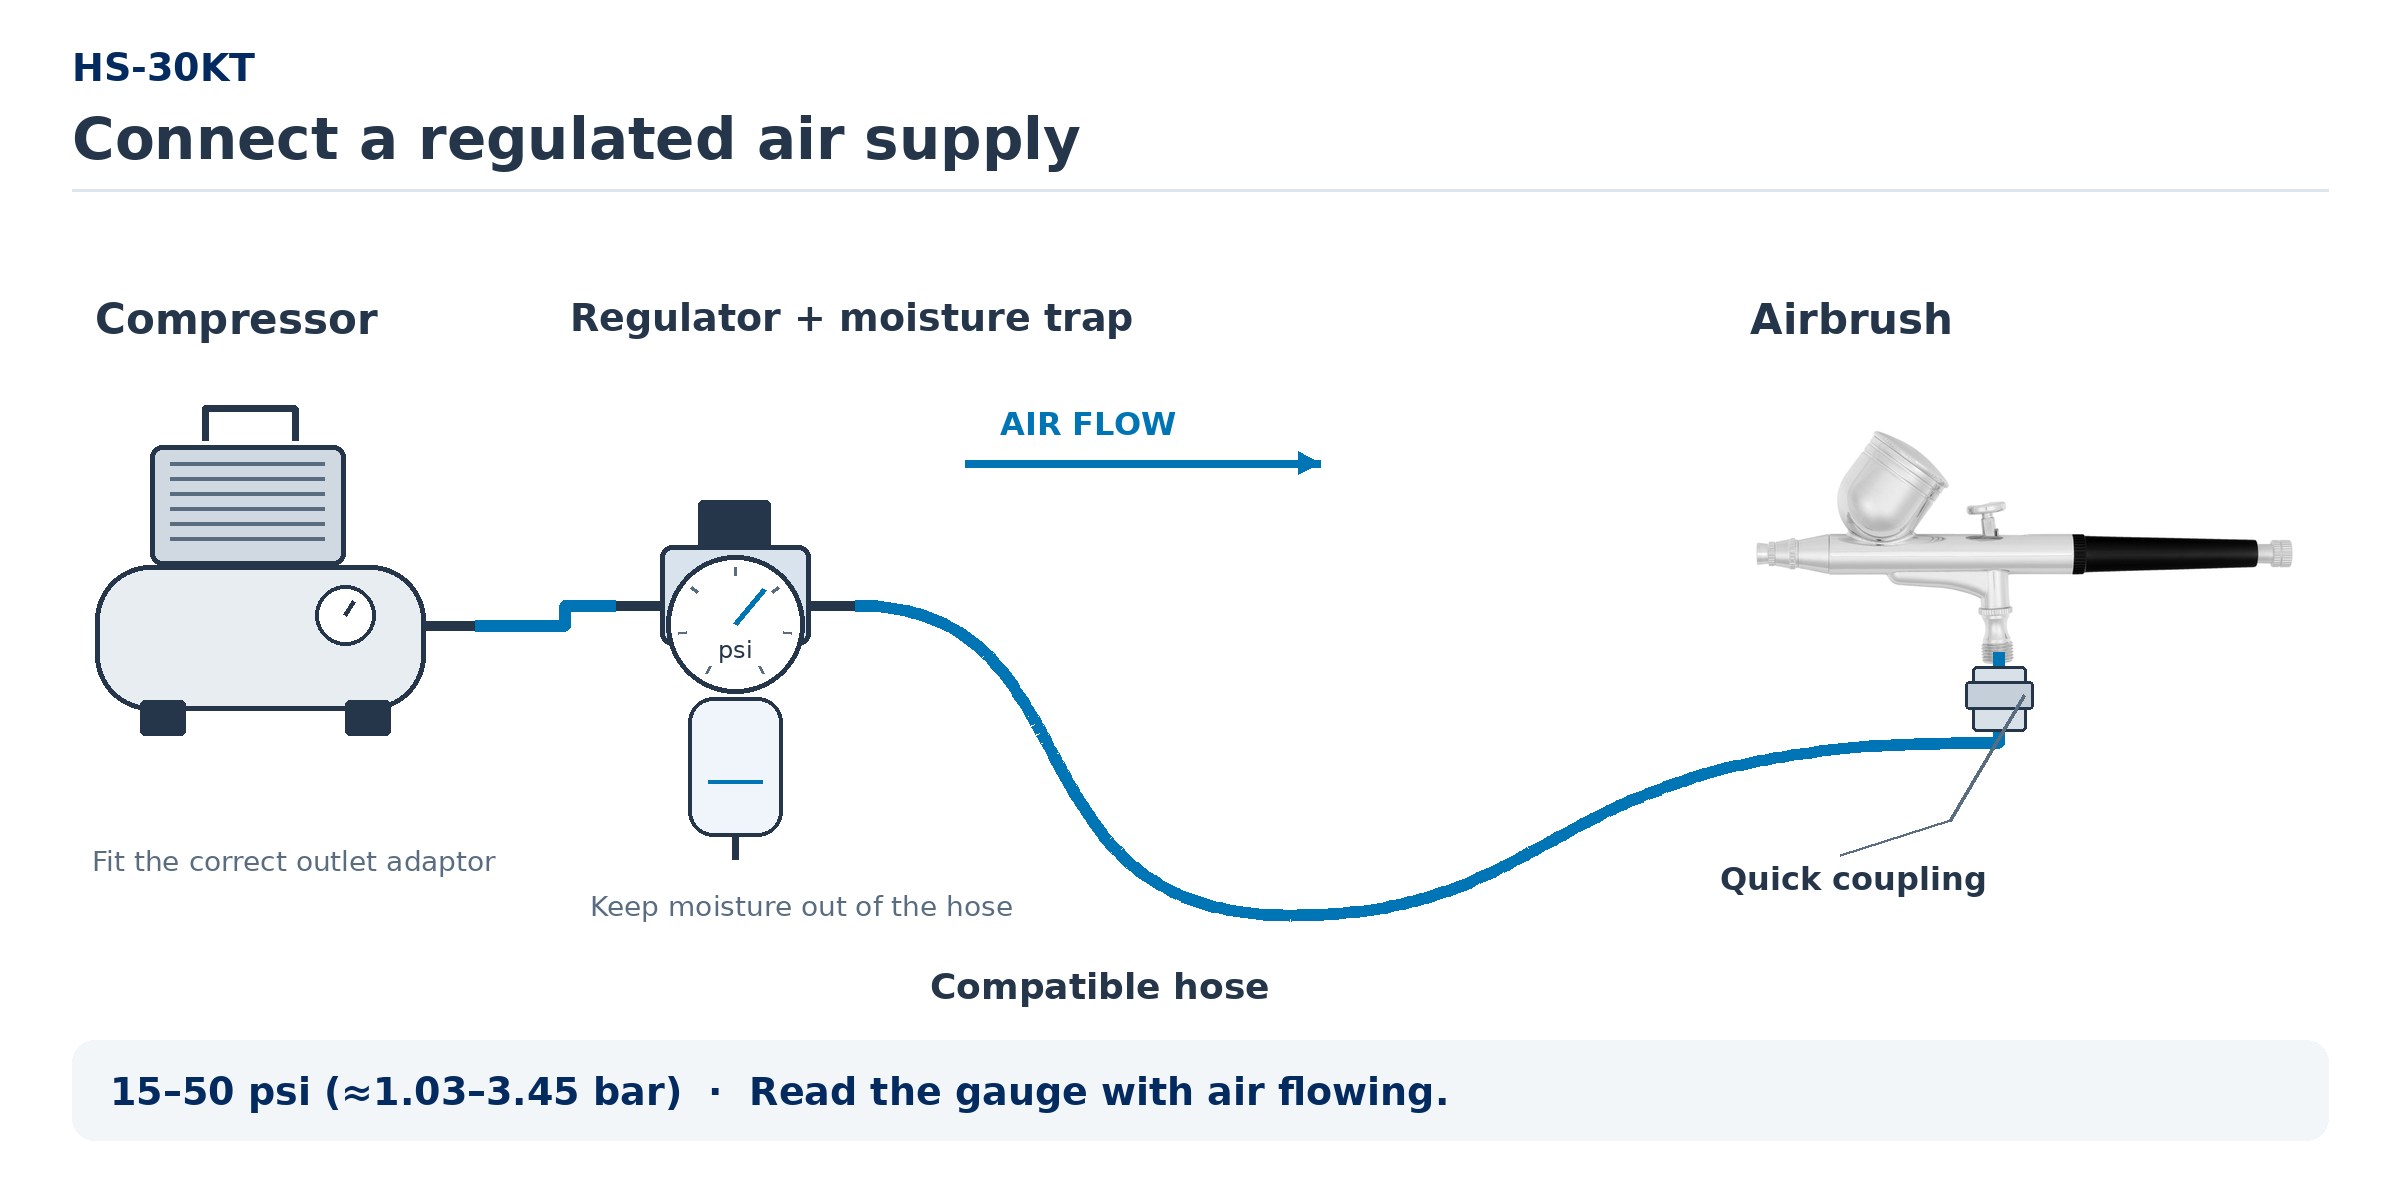
- Switch off the compressor and reduce the regulator setting before connecting the hose.
- Connect the hose between the regulated compressor outlet and the airbrush. If using the supplied quick coupling, fit its mating halves to the airbrush and hose, then engage them fully. Check that the connection locks before turning on the air.
- Check that all connections seat correctly and the hose is undamaged. Use the correct mating fittings; do not compensate for an incorrect thread by tightening harder.
- Turn on the compressor. Point the empty airbrush towards the cleaning pot and operate the trigger for air only. (Fig. 2)
- Read the regulator gauge while air is flowing. Start at the low end of the working range and increase only as needed during the spray test. Keep the supply within 15–50 psi (approximately 1.03–3.45 bar).
- Release the trigger and check for leaks. If a connection leaks, turn off and depressurise the system before reseating it.
The pressure in a compressor tank is not necessarily the pressure delivered to the airbrush. Use the regulated outlet gauge and check the setting with air flowing. The rear needle-travel screw controls paint delivery; it does not replace the air-pressure regulator.
Prepare the paint
- Choose a paint intended for airbrushing and suitable for the surface. Follow its manufacturer’s instructions for mixing, thinning and drying.
- Stir the paint thoroughly in a separate container. Add only the recommended thinner, a little at a time. Ready-to-spray paints may not need additional thinning.
- Remove lumps or dried particles with a suitable paint strainer. Use a fine, freely flowing mixture that can pass through the selected nozzle.
- Prepare a small test batch first. Check adhesion and compatibility on scrap material before painting the finished model.
- Fill the cup with only the quantity needed, leaving space below the rim. Keep the airbrush upright and keep any lid vent clear.
A milk-like consistency is a useful initial visual guide, not a fixed mixing ratio. Paint type, pigment size, nozzle size and pressure all affect the result. Build coverage with several light passes instead of trying to apply a thick coat at once.
Practise trigger control
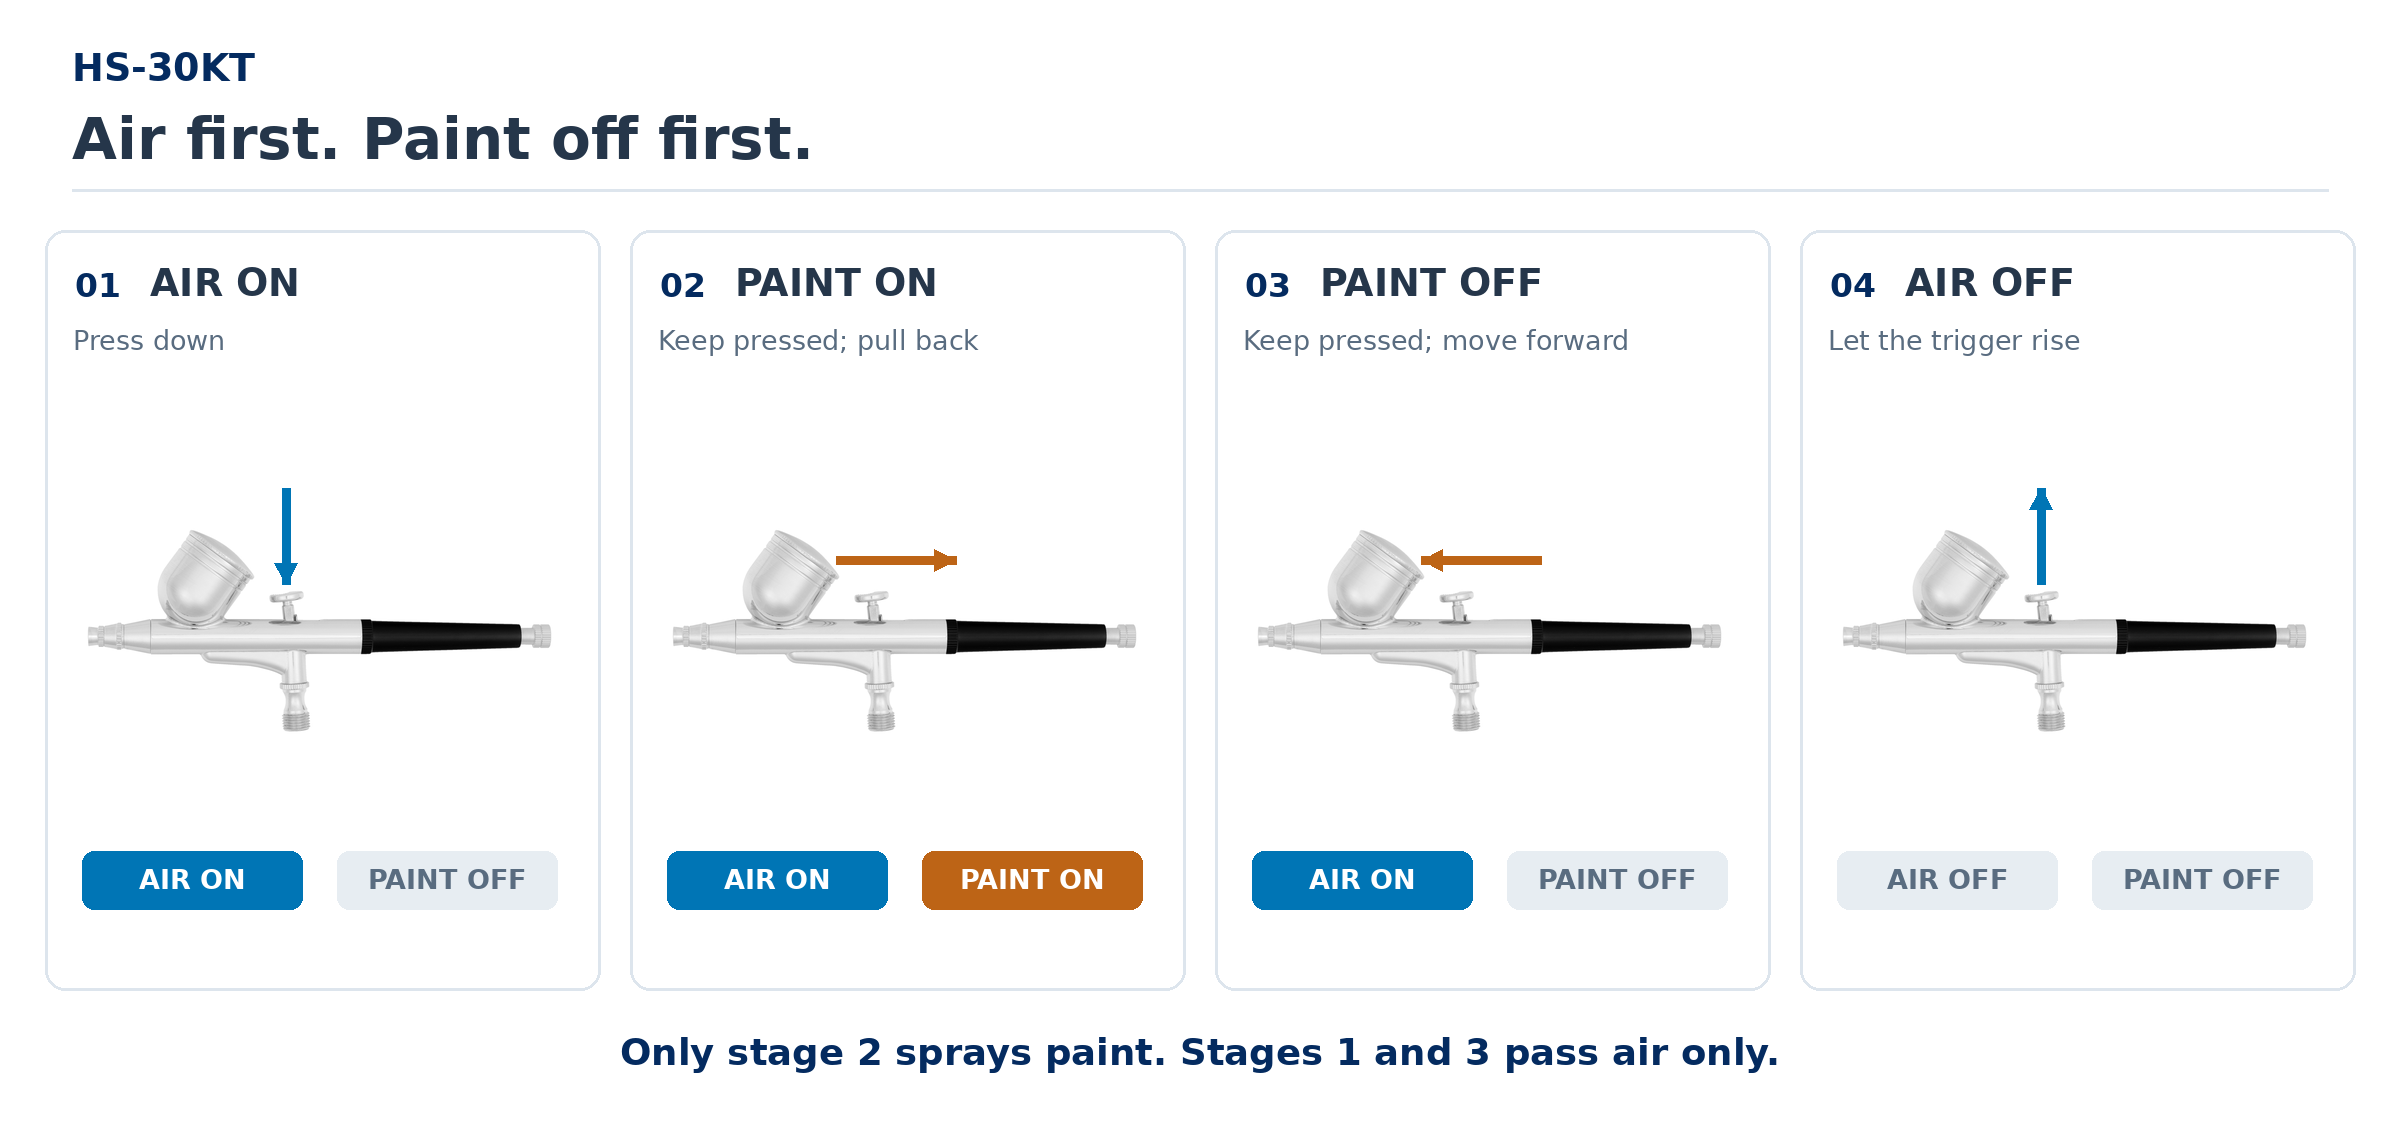
Make the first function test with a small amount of clean water or a compatible cleaning liquid, spraying into the cleaning pot. Check the trigger sequence before filling with paint. (Fig. 3)
- Hold the airbrush like a pen, with your index finger on the top trigger. Keep the paint cup upright.
- Air on: press the trigger straight down without pulling it back. Only air should emerge.
- Paint on: keep the trigger pressed and draw it back gradually. A little movement gives a small amount of paint; further movement increases the volume.
- Paint off: move the trigger fully forward while keeping it pressed down.
- Air off: let the trigger rise. Practise this sequence until you can operate it smoothly.
Only air should flow in the air-only position. Liquid should stop when the trigger returns to that position. If it does not, disconnect the air supply and check the needle seating and cleanliness before continuing.
Pulling the trigger back before pressing it down can leave paint at the tip. The next burst of air may splatter it onto the work. Follow the sequence „Air first → paint second → paint off first → air off last.“
Adjust paint delivery and spray
- With the trigger released, turn the rear adjustment screw clockwise to reduce available needle travel, or anticlockwise to increase it. Start with a small paint opening. Never force the screw against its stop.
- Hold the airbrush approximately 7.5 cm from a test card as a starting exercise. Point it towards the waste area beside the intended stroke.
- Begin moving your hand, press down for air, then pull the trigger back gradually for paint. Keep the movement steady as you pass across the card.
- Stop the paint before stopping the airflow, and continue moving past the end of the stroke.
- Inspect the result. Adjust thinning, paint delivery or regulated pressure one at a time, then test again. Stay within the working-pressure range.
- Move closer and reduce paint delivery for finer lines. Move farther away for a wider, softer pattern. Avoid dwelling in one place, which can cause runs.
- Apply light, overlapping passes to the workpiece. Allow the drying time specified for the paint before applying another coat or removing masking.
Practise an even line that starts and ends cleanly. For a line starting at a precise point, approach with air already flowing and add paint as you pass that point. At the end, stop the paint and continue moving briefly with air only.
Change colour or pause
- Stop spraying and empty the remaining paint into a suitable waste container.
- Wipe the cup with a lint-free cloth or soft brush dampened with the appropriate cleaner. Avoid pushing dried paint into the feed passage.
- Add a small amount of fresh cleaner and spray it into the cleaning pot until it emerges clear. Repeat if colour remains.
- Empty the cleaner before adding the next paint. When changing between incompatible paint systems, clean thoroughly with a suitable intermediate rinse recommended by the paint supplier.
- Before a longer pause, clean the airbrush rather than leaving paint to dry in the cup, nozzle or on the needle. Put the airbrush in its stand.
Do not immerse the assembled airbrush in cleaner or leave it soaking. Do not scrape the nozzle with wire, a drill or a hard cleaning tool. Avoid blocking the spray head with a finger to force liquid backwards; use forward flushing and the maintenance procedure below.
Finish the session
- Flush the paint passage as described above while keeping ventilation or extraction running.
- Switch off the compressor and isolate the air supply. With the nozzle directed into the cleaning pot, release the remaining hose pressure using the trigger. Disconnect the hose only when it is depressurised.
- Clean the needle and front caps as described under Cleaning the needle and caps. Inspect for damage and paint deposits.
- Reassemble the airbrush and carry out the short function test in that section, then switch off, depressurise and disconnect again.
- Leave the cup empty and the airbrush clean and dry. Drain the compressor moisture trap or tank as its manual specifies. Store the airbrush with its needle protected.
Maintenance
Work over a clean tray under good lighting. Keep small parts in order and use the Parts reference to identify them. Routine cleaning does not require removal of the trigger, air-valve mechanism or needle-guide seal.
Cleaning the needle and caps
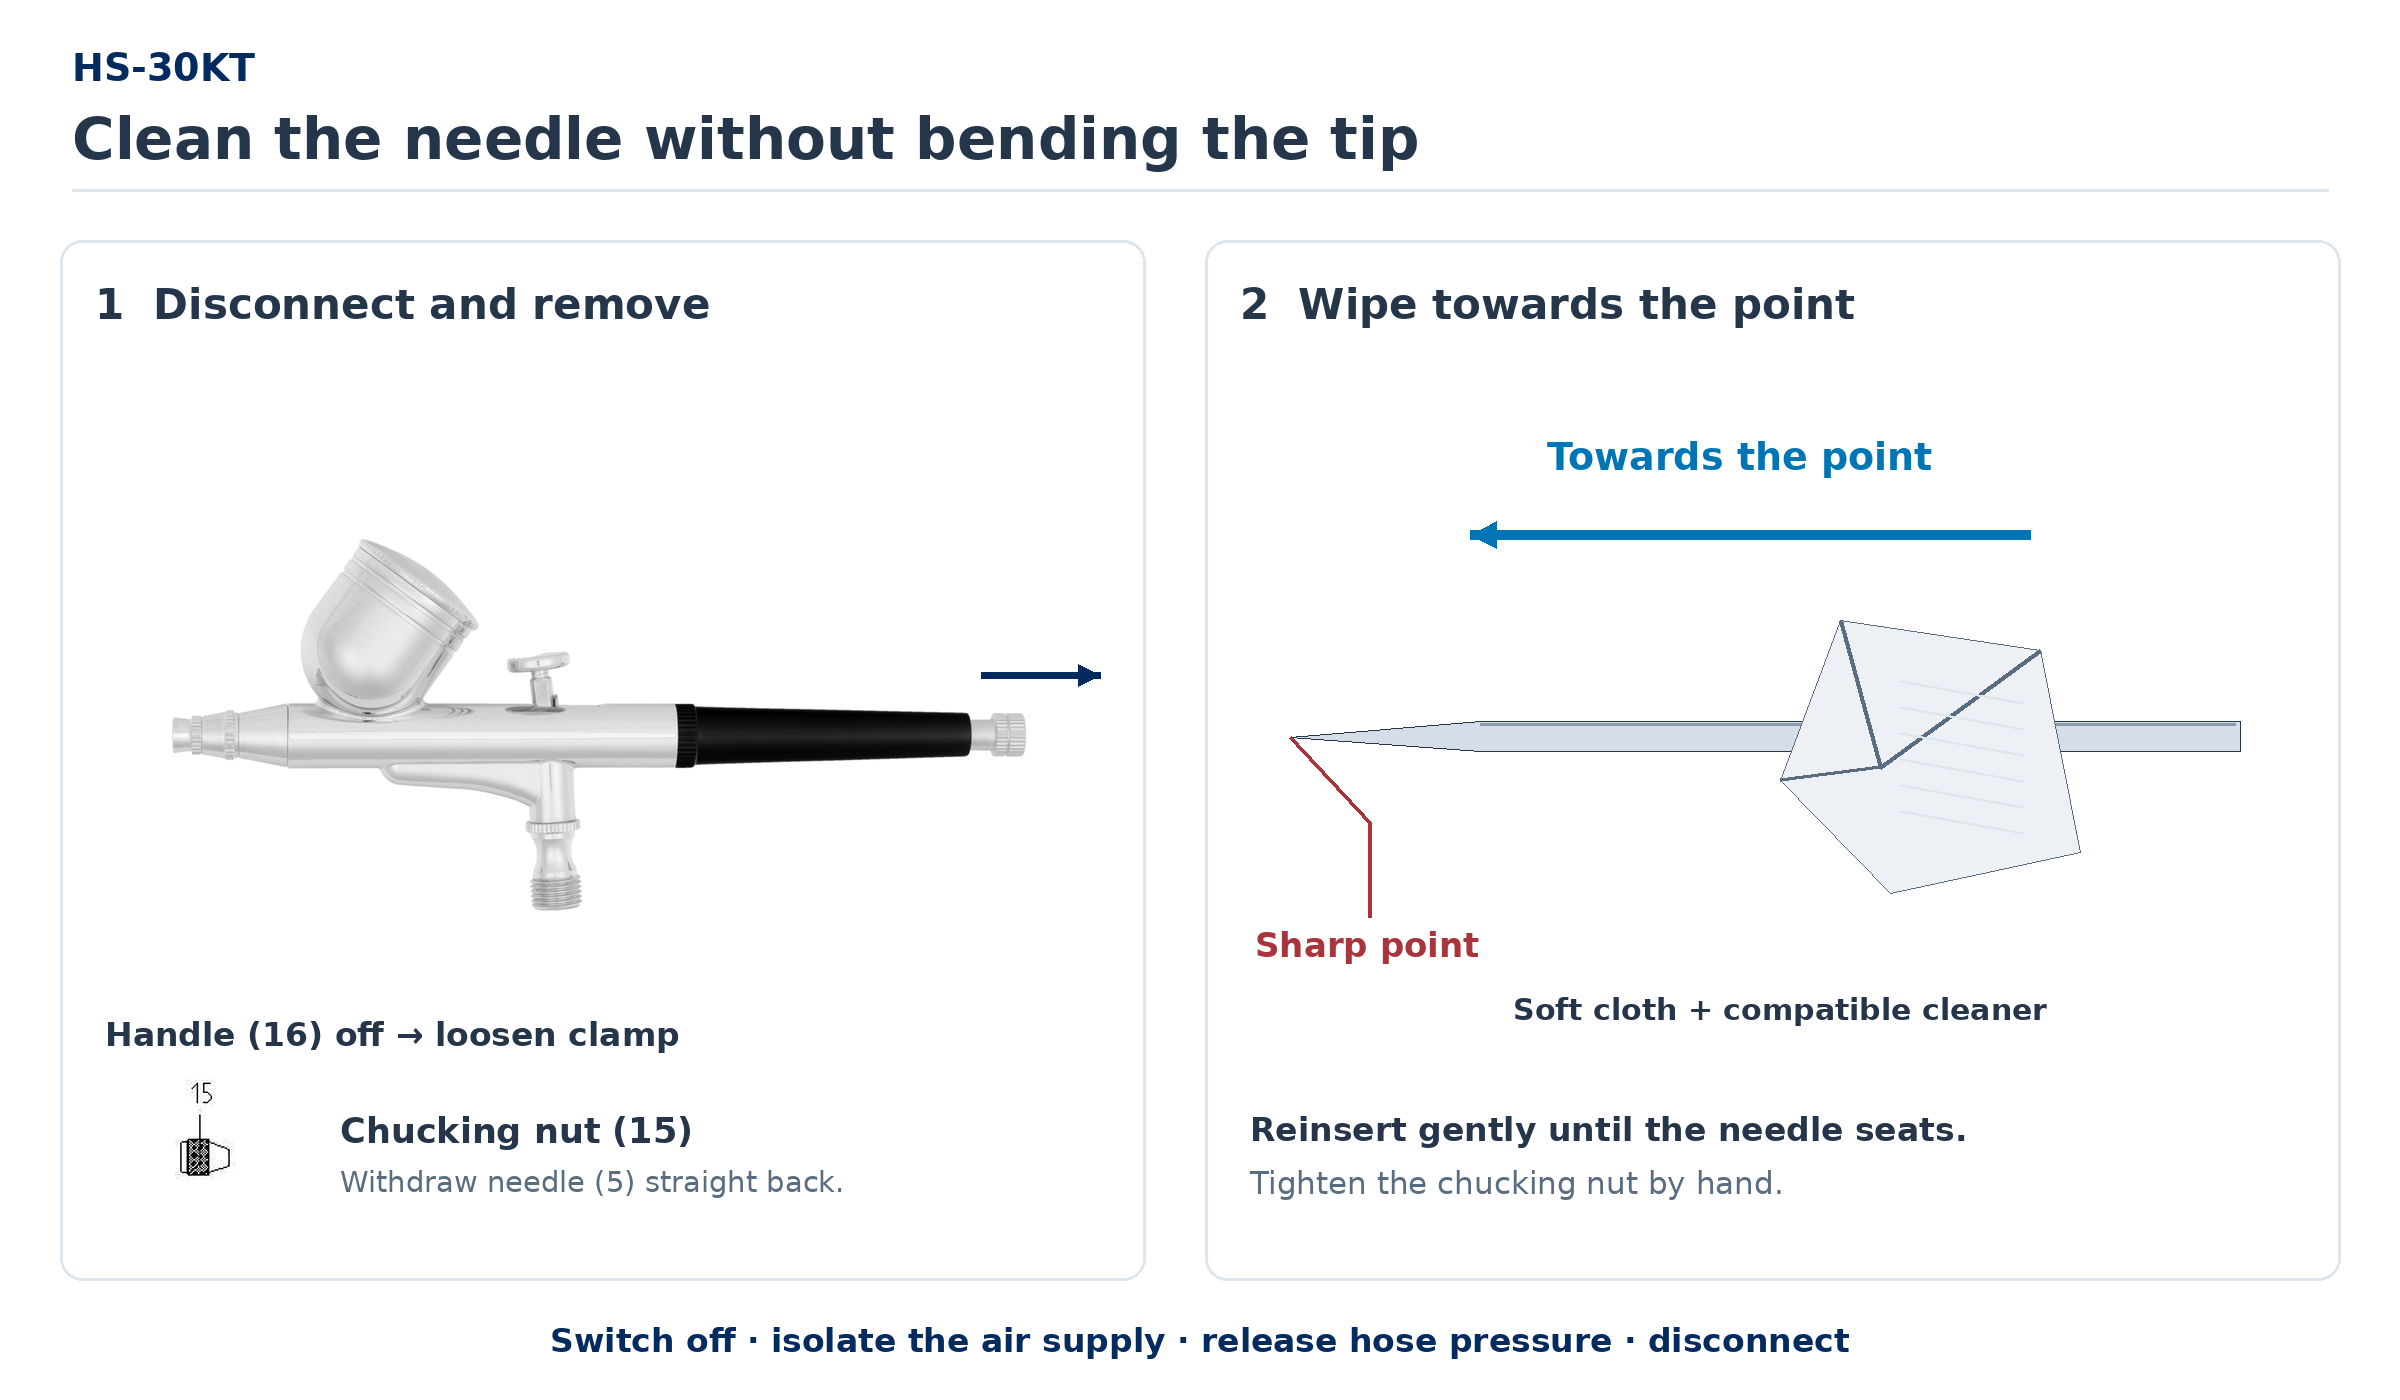
- Flush the airbrush, switch off the air supply, release pressure and disconnect the hose.
- Unscrew the rear handle (16). Loosen the needle chucking nut (15) by hand.
- Withdraw the needle (5) straight out through the rear. If dried paint holds it in place, soften the deposits with a compatible cleaner; do not pull by force.
- Wipe the needle with a soft, cleaner-dampened cloth, moving from the shaft towards the point. Keep the point away from your fingers and do not bend it.
- Unscrew the needle cap (1) and nozzle cap (2). Clean paint deposits with a soft brush and suitable cleaner. Keep cleaner out of the air-valve mechanism and inspect the nozzle without removing it unnecessarily.
- Refit the clean front caps and their seals. With the trigger at rest, guide the clean needle forward gently until it just seats in the nozzle. Stop at resistance; do not force or twist the tip into its seat.
- Tighten the chucking nut by hand and refit the rear handle. Check that the trigger returns freely.
- Reconnect the regulated air supply for a test with a small amount of clean water or compatible cleaning liquid. First press the trigger down without pulling it back: no liquid should spray. Then add liquid flow and confirm an even spray and clean shut-off. Empty the cup, switch off, release pressure and disconnect again.
The needle and nozzle form a precision pair. A bent needle or damaged nozzle must be replaced. Forcing the needle into its seat can split the nozzle and cause continuous paint leakage.
Changing the needle and nozzle size
Use a matching needle and nozzle: Ø0.2 mm, Ø0.3 mm and Ø0.5 mm. The nominal size identifies a compatible needle/nozzle set; it is not the diameter of the needle shaft. Use parts intended for this model.
- Flush, depressurise and disconnect the airbrush. Remove the rear handle, loosen the chucking nut and withdraw the needle as described above.
- Remove the needle cap (1) and nozzle cap (2). Keep the nozzle-cap O-ring (4) safe.
- Seat the supplied spanner (29) on the flats of the threaded nozzle (3). Unscrew the nozzle carefully. Do not grip the nozzle tip with pliers.
- Fit the replacement nozzle of the required size. Start its thread squarely and use the spanner only to seat it gently. Never tighten it by force.
- Refit the correct nozzle cap, its seal and the needle cap. If the replacement set includes a size-specific cap, use that matching cap.
- Insert the needle of the same nominal size as the nozzle, as described under Cleaning the needle and caps. Tighten the chucking nut by hand and refit the rear handle.
- Test with a compatible cleaning liquid. Check for leaks, bubbles in the cup, an uneven spray or liquid flowing in the air-only position. Correct any fault before filling with paint.
See the front-assembly components in (Fig. 6).
The HS-30 uses a small threaded nozzle. Its thread can break if overtightened. Do not routinely remove it during colour changes. If a part does not seat readily, check its size and alignment before proceeding.
Routine inspection
- Before each session: inspect the needle tip, hose and connections; check free trigger movement and perform a liquid test.
- At each colour change: flush the paint cup and passage before residues dry.
- After each session: clean the needle and caps, empty the cup and store dry.
- If a fault persists after cleaning: have the nozzle, seals and mechanism checked by your dealer. Do not adjust the needle packing or dismantle the air valve without the correct service instructions.
Appendix
Troubleshooting
Shut off the air supply, release pressure and disconnect before opening the airbrush or correcting a connection. Reconnect only for a controlled function test.
| Symptom | Check / action |
|---|---|
| No air | Check the supply, regulator, hose and coupling. |
| Air but no paint | Refill the cup; clean the paint passage; check thinning and the needle clamp. |
| Spluttering | Clean the needle tip and caps; check paint preparation and flowing pressure. |
| Bubbles in the cup | Check head assembly seating; inspect the nozzle and seals. |
| Paint during air-only operation | Clean and reseat the needle; check for damage. |
| Stiff trigger or needle | Soften and remove paint deposits; seek service if sticking remains. |
| Runs or spreading lines | Reduce paint delivery; keep moving and allow coats to dry. |
Parts reference
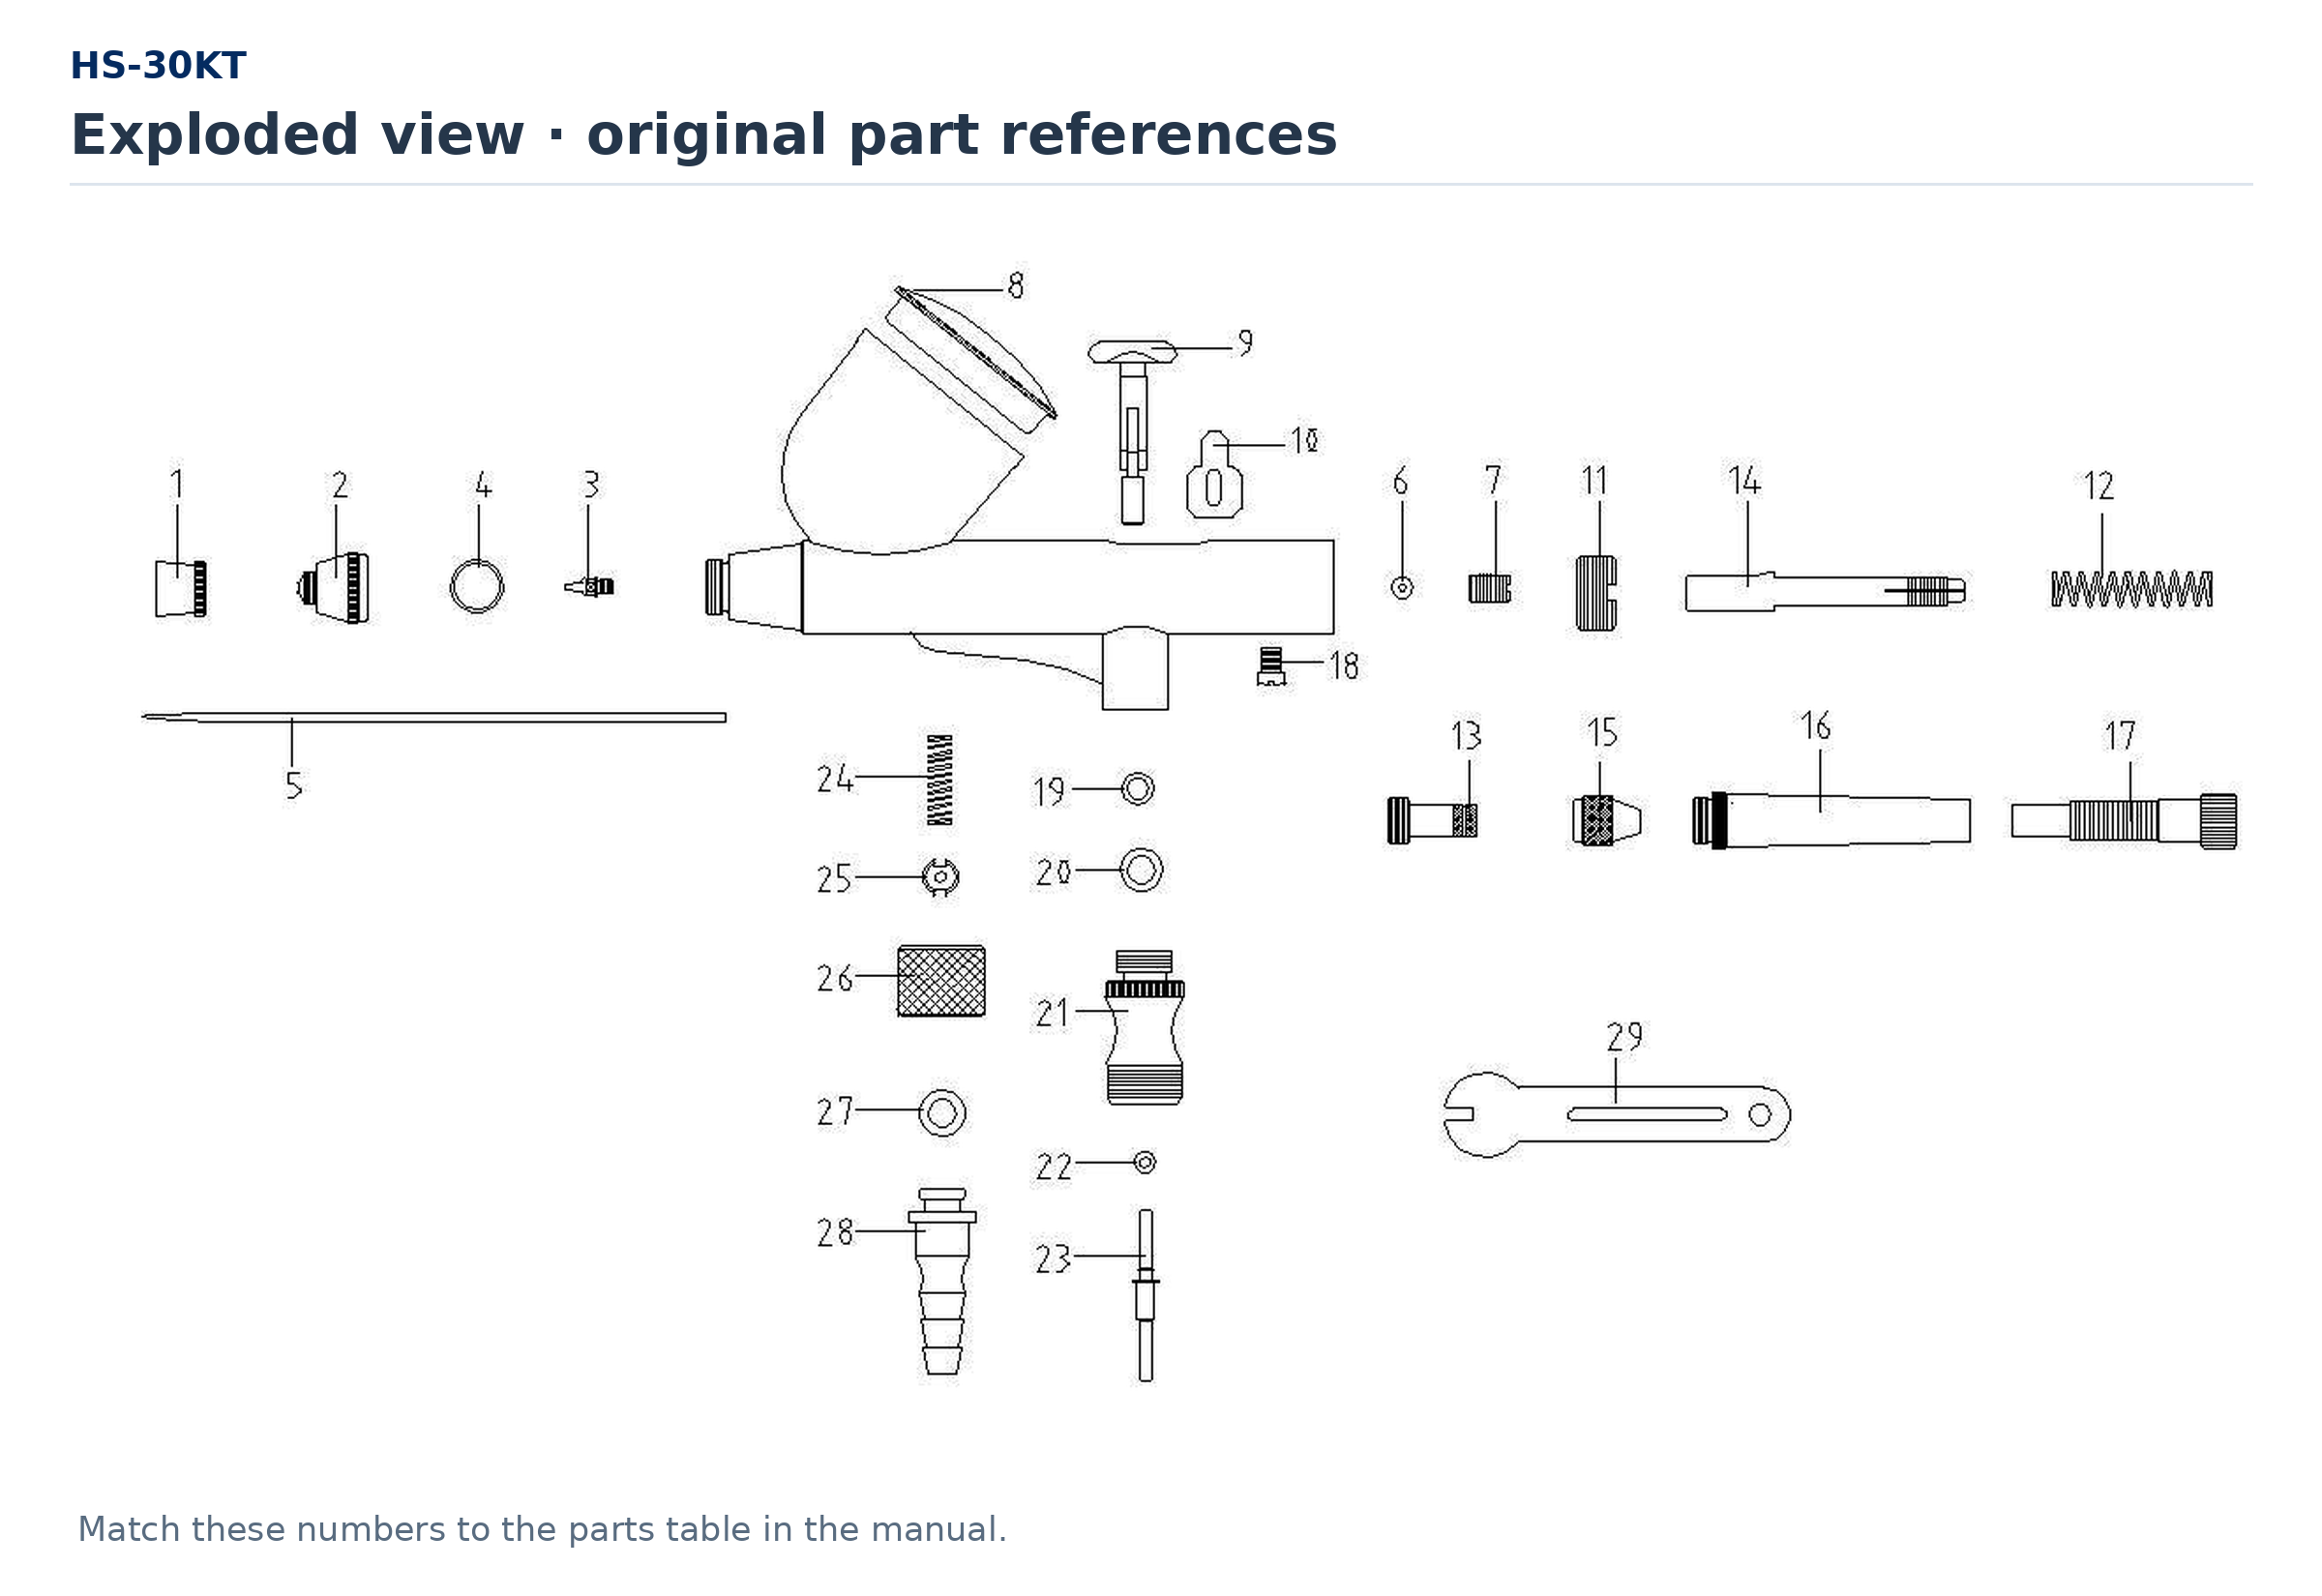
| Drawing reference | Component |
|---|---|
| 1 | Needle cap |
| 2 | Nozzle cap |
| 3 | Nozzle |
| 4 | Nozzle-cap O-ring |
| 5 | Needle |
| 6 | Needle-guide O-ring |
| 7 | Needle guide |
| 8 | Paint-cup lid |
| 9 | Operating lever / trigger |
| 10 | Lever guide |
| 11 | Stopper |
| 12 | Spring |
| 13 | Spring case |
| 14 | Needle chucking guide |
| 15 | Needle chucking nut |
| 16 | Rear handle |
| 17 | Needle-travel adjustment screw |
| 18 | Guide screw |
| 19 | Lever-guide O-ring |
| 20 | Air-valve O-ring |
| 21 | Valve body |
| 22 | Valve-rod O-ring |
| 23 | Valve rod |
| 24 | Valve spring |
| 25 | Valve screw |
| 26 | Hose-connector nut |
| 27 | Hose-connector O-ring |
| 28 | Hose connector |
| 29 | Nozzle spanner |
Storage
Store the clean, dry airbrush in its case or a protected holder, with the needle cap fitted. Keep spare needle/nozzle pairs together and protect the needle points. Keep paints and cleaners in their original labelled containers according to the suppliers’ storage instructions.
Warranty and post-warranty service
All HaoSheng products are covered by a 2-year warranty covering all manufacturing defects and faults. When making a claim within the warranty period, please always present a copy of the proof of purchase with the product and provide the service personnel with as detailed and complete information as possible about the defect found, your usage and other information that will facilitate the assessment of the claim and speed up its settlement. Please make your claim at the shop where you purchased the product.
This warranty certificate entitles you to a free warranty repair of the product supplied by KAVAN Europe s.r.o. within a period of 24 months. The warranty does not cover natural wear and tear due to normal use, as this is a product for modelling use, where the individual parts operate under much higher loads than normal toys are subjected to.
The warranty also does not cover any part of the equipment that has been improperly installed, roughly or improperly handled, or damaged in an accident, or any part of the equipment that has been repaired or altered by an unauthorised person (this includes the application of any waterproof sprays/coatings by the user). Like other fine electronics products, do not expose this equipment to high temperatures, low temperatures, moisture, dusty environments, violent mechanical shocks and impacts. Do not leave it in direct sunlight for extended periods of time.
Improper installation includes inadequate mounting, mechanical strain on cables and insufficient cooling.
Please claim warranty repairs from the shop where you purchased the product.
If possible, use the original packaging when returning the product for service. Include a dated description of its use and the fault, together with your full address and telephone number.