KAVAN 304TS TwinShark 2700mm - Instruction manual
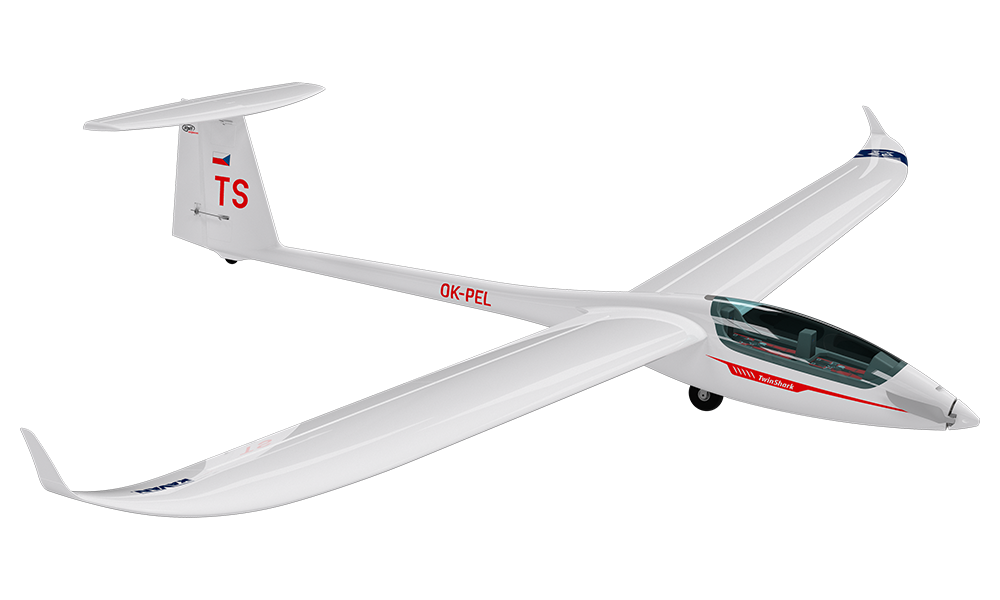
KAVAN 304TS TwinShark - white
Introduction
The TwinShark is a semi-scale motor glider made from carbon-reinforced EPO (expanded polyolefin) foam, with a brushless power system. It is intended for pilots who have mastered a trainer with aileron, elevator, rudder and throttle control. Read this manual and the instructions for your radio, battery, charger and ESC before assembly or operation.
HPH 304TS Twin Shark
A Czech sailplane with German roots
In 1962 Eugen Hänle founded the Glasflügel Segelflugzeugbau GmbH, which soon became famous as the first company to produce fiberglass sailplanes in large numbers. Glasflügel’s designs have always been known for innovative solutions becoming standard features of modern sailplanes: quick assembly systems for wings and tailplanes, trailing edge air brake-flap combinations, highly practical cockpit and control system design and many more. Unfortunately, after the untimely death of the founder in a flight accident in 1975, the company encountered financial difficulties. It was finally dissolved in 1982.
In the mid-1990s, a young Czech company called HPH s.r.o. (already established as a museum quality scale model manufacturer) restored the production of one of the latest sailplanes designed by the Glasflügel – Type 304. The manufacturing plant in Kutná Hora (central Bohemia) started with the HPH 304CZ built using the original moulds and jigs, later upgraded to 15 metres FAI class HPH 304C Wasp. In 2006 they introduced a brand new 18-metre-class design named HPH 304S Shark and finally the 20-metre two-seater class sailplane HPH 304TS Twin Shark in 2017.
Full-size aircraft specifications
| Parameter | Value |
|---|---|
| Wingspan | 20 m |
| Length | 8.95 m |
| Wing area | 15.3 m² |
| Weight | 495 kg (empty), 850 kg (max. take-off) |
| Never exceed speed | 275 km/h |
| Stall speed at maximum weight | 68 km/h |
| Wing loading | 39–55.5 kg/m² |
Background specifications follow the full-size aircraft manufacturer’s technical data, which are marked preliminary and subject to change. They are not operating limits for the RC model.
Features
- Factory-built, officially licensed partially assembled model
- Semi-scale sailplane for thermal and slope soaring
- Optional undercarriage wheel
- Brushless motor with an 11×8" folding propeller
- Aileron, flap, elevator, rudder and throttle control
Technical specifications
| Parameter | Value |
|---|---|
| Wingspan | 2700 mm |
| Length | 1285 mm |
| Wing area | 45 dm² |
| Model weight | 1680 g |
| All-up weight | 1950–2050 g |
| Motor | C3548-750 |
| ESC | KAVAN R-50SB SBEC |
| Propeller | 11×8" |
| Installed servos | 6 |
| Flight battery (not included) | 4S LiPo, 14.8 V, 2600–3300 mAh, at least 30C |
Check the label on the ESC fitted to your model before calibration or programming. The original aircraft manual specifies KAVAN R-50SB; a replacement labelled R-50SB Plus uses different instructions. Follow the matching manual linked in the appendix.
Before you start
- If you are not an experienced RC pilot, plan to have a fully competent pilot check your completed model and help you with your first flights. Even though we have tried to provide you with a thorough instruction manual, RC models are rather complicated and an experienced modeller can quickly check over your model to make sure your first flights are successful.
- Please assemble your model exactly according to these instructions. Do not attempt to modify or change your model in any way, as doing so may adversely change its flying characteristics.
- Before you begin, please check the entire contents of this kit to make sure that no parts are missing or damaged. This will also help you to become familiar with each component of your plane. If you find that any of the parts are either missing or damaged, please contact your dealer immediately for replacement.
- Trial fit each part before glueing it in place. Make sure you are using the correct part and that it fits well before assembling. No amount of glue can make up for a poorly-fitting part.
- The manual contains a drawing showing the default position of the Centre of Gravity (CG) and recommended control surface throws. Please note it is essential to keep the recommended CG position for the first flight otherwise the model could be unstable, hard to control or even unable to fly at all! Start at the forward end of the specified range for greater stability. A rearward CG makes the model more responsive and less stable; adjust it only after becoming familiar with the model, keeping within the specified range.
Your dealer cannot accept kits for return if construction has begun.
Safety precautions
This RC model is not a toy. Use it with care and strictly following the instructions in this manual.
Assemble this model following strictly these instructions. DO NOT modify or alter the model. Failure to do so, the warranty will lapse automatically. Follow the instructions to obtain a safe and solid model at the end of the assembly.
Children under the age of 14 must operate the model under the supervision of an adult.
Assure that the model is in perfect condition before every flight, taking care that all the equipment works correctly and that the model is undamaged in its structure.
Fly only on days with a light breeze and in a safe place away from any obstacles.
General warnings
- An RC aeroplane is not a toy! If misused, it can cause serious bodily harm and damage to property. Fly only in a safe place and follow all instructions and recommendations in this manual. Beware of the propeller! Keep loose items that can get entangled in the propeller away from the spinning propeller, including loose clothing, or other objects such as pencils and screwdrivers. Ensure that your and other people's hands and faces, and animals are kept away from the rotating propeller.
- As the user of this product, you are solely responsible for operating it in a manner that does not endanger yourself and others or result in damage to the product or the property of others. This model is controlled by a radio signal that is subject to interference from many sources outside your control. Interference, equipment failure or pilot error can cause loss of control, so it is advisable to always keep a safe distance in all directions around your model, as this margin will help to avoid collisions or injury.
- Never operate your model with low transmitter batteries.
- Always operate your model in an open area away from power lines, cars, traffic or people. Avoid operating your model in populated areas where injury or damage can occur.
- Carefully follow the directions and warnings for this and any optional support equipment (chargers, rechargeable batteries, etc.) which you use.
- Keep all chemicals, small parts and anything electrical out of the reach of children.
- Moisture causes damage to electronics. Avoid water exposure to all equipment not specifically designed and protected for this purpose.
- The model is mostly made of plastics – it is not fireproof. Keep it away from heat sources, direct sunlight and hot enclosed cars; high temperatures can distort the foam airframe or cause other damage.
- Disconnect the flight battery whenever the model is not in use. Even at zero throttle, the ESC draws current; leaving the battery connected for hours or days can deeply discharge it, damage it and create a fire risk.
Set contents
Almost-ready-to-fly EPO motor glider with installed brushless motor, ESC and servos, folding propeller, assembly accessories and instruction manual. The transmitter, receiver and flight battery are not included.
You will also need
- A transmitter and compatible receiver with at least 6 channels when using the supplied aileron and flap Y-leads. Use at least a 7-channel computer radio for independent aileron and flap control and advanced mixes.
- A 4S LiPo flight battery rated 14.8 V, 2600–3300 mAh and at least 30C, plus a suitable charger.
- Regular modeller’s tools: precision knife (KAV66.770), screwdrivers, pliers, and suitable Allen keys.
Main section
Model assembly
Remove the propeller before the initial radio, ESC and motor setup, including throttle calibration. Refit it only after confirming correct operation, with the flight battery disconnected. Keep the throttle at minimum during control-surface checks; centre only the aileron, elevator and rudder controls and their trims.
-
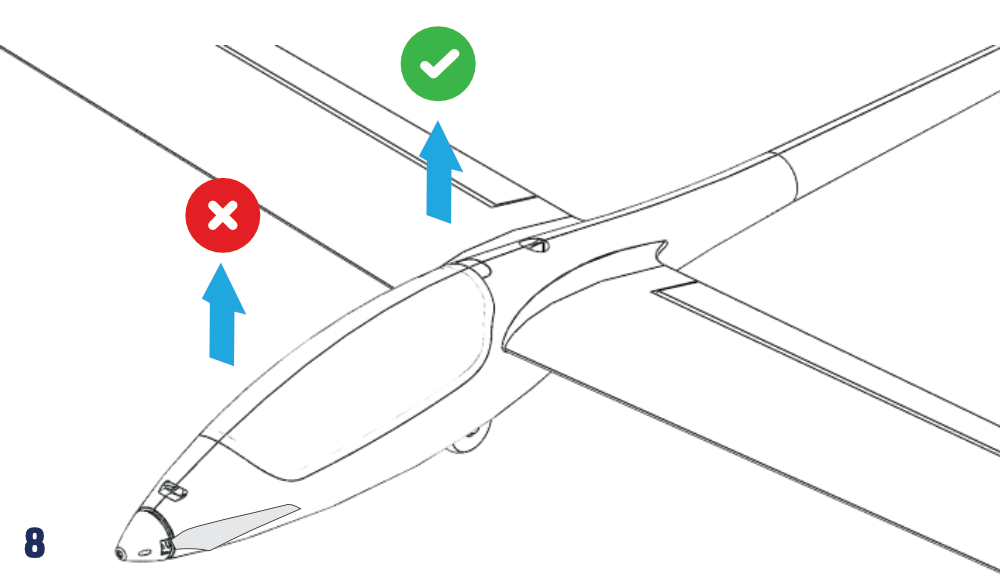
Lift the rear of the canopy and remove it. Do not pull up the front of the canopy. (Fig. 8)
-
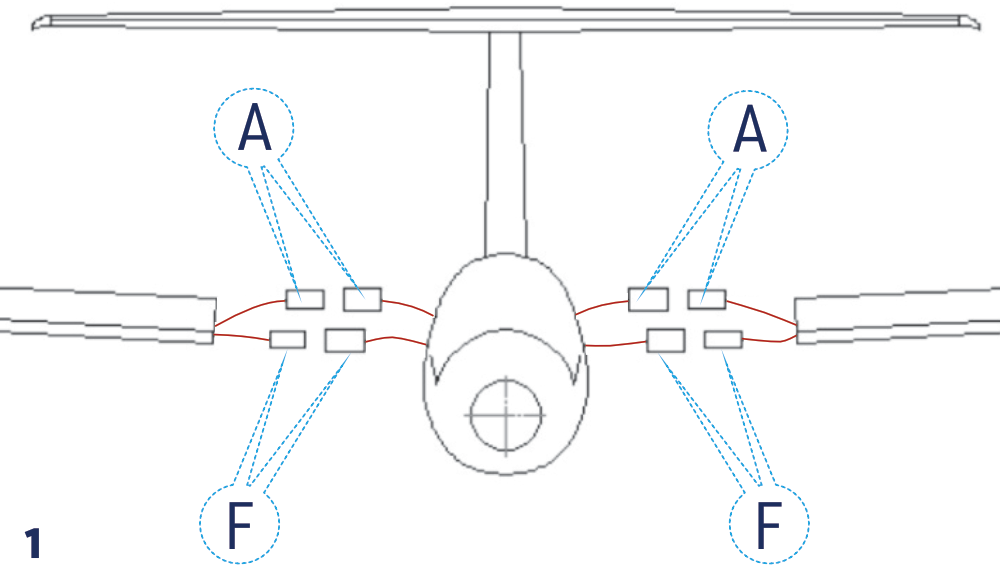
Connect the aileron (A) and flap (F) servo leads to the matching extension leads in the fuselage wing opening. Check connector orientation and ensure that aileron and flap leads are not interchanged. (Fig. 1)
NoteThe supplied Y-leads allow basic 6-channel operation. For independent aileron and flap control with a computer radio, replace them with four 25–30 cm extension leads and connect each wing servo to its own receiver channel.
-
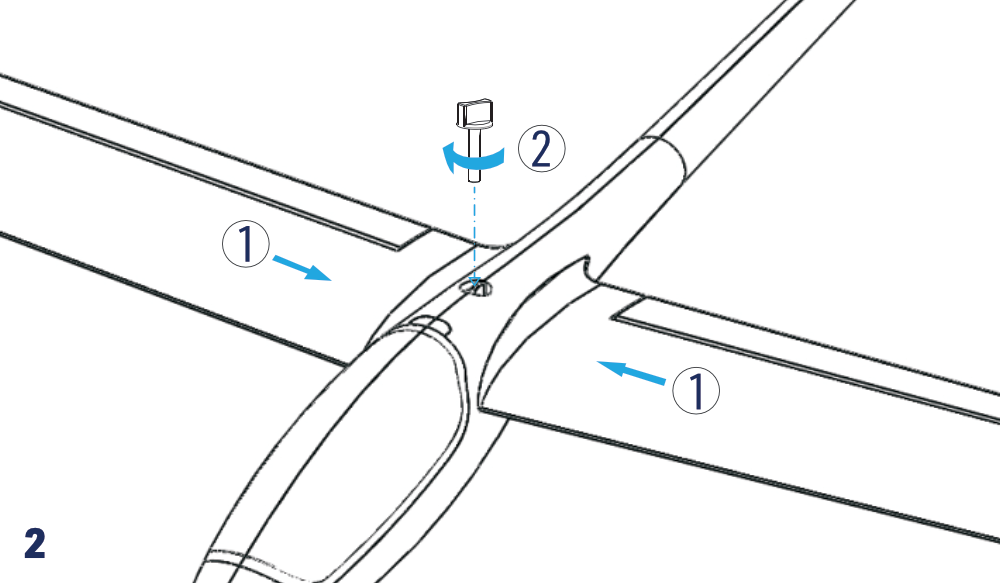
Insert both wing halves into the fuselage and secure them with the M6 nylon bolt. (Fig. 2)
-
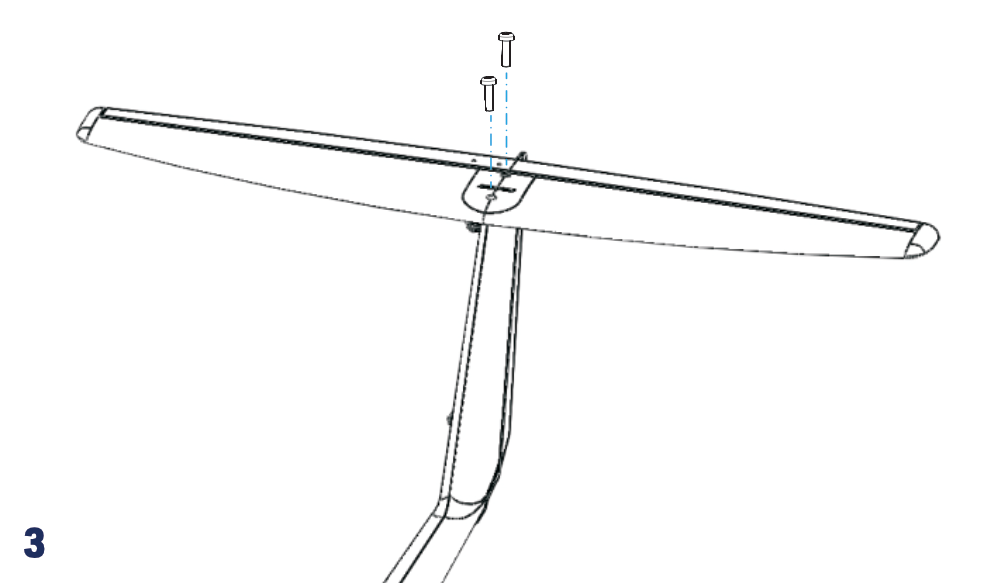
Fit the horizontal tailplane to the top of the fin and secure it with two M3×10 mm screws. (Fig. 3)
-
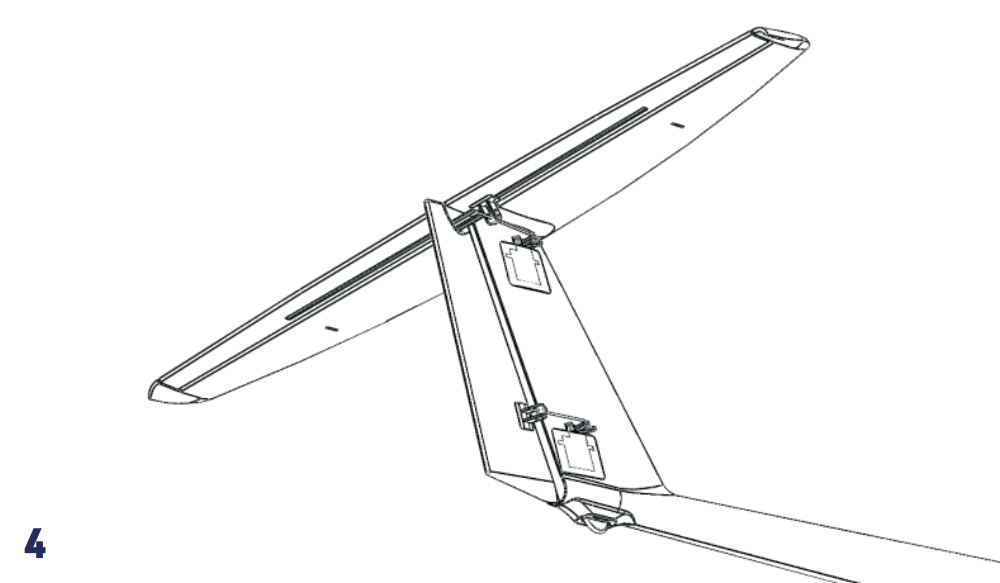
Connect the elevator pushrod from the servo installed in the fin to the elevator horn. (Fig. 4)
-
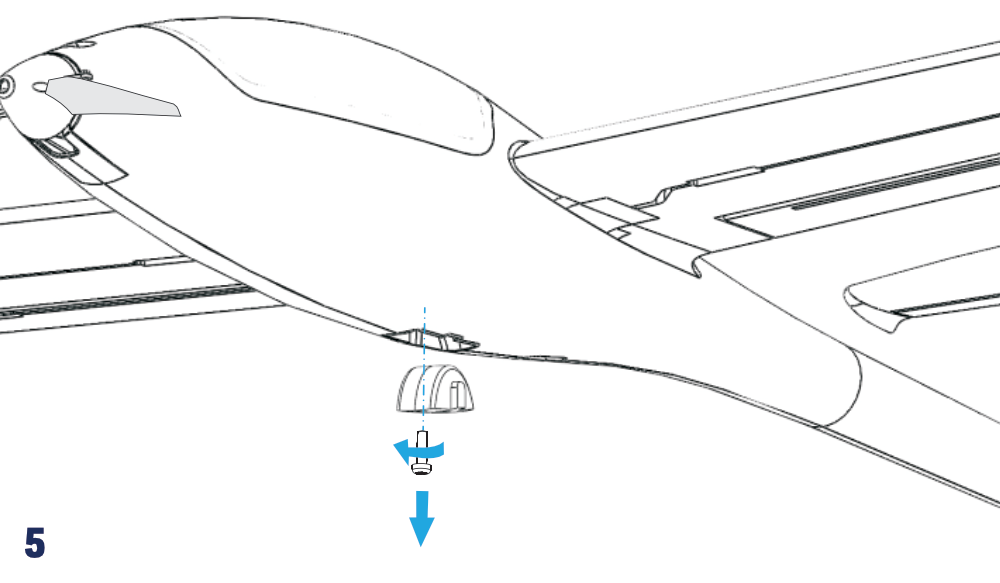
Optional wheel: the model can land on its belly as supplied. To fit the wheel, remove the retaining screw and foam filler from the wheel bay. (Fig. 5)
-
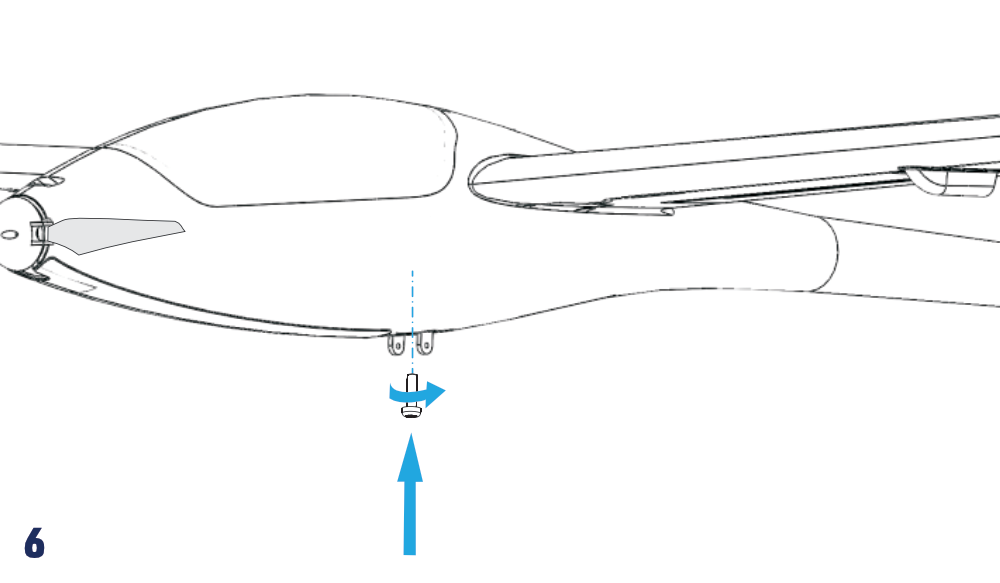
Fit the wheel yoke in the bay and secure it with the screw removed in the previous step. (Fig. 6)
-
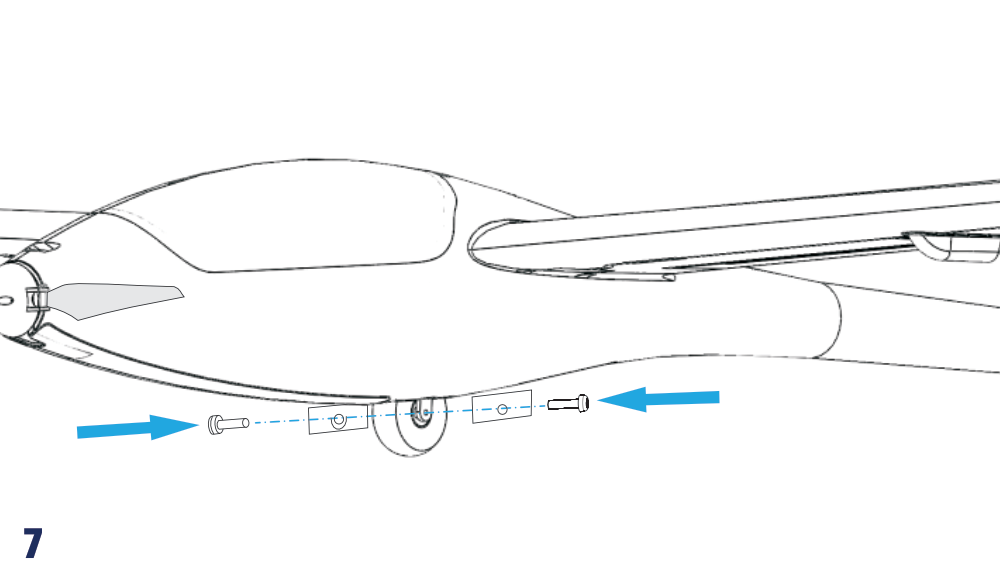
Place the wheel in the yoke. Fit the dummy undercarriage doors on both sides and secure the assembly with two screws, one from each side. (Fig. 7)
-
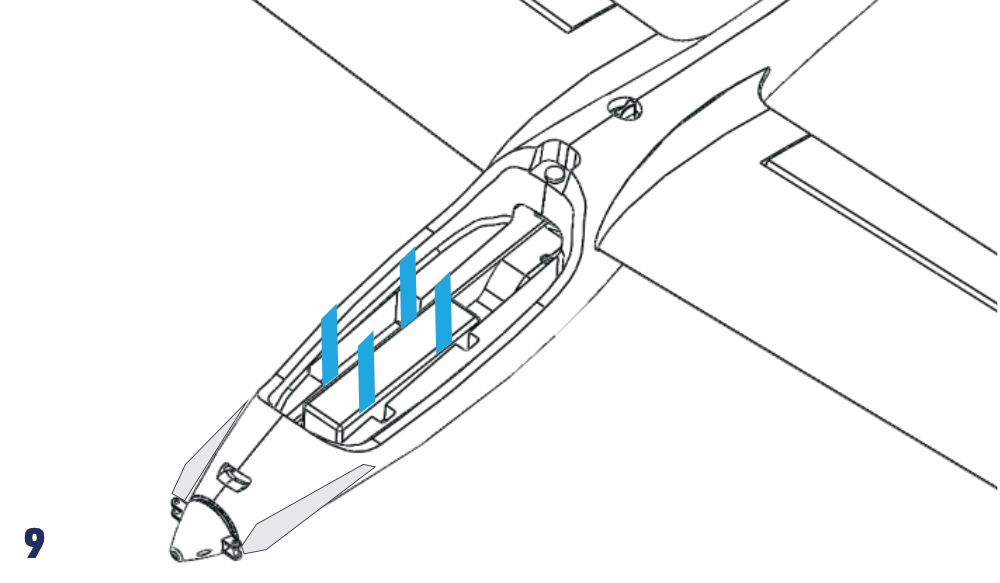
Secure the flight battery in the central cockpit bay with the hook-and-loop strap. Secure the receiver behind the battery and the ESC beside it with hook-and-loop tape or double-sided foam tape. Connect the servos and ESC according to the radio instructions. With a diversity receiver, arrange the active antenna sections perpendicular to each other. (Fig. 9)
-
With the propeller removed, switch on the transmitter with the throttle at minimum, then connect the flight battery. Calibrate the throttle range according to the instructions for the fitted ESC in the appendix. Keep the throttle at minimum, centre the other controls and trims, and set all control surfaces to neutral. Tighten the pushrod-connector screws on the elevator and rudder servo arms and check that the linkages are secure and move freely.
-
Disconnect the flight battery and refit the canopy after completing setup.
Pre-flight preparation
Radio and control surfaces
Follow your radio instructions for installation and programming. With the propeller removed, switch on the transmitter at minimum throttle and then connect the flight battery. Check the neutral position, direction and travel of every control surface. To reduce travel mechanically, move the linkage closer to the servo-arm centre or farther from the control-surface hinge on its horn; reverse these changes to increase travel.
Control throws
| Control surface | Low rate | High rate |
|---|---|---|
| Ailerons | 15 mm up / 8 mm down | 20 mm up / 10 mm down |
| Ailerons (Butterfly) | 20 mm up | 20 mm up |
| Ailerons (Thermal) | 3 mm down | 3 mm down |
| Ailerons (Speed) | 3 mm up | 3 mm up |
| Elevator | ±9 mm | ±12 mm |
| Elevator (Butterfly) | 1–3 mm down | 1–3 mm down |
| Rudder | ±25 mm | ±35 mm |
| Flaps | 8 mm up / 15 mm down | 8 mm up / 15 mm down |
| Flaps as Ailerons | 7 mm up / 3.5 mm down | 10 mm up / 5 mm down |
| Flaps (Butterfly) | 20 mm down | 20 mm down |
| Flaps (Thermal) | 4 mm down | 4 mm down |
| Flaps (Speed) | 3 mm up | 3 mm up |
Use low rates for less experienced pilots and normal soaring. High rates allow an experienced pilot to use the model’s aerobatic capabilities. Aileron differential, with downward travel about 50 % of upward travel, requires a computer radio and independent aileron channels.
With suitable radio programming and independent wing-servo channels, the following mixes can be used:
- Butterfly airbrake: both ailerons move up and both flaps move down, with 1–3 mm of down-elevator compensation as listed in the table.
- Thermal: both ailerons and both flaps move down by the listed amounts.
- Speed: both ailerons and both flaps move up by the listed amounts.
- Flaps as ailerons: the flaps assist roll control, following the ailerons with the asymmetric travel shown in the table.
Motor rotation
Check rotation during the initial propeller-free test: the motor must turn clockwise when viewed from the cockpit towards the nose. If it turns the wrong way, return the throttle to minimum, disconnect the flight battery and swap any two of the three wires between the motor and ESC. Test again before fitting the propeller.
Centre of gravity
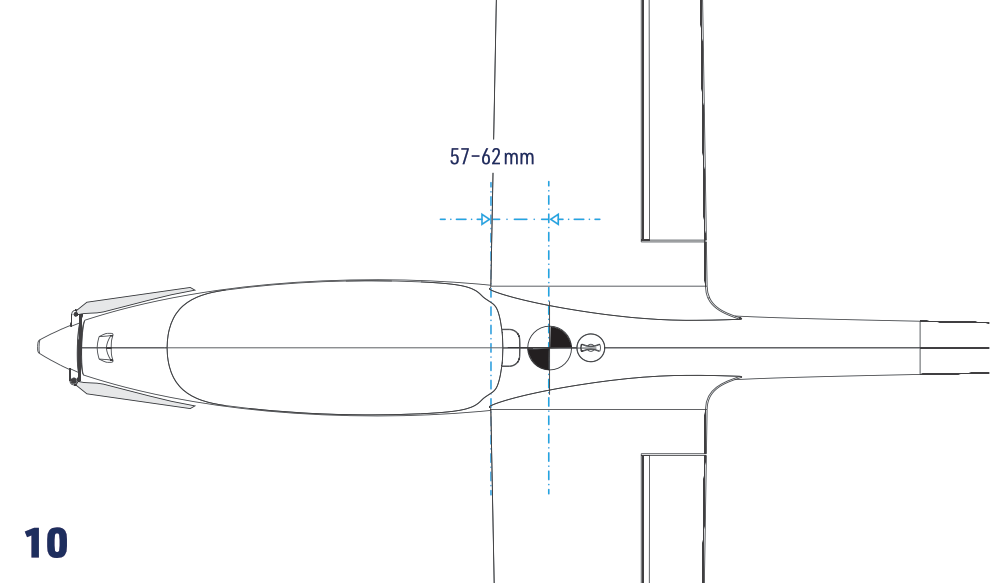
The CG must be 57–62 mm behind the wing leading edge, measured at the wing root as shown. Check with the model complete and its flight battery installed. Adjust the battery position first; if necessary, secure suitable ballast in the nose or tail. (Fig. 10)
Do not fly with the CG outside the specified range. Start at the forward end for the first flight; a rearward CG reduces stability. A small amount of securely fitted ballast is preferable to an incorrectly balanced model.
Range and final checks
Fully charge the flight and transmitter batteries. Check the complete radio installation and perform the range test specified by the radio manufacturer, both with the motor off and at full throttle. Restrain the model securely and keep everyone clear of the propeller and its rotation plane. The range at full throttle must not decrease by more than 10 % compared with the motor-off test. Do not fly unless both tests pass completely.
Flying
The TwinShark is intended for an intermediate pilot. If you lack experience with this type of model, have an experienced pilot make the first flight, check the trim and help with the initial flights. Choose light wind and a clear, safe flying site. Test flying and fine adjustment follow normal practice for a thermal motor glider of this size and layout.
Appendix
KAVAN R-50SB Plus instructions
Use the KAVAN Plus ESC instruction manual for throttle calibration, normal startup, programming, protection functions and troubleshooting. Select LiPo battery mode for the specified flight battery and configure the motor brake for the folding propeller.
Caution
- Do not install the propeller on the motor when you test the ESC and motor for the first time to verify the correct settings on your radio. Only install your propeller after you have confirmed that the settings on your radio is correct.
- Never use ruptured or punctured battery cells.
- Never use battery packs that are known to overheat.
- Never short circuit battery or motor terminals.
- Always use proper insulation material for cable insulation.
- Always use proper cable connectors.
- Do not exceed the number of cells or servos specified for the ESC.
- Wrong battery polarity will damage the ESC and void the warranty.
- Install the ESC in a suitable location with adequate ventilation for cooling.
- Use only batteries that are supported by the ESC and ensure the correct polarity before connecting.
- Switch your transmitter ON first and ensure the throttle stick is in the minimum position before connecting the battery pack.
- Never switch your transmitter OFF while the battery is connected to your ESC.
- Only connect your battery pack just before flying and do not leave your battery pack connected after flying.
- Handle your model with extreme care once the battery pack is connected and keep away from the propeller at all times. Never stand in-line or directly in front of any rotating parts.
- Do not immerse the ESC under water, do not allow it to get wet while powered up.
- Always fly at a designated flying site and follow the rules and guidelines set by your modeller’s club.
Repairs and maintenance
- Please perform the range check in the beginning of each flying session.
- Before every take off please check the correct control surface movement.
- After every landing check the plane for any damage, loose clevises or push rods, damaged undercarriage (if fitted), damaged propeller etc. Do not fly again until the damage is repaired.
Although the TwinShark model is manufactured of the extra tough and virtually unbreakable expanded polyolefin (EPO) foam, damage or broken parts may occur. A minor damage can be repaired simply gluing the parts together with a cyanoacrylate (CA) glue or with a clear sticky tape. In a case of a major damage it is always better to purchase a brand new spare part. A wide range of genuine spare parts and accessories is available through the KAVAN Europe s.r.o. dealers.
In the unfortunate event of a crash or heavy landing, no matter how minor or major, you must lower the throttle stick to its lowest position as quickly as possible to prevent damage to the electronic speed controller.
Failure to lower the throttle stick and trim to the lowest possible positions in the event of a crash could result in damage to the ESC, which may require replacement of the ESC.
Crash damage is not covered under warranty.
Guarantee
The supplied guarantee follows the applicable legal requirements in the country of purchase. For a claim, contact the retailer from whom you purchased the model. KAVAN Europe s.r.o. guarantees that this model kit is free from defects in both materials and workmanship at the time of sale. This warranty does not cover any parts damaged through use or as a result of modification; subject to applicable law, the liability of the manufacturer and importer is limited to the original purchase price of the model kit. This limitation does not apply where a court imposes unlimited liability for proven intent or gross negligence. KAVAN Europe s.r.o. also reserves the right to change or modify this warranty without prior notice. The model kit is subject to ongoing improvement and refinement, and the manufacturer reserves the right to change the design without prior notice.
Since KAVAN Europe s.r.o. has no control over potential damage during shipping, the method of assembly, or the materials used by the modeller to complete the model, no liability can be assumed or accepted for damages associated with the use of the model assembled by the user. The moment the user decides to use the model they have assembled, they assume full responsibility. If the purchaser is not prepared to accept this responsibility, they should immediately return the kit in its complete and unused condition to the place of purchase.
If your RC model requires service, please follow the guidelines below. Failure to comply with these guidelines may result in the warranty being voided.
- Send the complete model and transmitter for service unless you have agreed otherwise with the service technician.
- If possible, use the original packaging to pack the model. Do not use the original cardboard box as the final packaging.
- Include a detailed description of how you have used the model and RC kit, as well as the problem you have encountered. Attach a numbered list of the included accessories and provide any additional information that may assist the service department. Date the note and double-check that it includes your full address and phone number.
- Provide your name, address, and phone number where you can be reached during business hours. Include a copy of the model’s proof of purchase.
This warranty card entitles you to a free warranty repair of a product supplied by KAVAN Europe s.r.o. within 24 months. The warranty does not cover normal wear and tear resulting from regular use, as this is a product intended for sports and model-making use, in which individual parts operate under much higher loads than those to which ordinary toys are subjected. The model’s moving parts (motor, servos, and their gears, etc.) are subject to natural wear and tear, and replacement may be necessary over time.
The warranty also does not cover any part of the model or RC kit that was improperly installed, handled roughly or incorrectly, or damaged in a crash, nor does it cover any part of the model or RC kit that was repaired or modified by an unauthorised person. As with other delicate electronic products, do not expose your RC system to high temperatures, low temperatures, humidity, or dusty environments. Do not leave it in direct sunlight for extended periods.
The guarantee also excludes faults caused by incorrect wiring or reversed polarity, late or omitted maintenance, operation outside the specified limits, and accessories or repairs not approved by KAVAN Europe s.r.o. Avoid strong mechanical shocks and user-applied waterproof coatings on the RC electronics.
Recycling and waste disposal note (European Union)
Electrical equipment marked with the crossed-out waste bin symbol must not be discarded in the domestic waste; it should be disposed of via the appropriate specialised disposal system. In the countries of the EU (European Union) electrical devices must not be discarded via the normal domestic waste system (WEEE - Waste of Electrical and Electronic Equipment, Directive 2012/19/EU). You can take your unwanted equipment to your nearest public collection point or recycling centre, where it will be disposed of in the proper manner at no charge to you. By disposing of your old equipment in a responsible manner you make an important contribution to the safeguarding of the environment!
EU declaration of conformity
Hereby, KAVAN Europe s.r.o. declares that the model TwinShark and the included electronic and electric devices are in compliance with the requirements of relevant European directives and harmonized norms. The full text of the Declaration of Conformity is available at kavanrc.com/doc.