KAVAN Vibe 1000mm - Instruction manual
Introduction
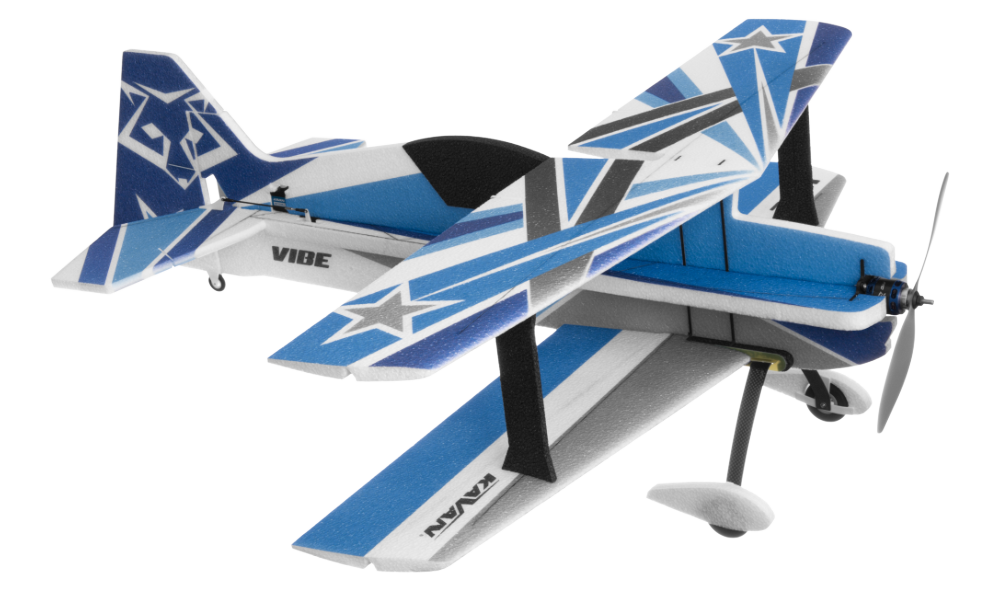
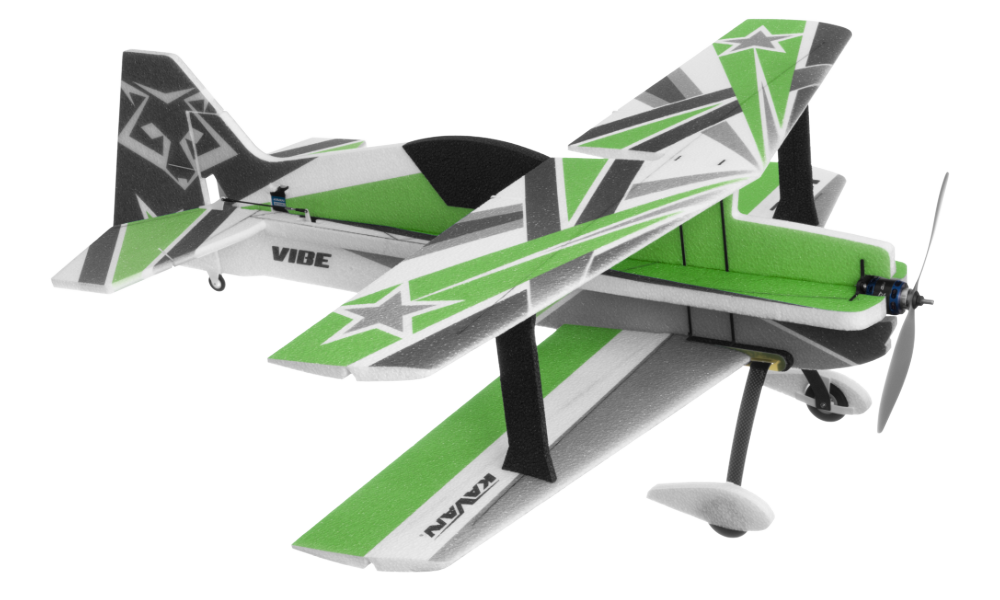
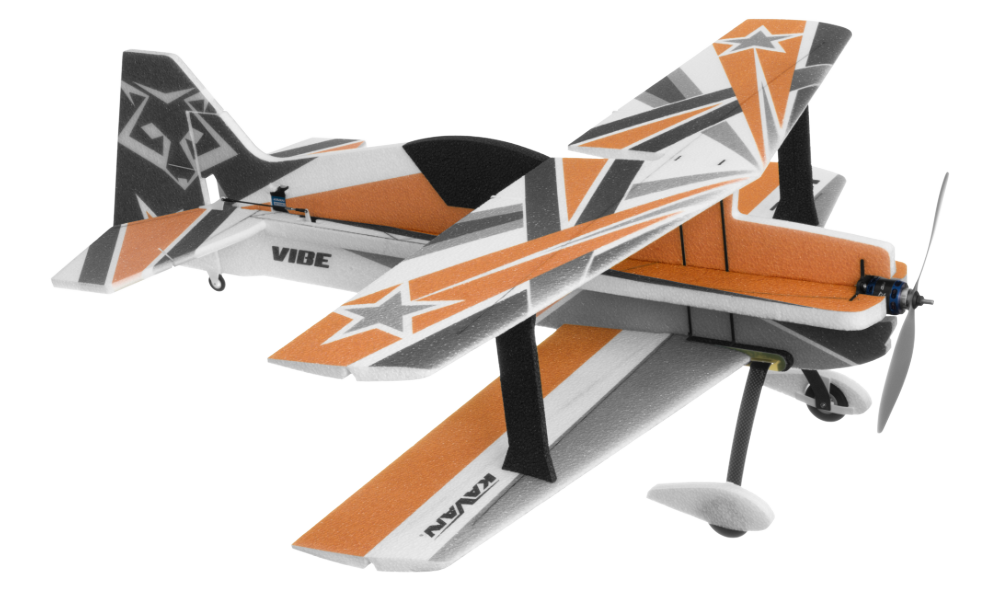
The Vibe is a kit for a 3D aerobatic biplane made from carbon-reinforced EPP (expanded polypropylene) foam. It suits pilots who have mastered a trainer with aileron, elevator, rudder and throttle control. The motor, ESC, radio, flight battery and four servos are selected and installed by the builder.
Before you start
- If you are not an experienced RC pilot, plan to have a fully competent pilot check your completed model and help you with your first flights. Even though we have tried to provide you with a thorough instruction manual, RC models are rather complicated and an experienced modeller can quickly check over your model to make sure your first flights are successful.
- Please assemble your model exactly according to these instructions. Do not attempt to modify or change your model in any way, as doing so may adversely change its flying characteristics.
- Before you begin, please check the entire contents of this kit to make sure that no parts are missing or damaged. This will also help you to become familiar with each component of your plane. If you find that any of the parts are either missing or damaged, please contact your dealer immediately for replacement.
- Trial fit each part before glueing it in place. Make sure you are using the correct part and that it fits well before assembling. No amount of glue can make up for a poorly-fitting part.
- The manual shows the initial centre of gravity (CG) and recommended control throws. Use the specified CG for the first flight; otherwise the model may be unstable, difficult to control or unable to fly safely. See the pre-flight section before making any later adjustment.
Your dealer cannot accept kits for return if construction has begun.
Safety precautions
This RC model is not a toy. Use it with care and strictly following the instructions in this manual.
Assemble this model following strictly these instructions. DO NOT modify or alter the model. Failure to do so, the warranty will lapse automatically. Follow the instructions to obtain a safe and solid model at the end of the assembly.
Children under the age of 14 must operate the model under the supervision of an adult.
Assure that the model is in perfect condition before every flight, taking care that all the equipment works correctly and that the model is undamaged in its structure.
Fly only on days with a light breeze and in a safe place away from any obstacles.
General warnings
- An RC aeroplane is not a toy! If misused, it can cause serious bodily harm and damage to property. Fly only in a safe place and follow all instructions and recommendations in this manual. Beware of the propeller! Keep loose items that can get entangled in the propeller away from the spinning propeller, including loose clothing, or other objects such as pencils and screwdrivers. Ensure that your and other people's hands and faces, and animals are kept away from the rotating propeller.
- As the user of this product, you are solely responsible for operating it in a manner that does not endanger yourself and others or result in damage to the product or the property of others. This model is controlled by a radio signal that is subject to interference from many sources outside your control. Interference, equipment failure or pilot error can cause loss of control, so it is advisable to always keep a safe distance in all directions around your model, as this margin will help to avoid collisions or injury.
- Never operate your model with low transmitter batteries.
- Always operate your model in an open area away from power lines, cars, traffic or people. Avoid operating your model in populated areas where injury or damage can occur.
- Carefully follow the directions and warnings for this and any optional support equipment (chargers, rechargeable batteries, etc.) which you use.
- Keep all chemicals, small parts and anything electrical out of the reach of children.
- Moisture causes damage to electronics. Avoid water exposure to all equipment not specifically designed and protected for this purpose.
- The model is mostly made of plastics – it is not fireproof. Keep it away from heat sources, direct sunlight and hot enclosed cars; high temperatures can distort the foam airframe or cause other damage.
- Disconnect the flight battery whenever the model is not in use. Even at zero throttle, the ESC draws current; leaving the battery connected for hours or days can deeply discharge it, damage it and create a fire risk.
Set contents
Printed EPP fuselage, wing, tail and wheel-pant parts; plywood firewall; carbon reinforcements and undercarriage; wheels; plastic horns and fittings; linkage hardware; and an instruction manual. The motor, propeller, ESC, radio, flight battery and servos are not included.
Features
- Printed EPP airframe parts with carbon reinforcement
- Designed and manufactured in the Czech Republic
- Biplane layout with large control surfaces
- Low weight and a large wing area
- Carbon main undercarriage, wheel pants and a steerable tailwheel
- Aileron, elevator, rudder and throttle control
Technical specifications
| Parameter | Value |
|---|---|
| Wingspan | 980 mm |
| Length | 1060 mm |
| All-up weight | 750–800 g |
You will also need
- A transmitter and compatible receiver with at least 4 channels; a computer radio with dual rates and expo is recommended.
- A brushless power system, suitable 3S or 4S LiPo flight battery and charger, and four micro servos: two for the ailerons, one for the elevator and one for the rudder. Select a complete configuration from the table below.
- Regular modeller’s tools: a modeller’s knife (KAV66.770), screwdrivers, pliers, a drill with Ø1.5 mm, Ø1.6 mm, Ø2.0 mm and Ø3.0 mm bits, and 180–360 grit sandpaper.
- Medium CA (KAV56.9952), thin CA (KAV56.9951), CA accelerator (KAV56.9959) and hot-melt adhesive.
Recommended power systems and servos
- Sunday 3D: For 3D aerobatic beginners and Sunday flyers.
- 3D: For everybody who likes it hot and 3D.
A 40–50A ESC with an adequately rated linear BEC may be used with analogue servos. Use a powerful switching SBEC for high-torque, high-speed digital servos. Check the supply-voltage and current requirements of all four servos.
| Component | 3S LiPo – Sunday 3D | 3S LiPo – 3D | 4S LiPo – 3D |
|---|---|---|---|
| Motor | KAVAN C3536-1000 | KAVAN PRO 3536-1000 | KAVAN PRO 3536-1000 |
| Propeller | APC 11×4.7"SF | APC 11×4.7"SF | APC 10×4.7"SF |
| ESC | KAVAN R-40SB Plus | KAVAN R-50SB Plus | KAVAN R-50SB Plus |
| Battery | KAVAN LiPo 11.1 V 1800 mAh 40/80C | KAVAN LiPo 11.1 V 1300 mAh 40/80C | KAVAN LiPo 14.8 V 1300 mAh 40/80C |
| Servos | KAVAN GO-13MG, Hitec HS-65MG or HS-70MG | KAVAN GO-1013MG, Hitec HS-5065MG or HS-5070MH | KAVAN GO-1013MG, Hitec HS-5065MG or HS-5070MH |
Keep each motor, propeller and battery combination together. Follow the KAVAN Plus ESC instructions when using the listed Plus controllers.
Parts list
Use the drawing references to identify the supplied parts. Dimensions describe the unassembled parts unless stated otherwise.
Main parts
| Part | Quantity | Material | Dimensions | Drawing |
|---|---|---|---|---|
| Instruction manual | 1 | Paper | A4 | |
| Fuselage – vertical part | 1 | EPP | (Fig. 26) | |
| Fuselage – horizontal part | 1 | EPP | (Fig. 19) | |
| Top wing – left + right | 1+1 | EPP | (Fig. 2) | |
| Bottom wing – left + right | 1+1 | EPP | (Fig. 2) | |
| Canopy | 1 | EPP | (Fig. 26) | |
| Rudder | 1 | EPP | (Fig. 32) | |
| Horizontal tailplane | 1 | EPP | (Fig. 16) | |
| Wing strut | 2 | EPP | (Fig. 34) | |
| Undercarriage block | 2 | EPP | (Fig. 29) | |
| Wheel pant – inner | 2 | EPP | (Fig. 53) | |
| Wheel pant – outer | 2 | EPP | (Fig. 53) | |
| Main undercarriage | 1 | Carbon | (Fig. 47) | |
| Fuselage vertical reinforcement | 2 | Plywood | 3 mm | (Fig. 28) |
Carbon parts bundle
| Part | Quantity | Material | Dimensions | Drawing |
|---|---|---|---|---|
| Carbon spar | 5 | Carbon | 3×0.5×1000 mm | (Fig. 20) (Fig. 22) |
| Carbon spar | 1 | Carbon | 3×1.0×330 mm | (Fig. 17) |
| Carbon spar | 1 | Carbon | 3×1.0×250 mm | (Fig. 17) |
| Carbon spar | 2 | Carbon | 3×0.5×200 mm | (Fig. 34) |
| Carbon rod | 4 | Carbon | Ø1.5×800 mm | (Fig. 4) |
Small accessories bag
| Part | Quantity | Material | Dimensions | Drawing |
|---|---|---|---|---|
| Firewall | 1 | Plywood | 3 mm | (Fig. 15) |
| Rudder hinge | 3 | Plastic | (Fig. 32) | |
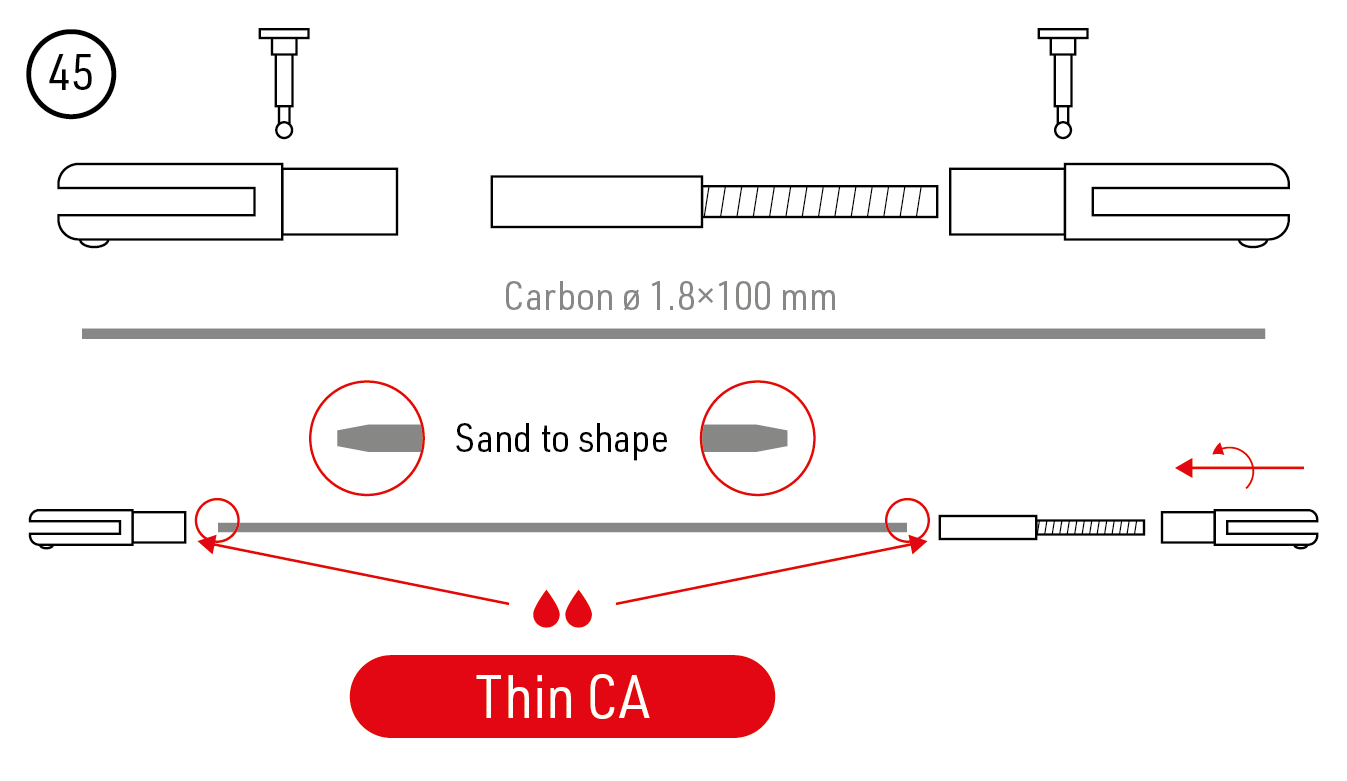
| Elevator pushrod | 1 | Carbon | Ø1.8×100 mm | (Fig. 45) |
| Rudder pushrod | 1 | Carbon | Ø1.8×100 mm | (Fig. 45) |
| Aileron horn | 2 | Plastic | (Fig. 9) | |
| Rudder horn | 1 | Plastic | (Fig. 41) | |
| Elevator horn | 1 | Plastic | (Fig. 41) | |
| Aileron joiner horn | 4 | Plastic | (Fig. 13) | |
| Undercarriage holder | 2 | Fibreglass | 1.5 mm | (Fig. 29) |
| Undercarriage plate | 1 | Fibreglass | 1.5 mm | (Fig. 47) |
| Wheel | 2 | Plastic | Ø50 mm | (Fig. 53) |
| Tailwheel | 1 | Plastic | Ø25 mm | (Fig. 60) |
| Wheel pant holder | 2 | Plastic | (Fig. 53) | |
| Wheel axle | 2 | Steel | M3×16 mm socket screw | (Fig. 53) |
| M3 nut | 4 | Steel | M3 | (Fig. 53) |
| M3 washer | 4 | Steel | Ø6 mm | (Fig. 53) |
| Undercarriage bolt | 2 | Steel | 3.8×7 mm self-tapping screw | (Fig. 47) |
| Tailwheel bracket | 1 | Plastic | (Fig. 60) | |
| Tailwheel axle | 1 | Steel | M2×10 mm screw | (Fig. 60) |
| Tailwheel bracket axle | 1 | Steel | M2×5 mm screw | (Fig. 60) |
| Ball link | 8 | Plastic/brass | (Fig. 9) (Fig. 39) | |
| Ball link screw | 8 | Steel | M1.5×4 mm screw | (Fig. 9) (Fig. 39) |
| Clevis | 4 | Plastic | (Fig. 9) | |
| Clevis pin | 4 | Brass | (Fig. 9) | |
| Aileron pushrod | 2 | Steel | M2×40 mm screw | (Fig. 9) |
| Aileron joiner rod | 2 | Carbon | Ø1.5×180 mm | (Fig. 37) |
| M2/2 threaded coupler | 2 | Brass | (Fig. 45) | |
| M2/1.5 threaded coupler | 2 | Brass | (Fig. 37) |
Main section
Model assembly
Keep the propeller removed during assembly, radio setup and the initial motor test. Keep the flight battery disconnected except when a powered check is required. Switch on the transmitter with the throttle at minimum before connecting the flight battery; disconnect the battery before switching off the transmitter.
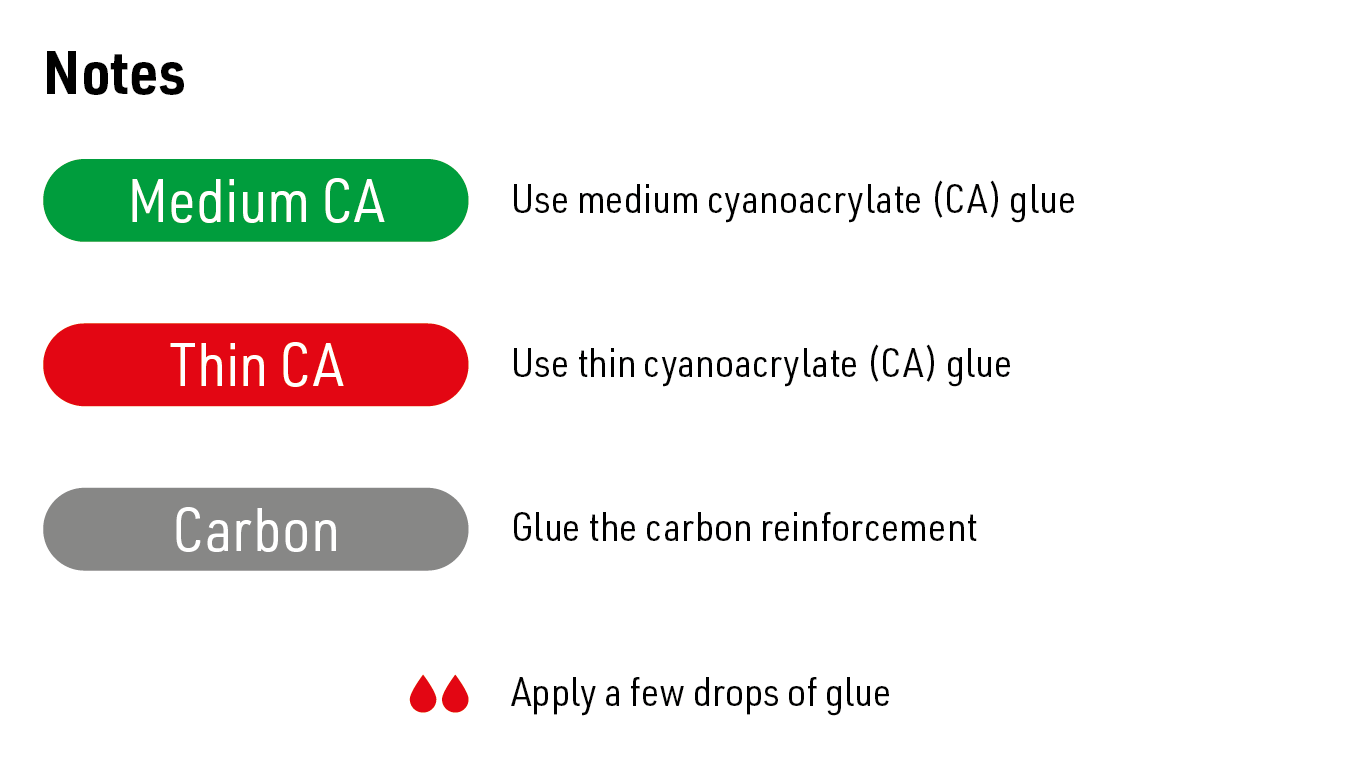
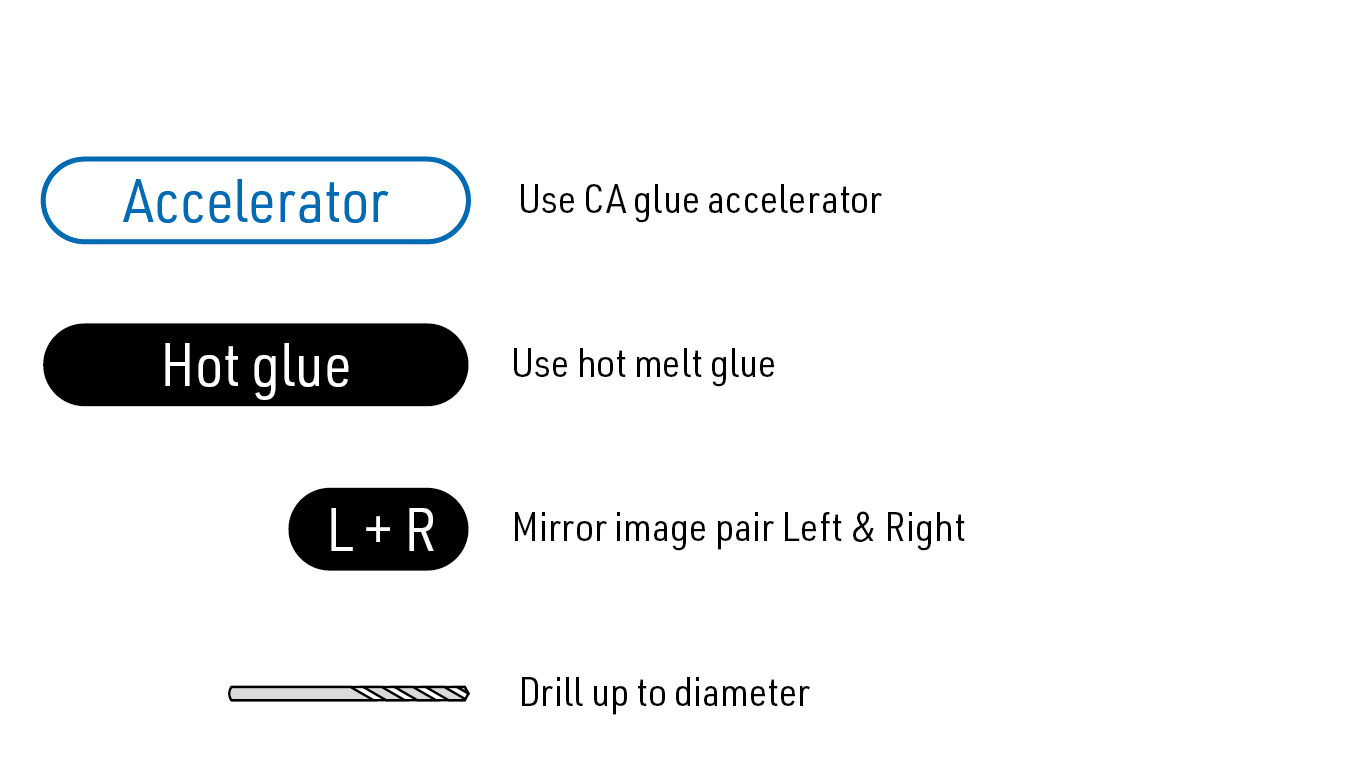
Drawing symbols
Follow the drawings in numerical order. The labels in the original drawings mean:
| Drawing label | Meaning |
|---|---|
| Medium CA | Medium-viscosity cyanoacrylate adhesive |
| Thin CA | Thin cyanoacrylate adhesive |
| No glue / Do not glue | Leave the indicated joint unglued at this stage |
| Carbon | Fit the carbon reinforcement |
| Red drops | Apply a few drops of the indicated adhesive |
| Accelerator | Apply CA accelerator |
| Hot glue | Use hot-melt adhesive |
| TS / Top side | Upper surface |
| BS / Bottom side | Lower surface |
| L + R | Make matching left and right assemblies |
| Drill symbol and Ø | Drill to the specified diameter |
| Cut / Cut line | Cut along the marked line |
| Roughen / Sand to shape | Roughen the bonding surface or sand the end to the illustrated shape |
| Servo neutral | Centre the servo electrically before setting its arm |
Use the dimensions printed on the drawings. The images on screen are not full-size templates. Check the assembled linkage lengths before gluing the fittings permanently.
Wings and lower aileron controls
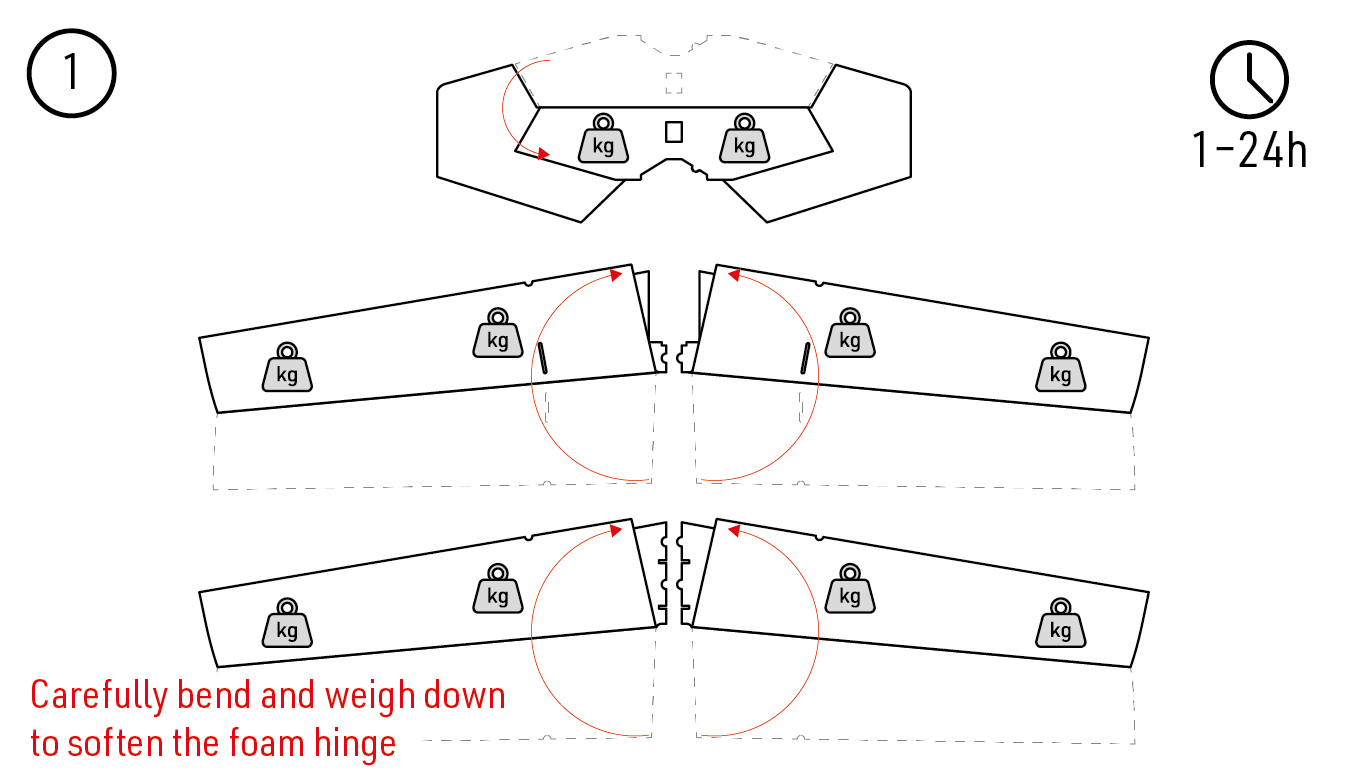
- Carefully fold back the elevator and all four ailerons and hold them with weights for 1–24 hours to soften the foam hinges. Do not tear the hinges. (Fig. 1)
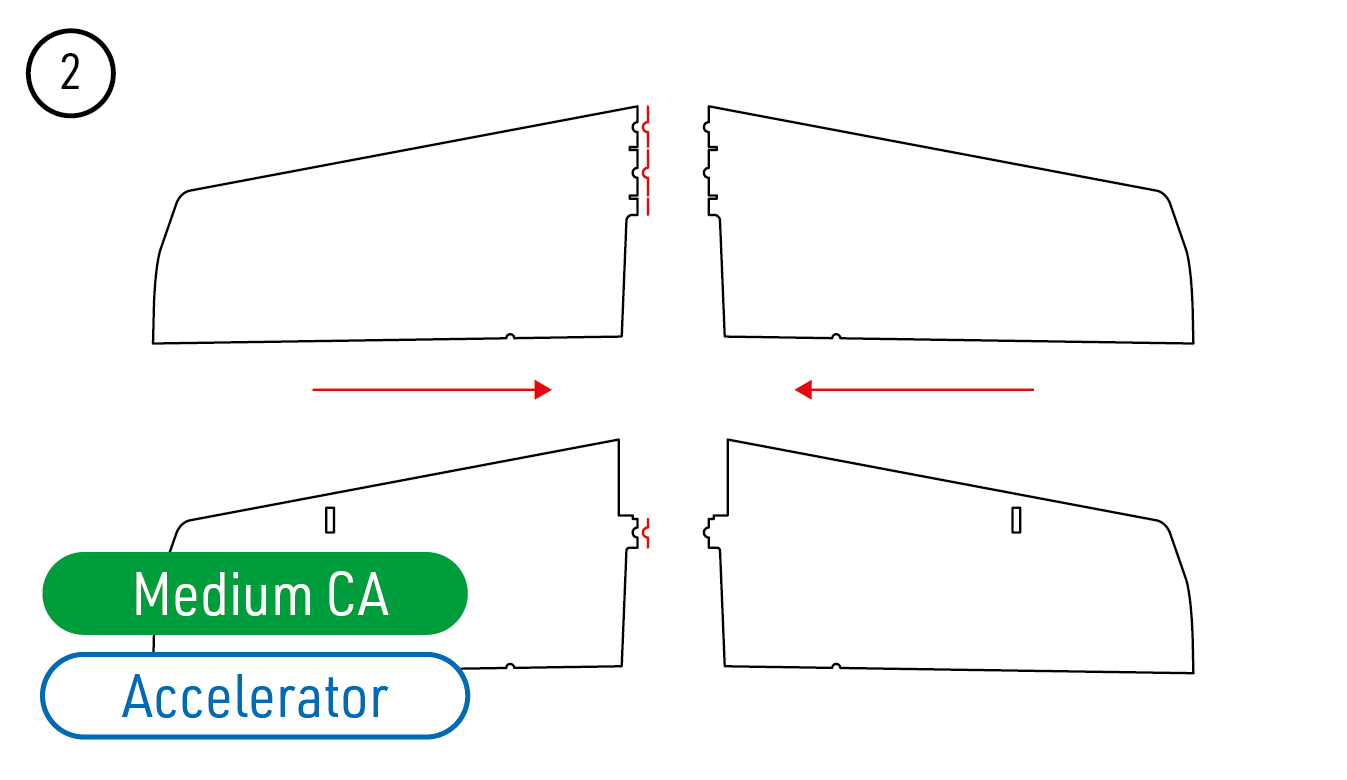
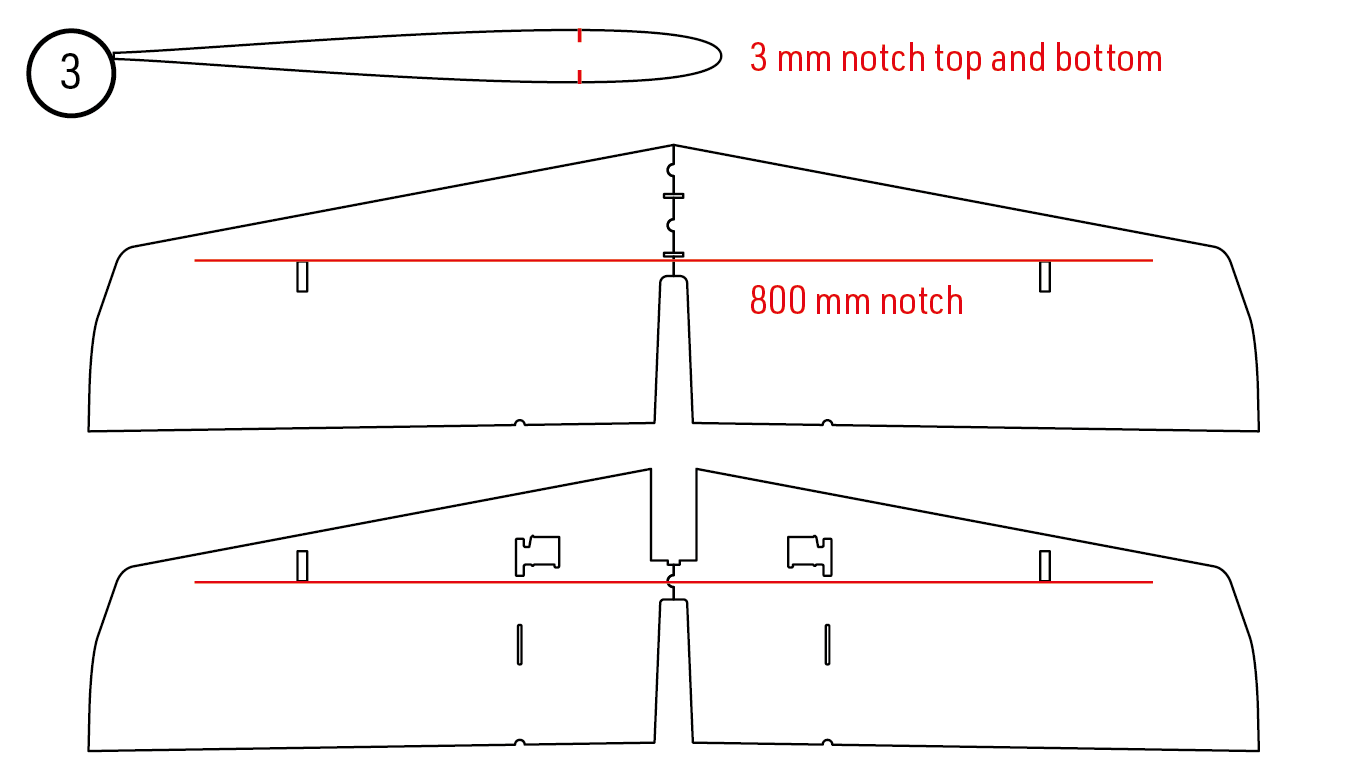
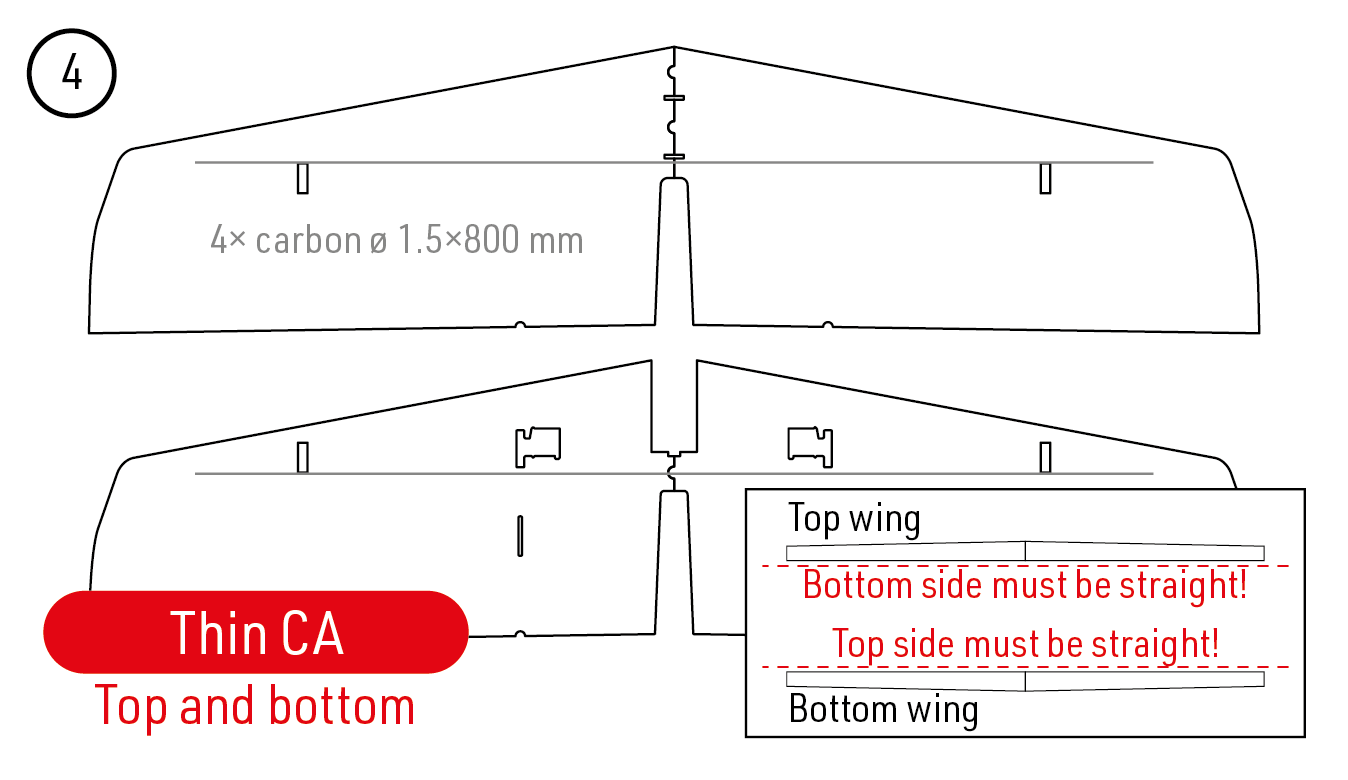
- Join the left and right panels of each wing with medium CA and accelerator. Cut 800mm spar slots 3 mm deep on both faces of both wings. Glue in the four Ø1.5×800 mm carbon rods with thin CA. Keep the underside of the upper wing straight and the upper side of the lower wing straight. (Fig. 2) (Fig. 3) (Fig. 4)
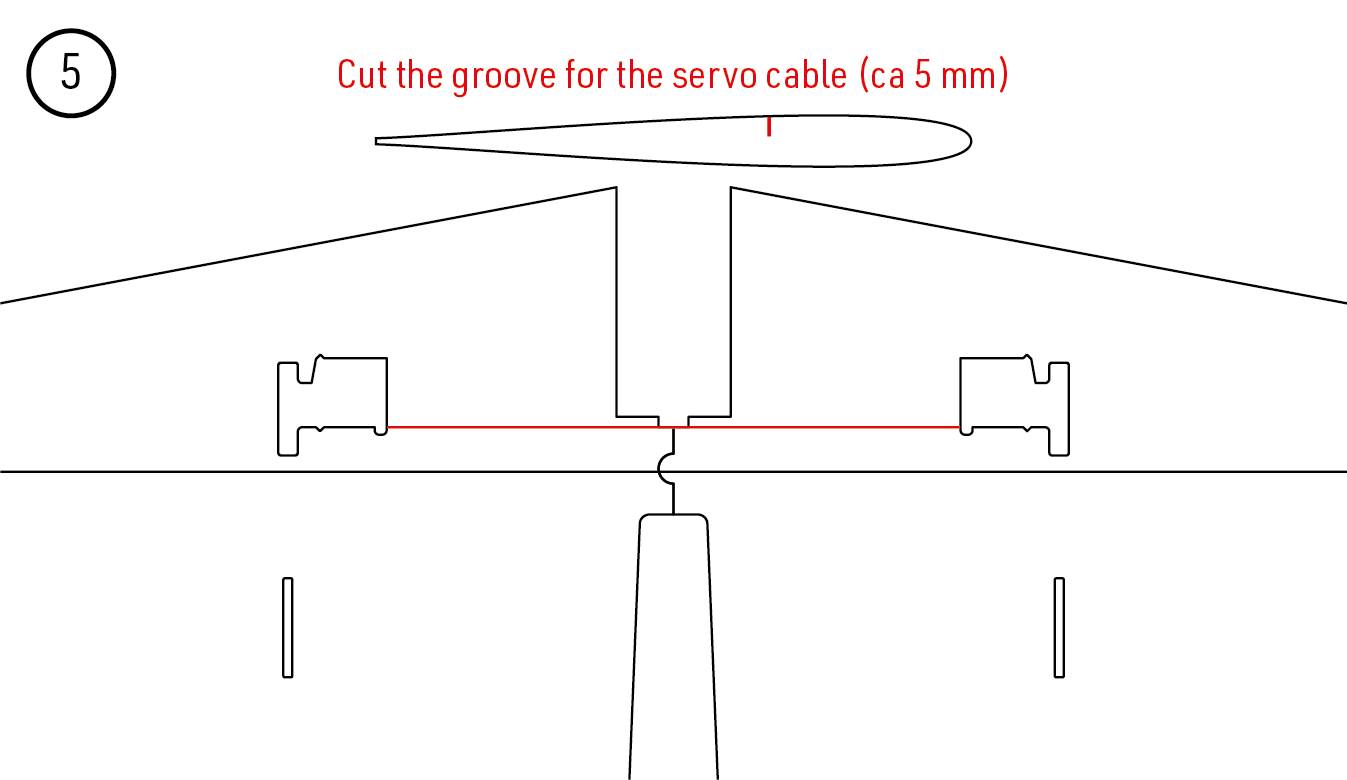
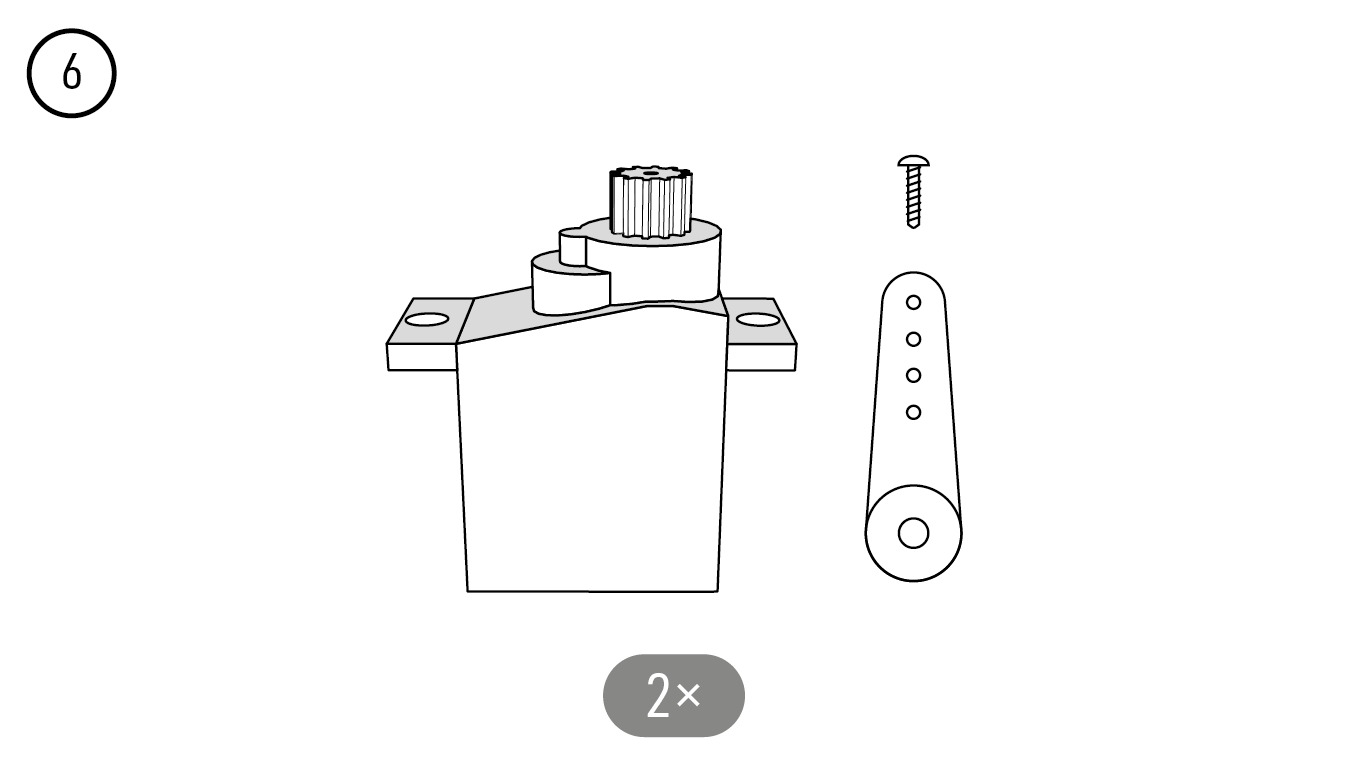
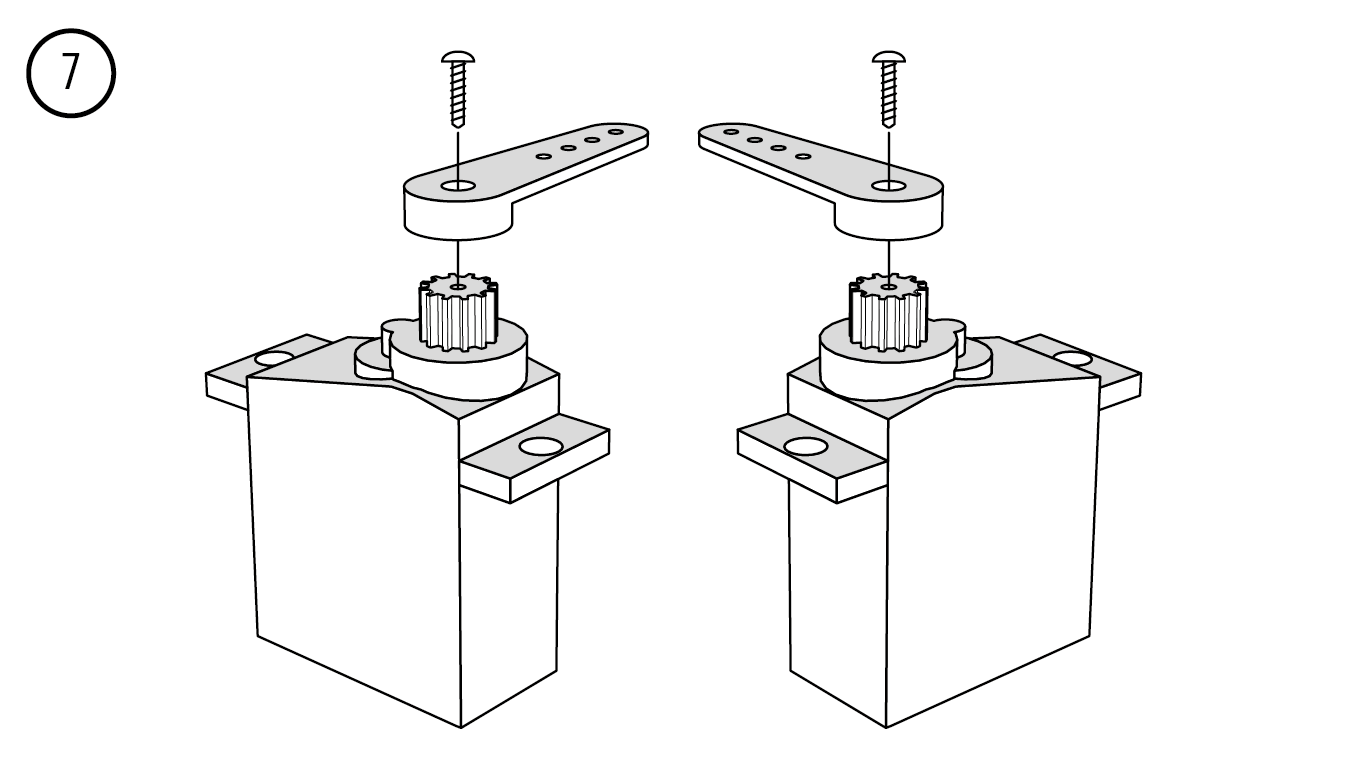
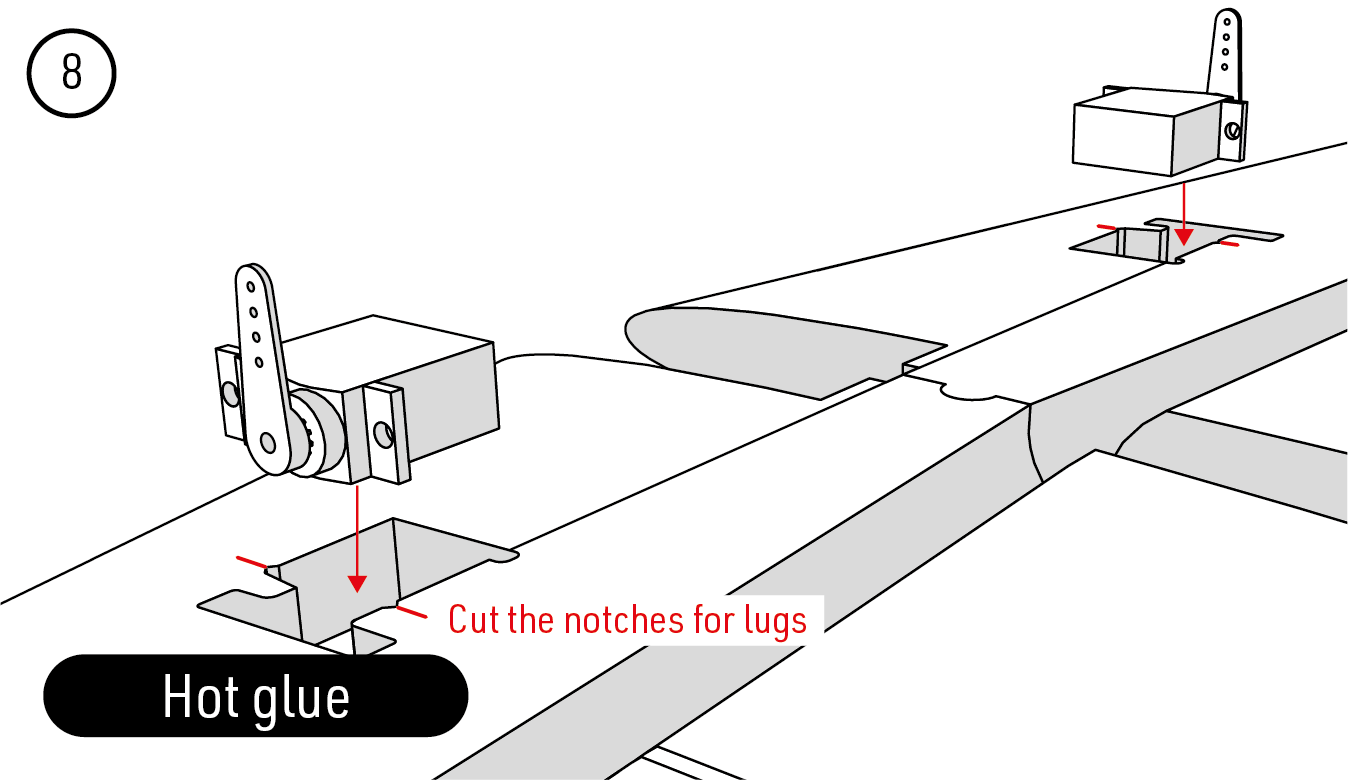
- Cut the lower-wing servo-lead groove approximately 5 mm deep. Centre both aileron servos electrically, fit their arms as a mirrored pair and secure the arm screws. Cut recesses for the mounting lugs, glue the servos in with hot melt glue and route their leads in the groove. (Fig. 5) (Fig. 6) (Fig. 7) (Fig. 8)
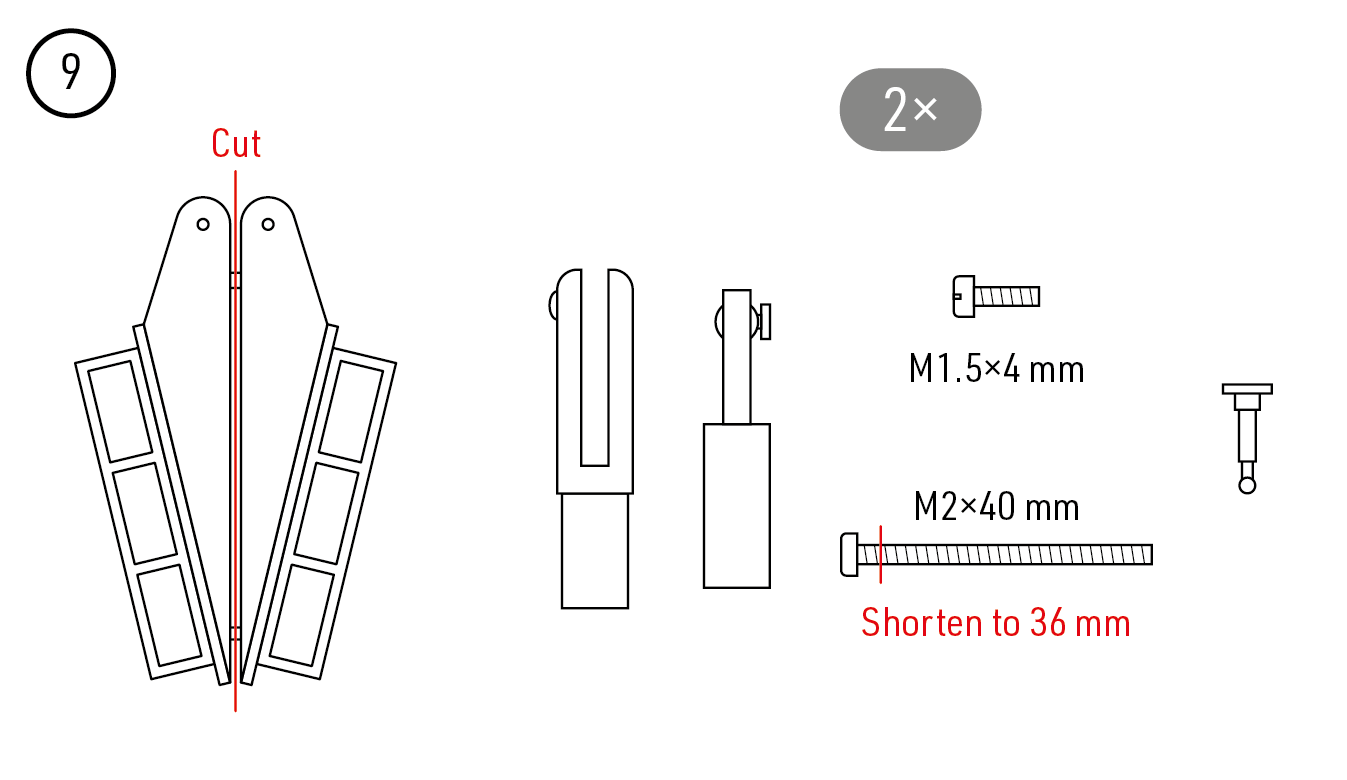
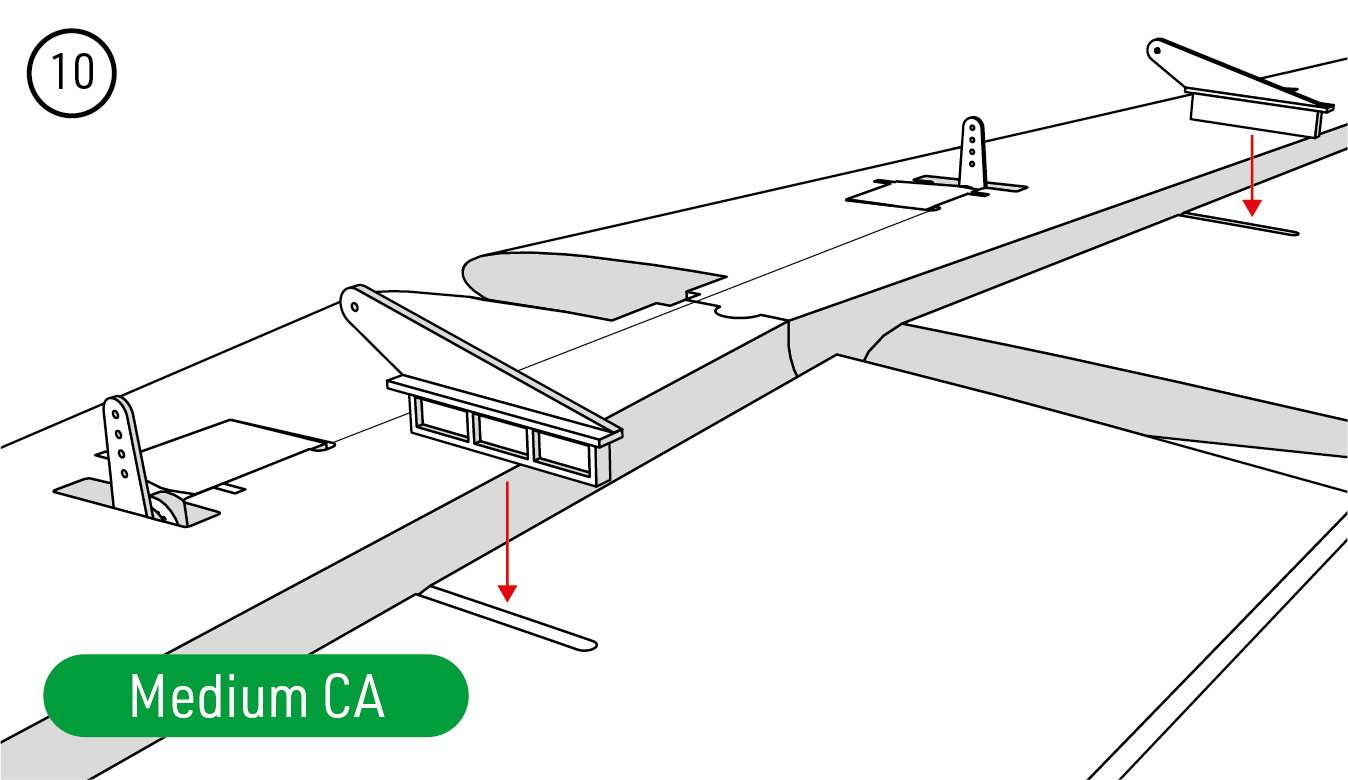
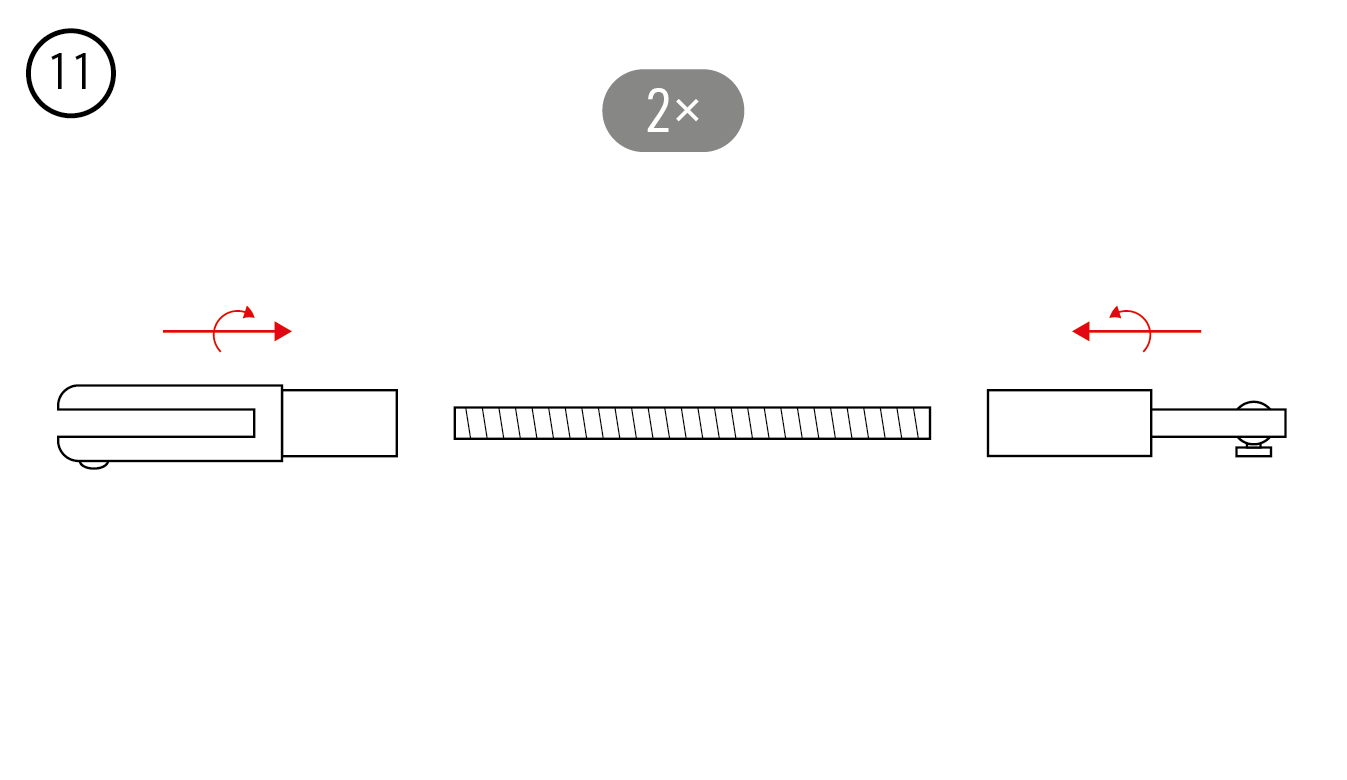
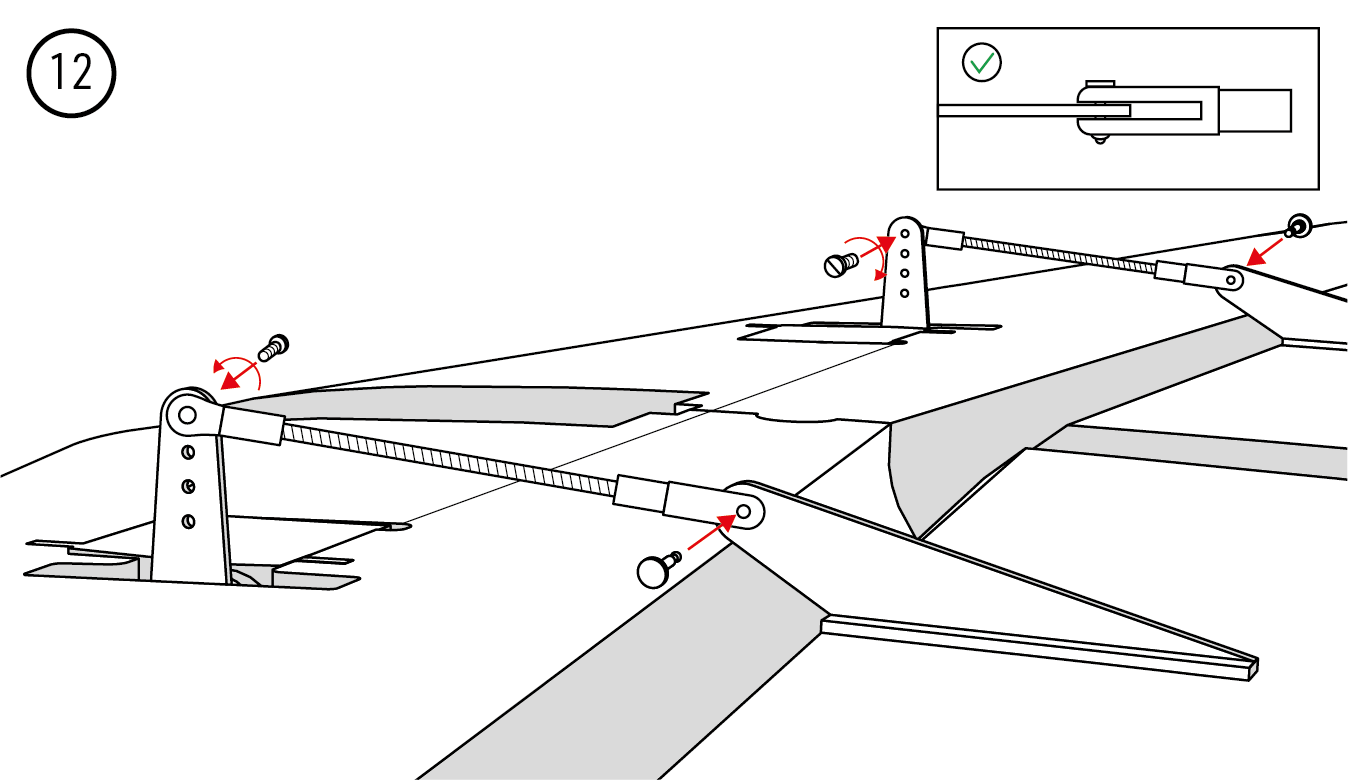
- Separate the lower aileron horns and fit the ball links with M1.5×4 mm screws. Remove the heads from the two M2×40 mm screws and shorten the threaded rods to 36 mm. Glue the horns into the lower ailerons with medium CA, then assemble the pushrods with a ball link at the horn and a clevis at the servo. Adjust both ailerons to neutral and secure the clevis pins fully. (Fig. 9) (Fig. 10) (Fig. 11) (Fig. 12)
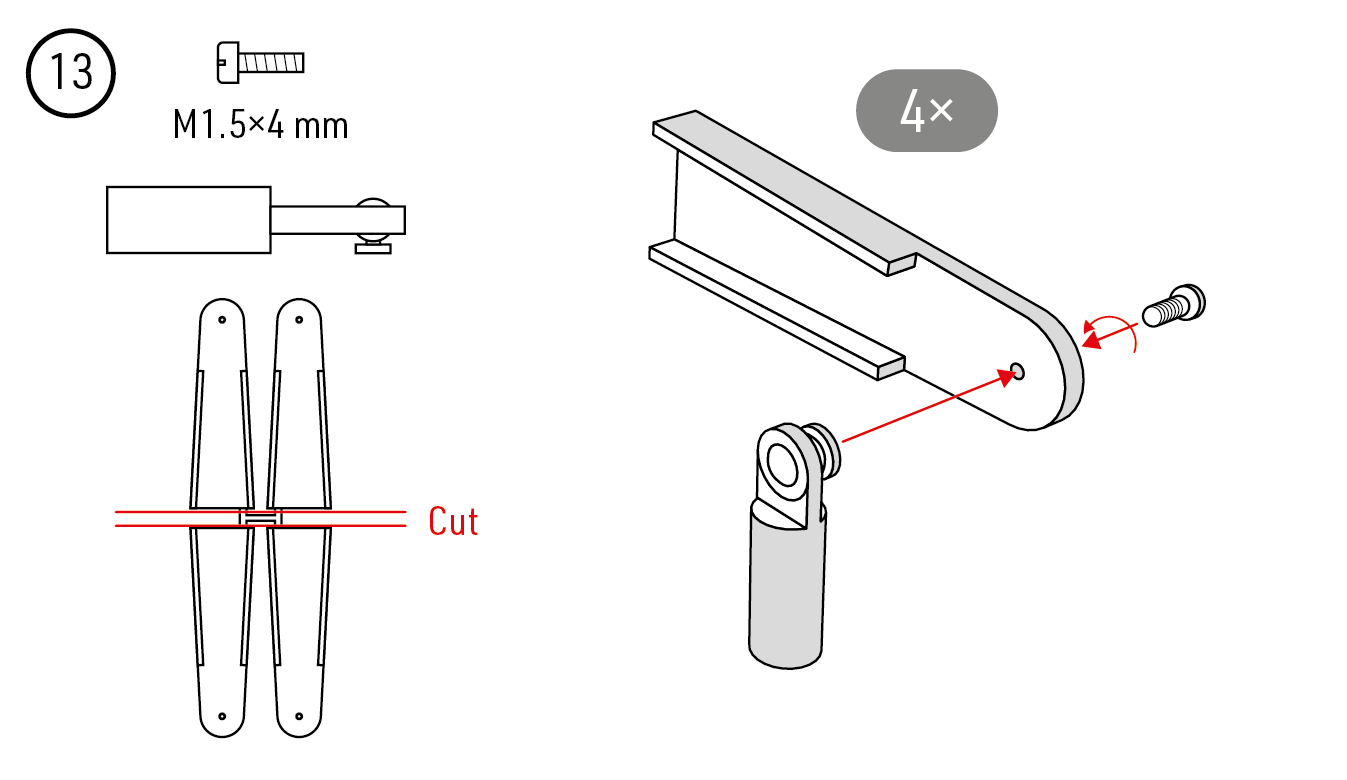
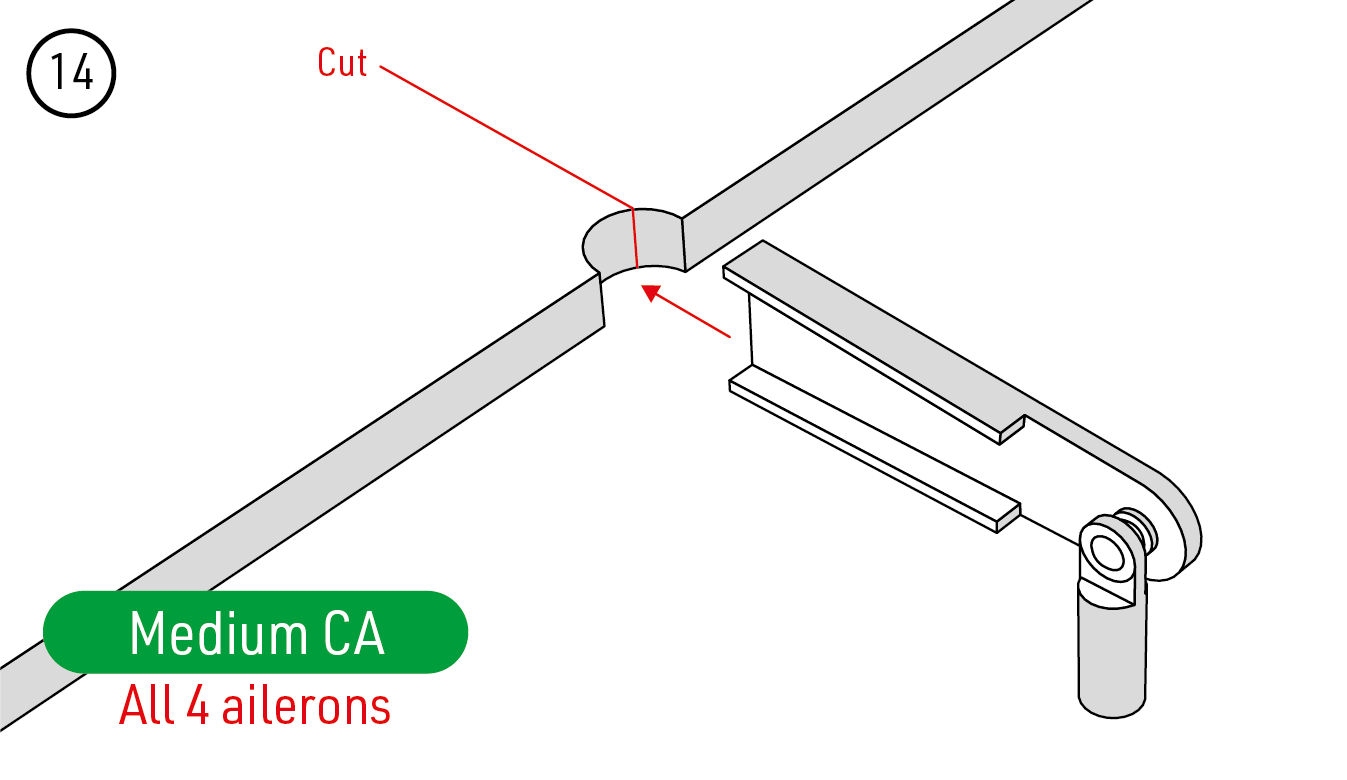
- Separate the four aileron joiner horns and fit their ball links with M1.5×4 mm screws. Cut the marked notches and glue one horn into each upper and lower aileron with medium CA. (Fig. 13) (Fig. 14)
Fuselage and tailplane
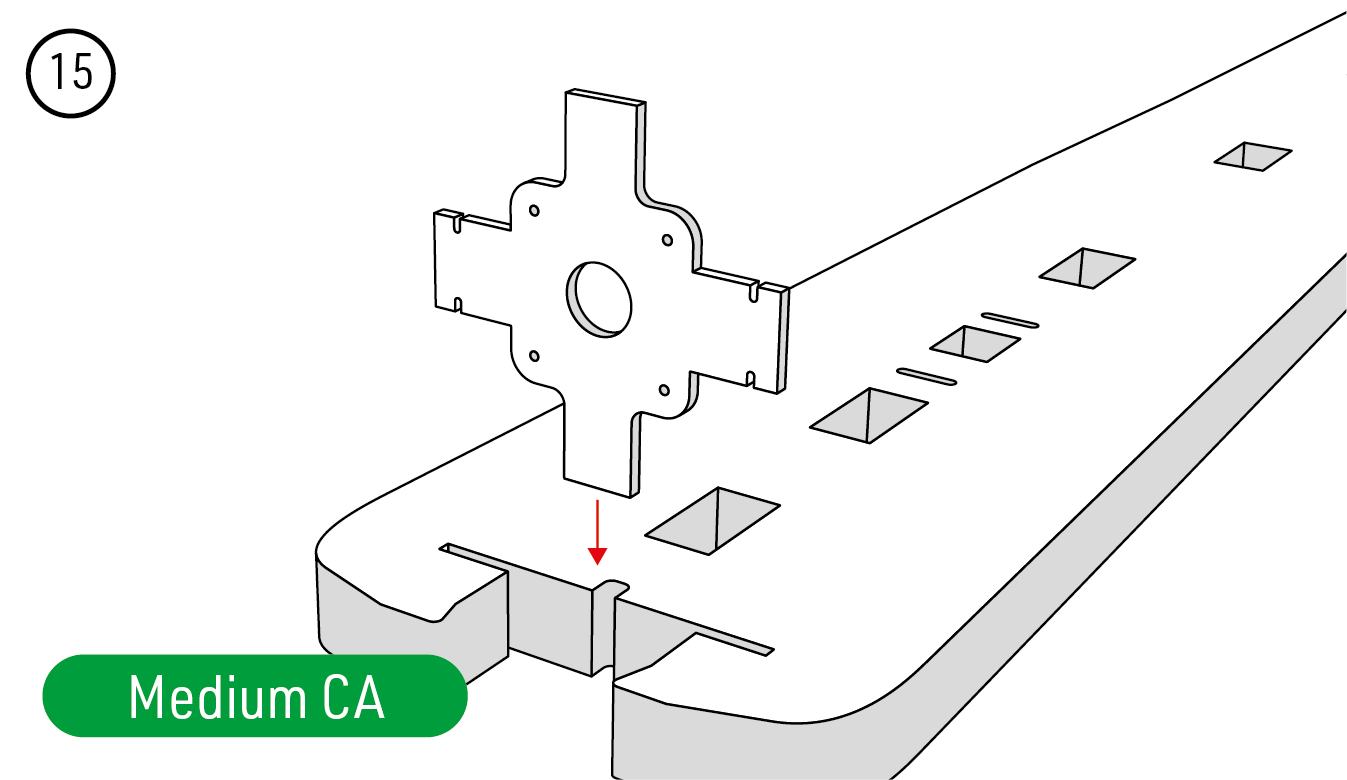
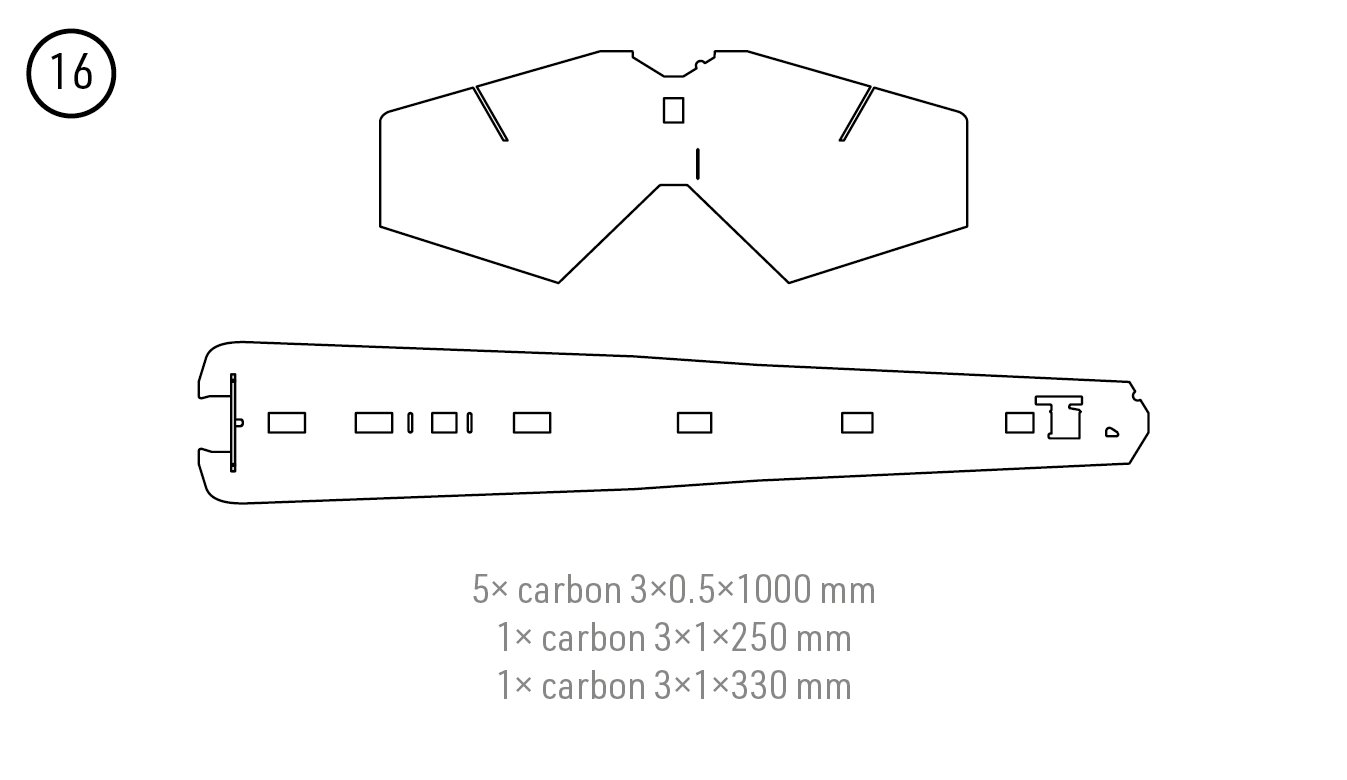
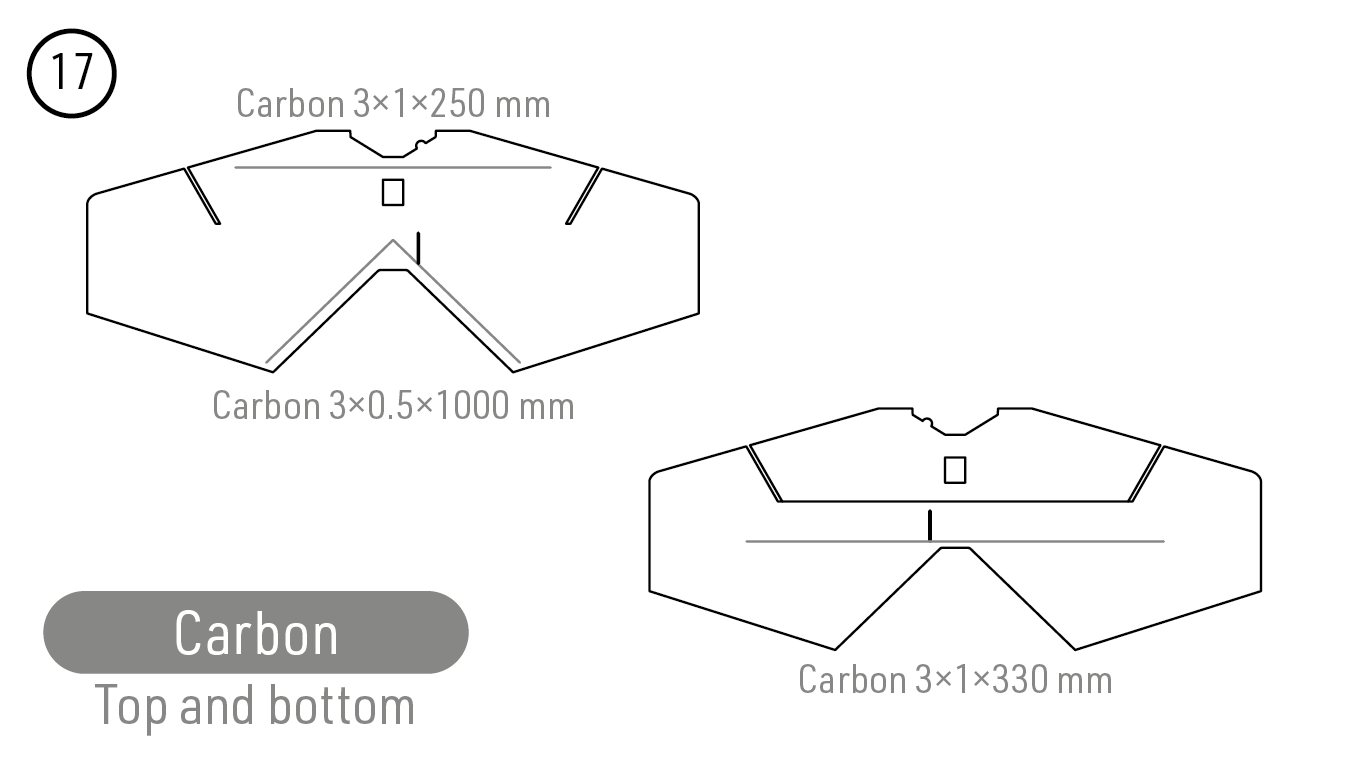
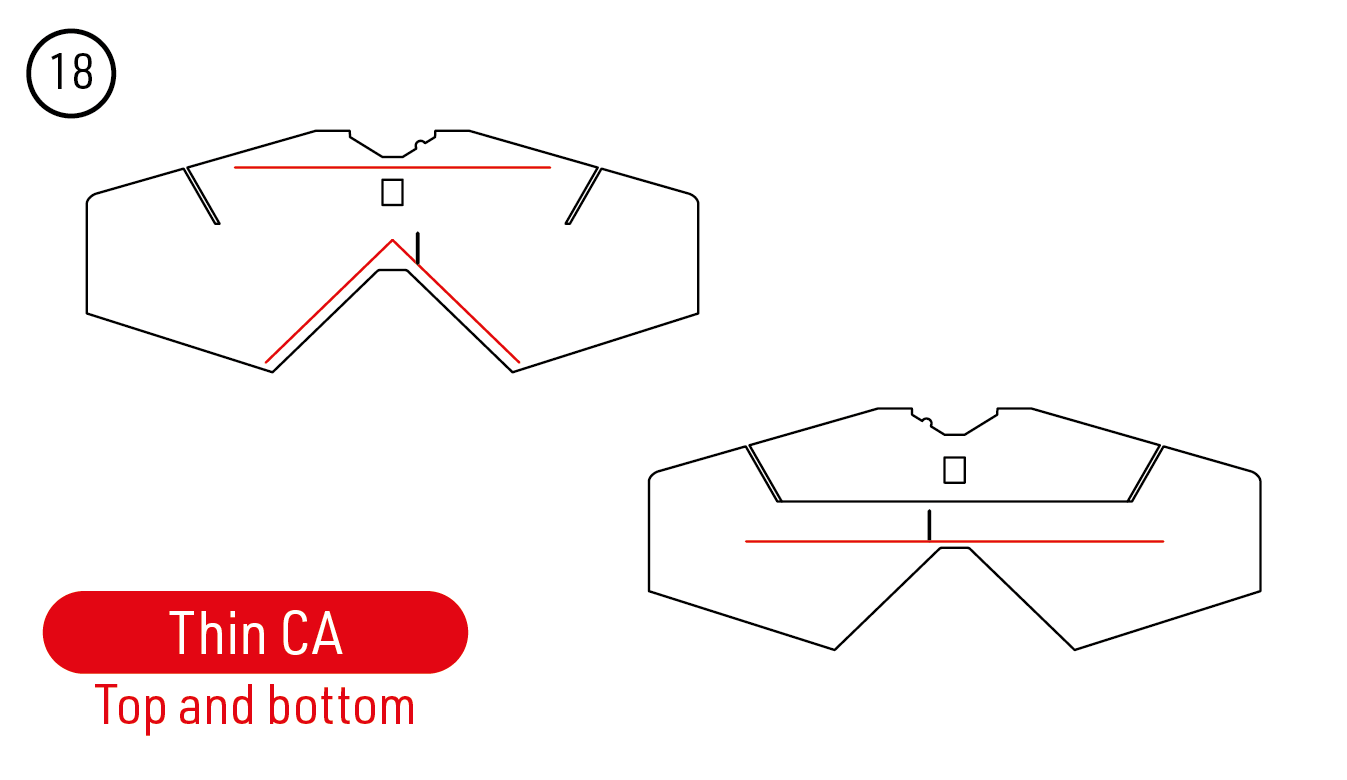
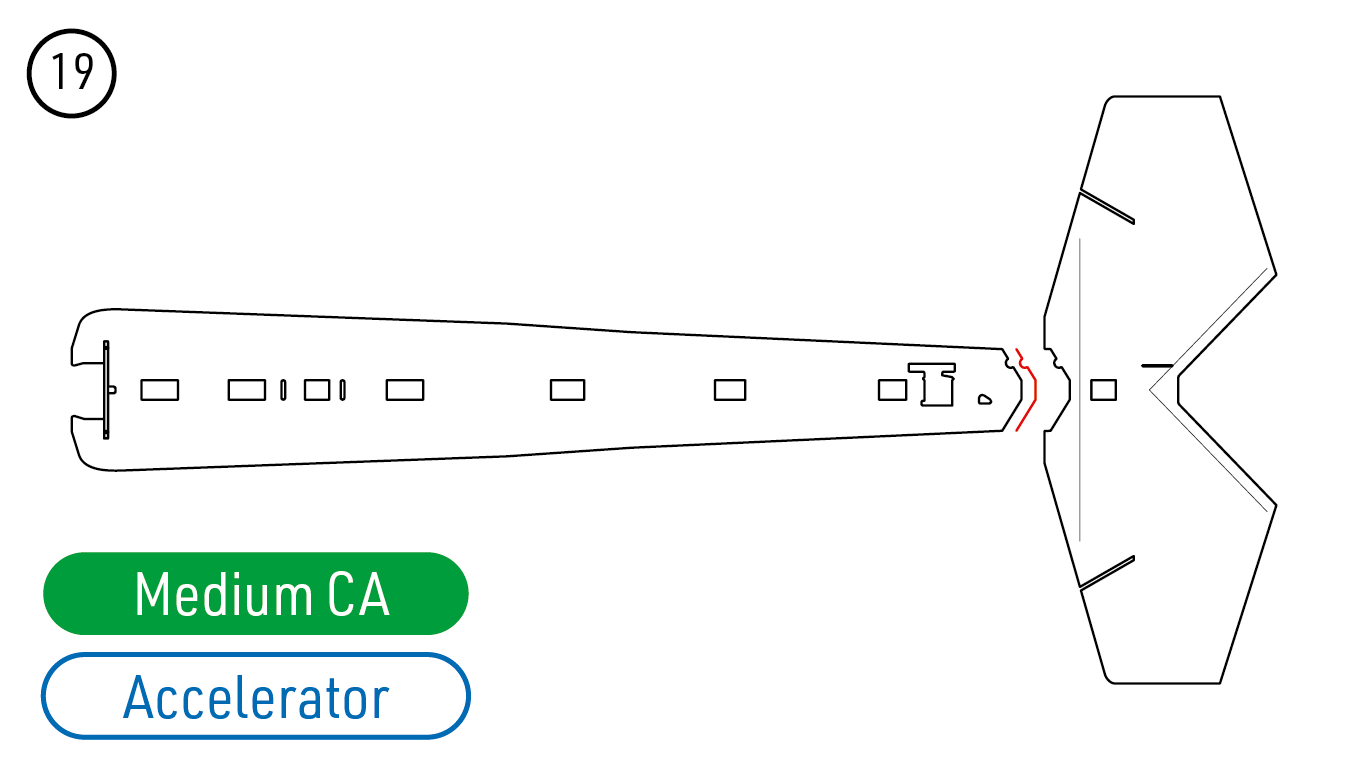
- Glue the plywood firewall into the horizontal fuselage with medium CA. Reinforce the horizontal tailplane as shown: use the 3×1×250 mm strip in the stabilizer, the 3×1×330 mm strip in the elevator, and diagonal pieces cut from the 3×0.5×1000 mm stock. Follow the top/bottom layout and fix with thin CA. Glue the tailplane to the horizontal fuselage with medium CA and accelerator. (Fig. 15) (Fig. 16) (Fig. 17) (Fig. 18) (Fig. 19)
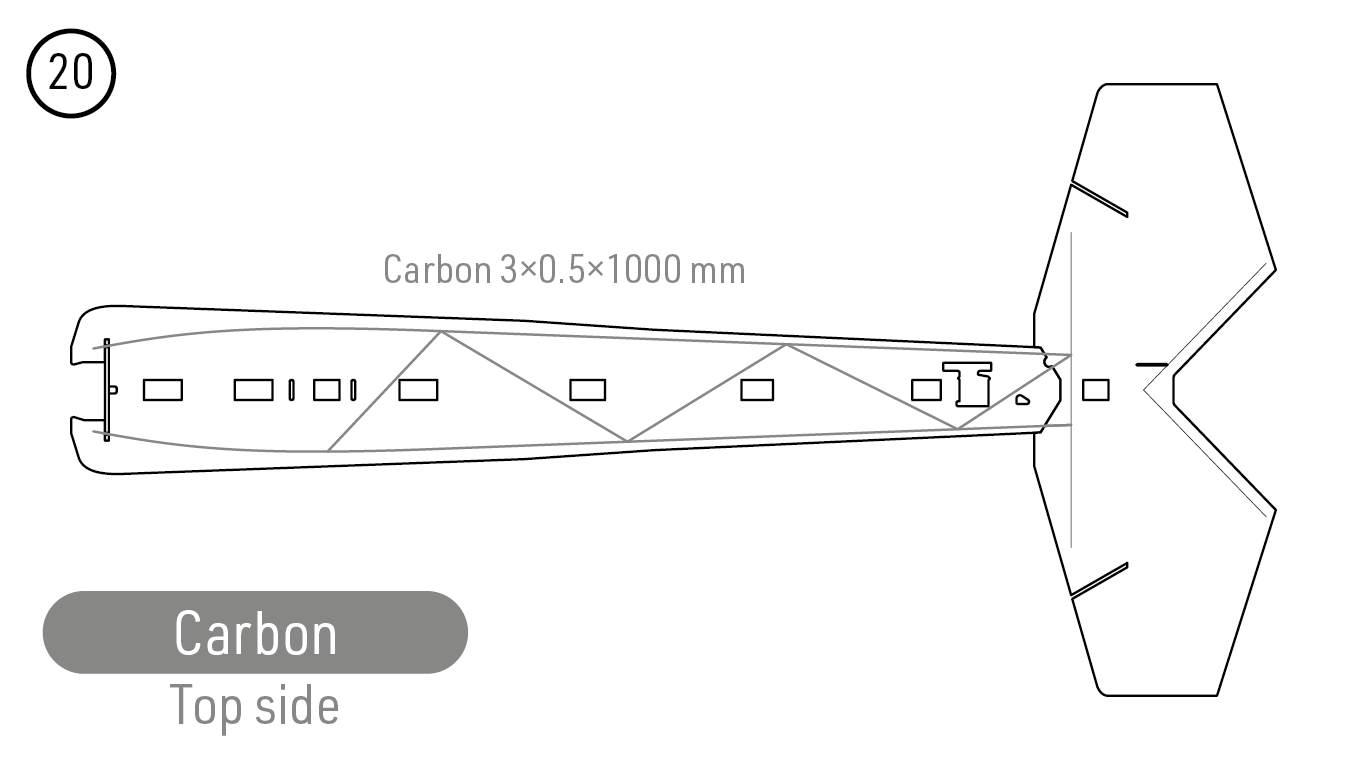
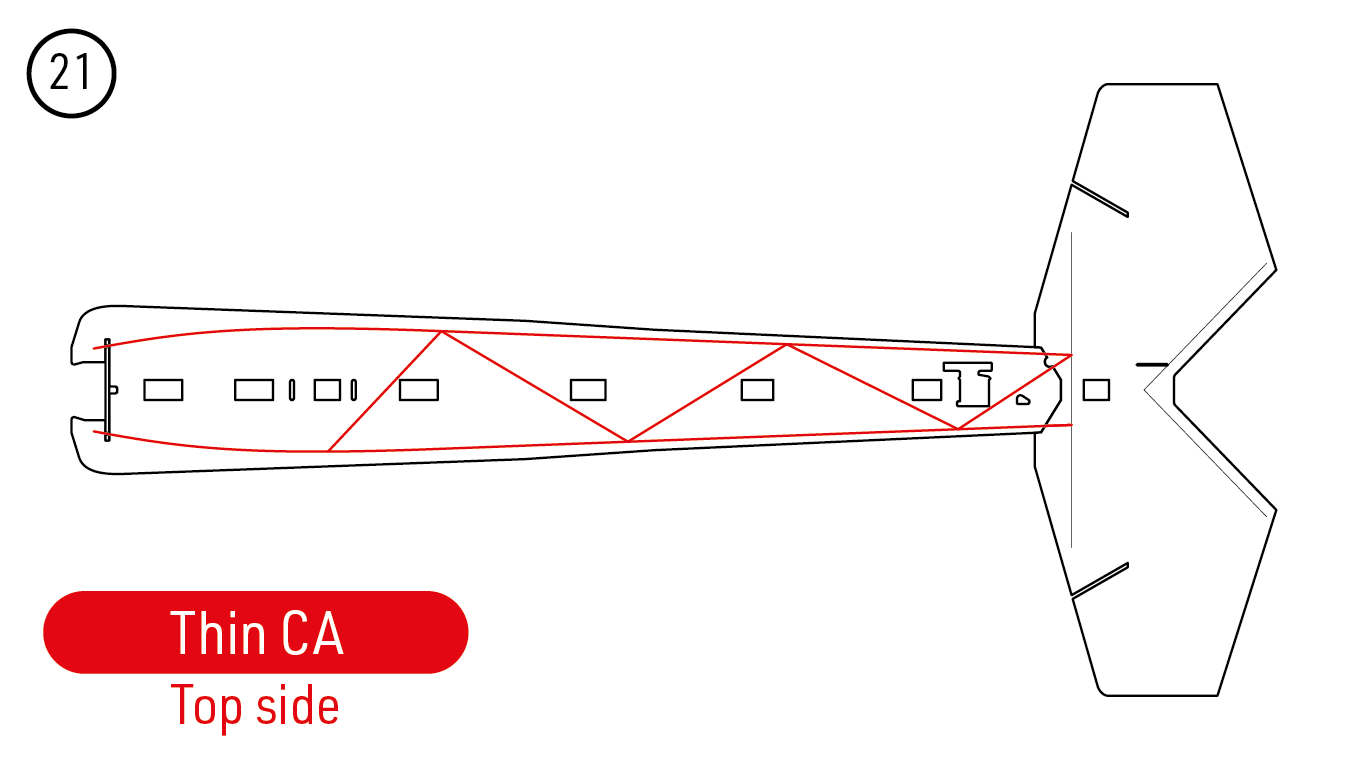
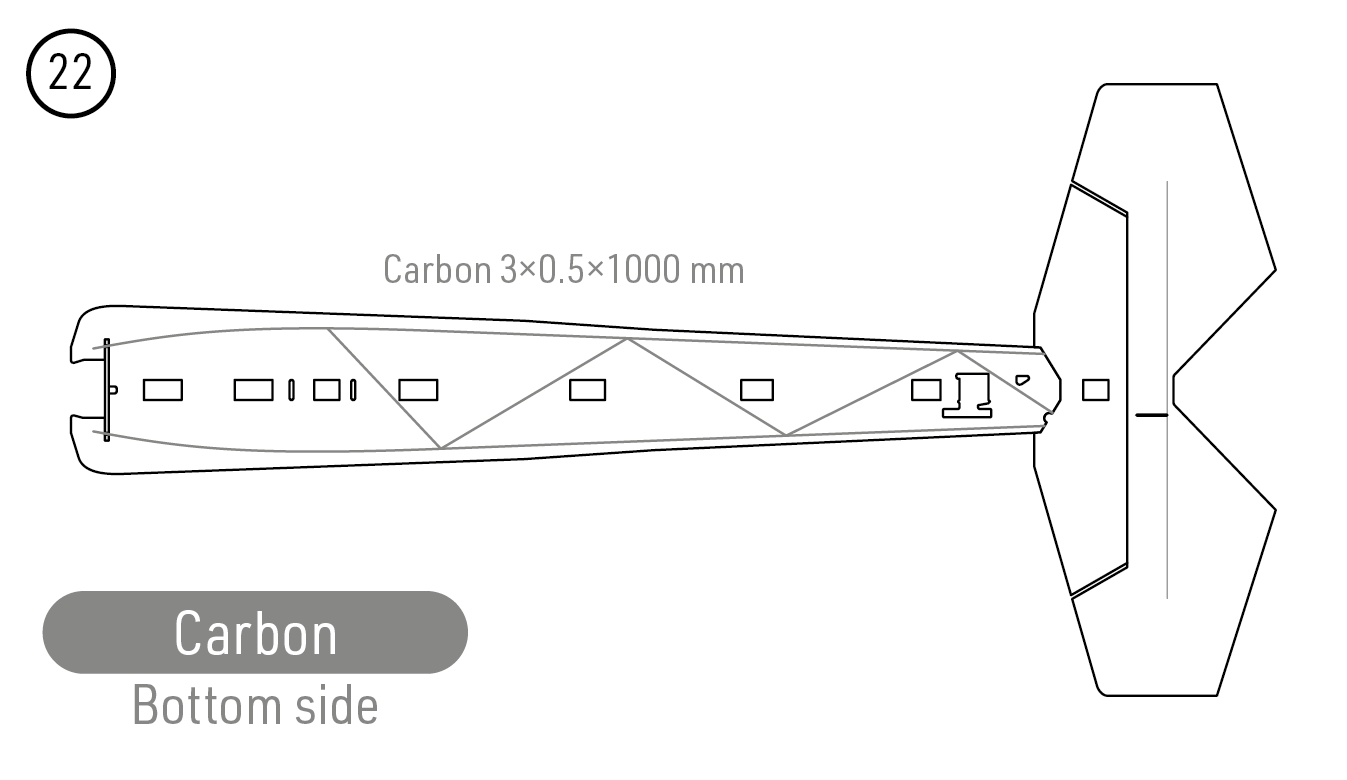
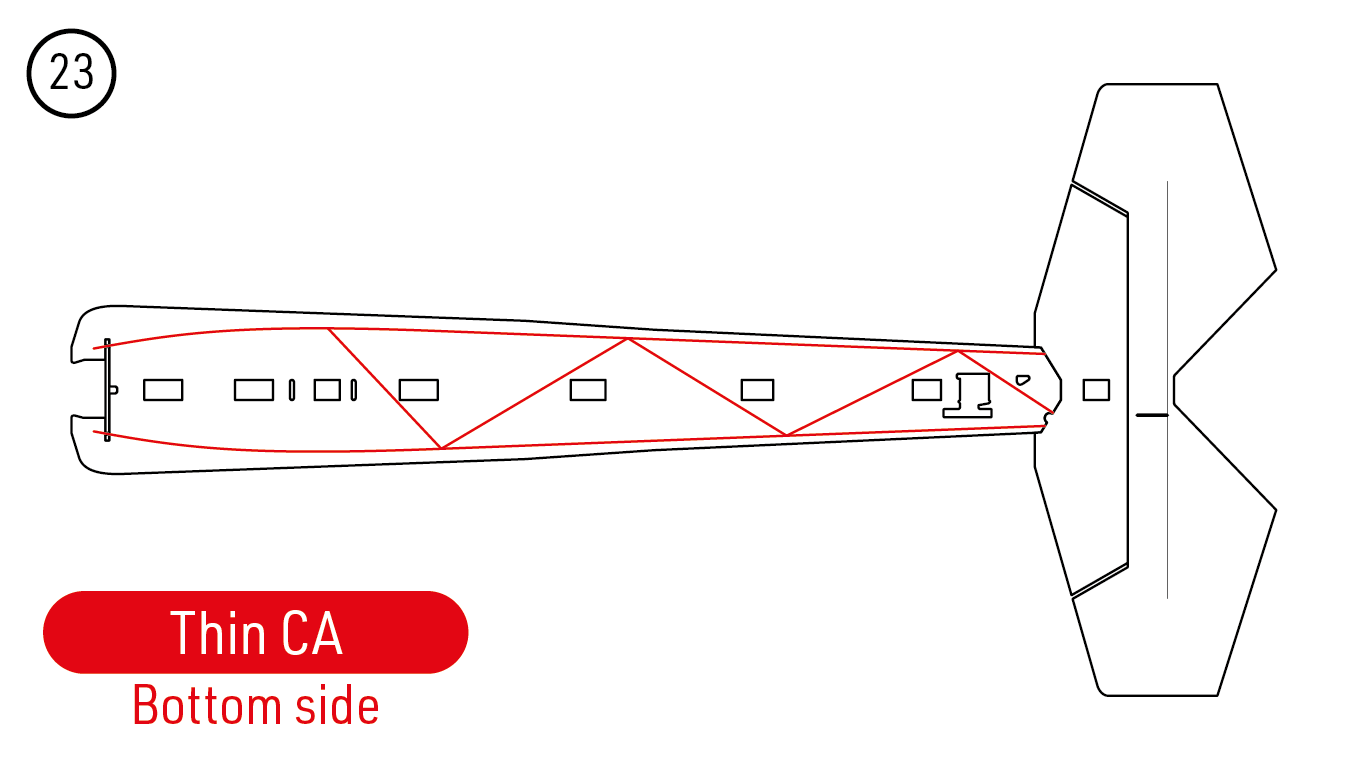
- Fit the longitudinal and diagonal 3×0.5 mm carbon reinforcements on the top and bottom of the horizontal fuselage, cutting them from the supplied 1000mm strips to match the layout. Glue with thin CA while keeping the fuselage flat and straight. (Fig. 20) (Fig. 21) (Fig. 22) (Fig. 23)
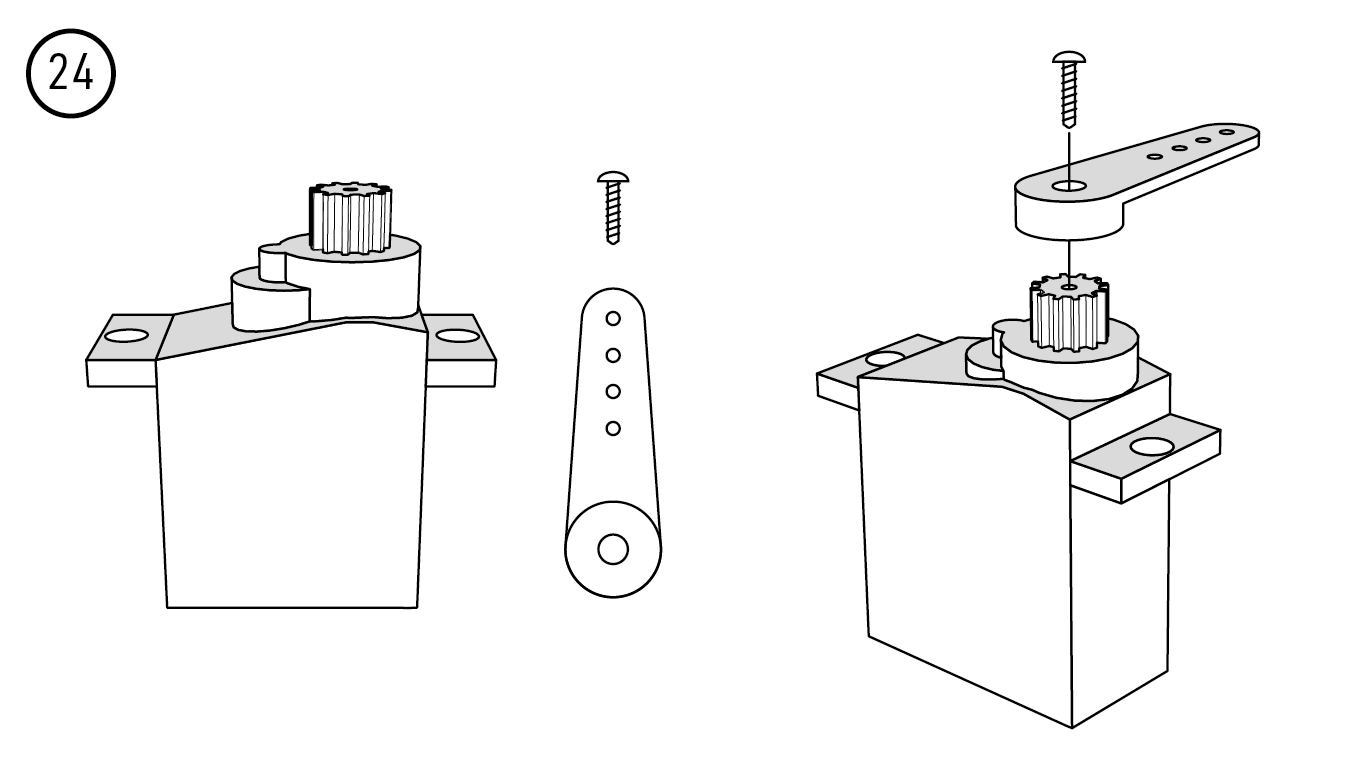
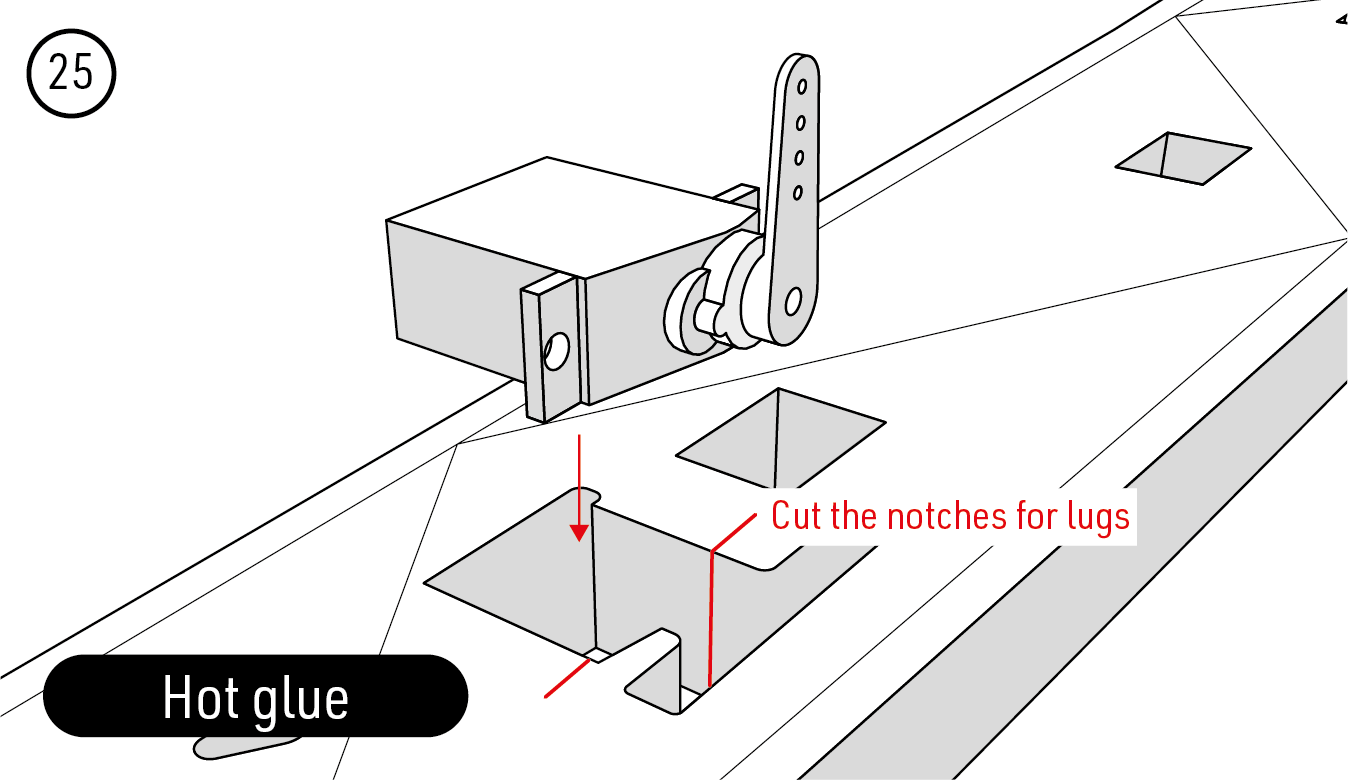
- Centre the elevator servo electrically, secure its arm and cut recesses for the mounting lugs. Fix it into the horizontal fuselage with hot melt glue. (Fig. 24) (Fig. 25)
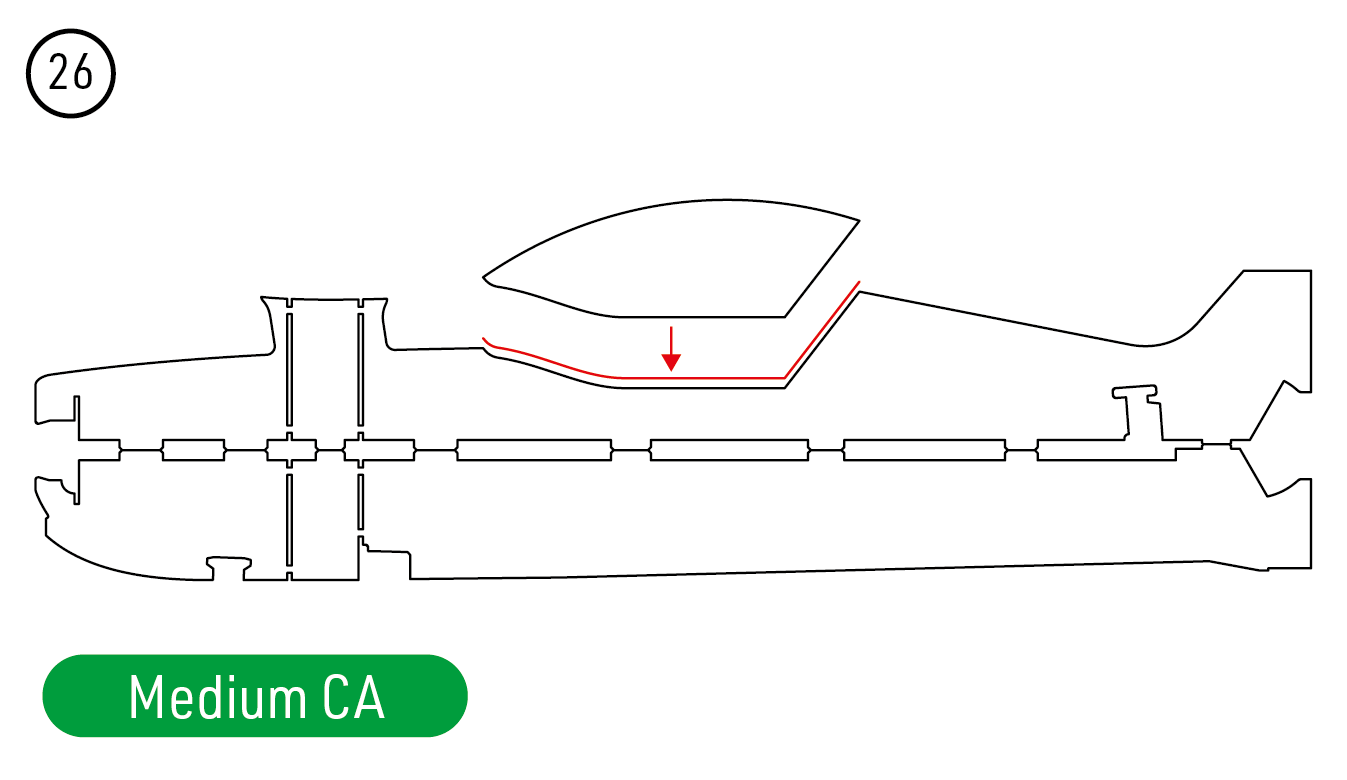
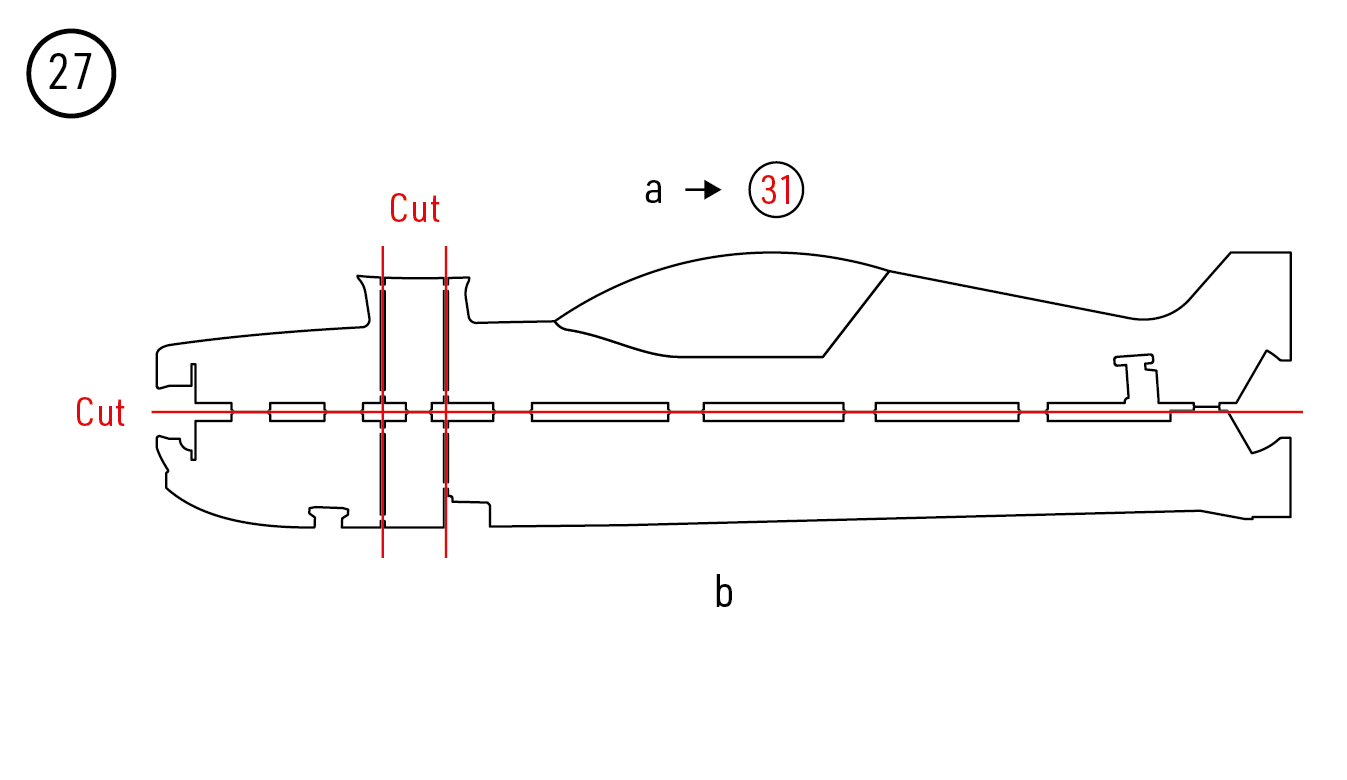
- Glue the canopy to the vertical fuselage part with medium CA. Cut the vertical fuselage along the marked horizontal line and separate the centre strut as shown. Retain the upper part a for later assembly. (Fig. 26) (Fig. 27)
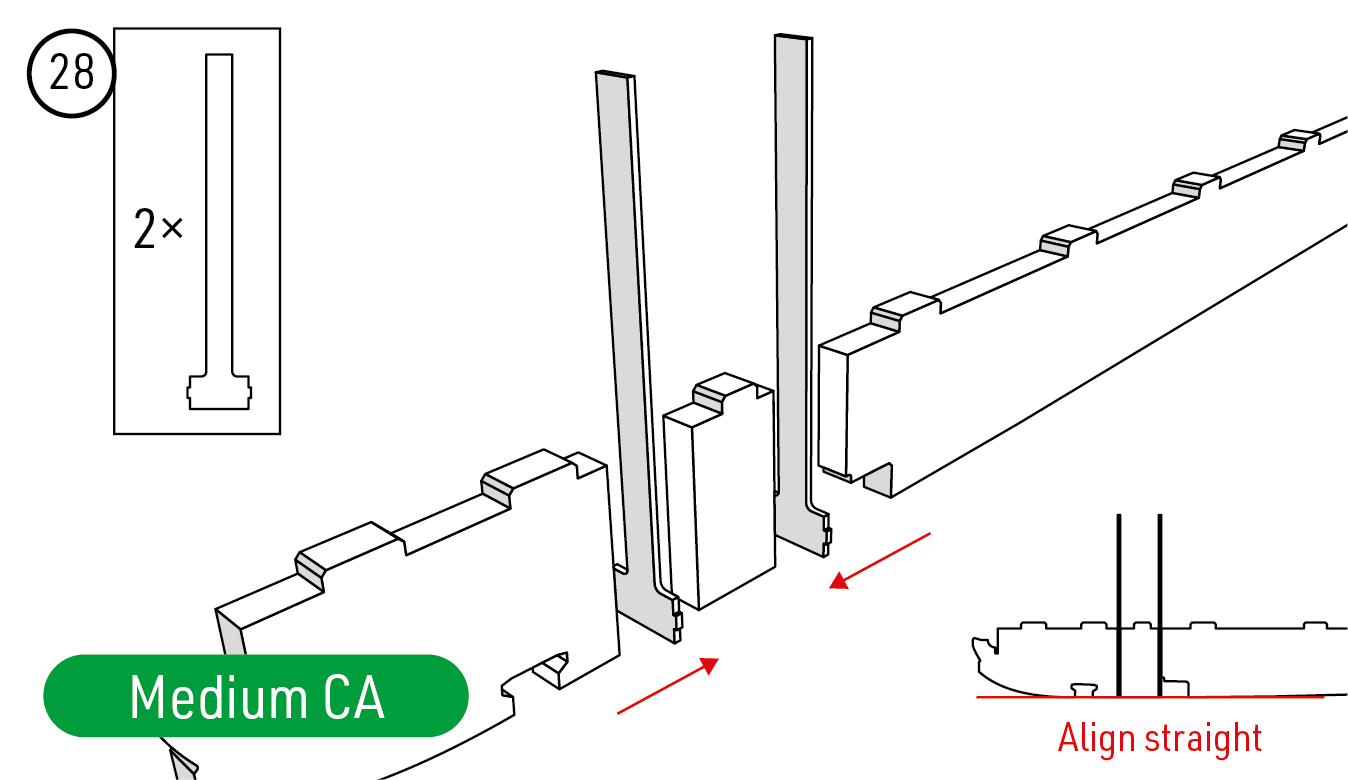
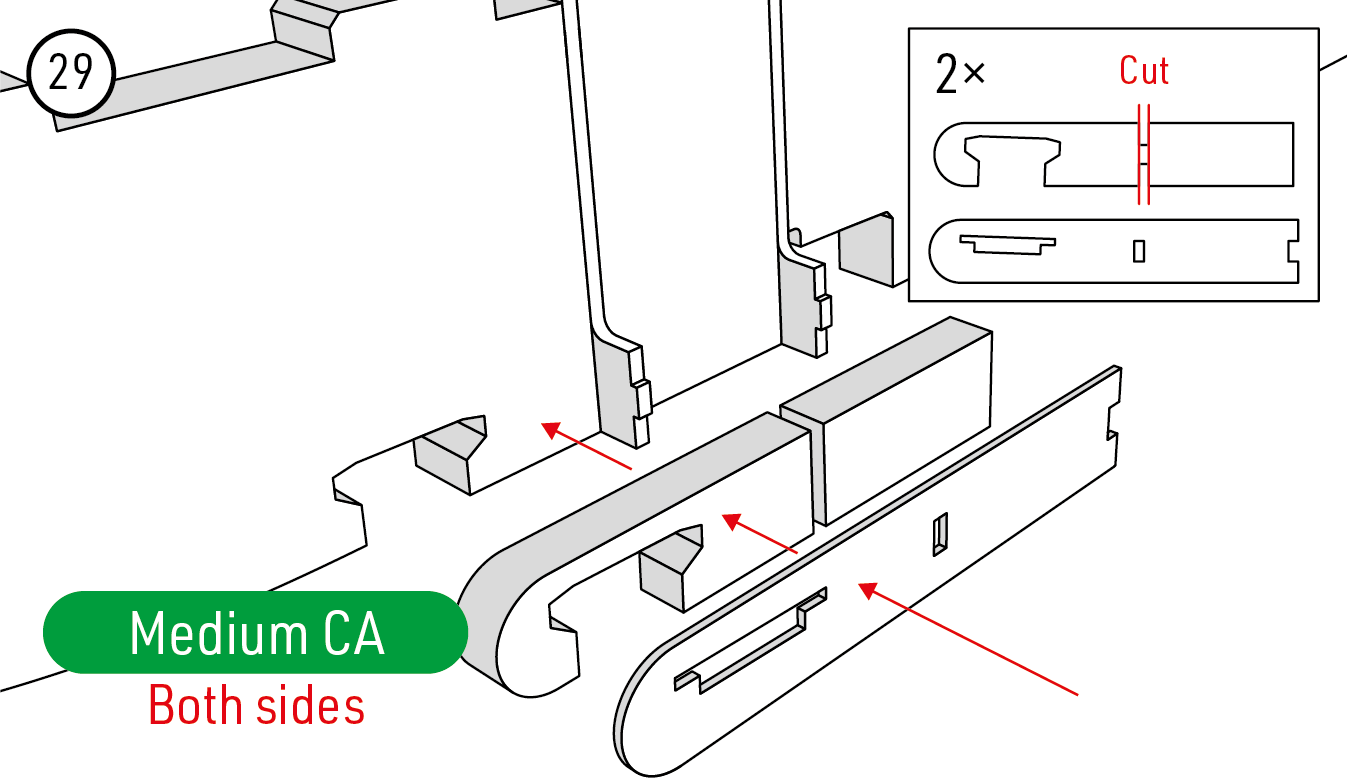
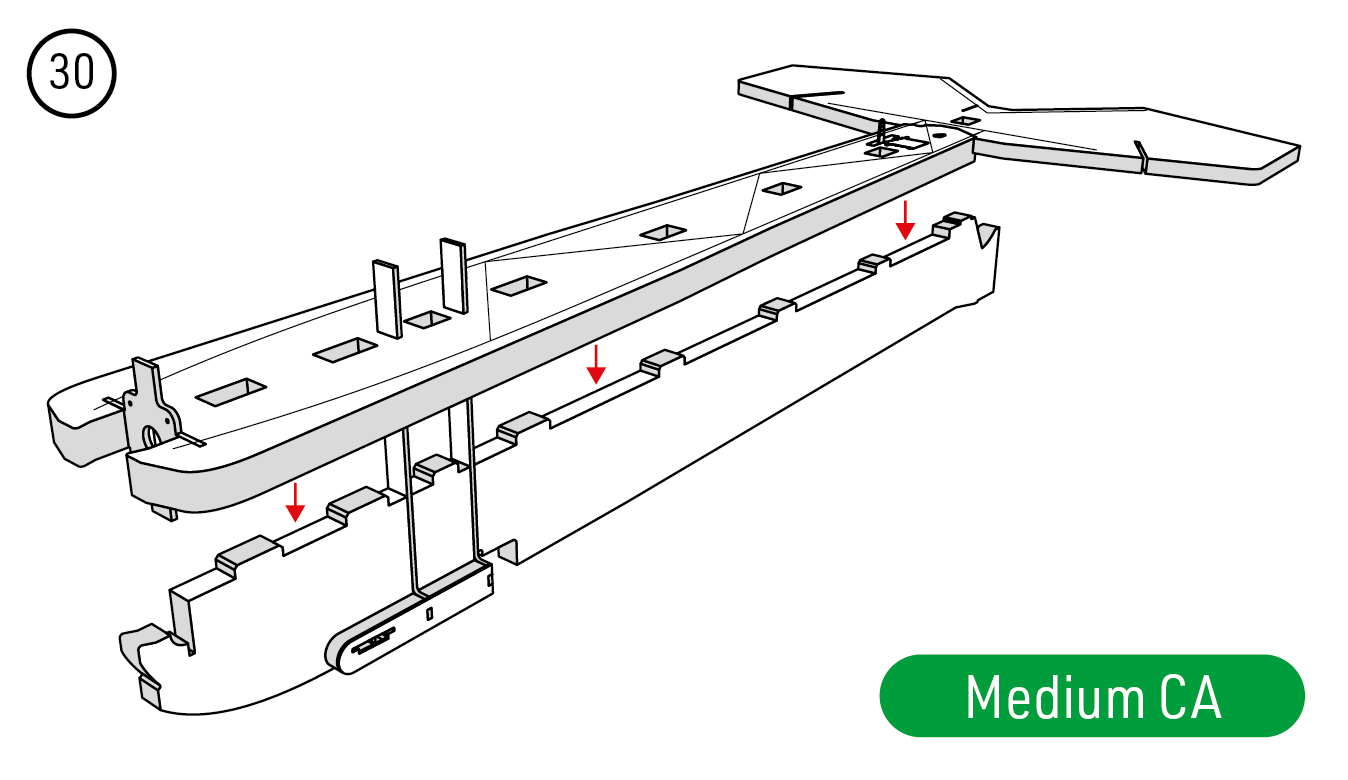
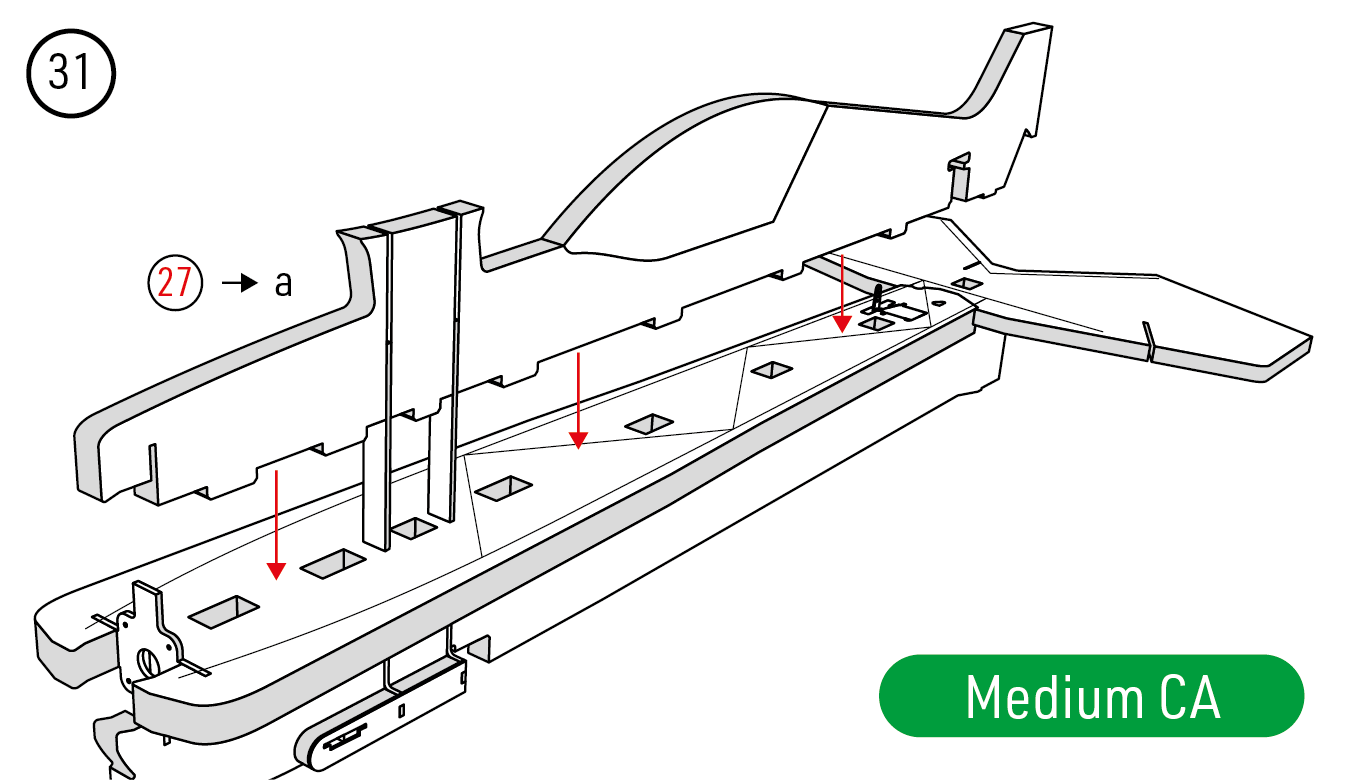
- Glue the two plywood vertical reinforcements around the centre strut with medium CA, keeping the lower fuselage straight. Fit the EPP undercarriage blocks and fibreglass holders on both sides, then glue the lower and upper vertical fuselage parts onto the horizontal assembly. Keep all parts square and untwisted. (Fig. 28) (Fig. 29) (Fig. 30) (Fig. 31)
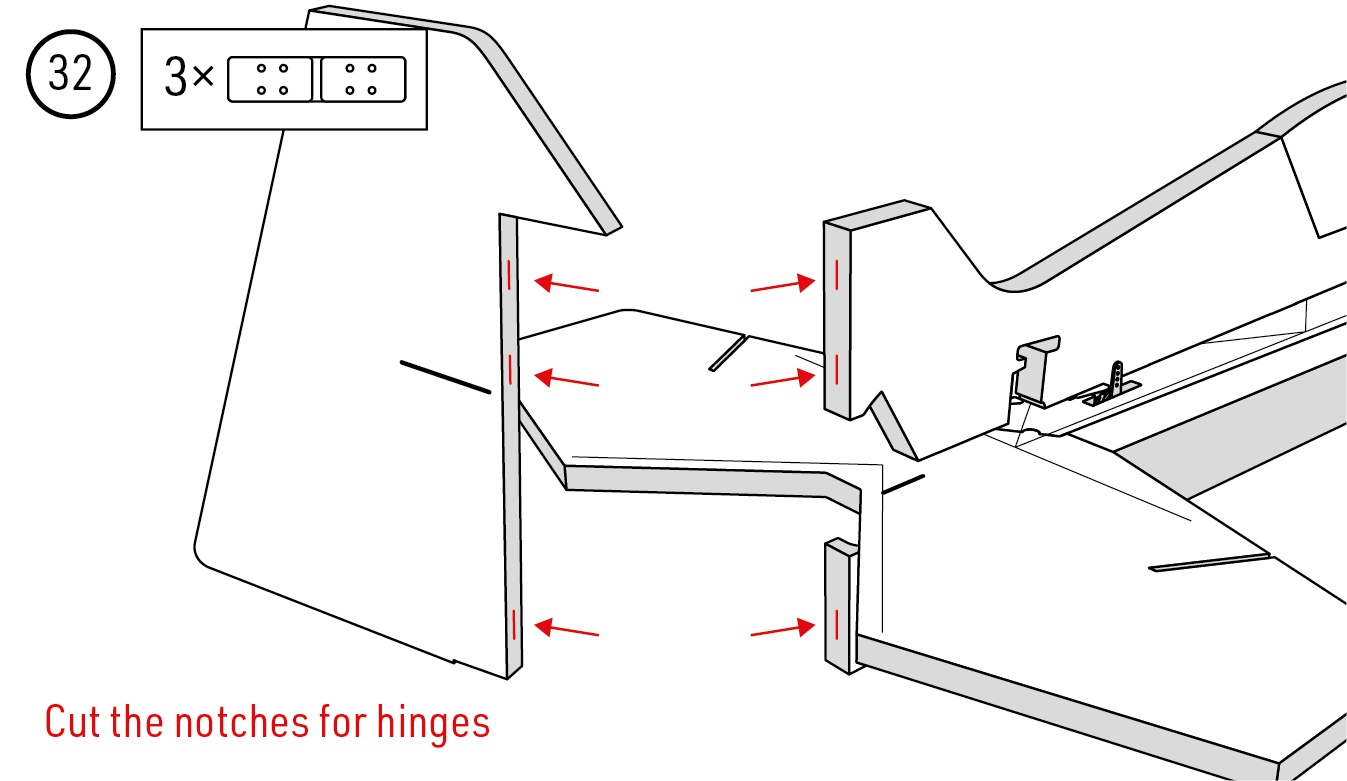
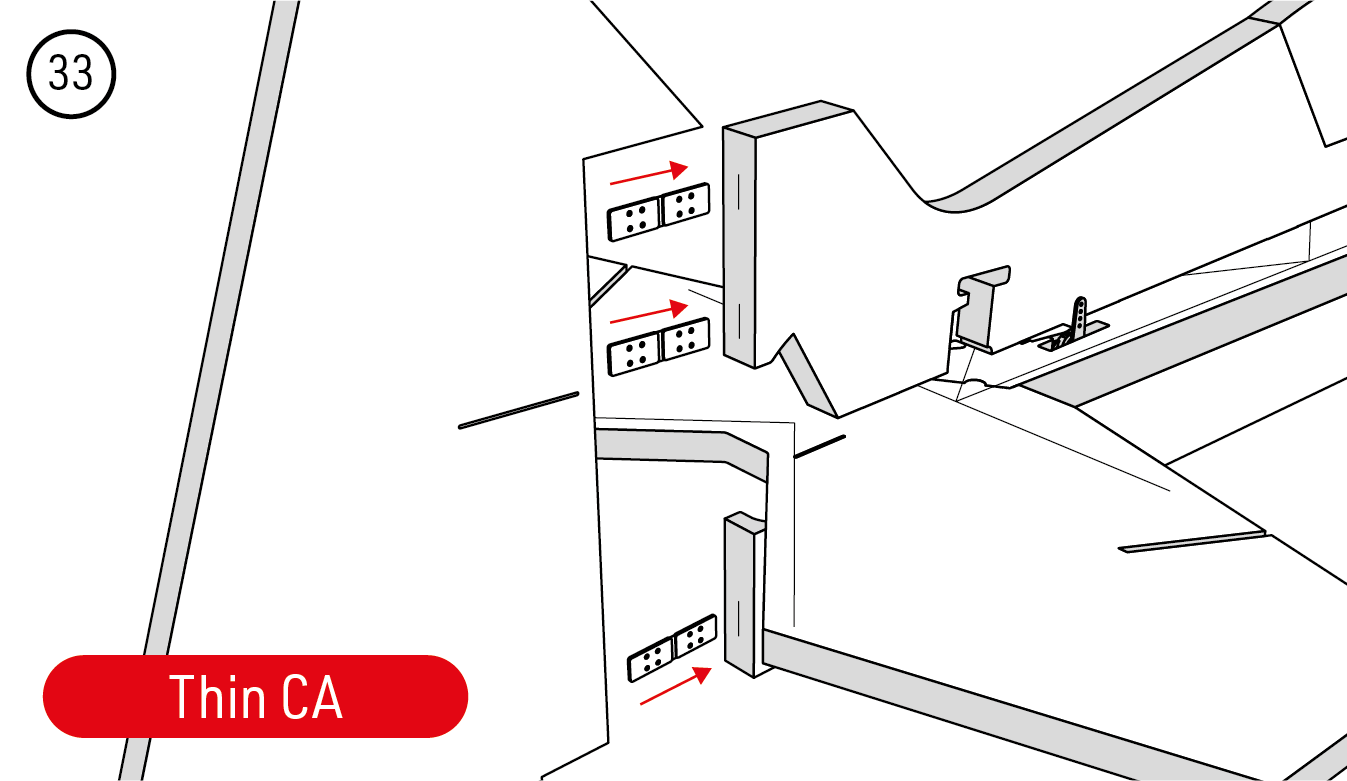
- Cut the three rudder-hinge slots, fit the hinges and secure them with thin CA. Keep glue out of the moving joints and check that the rudder moves freely. (Fig. 32) (Fig. 33)
Joining the wings and completing the linkages
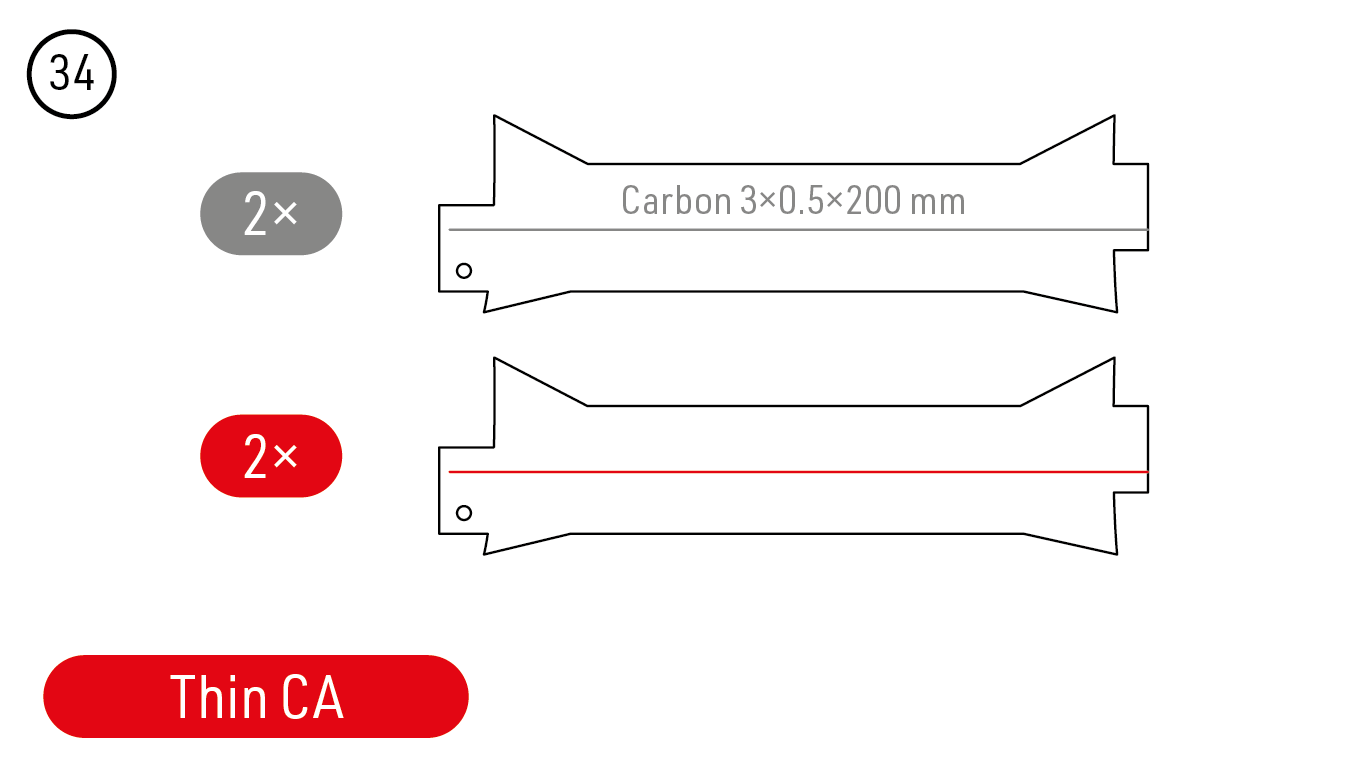
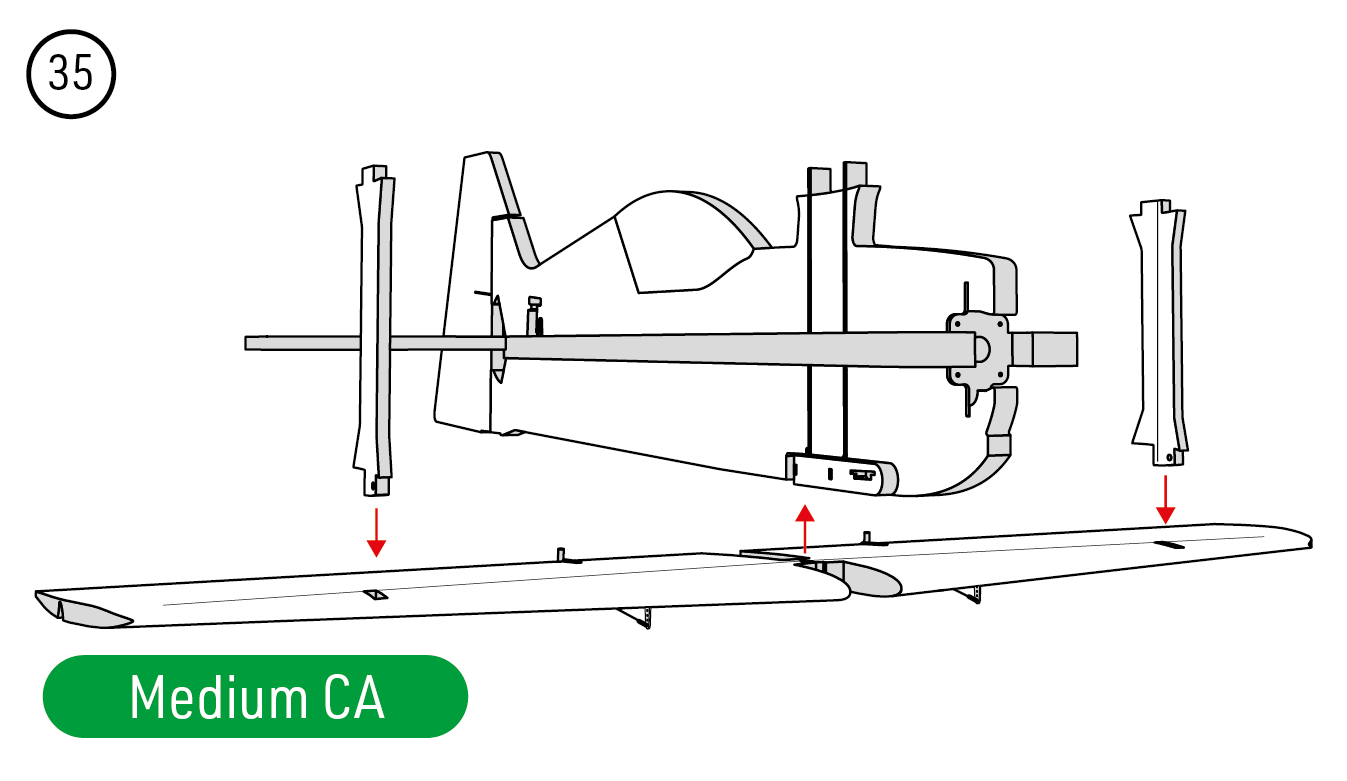
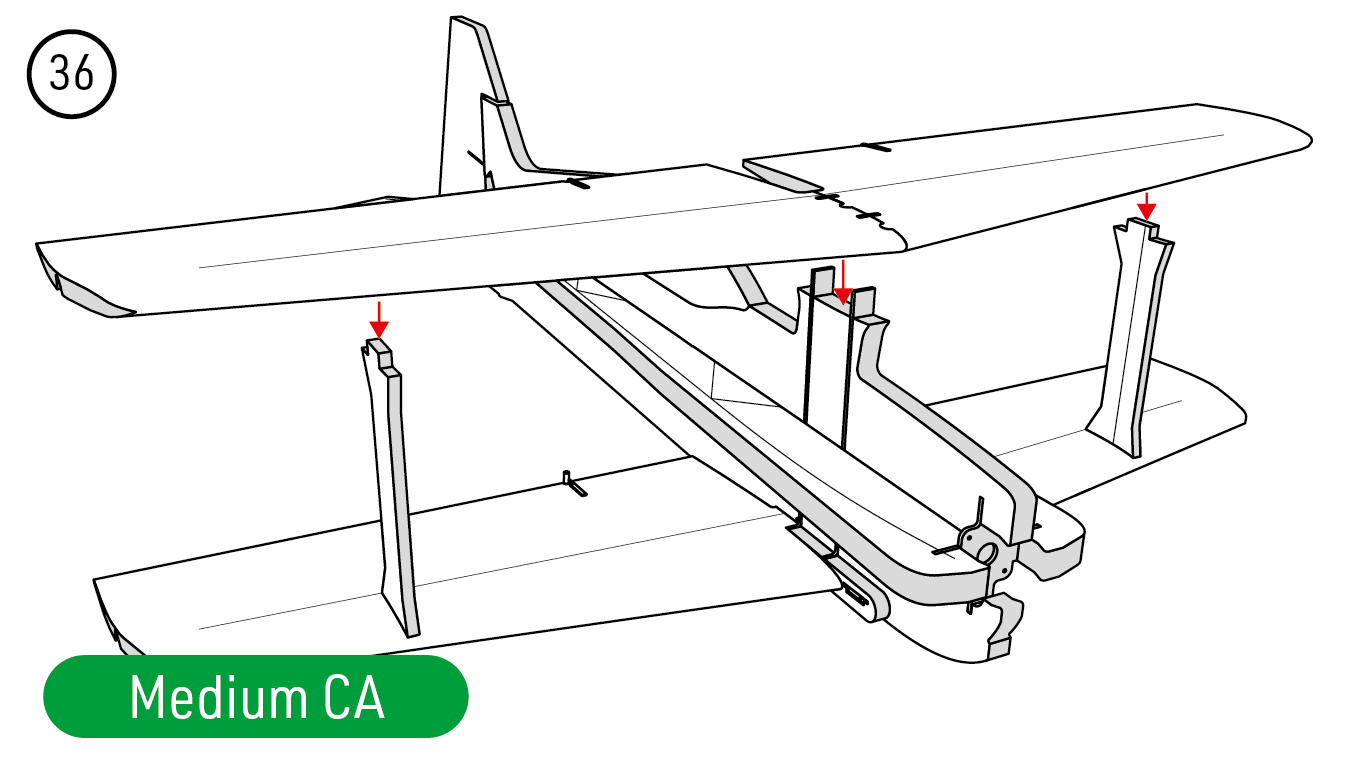
- Reinforce each interplane strut with a 3×0.5×200 mm carbon strip and thin CA. Glue the lower wing and both struts to the fuselage with medium CA, then fit the upper wing onto the centre support and outer struts. Check alignment before the glue sets. (Fig. 34) (Fig. 35) (Fig. 36)
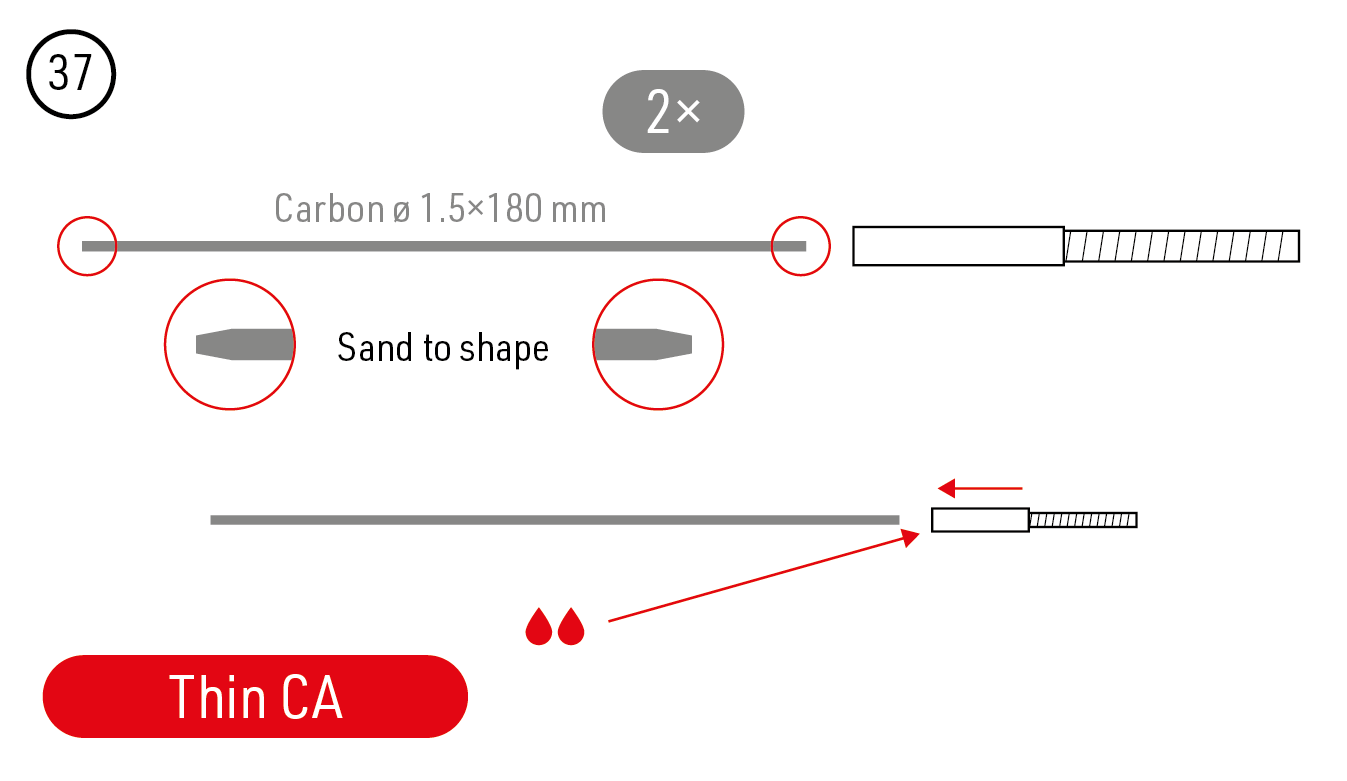
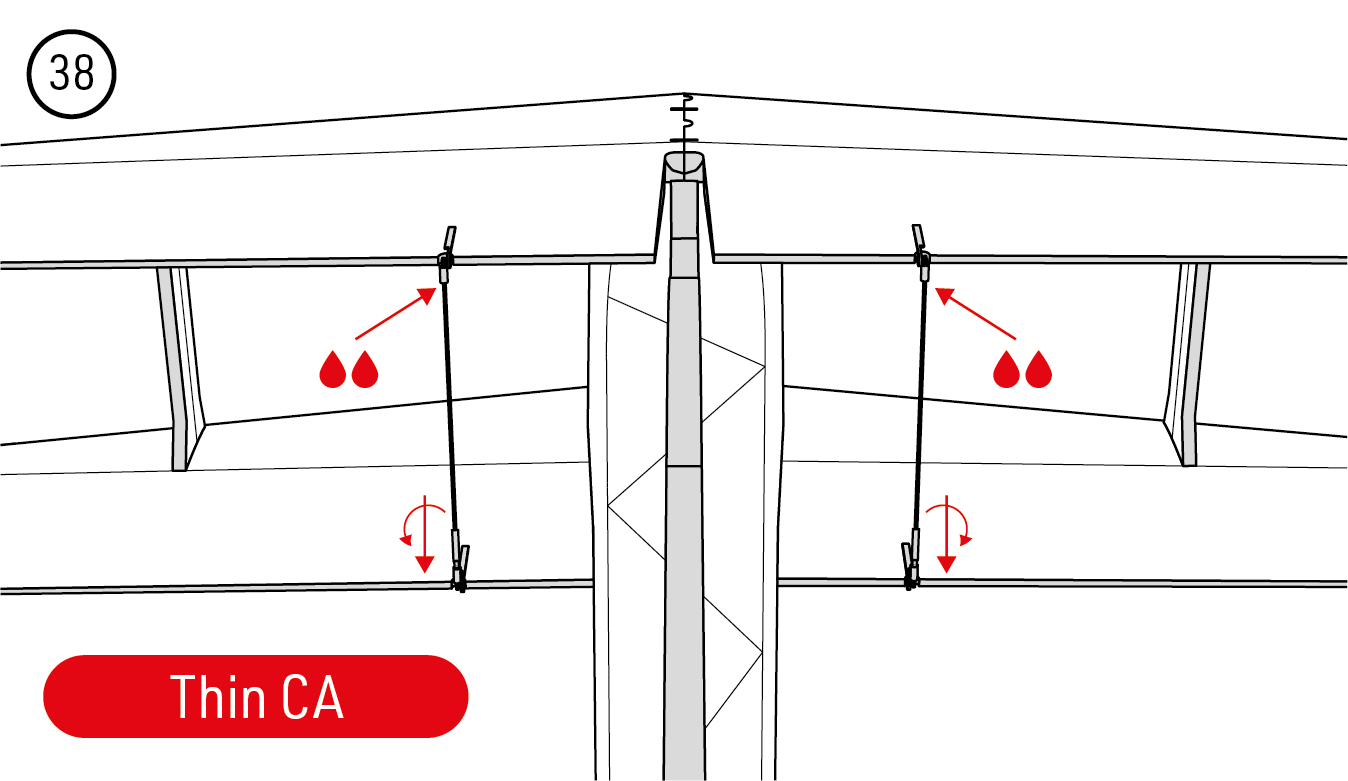
- Prepare both Ø1.5×180 mm carbon aileron joiner rods: sand their ends to fit and glue an M2/1.5 threaded coupler to one end with thin CA. Screw each coupler into its lower ball link. Set upper and lower ailerons to neutral, then glue the plain upper ends into their ball links. Keep the ball joints free. (Fig. 37) (Fig. 38)
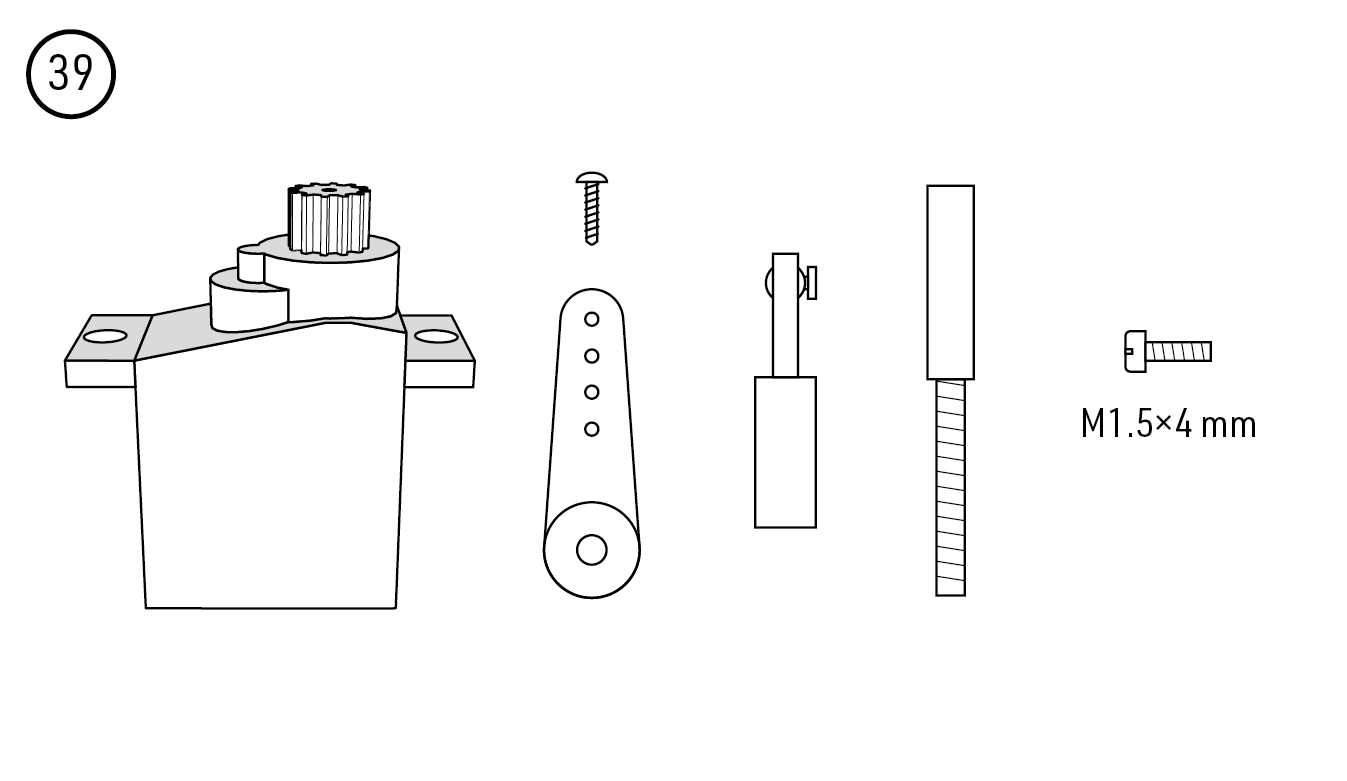
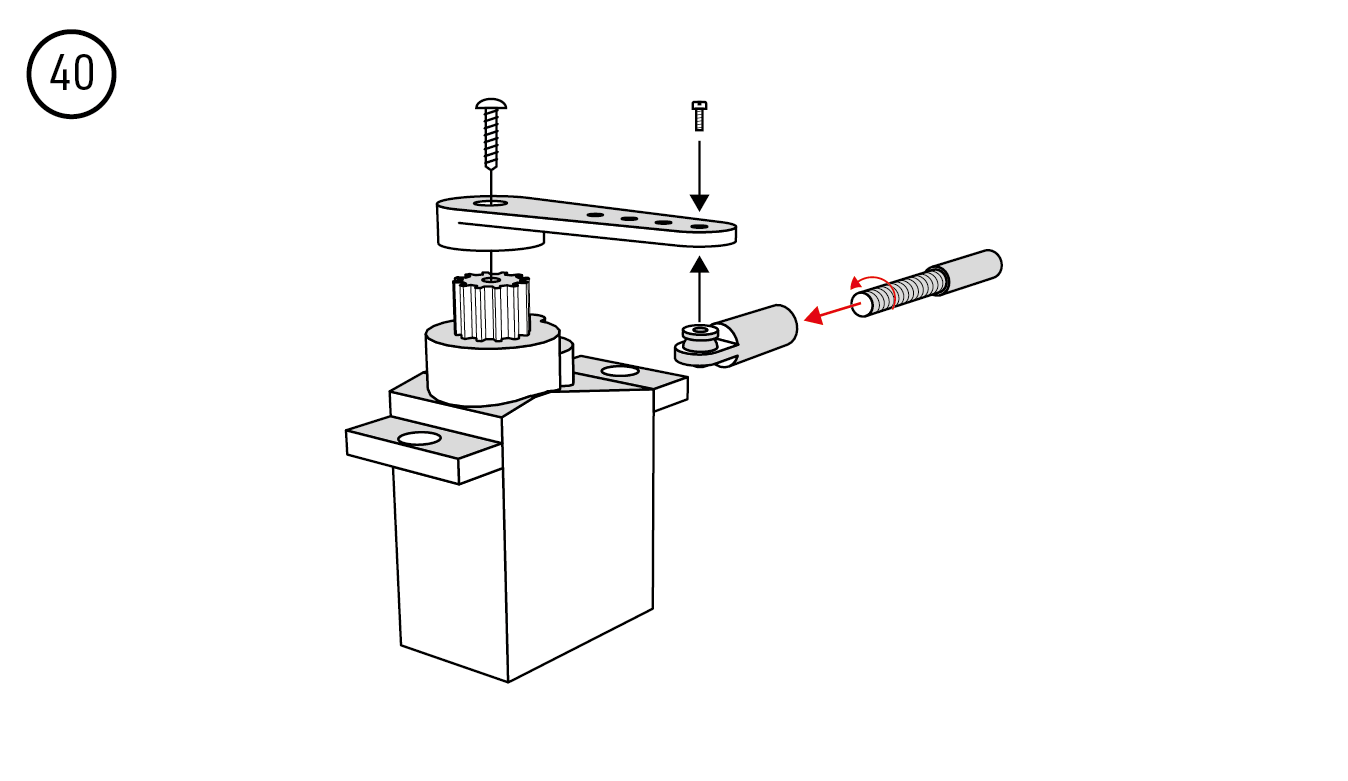
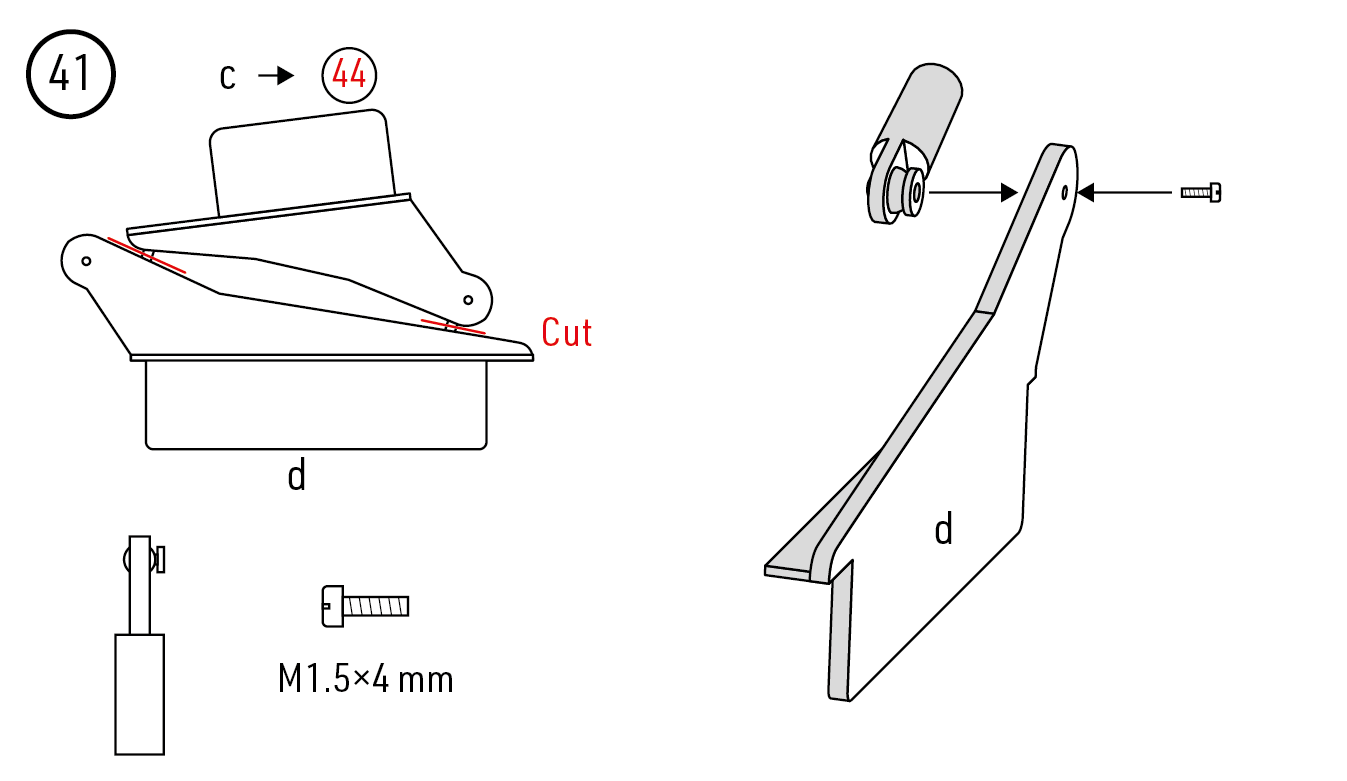
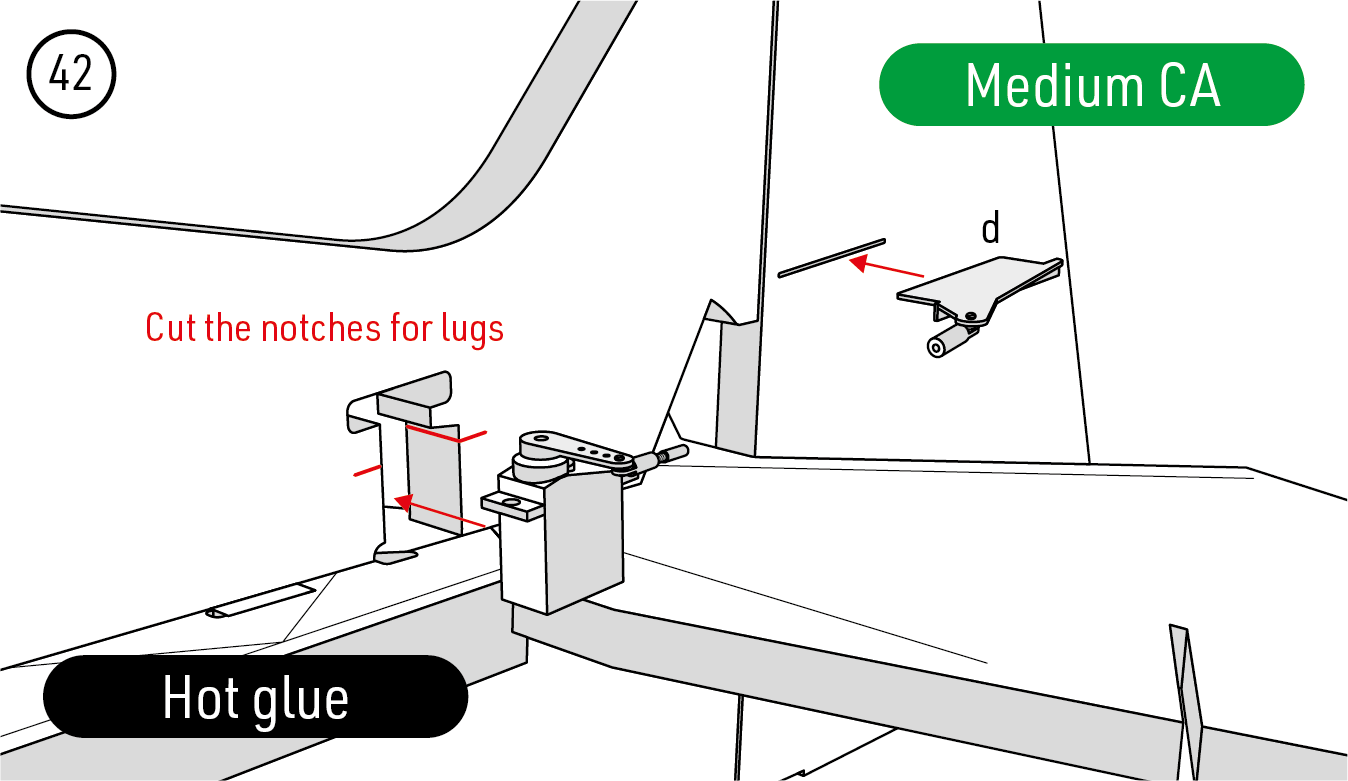
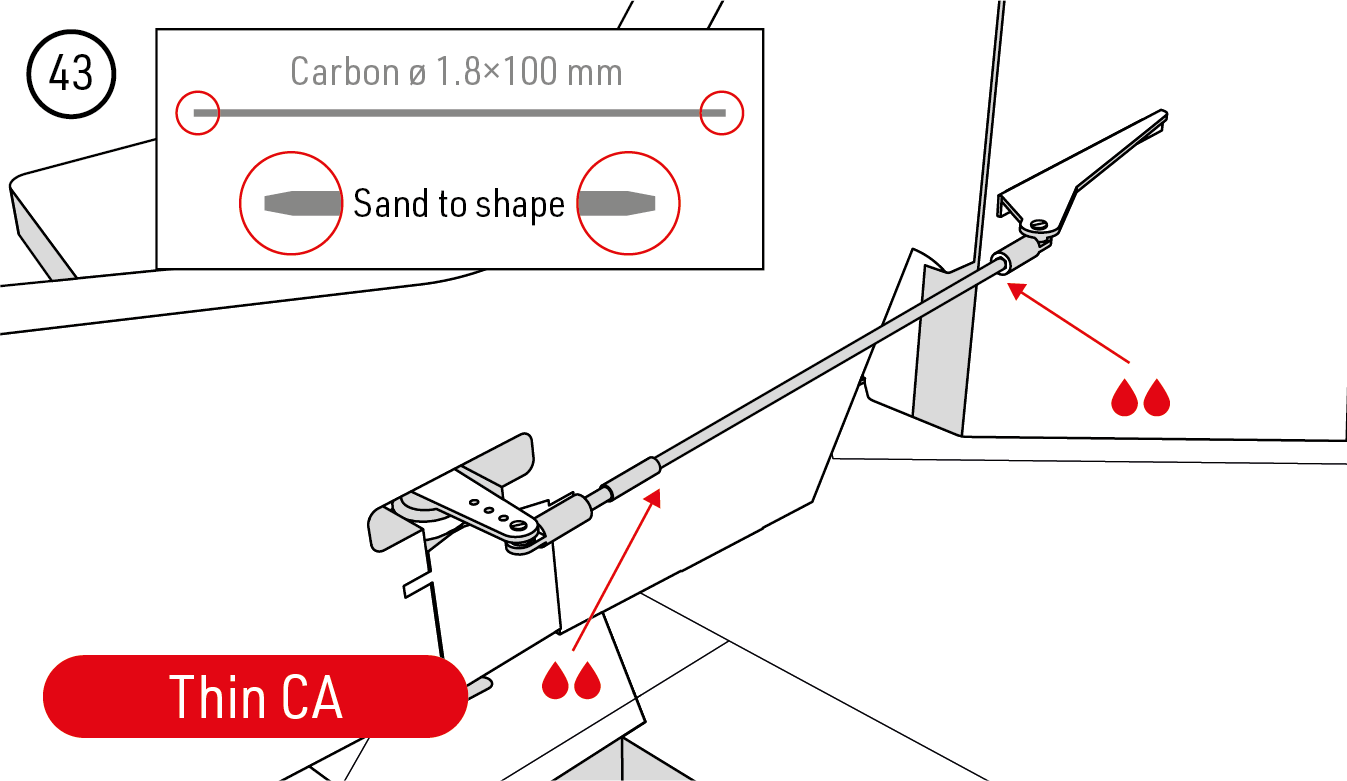
- Centre the rudder servo and fit its arm, ball link and threaded coupler. Separate horns c and d; retain c for the elevator and fit a ball link to d. Glue horn d into the rudder with medium CA and the servo into the vertical fuselage with hot melt glue, cutting lug recesses as needed. Sand the Ø1.8×100 mm rod ends to fit and glue the rod into the fittings with thin CA after setting the rudder to neutral. (Fig. 39) (Fig. 40) (Fig. 41) (Fig. 42) (Fig. 43)
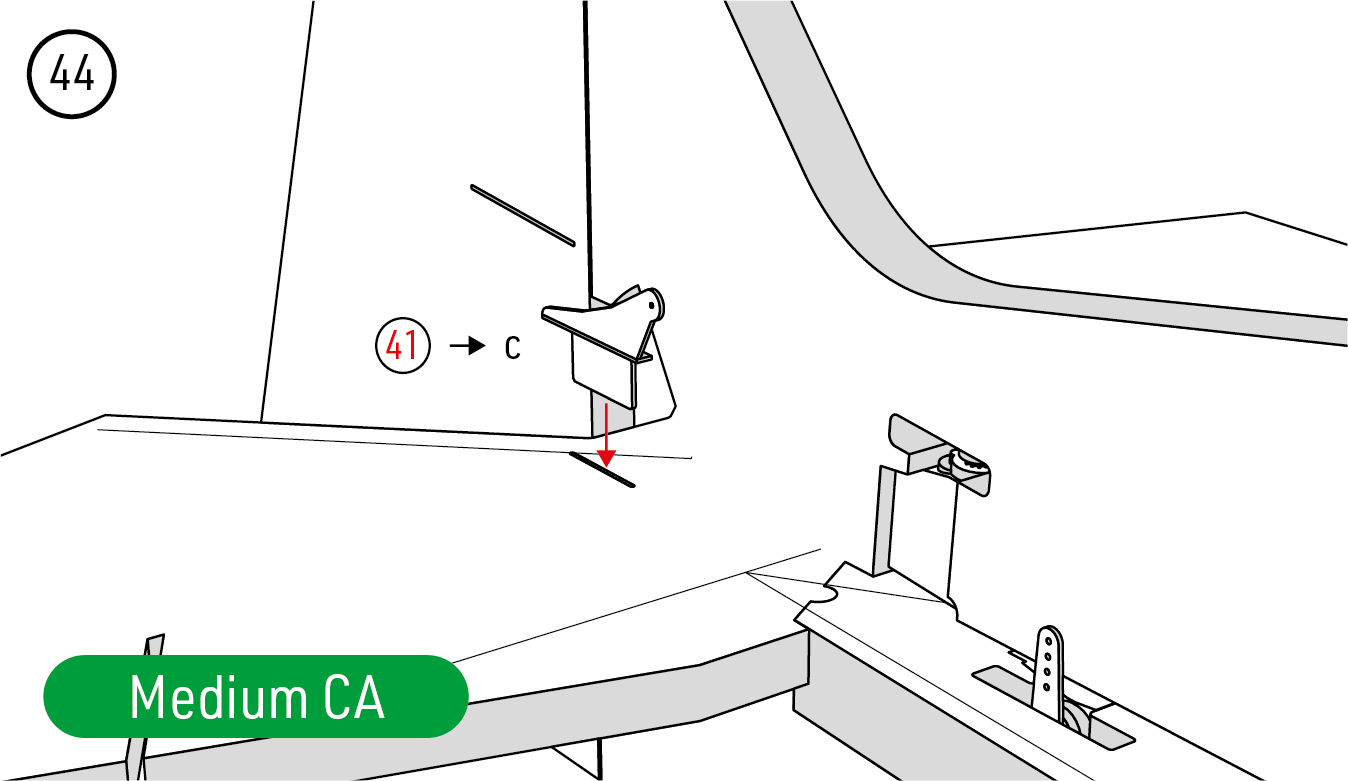
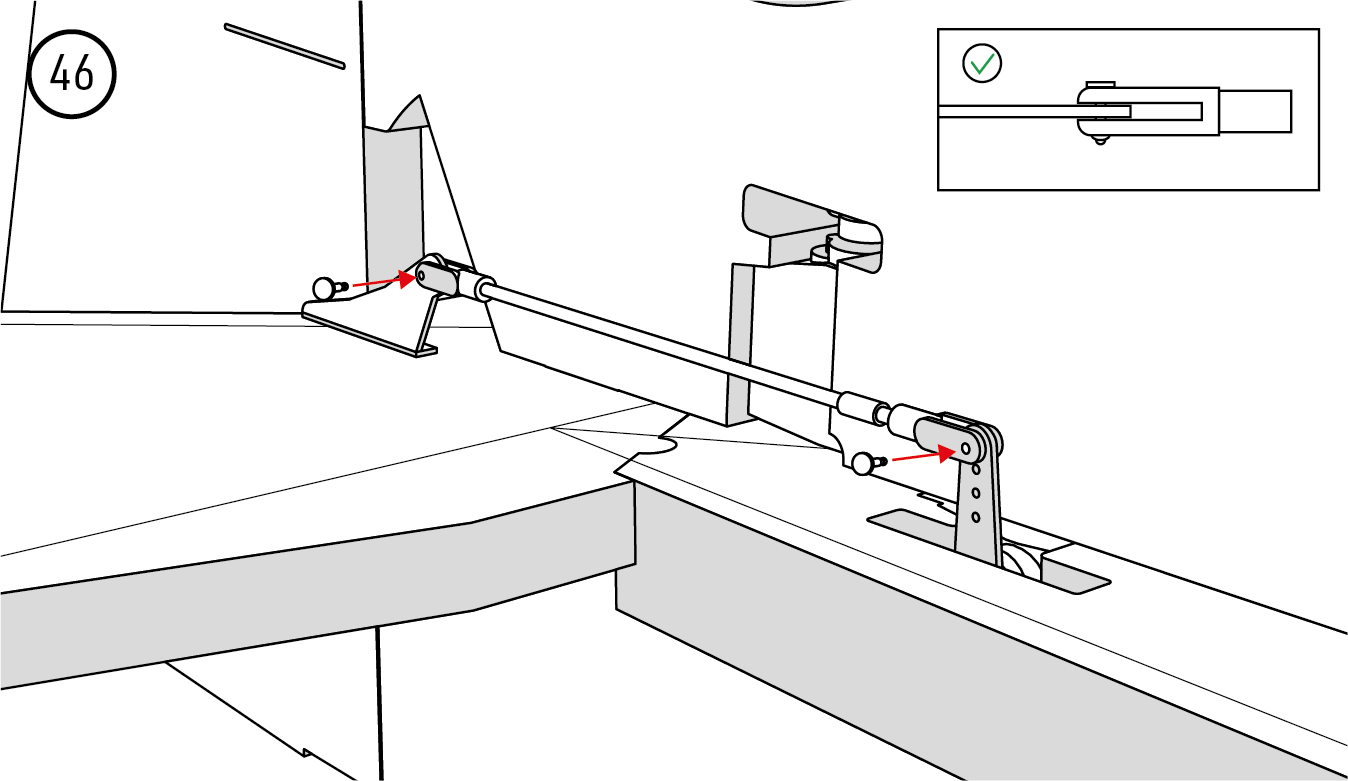
- Glue horn c into the elevator with medium CA. Make its pushrod from the second Ø1.8×100 mm rod, a fixed clevis, an M2/2 threaded coupler and an adjustable clevis. Sand the ends to fit, set the elevator neutral and glue the fittings with thin CA. Fit and fully secure both clevis pins. (Fig. 44) (Fig. 45) (Fig. 46)
Undercarriage and wheels
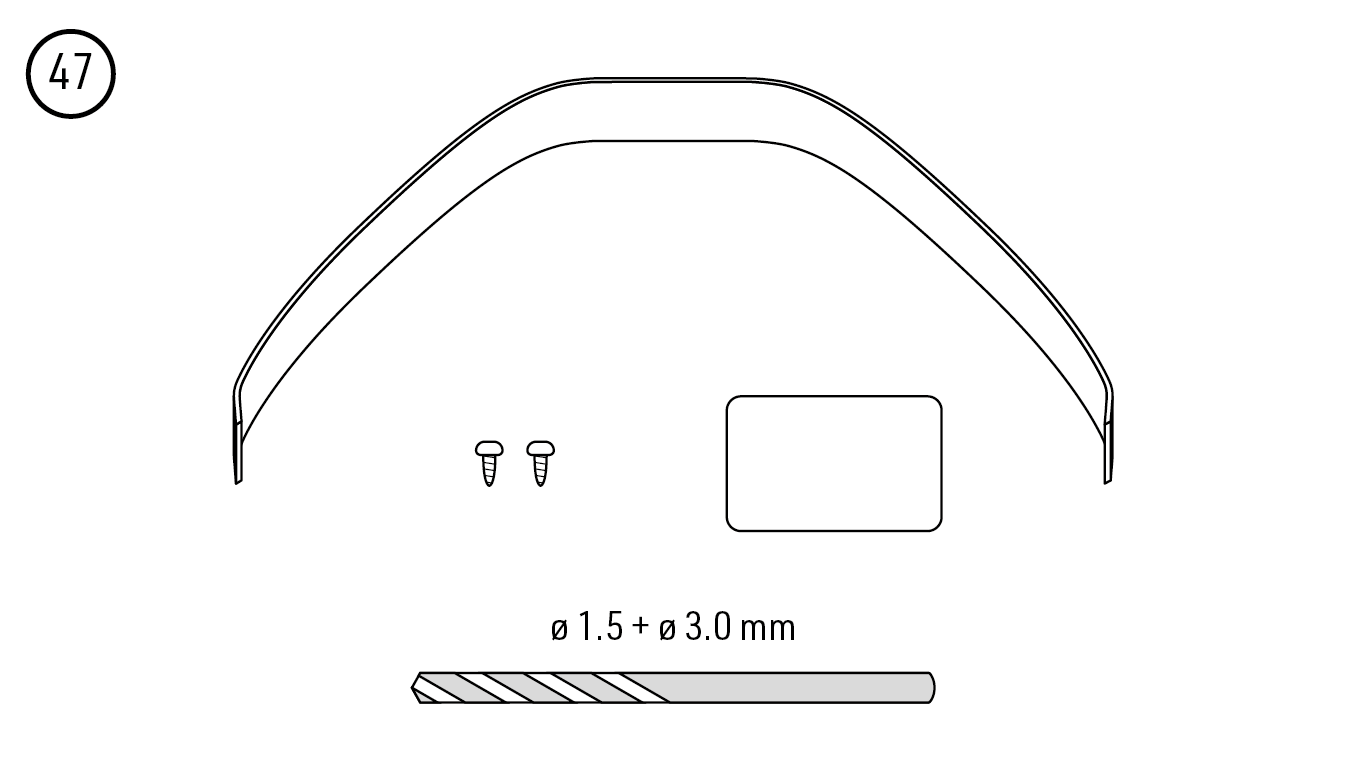
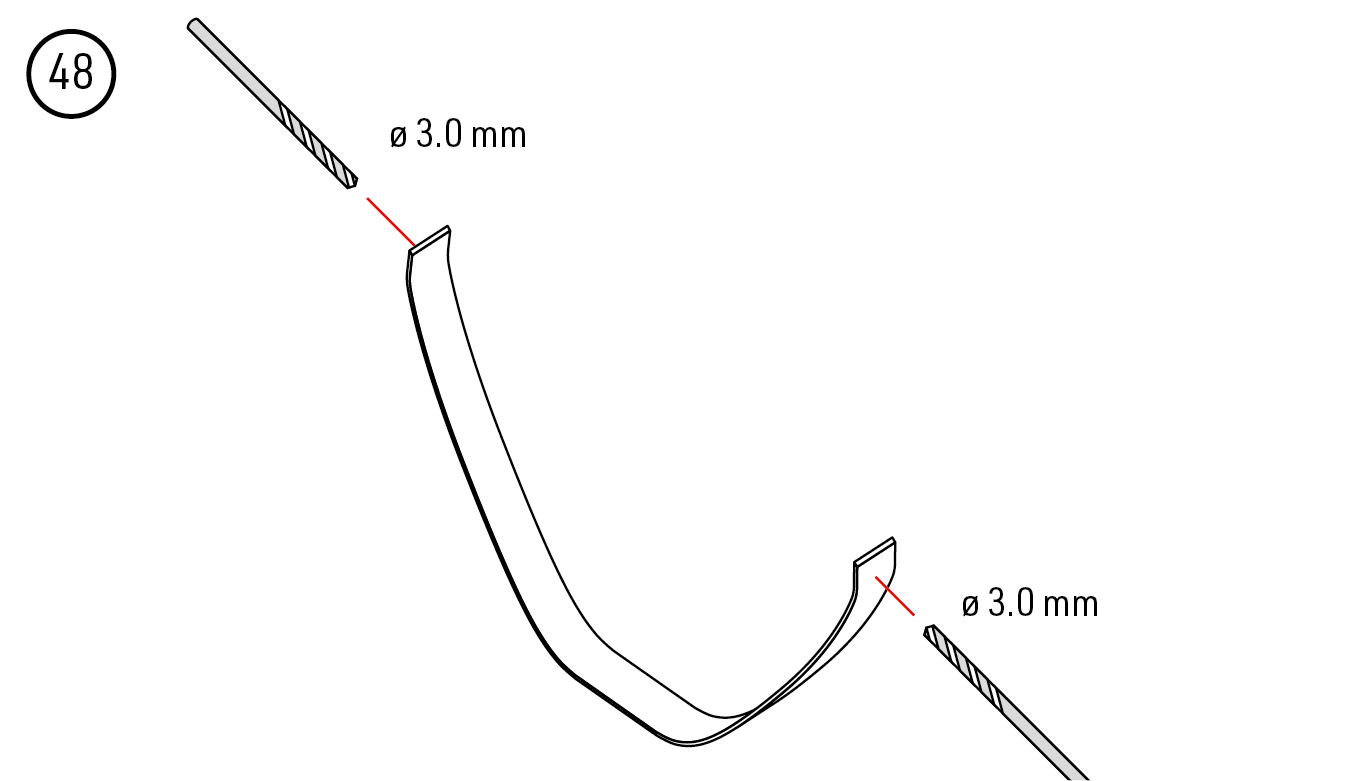
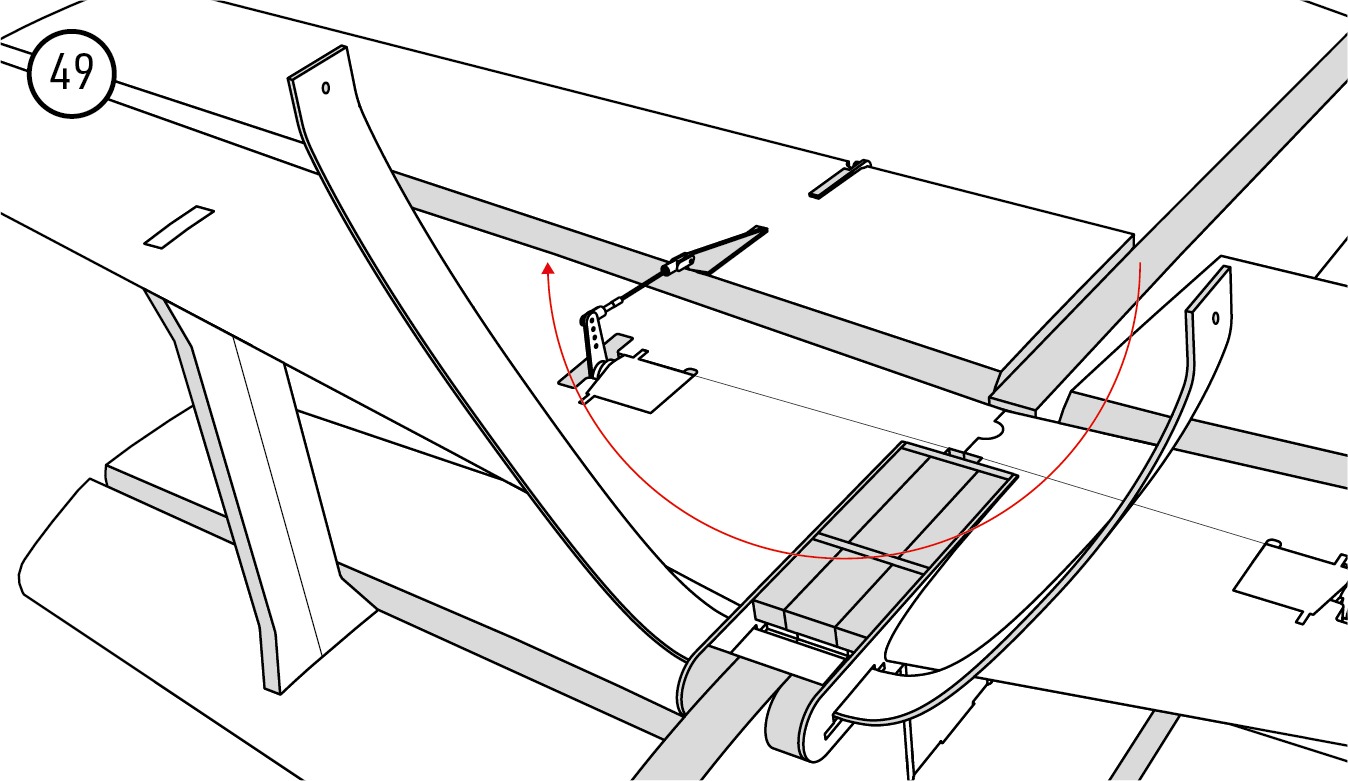
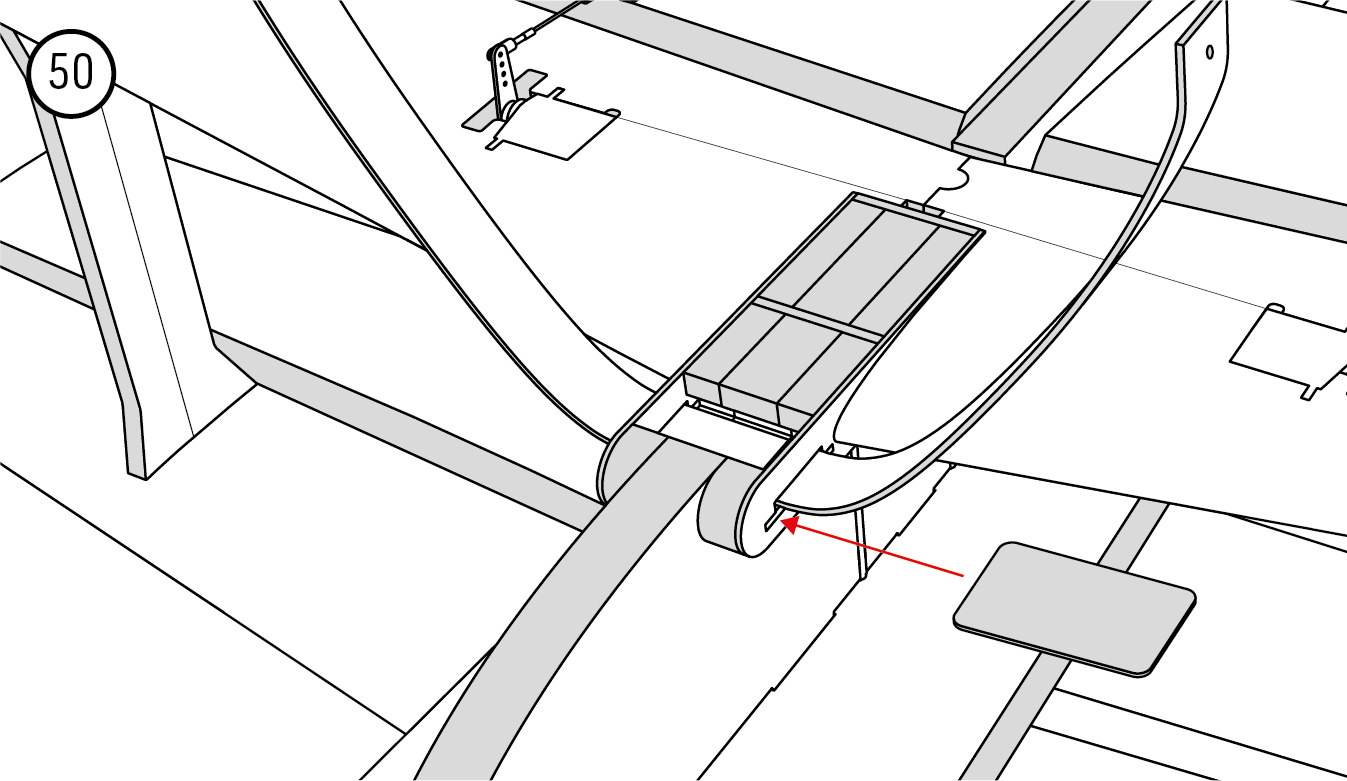
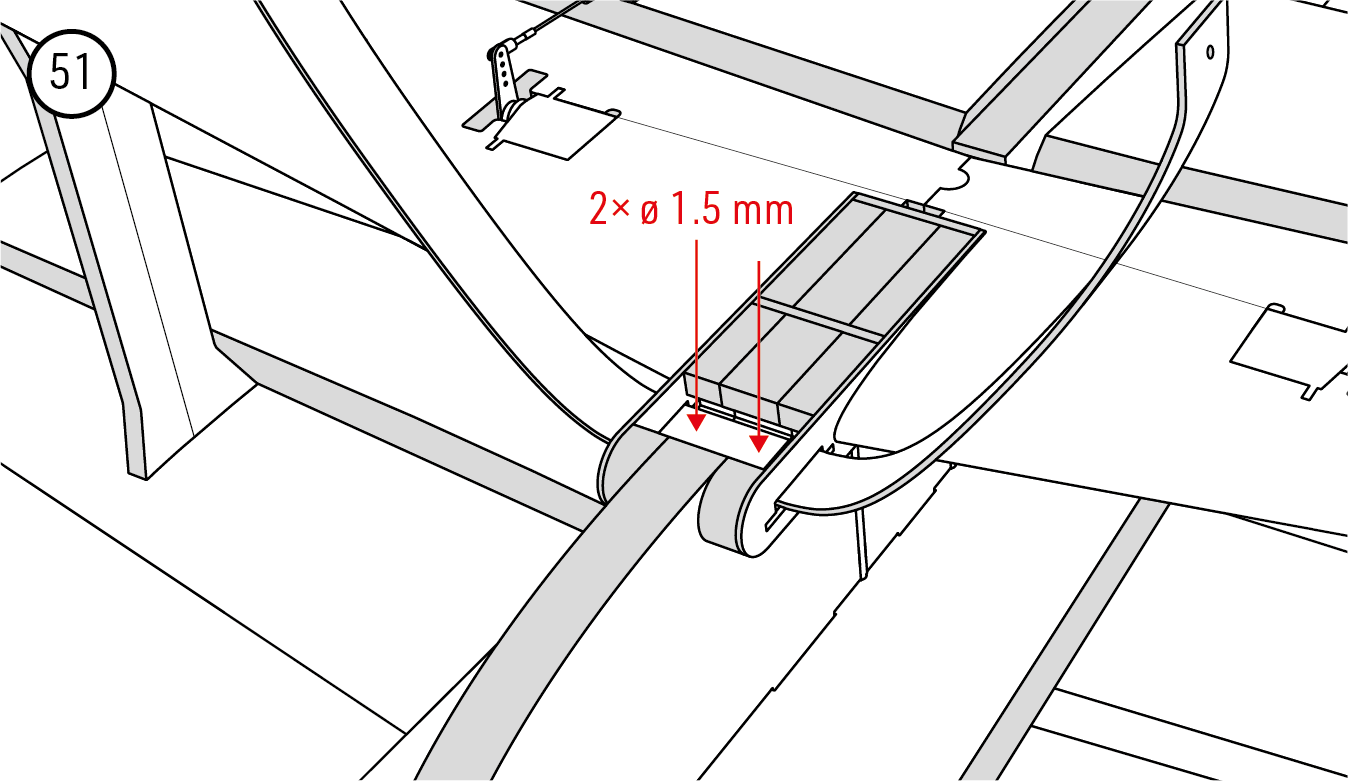
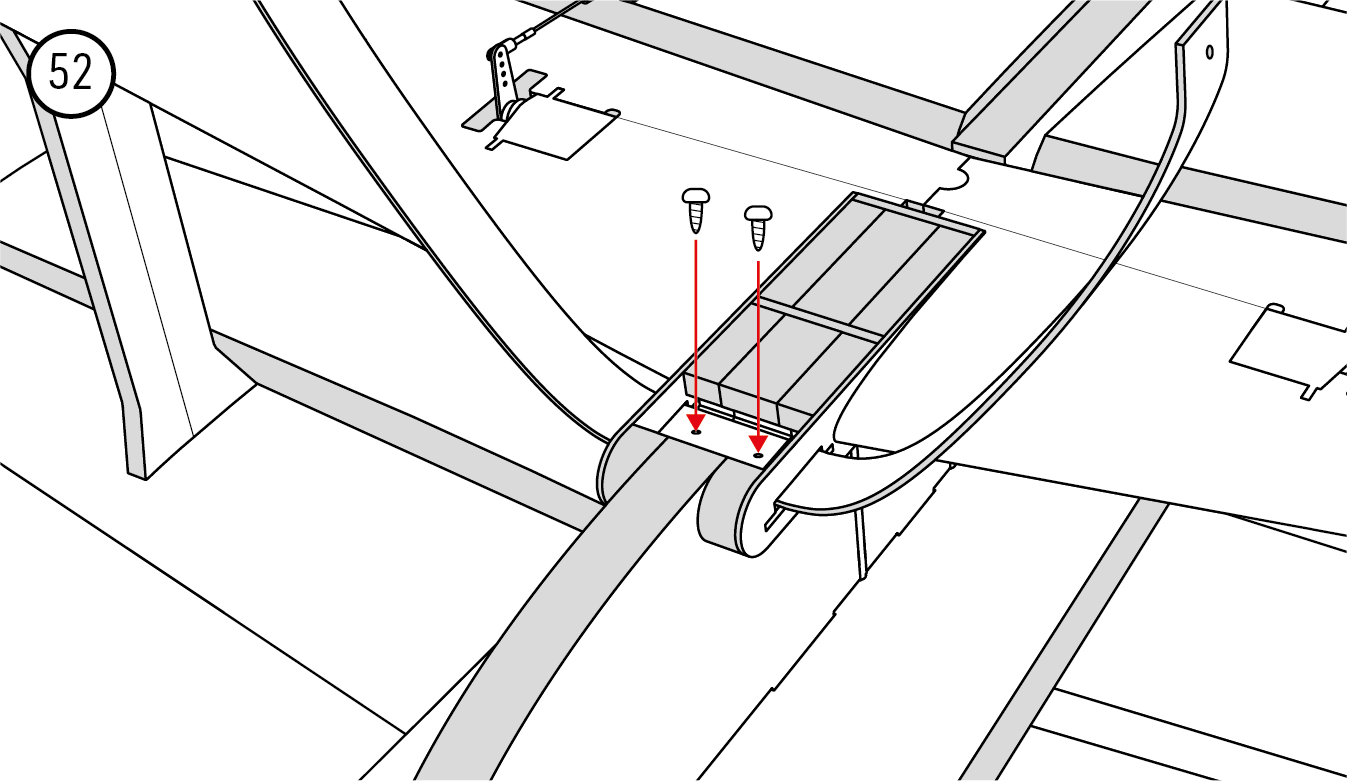
- Drill the main undercarriage wheel holes Ø3.0 mm. Insert and rotate the carbon undercarriage into its holders, slide in the fibreglass retaining plate, drill the two Ø1.5 mm pilot holes shown and secure it with the supplied 3.8×7 mm self-tapping screws. (Fig. 47) (Fig. 48) (Fig. 49) (Fig. 50) (Fig. 51) (Fig. 52)
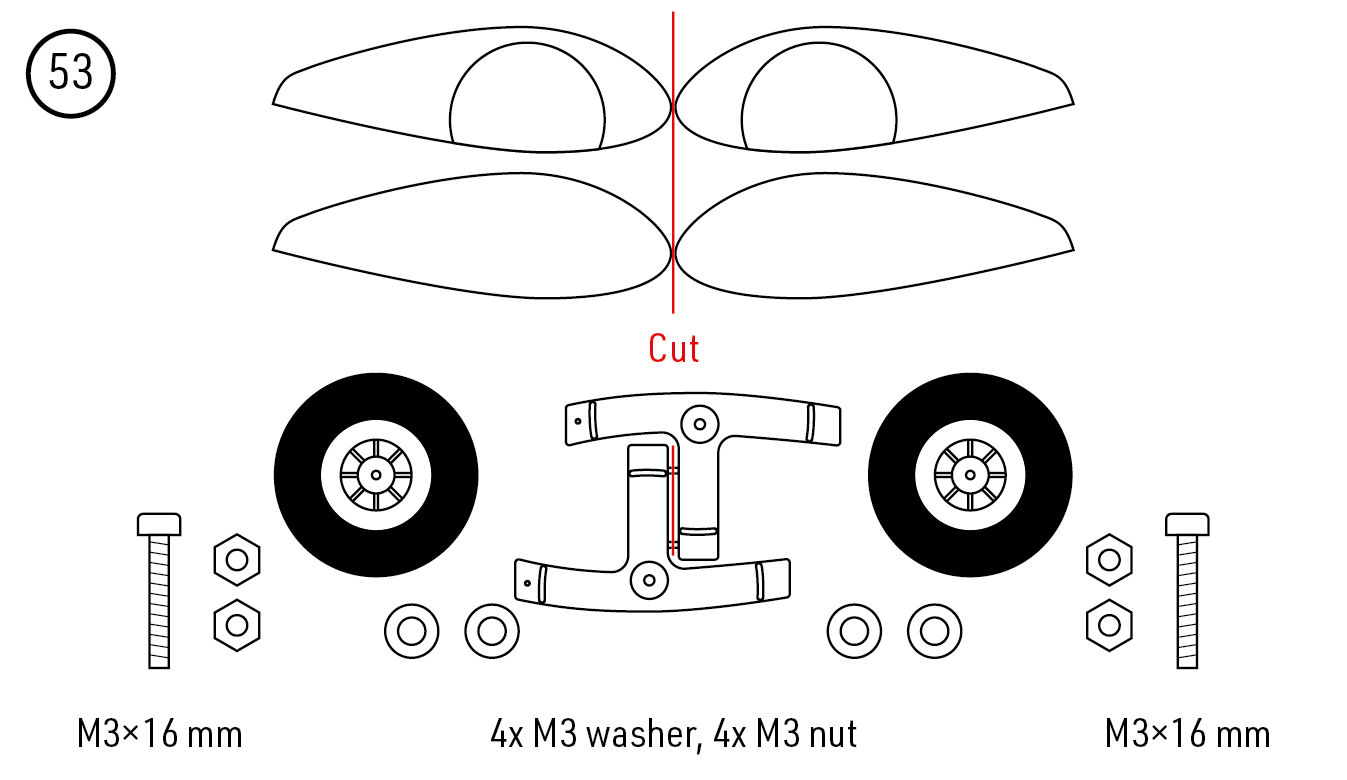
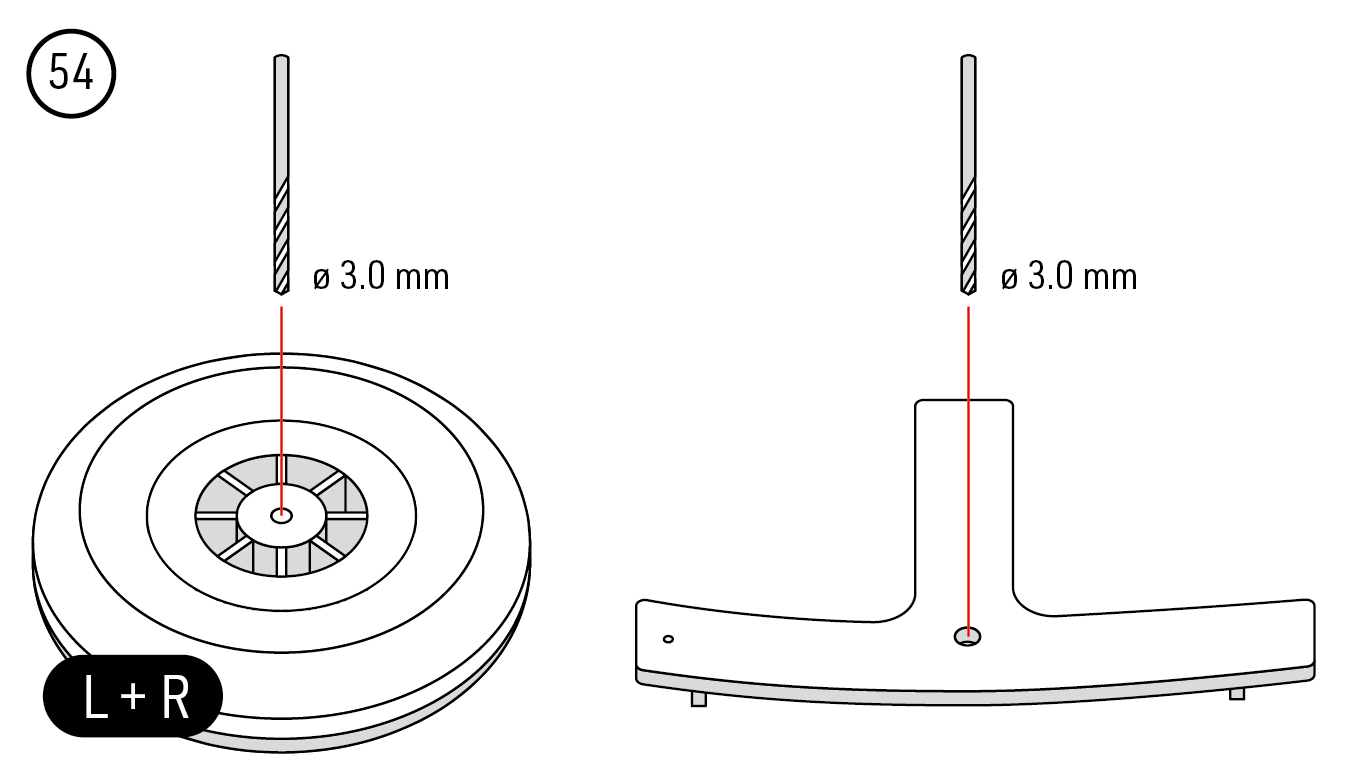
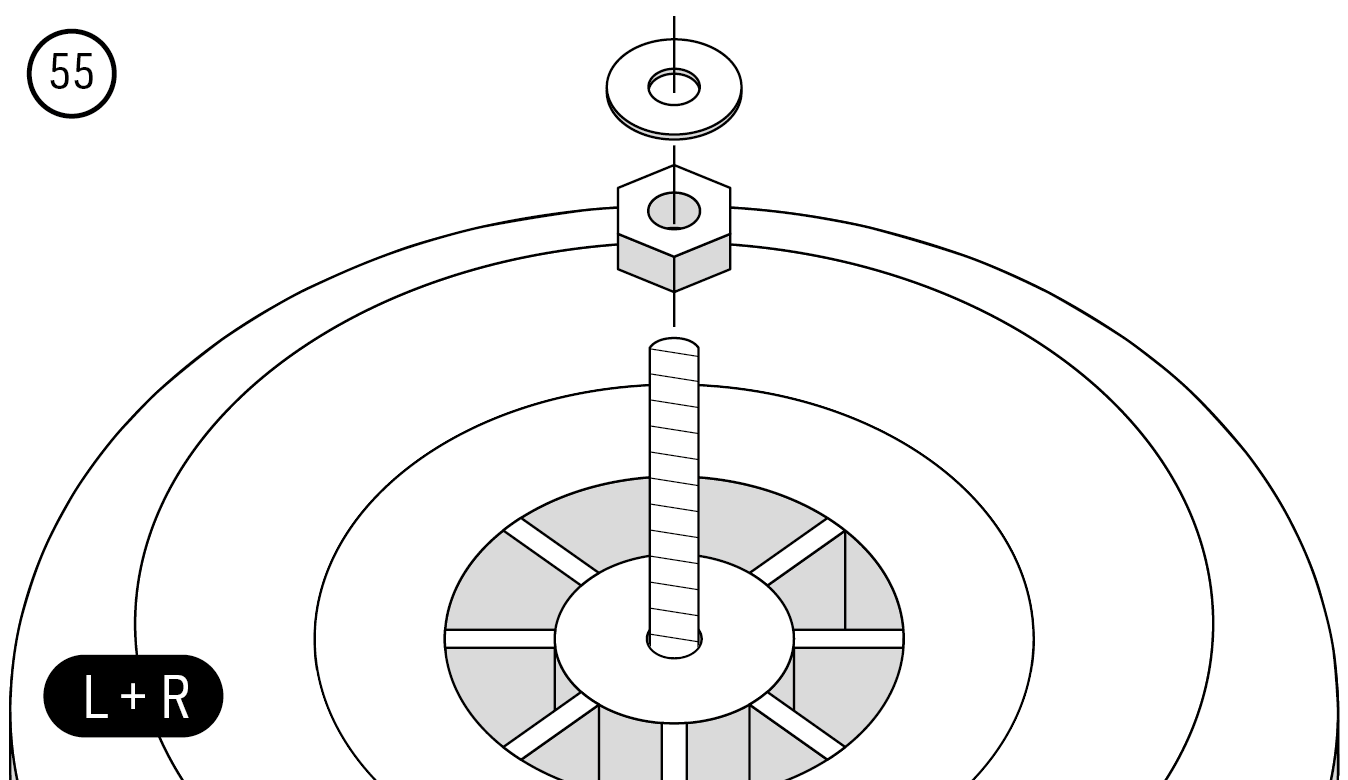
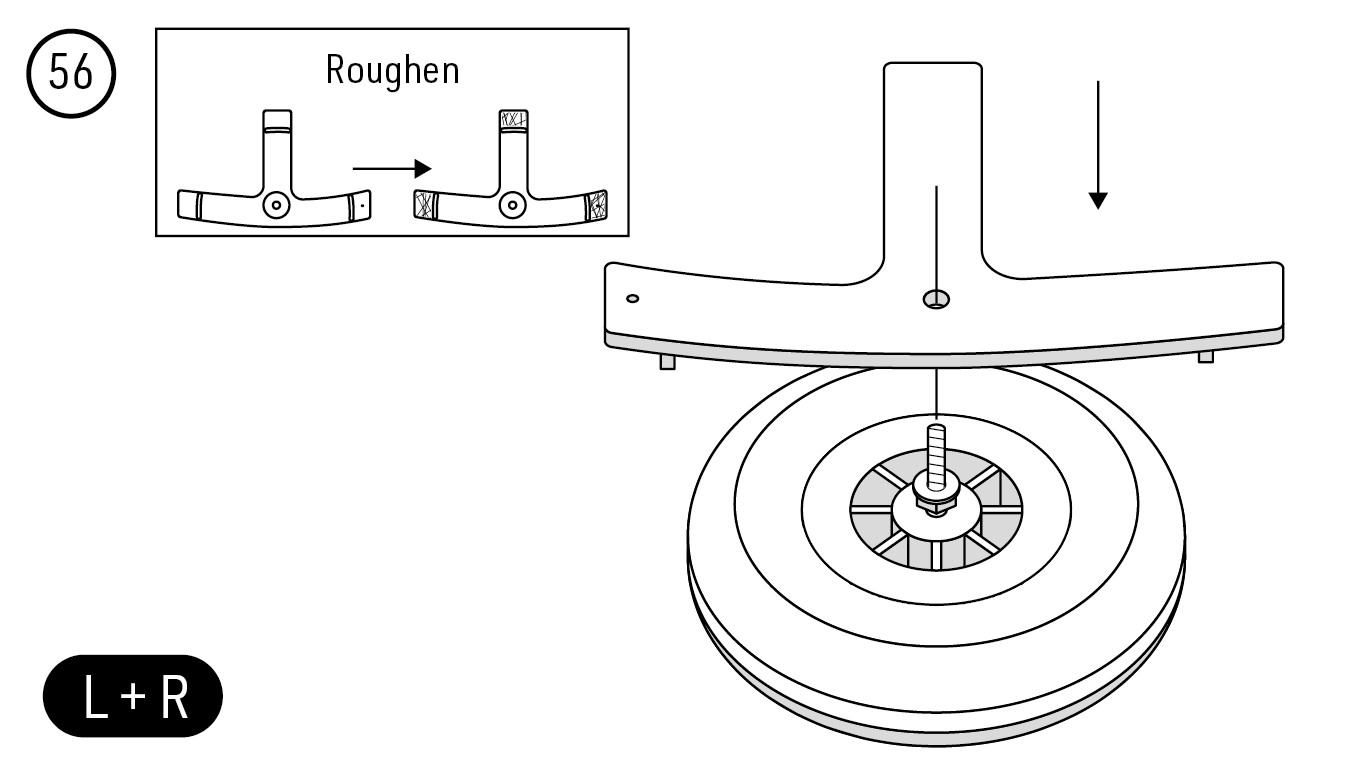
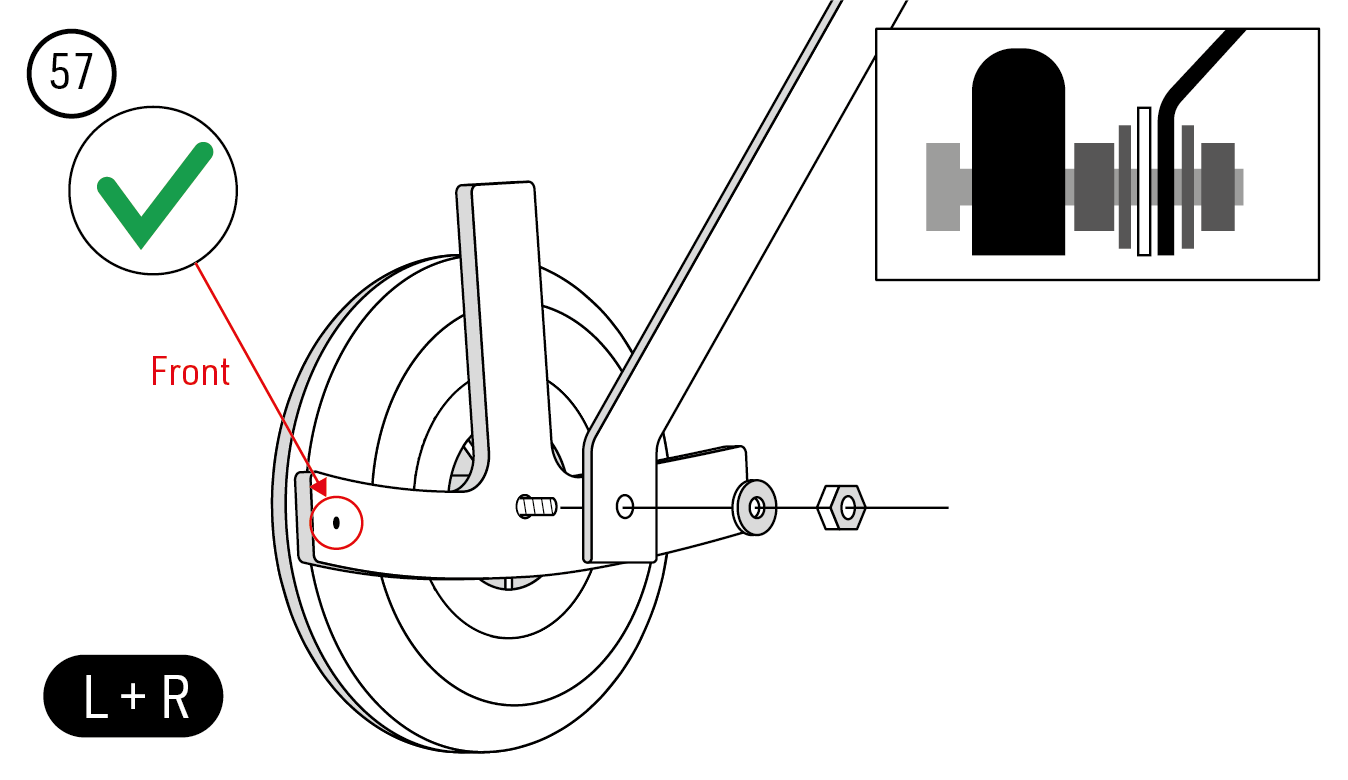
- Separate the wheel-pant parts and holders. Drill both main-wheel hubs and both holder axle holes Ø3.0 mm. Assemble each Ø50 mm wheel on an M3×16 mm screw with a nut and washer, add the roughened holder, fit the assembly to the undercarriage and secure it with the outer washer and nut. The small identifying hole in each holder faces forwards. Keep both wheels free to rotate. (Fig. 53) (Fig. 54) (Fig. 55) (Fig. 56) (Fig. 57)
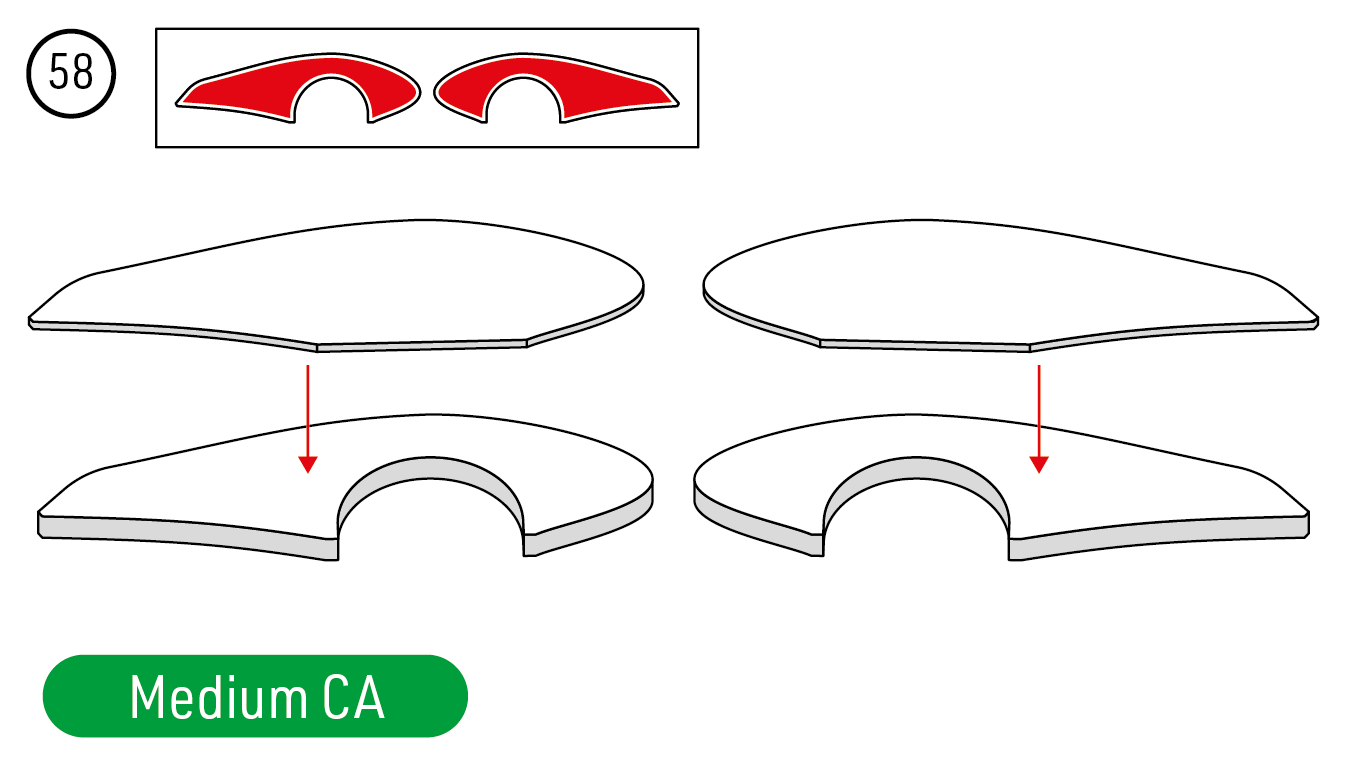
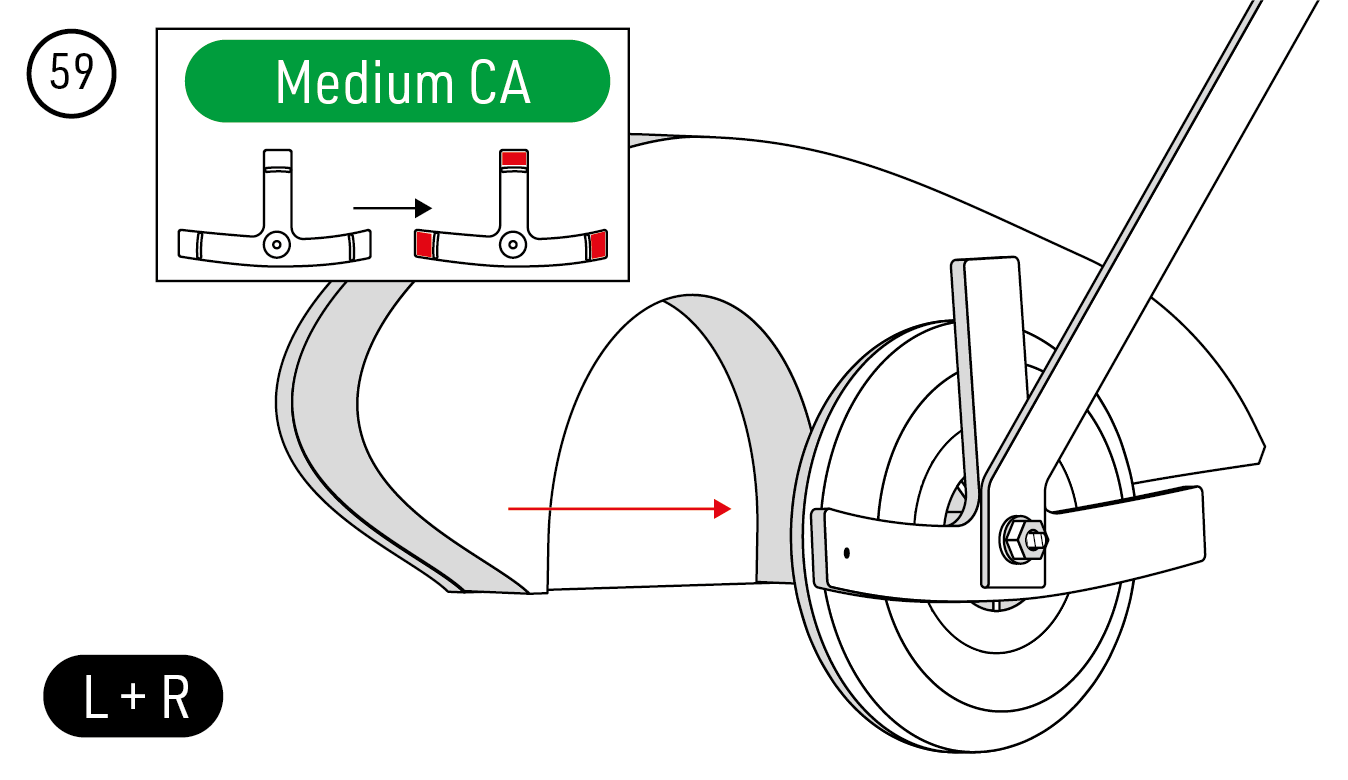
- Glue the inner and outer EPP wheel-pant halves together with medium CA, then glue each pant onto the roughened holder ends. Keep adhesive off the wheels and leave running clearance. (Fig. 58) (Fig. 59)
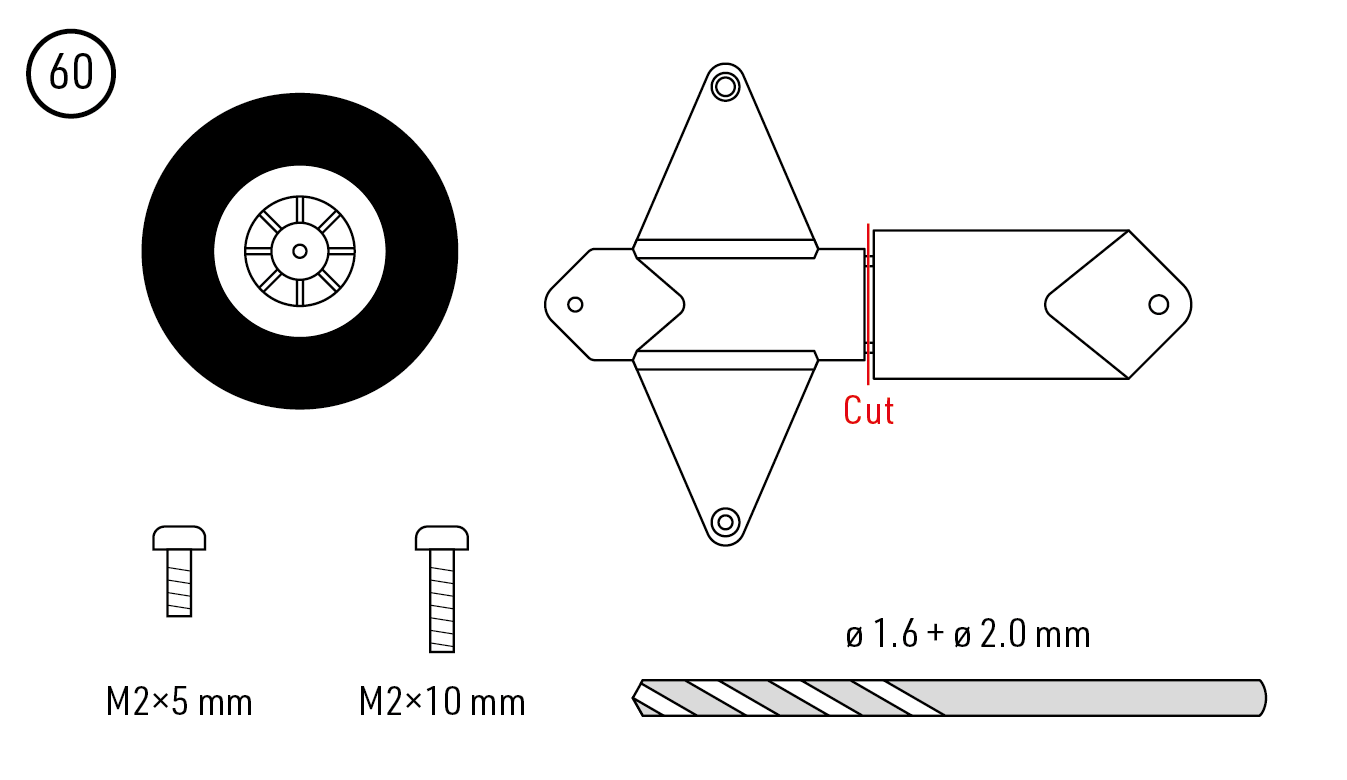
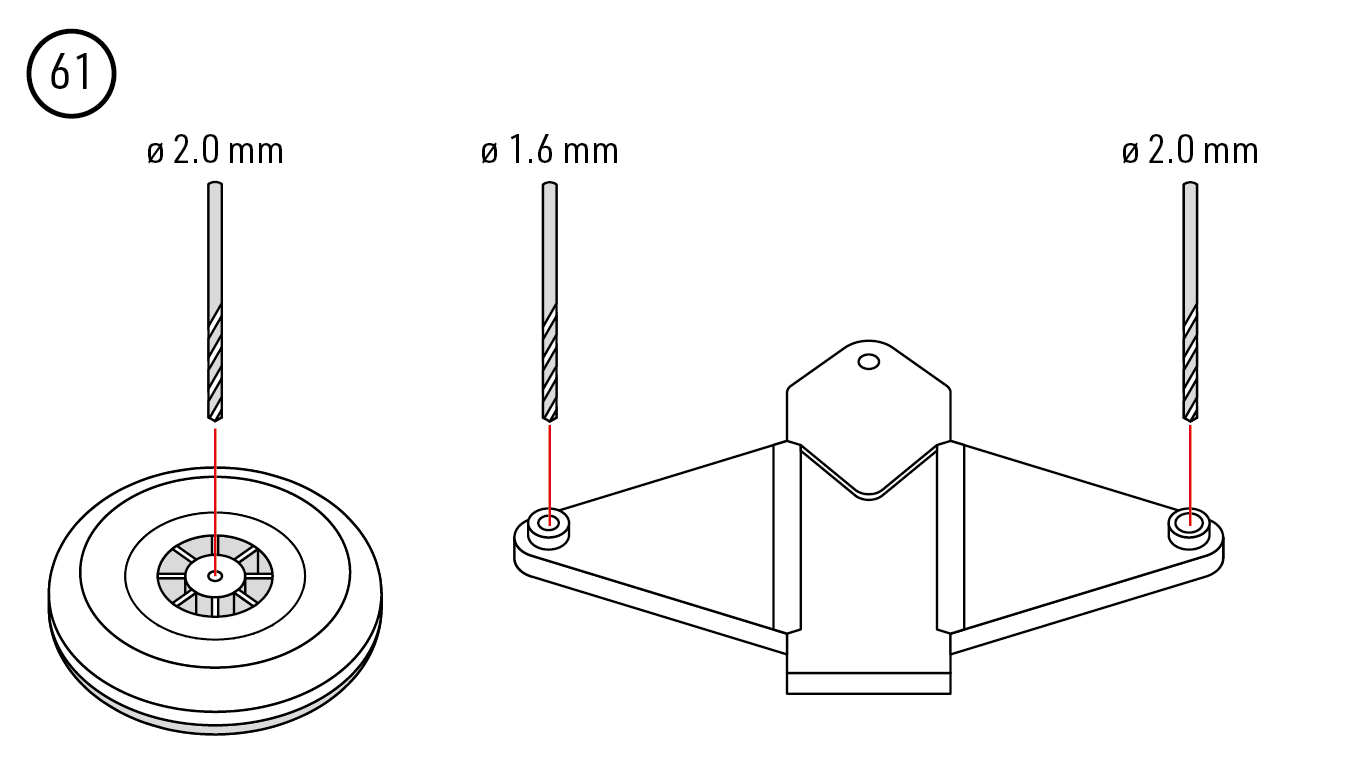
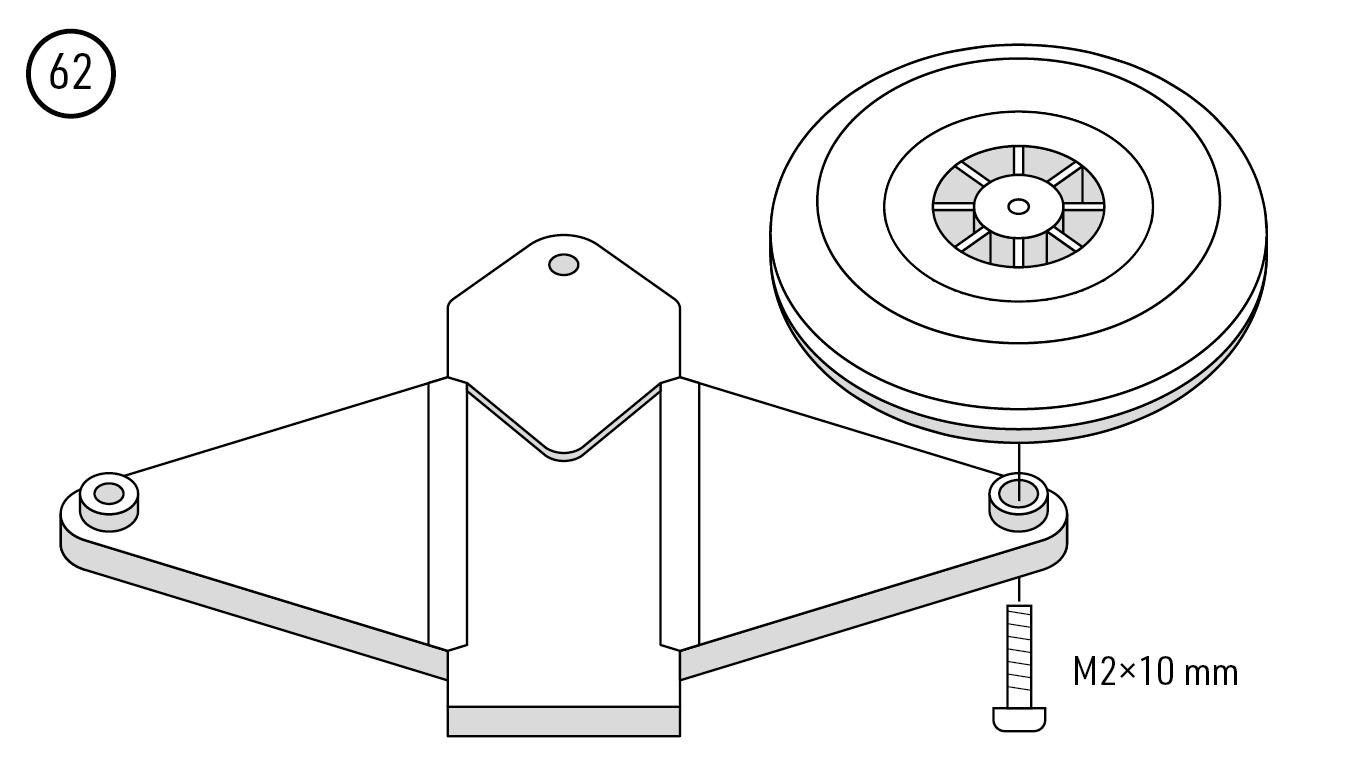
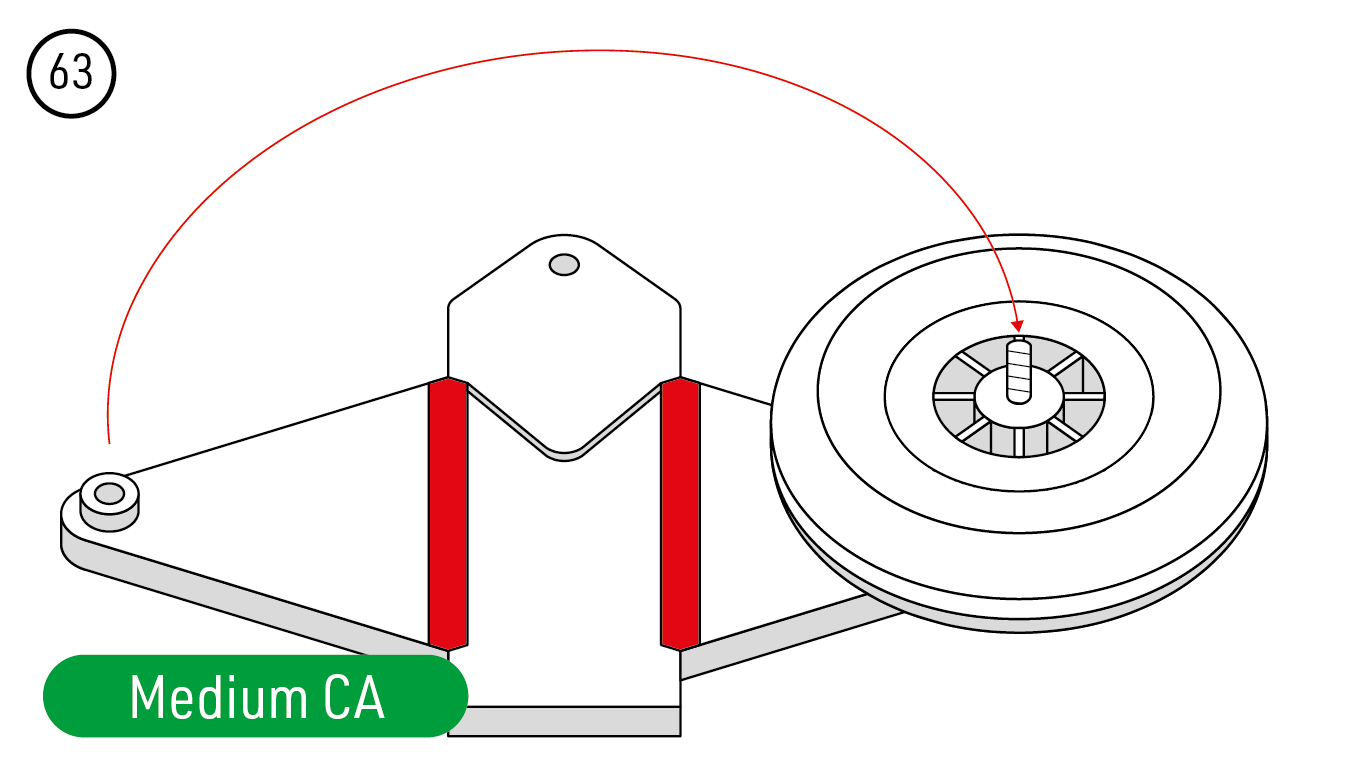
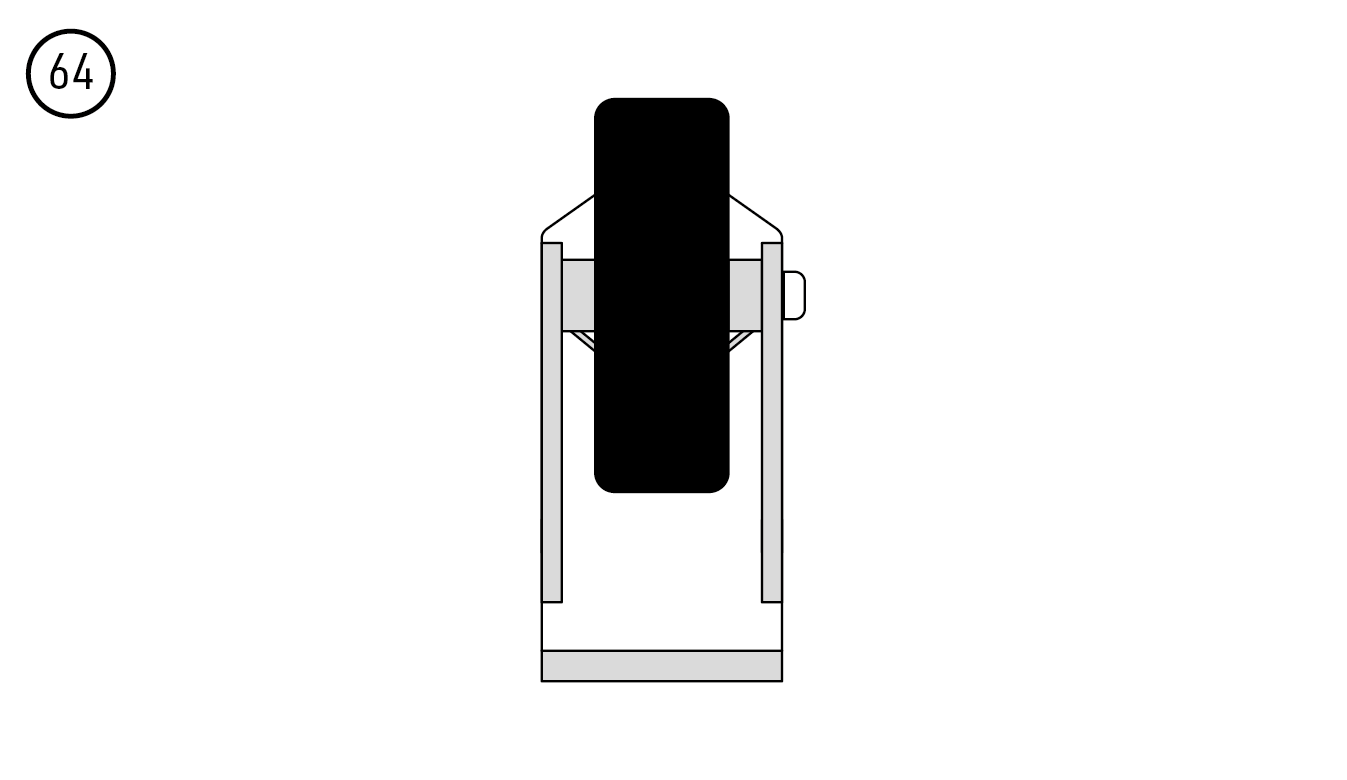
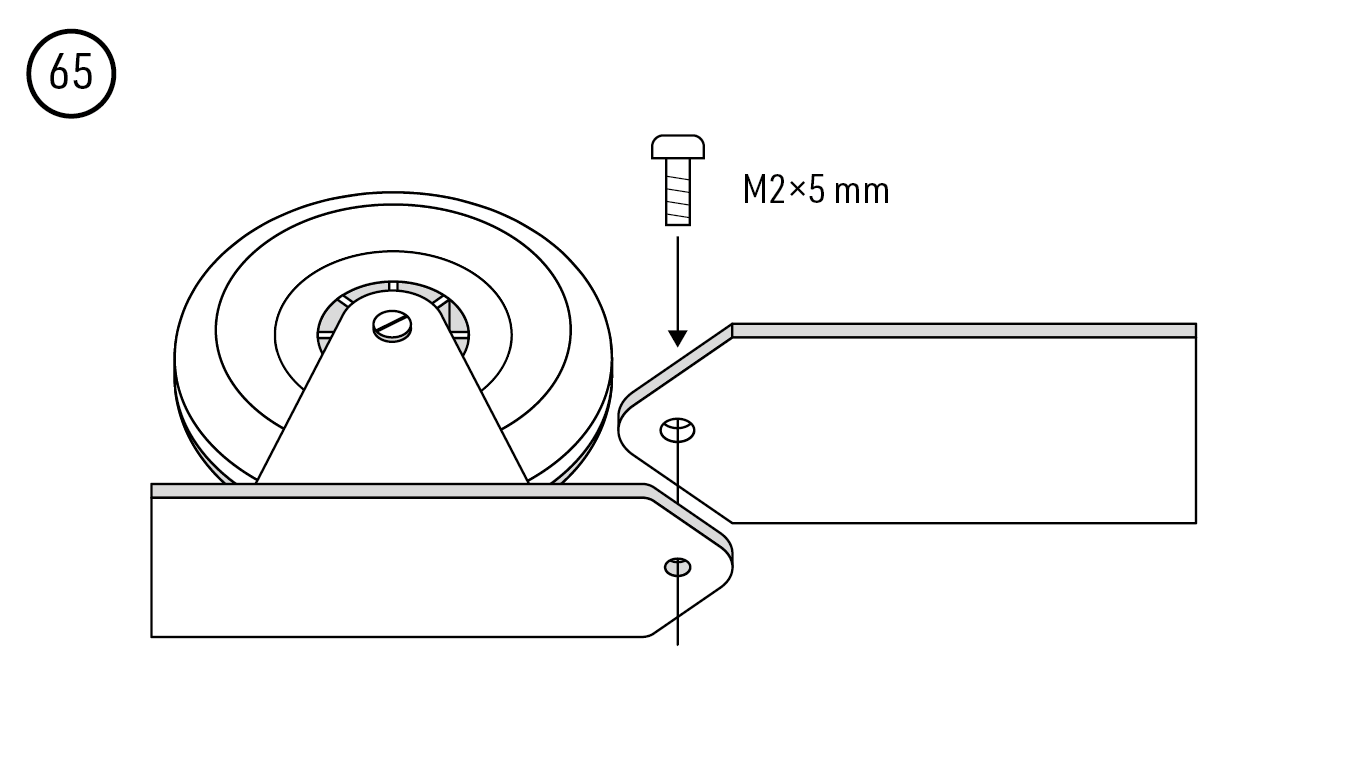
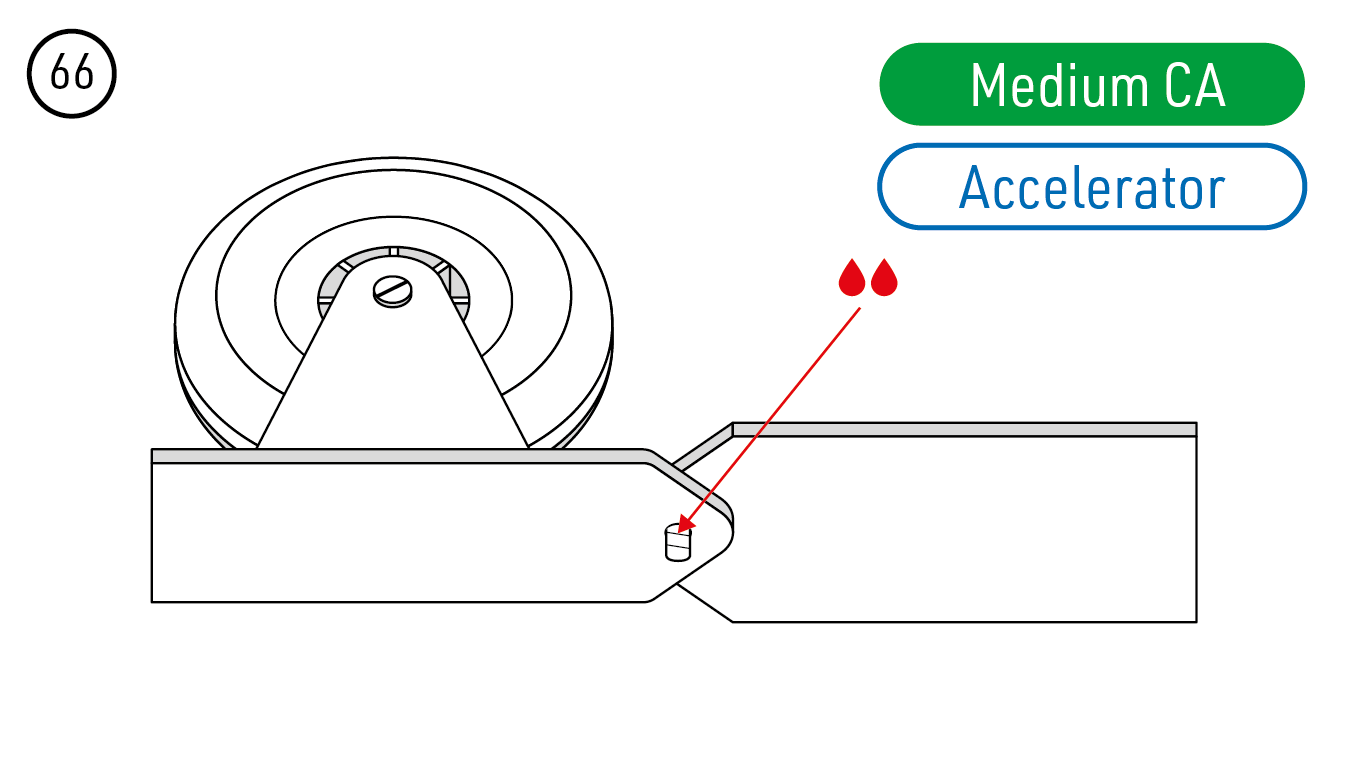
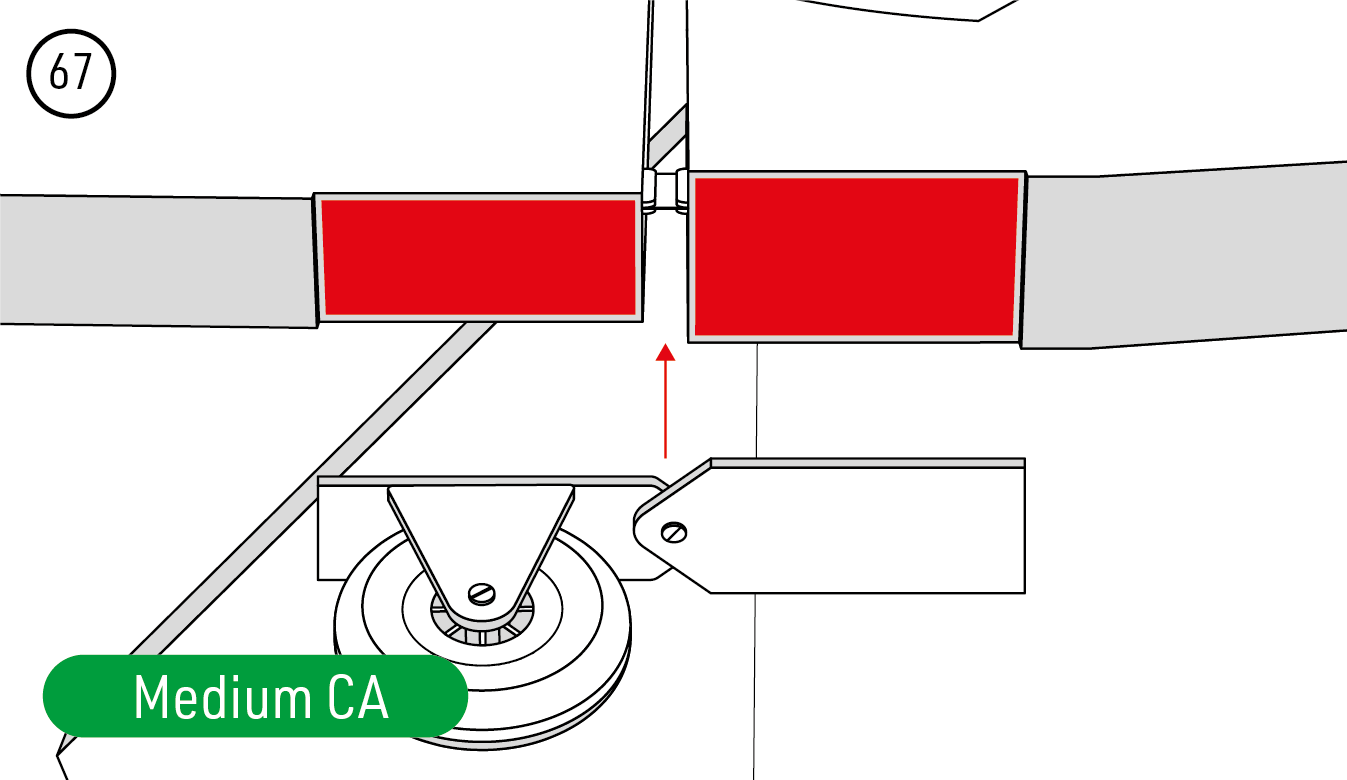
- Separate the tailwheel parts. Drill the Ø25 mm wheel hub and one fork arm Ø2.0 mm; drill the other arm Ø1.6 mm. Fit the M2×10 mm axle, fold and glue the fork with medium CA, and check free wheel rotation. Join the fork to its mounting plate with the M2×5 mm pivot screw. Secure the protruding screw end as shown with a little medium CA and accelerator, keeping the pivot free. Glue the mounting surfaces to the underside of the fuselage and rudder as shown and check that steering remains free. (Fig. 60) (Fig. 61) (Fig. 62) (Fig. 63) (Fig. 64) (Fig. 65) (Fig. 66) (Fig. 67)
Power system
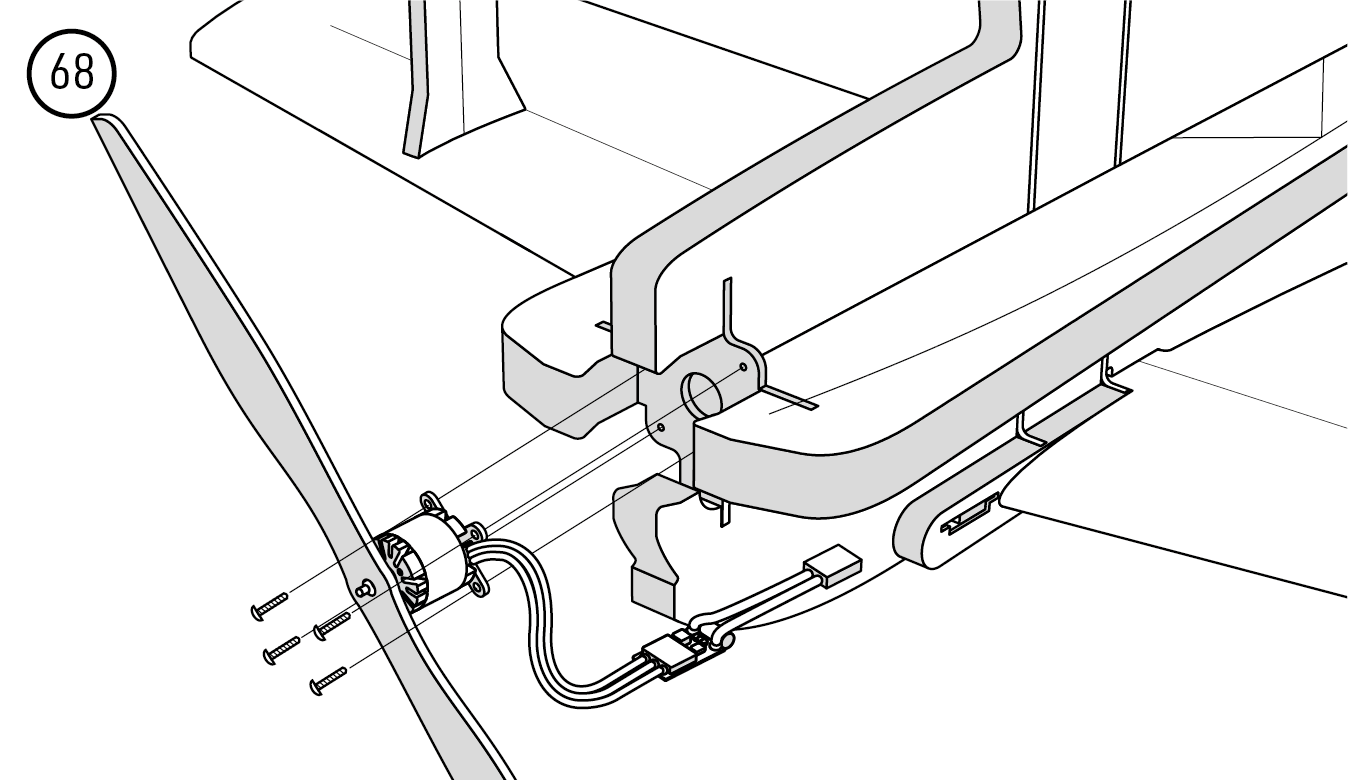
- Mount the selected motor to the firewall and install the ESC with adequate cooling. Secure the receiver and wiring according to their instructions. Keep the flight battery disconnected and the propeller removed until the setup checks are complete. (Fig. 68)
Pre-flight preparation
Radio and control checks
- Connect the servos and ESC to the receiver according to the radio instructions. Check that the BEC voltage is suitable for the receiver and all four servos. Use the linkage drawings to check neutral positions and geometry. (Fig. 37) (Fig. 43) (Fig. 45)
- With the propeller removed, switch on the transmitter with the throttle at minimum, centre the other controls and trims, and connect the flight battery. Check every control direction and adjust the linkages to neutral.
- Set the recommended throws. Moving a linkage closer to the servo shaft or farther from the control-surface pivot reduces the throw; the reverse increases it. Check for free movement throughout the selected travel and secure every clevis pin and servo-arm screw.
Control throws
| Recommended Throws | Low Rate | High Rate | ||
|---|---|---|---|---|
| Rate | Expo | Rate | Expo | |
| Ailerons | ±20° | 30–40 % | ±35° or more | 40 % |
| Elevator | ±30° | 30–40 % | ±50° or more | 40 % |
| Rudder | ±35° | 40–45 % | ±47° | 45 % |
Use low rates for the first flights and classic aerobatics. High rates are intended for experienced pilots flying 3D aerobatics. Set the expo direction according to the transmitter instructions so response is softer around neutral.
Motor rotation
With the propeller removed, check motor rotation. If necessary, disconnect the flight battery before swapping any two of the three motor wires, or change rotation using the ESC programming procedure. Once the radio and motor settings are correct, disconnect the battery and fit the propeller according to the motor and propeller instructions.
Centre of gravity
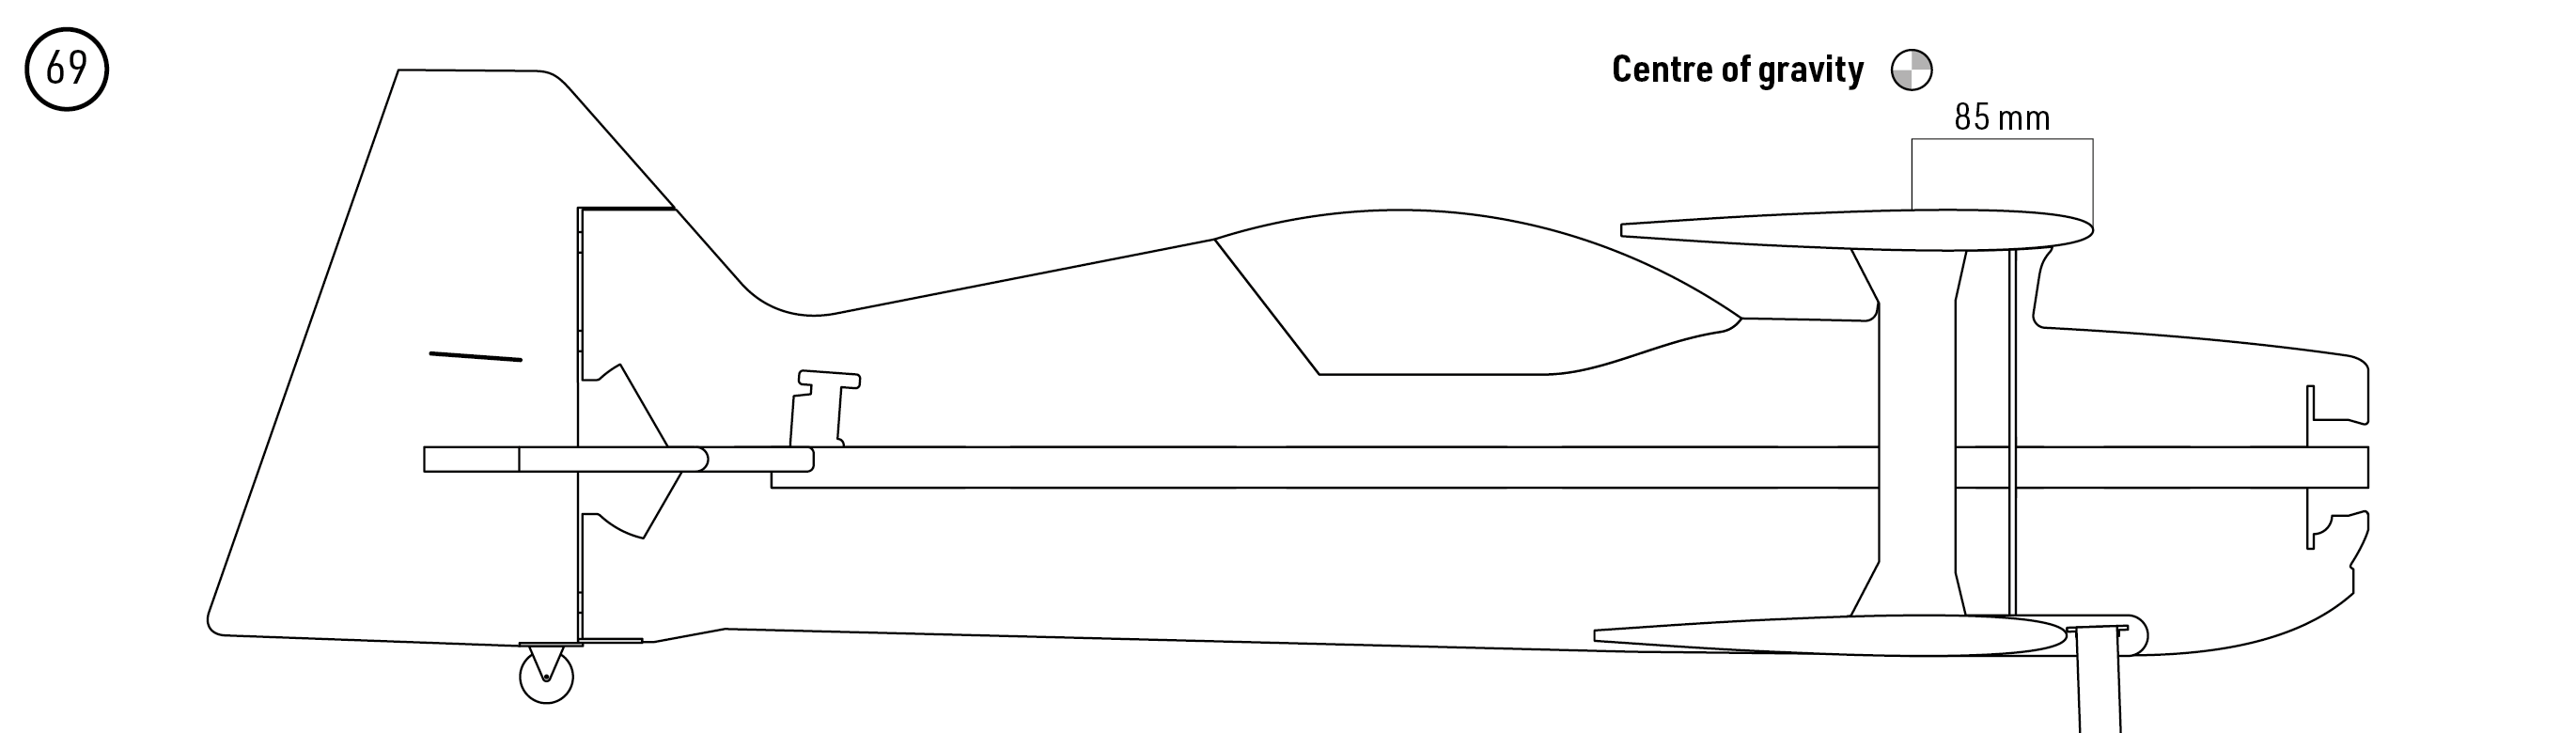
Secure the flight battery to the side of the lower vertical fuselage with hook-and-loop tape. With the model complete and ready to fly, adjust the battery position to obtain a CG 85 mm behind the leading edge of the upper wing, measured along the fuselage as shown. (Fig. 69)
Use the specified CG for the first flight. An incorrect CG can make the model unstable or uncontrollable. The original manual permits later adjustment to suit an experienced pilot, but gives no approved adjustment range.
Range check
Fully charge the flight battery and transmitter batteries. Perform the radio manufacturer’s range check with the motor stopped and running at full throttle, securing the model safely and keeping everyone clear of the propeller. The range must remain almost unchanged; a reduction greater than 10 % is unacceptable. Do not fly unless every range and control check passes.
Flying
The model is intended for pilots who have already mastered a trainer with aileron control. Choose calm weather and a clear flying area for the maiden flight. Ask an experienced pilot to inspect the completed model and assist with trimming if needed. Start with low rates and check the model’s behaviour at a safe height before attempting aerobatics.
Appendix
ESC instructions
Follow the instructions for the controller you install (Recommended:KAVAN standard ESCs, KAVAN Plus ESCs or KAVAN PRO SBEC ESCs). Verify the ESC and BEC ratings against the chosen battery and servos before connecting power.
Caution
- Do not install the propeller on the motor when you test the ESC and motor for the first time to verify the correct settings on your radio. Only install your propeller after you have confirmed that the settings on your radio are correct.
- Never use ruptured or punctured battery cells.
- Never use battery packs that are known to overheat.
- Never short circuit battery or motor terminals.
- Always use proper insulation material for cable insulation.
- Always use proper cable connectors.
- Do not exceed the number of cells or servos specified for the ESC.
- Wrong battery polarity will damage the ESC and void the warranty.
- Install the ESC in a suitable location with adequate ventilation for cooling.
- Use only batteries that are supported by the ESC and ensure the correct polarity before connecting.
- Switch your transmitter ON first and ensure the throttle stick is in the minimum position before connecting the battery pack.
- Never switch your transmitter OFF while the battery is connected to your ESC.
- Only connect your battery pack just before flying and do not leave your battery pack connected after flying.
- Handle your model with extreme care once the battery pack is connected and keep away from the propeller at all times. Never stand in-line or directly in front of any rotating parts.
- Do not immerse the ESC under water, do not allow it to get wet while powered up.
- Always fly at a designated flying site and follow the rules and guidelines set by your modeller’s club.
Repairs and maintenance
- Please perform the range check in the beginning of each flying session.
- Before every take off please check the correct control surface movement.
- After every landing check the plane for any damage, loose clevises or push rods, bent undercarriage, damaged propeller etc. Do not fly again until the damage is repaired.
Despite the toughness of EPP foam, the Vibe can be damaged. Repair minor damage with CA adhesive or clear adhesive tape. Replace seriously damaged parts with suitable original spares obtained through a KAVAN dealer.
After a crash or hard landing, immediately move the throttle to minimum to prevent damage to the ESC.
Failure to lower the throttle stick and trim to the lowest possible positions in the event of a crash could result in damage to the ESC, which may require replacement of the ESC.
Crash damage is not covered under warranty.
Guarantee
KAVAN Europe s.r.o. guarantees that this model kit is free from defects in both materials and workmanship at the time of sale. This warranty does not cover any parts damaged through use or as a result of modification; under no circumstances shall the liability of the manufacturer and importer exceed the original purchase price of the model kit. KAVAN Europe s.r.o. also reserves the right to change or modify this warranty without prior notice. The model kit is subject to ongoing improvement and refinement, and the manufacturer reserves the right to change the design without prior notice.
Since KAVAN Europe s.r.o. has no control over potential damage during shipping, the method of assembly, or the materials used by the modeller to complete the model, no liability can be assumed or accepted for damages associated with the use of the model assembled by the user. The moment the user decides to use the model they have assembled, they assume full responsibility. If the purchaser is not prepared to accept this responsibility, they should immediately return the kit in its complete and unused condition to the place of purchase.
If your RC model requires service, please follow the guidelines below. Failure to comply with these guidelines may result in the warranty being voided.
- If possible, use the original packaging to pack the model. Do not use the original cardboard box as the final packaging.
- Include a detailed description of how you have used the model and RC kit, as well as the problem you have encountered. Attach a numbered list of the included accessories and provide any additional information that may assist the service department. Date the note and double-check that it includes your full address and phone number.
- Provide your name, address, and phone number where you can be reached during business hours. Include a copy of the model’s proof of purchase.
This warranty card entitles you to a free warranty repair of a product supplied by KAVAN Europe s.r.o. within 24 months. The warranty does not cover normal wear and tear resulting from regular use, as this is a product intended for sports and model-making use, in which individual parts operate under much higher loads than those to which ordinary toys are subjected. The model’s moving parts (motor, servos, and their gears, etc.) are subject to natural wear and tear, and replacement may be necessary over time.
The warranty also does not cover any part of the model or RC kit that was improperly installed, handled roughly or incorrectly, or damaged in a crash, nor does it cover any part of the model or RC kit that was repaired or modified by an unauthorised person. As with other delicate electronic products, do not expose your RC system to high temperatures, low temperatures, humidity, or dusty environments. Do not leave it in direct sunlight for extended periods.