KAVAN AP09A - Instruction manual
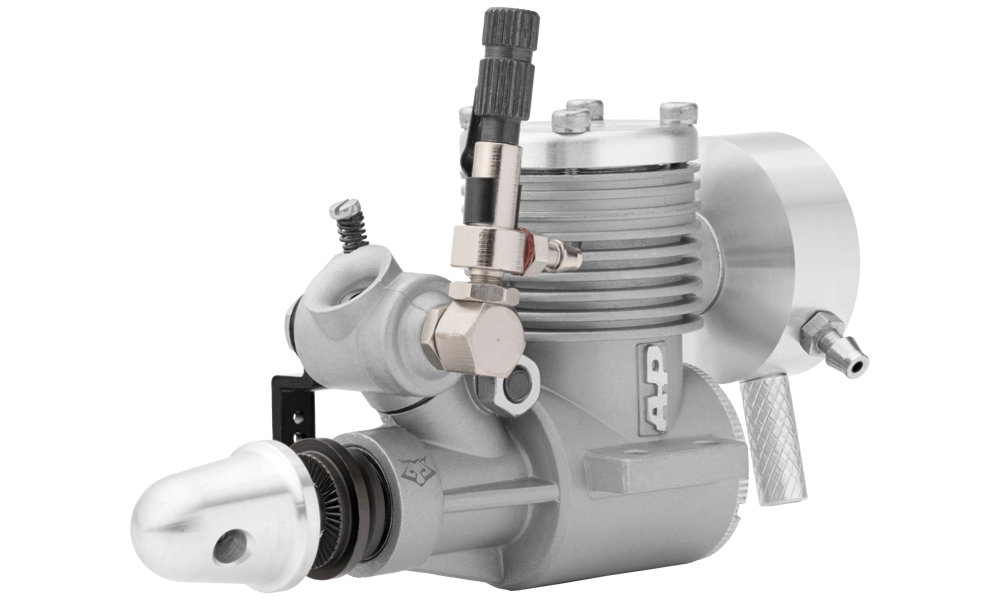
KAVAN AP09A
Introduction
The KAVAN AP09A is an ABC two-stroke glow engine with a crankshaft supported by two ball bearings, rear exhaust and an adjustable-direction muffler. Its single-needle RC carburettor simplifies mixture adjustment.
Engine overview
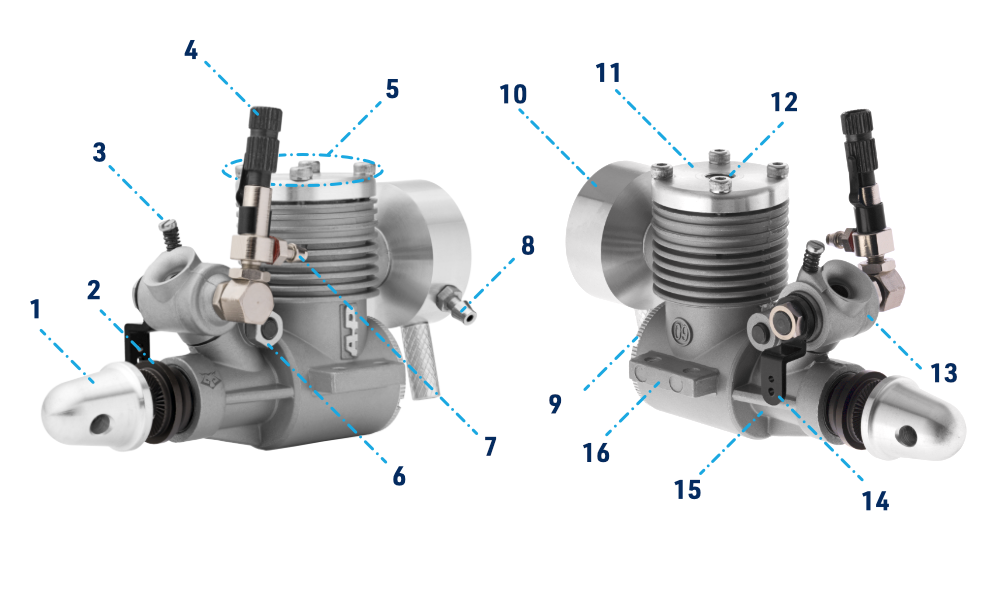
- Spinner nut
- Propeller drive plate
- Idle stop screw
- Main needle
- Cylinder-head bolts
- Retaining post and nut
- Fuel nipple
- Muffler pressure nipple
- Backplate
- Muffler
- Cylinder head
- Glow plug recess
- Carburettor
- Throttle arm
- Crankcase
- Mounting lug
Specifications
| Displacement | 1.47 cm³ (0.09 in³) |
|---|---|
| Bore | 12.5 mm |
| Stroke | 12 mm |
| Power | 0.35 kW at 16 500 rpm |
| Operating speed | 3000–17 000 rpm |
| Weight | 165 g (including muffler) |
| Propeller-shaft thread | M5 |
Safety notes
Model engine fuel is poisonous and highly flammable. Keep it away from eyes and mouth, children, flames, sparks and smoking. Store it in a clearly labelled, closed container. Run the engine only outdoors in an open area: the exhaust contains carbon monoxide. Allow the engine and muffler to cool before touching them. Keep glow leads and loose items away from the propeller.
Always use „common sense“ when operating model engines. Respect the power and torque of the engine and handle it according to the safety notes below. You and only you are fully responsible for the safe operation of your engine. Always work with caution and ensure you know what you are doing. Read the instructions and the principles of safe operation carefully in advance, and above all, follow them.
Following the instructions and safety notes will help you obtain reliable operation and good performance.
Remember that the engine is not a toy, but a beautiful product of fine mechanics, which, if handled incorrectly, can cause serious injury to you or other people, or significant property damage.
- Do not allow especially small children and other spectators, who could be injured as a result of operating your engine, to come too close. The safe distance is at least 5–6 m (20 feet) away from the engine while it is running. No one should stand in line with the rotating propeller!
- Always mount the engine to a solid and reliable mount using steel bolts with lock nuts. Never clamp the engine directly in a vice. To mount the engine to the model, use a high-quality, properly dimensioned engine mount recommended by the designer, model manufacturer, or specialist dealer. Make sure that all bolts are properly tightened.
- Use a propeller of the correct diameter and pitch. Follow the instructions in the Instruction Manual, on the model plan, or seek advice from a specialist dealer. Keep in mind that plastic propellers, especially those with larger diameters, may require special handling - always follow the propeller manufacturer's instructions.
- Mount the propeller in the correct orientation (when viewed from the „cabin“ of the model, the propeller in the pulling configuration is always clockwise; when viewed from the front, it rotates counter-clockwise). Always tighten the propeller nut carefully and firmly with the appropriate washer using the correct wrench and check the tightness regularly during operation. Use only undamaged and well-balanced propellers.
- Ensure that your face and other parts of your body are not within reach of the propeller when starting the engine. Do not lean over the propeller when adjusting the carburettor while the engine is running.
- Protect your fingers by using an electric starter or a starting stick. Follow the starter’s safety precautions and never start this engine with a bare hand or another body part.
- Adjust the carburettor only from behind the engine and the rotating propeller.
- Stop the engine only by completely closing the carburettor or by cutting off the fuel supply by pinching the fuel line. Never try to stop the rotating propeller with your fingers, hand or any other part of your body. Never throw anything into a spinning propeller in an attempt to stop it.
- Immediately discard any propeller with cracks, breaks, scratches or any signs of material fatigue or damage. Never attempt to repair or modify a propeller. Normal vibrations associated with engine operation can cause the propeller nut to loosen - check the tightness regularly and frequently.
- If you need to carry your model while the engine is running, be conscious of the spinning propeller. Keep the aeroplane pointed away from you and others.
- Do not use tight-fitting cowls over the engine. They can restrict air from flowing over the engine, resulting in engine damage from overheating.
- Do not fly near or under power lines.
Main section
Engine installation
Engine orientation
Mount the AP09A upright or rotated up to 90° to either side for the easiest setup. Other orientations are possible, but an inverted engine tends to run richer at idle and during acceleration. It may need different carburettor settings and a lower Fuel tank.
Mounting bolts and firewall
Use a suitable glass-filled plastic engine mount on a flat firewall, or level wooden mounting beams built into the airframe. Secure the engine with M3 socket-head screws, washers and locknuts. With a plastic mount, use an aircraft-grade plywood firewall at least 3 mm (1/8″) thick, reinforced for the engine’s power and torque.
Muffler installation
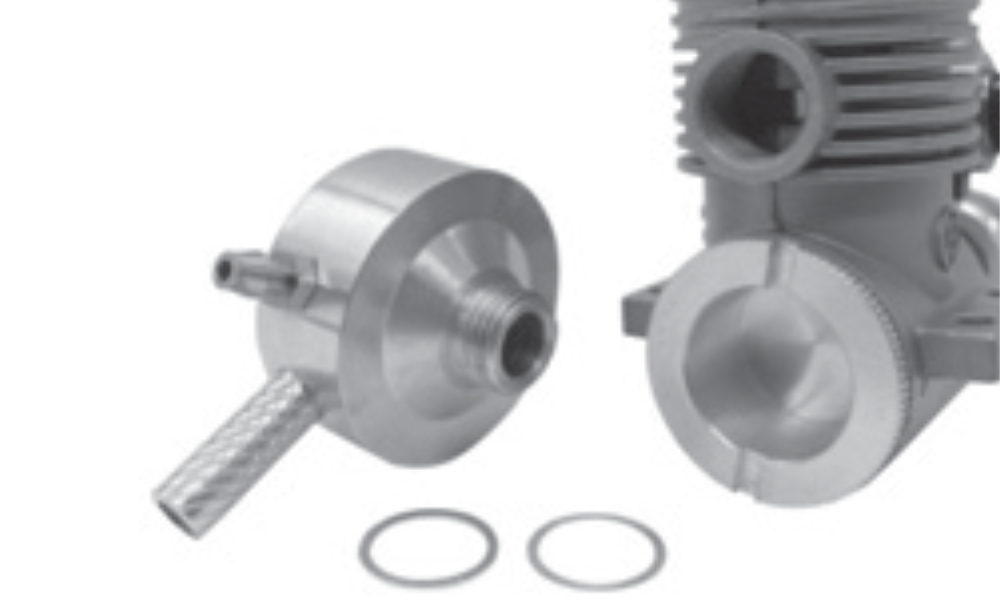
Screw the muffler into the rear exhaust opening, taking care not to cross-thread it. Adjust the direction of the exhaust tube by selecting the supplied spacers between the muffler and engine.
Fuel tank
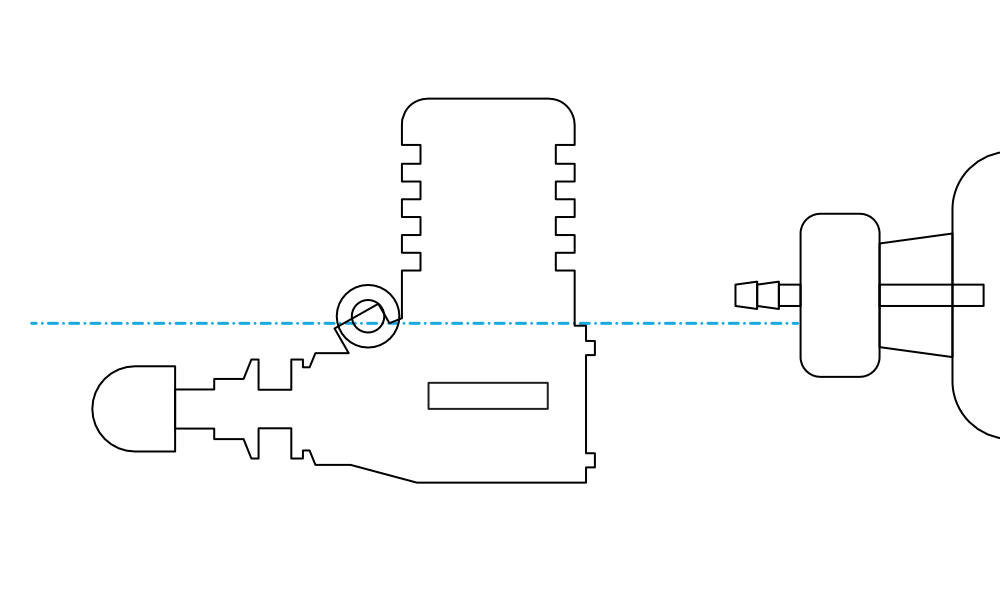
The manual permits a 30–110ml tank (1–4 oz), depending on the model and flight duration; do not exceed this range. The current catalogue recommends 50–60 ml within that range. A 30ml tank (1 oz) gives approximately 4–5 minutes at full throttle. Place the tank stopper at needle-valve height. A slightly higher position is often acceptable, but can cause problems in extreme aerobatics or with an inverted engine. For an inverted engine, place the stopper 5–6 mm below the needle valve; if this is impossible, lower the tank as far as the installation permits. Connect the tank pickup to the carburettor fuel nipple and its vent/pressure line to the muffler pressure nipple using suitable silicone tubing.
Needle-valve orientation
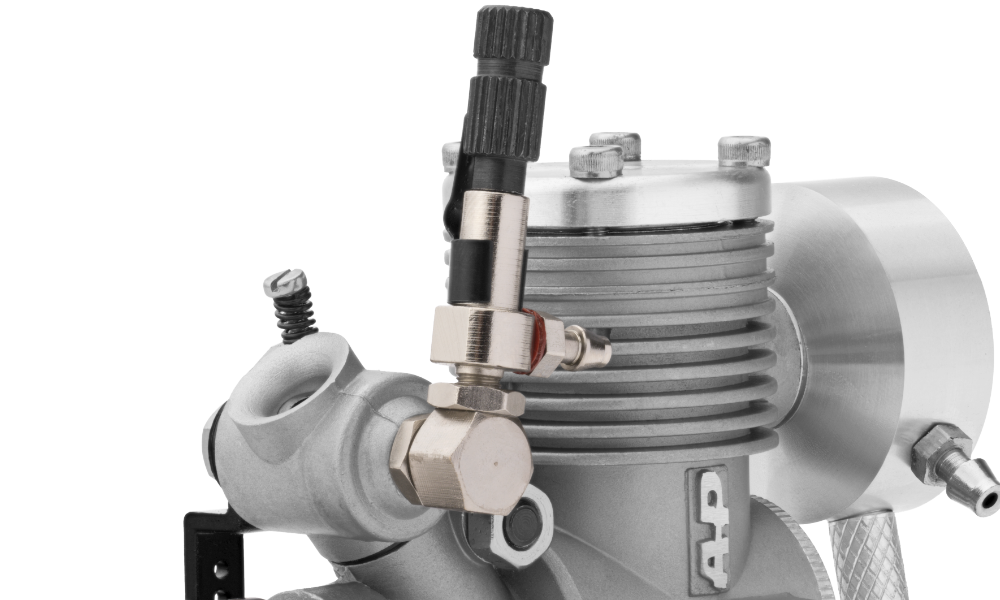
The main needle is angled away from the propeller for access. Loosen the nut at its base slightly, rotate the needle assembly to a suitable position, then retighten the nut.
Idle stop screw and throttle linkage
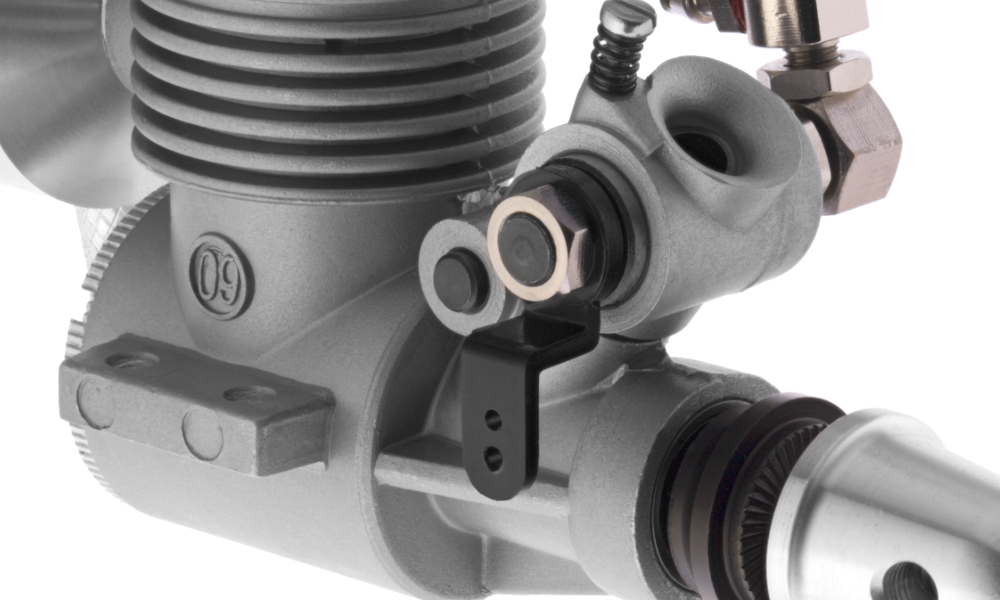
The idle stop screw limits throttle-barrel travel. Screwing it in holds the barrel farther open; unscrewing it allows more closure. Set it to permit complete closure so that the transmitter can stop the engine. With throttle trim fully lowered, adjust the linkage for full opening at full stick and complete closure at low stick. Raise the trim to set idle; lowering it again must stop the engine.
Carburettor installation
Insert the carburettor into the crankcase. Press it down lightly to compress the sealing O-ring, then tighten the pinch-bolt nut. Do not overtighten it: excessive force can crush the carburettor base.
Propeller installation
Balance the propeller before installation. An unbalanced propeller causes vibration and reduces the life of the engine and airframe. Fit the hub to the Ø5 mm shaft; if necessary, enlarge the bore carefully with a propeller reamer or tapered reamer without making it oversize. Fit the spinner nut and tighten it firmly using a screwdriver through its cross-hole. Do not use pliers.
Propeller, glow plug and fuel
Recommended propellers
Choose diameter and pitch to suit the model’s weight, size and drag. Keep within the recommended sizes below. Use a 7×4″ propeller for break-in; the catalogue suggests 7×3″ for sport flying.
| Recommended propellers |
|---|
| 6×4″ |
| 6×5″ |
| 7×3″ |
| 7×3.5″ |
| 7×4″ |
Recommended glow plug
Use a hot, short-reach glow plug for two-stroke engines, such as KAVAN PRO K1 (KAV28.9017) or O.S. No. 6 (formerly A3). The catalogue also lists KAVAN GP-1. Do not fit a long-reach plug: it can strike and damage the piston.
Recommended fuel
Use fresh methanol-based model-engine fuel. Its lubricant supplies the engine’s lubrication and helps remove heat. Keep the fuel container closed and protected from air and moisture.
| Operating stage | Nitromethane | Oil content |
|---|---|---|
| Break-in | 10 % | 20 % castor oil; no synthetic oil |
| After break-in | 15–20 % | 20 % total oil, including at least 16 % castor oil; synthetic oil may supply the balance |
All fuel percentages refer to the complete fuel mixture, including the stated minimum castor-oil content.
Do not use fuel lubricated solely with synthetic oil, fuel with too little oil, or stale fuel. An excessively lean mixture also reduces the amount of lubricant entering the engine and can cause overheating, rapid wear and seizure.
Main needle
Turn the main needle clockwise to lean the mixture and counterclockwise to enrich it. Before the first start, gently close it without forcing the seat, then open it 2½ turns. For subsequent starts, retain the previous running setting.
Starting procedure
Read the Safety notes and Break-in procedure before the first start. An electric starter is recommended, especially with a new engine. For manual starting, use a starting stick; never use a bare hand or another body part.
Excess fuel can hydraulically lock the engine. Before applying an electric starter, disconnect glow power and turn the propeller through compression 2–3 times by hand to check that it rotates freely. Never force a flooded engine or apply the starter with the carburettor or exhaust covered. This can damage the connecting rod or crankshaft and release the propeller assembly.
- Fit the 7×4″ break-in propeller and disconnect glow power. Fill the tank with the specified fuel.
- Open the throttle and set the main needle to 2½ turns open from gently closed.
- For an electric start, do not pre-prime: the starter will draw fuel. For manual starting only, fully open the carburettor, cover the exhaust outlet and turn the propeller 2–3 times to draw fuel. Remove your finger and turn it 3–5 more times, checking for flooding. Do not force it.
- Set approximately 1/4 throttle and connect glow power. If using an adjustable power panel, the Czech/German manual specifies 3–4 A; use a suitable supply for the fitted plug.
- Start with the electric starter or starting stick. If the engine does not start, disconnect glow power, check fuel delivery and repeat the preparation. If necessary, check the glow plug and its electrical connection.
- When it starts, open to approximately 1/2 throttle. Adjust the main needle gradually, by no more than 1/4 turn at a time, only enough to keep the engine running. Heavy smoke and a rough, four-stroking sound indicate the rich setting needed for initial running.
- After 20–40 seconds, disconnect glow power. For a new engine, continue with the Break-in procedure. For a run-in engine, open to full throttle and adjust gradually as described in Setting the mixture; abrupt or excessive leaning can stop or damage it.
- For a warm restart, reconnect glow power and start without priming first. Prime only if it will not fire, with glow power disconnected and hydraulic-lock checks repeated. If excessively hot, allow several minutes to cool and check whether the previous mixture was too lean; a very hot engine can ignite the prime prematurely.
Break-in procedure
ABC means an aluminium piston in a chrome-plated brass sleeve. The tapered sleeve feels tight near top dead centre when cold. This is normal and decreases as the engine warms and runs in. Do not dismantle the engine to alter the piston or sleeve fit.
- Mount the engine securely in the intended aircraft so the muffler, tank and throttle linkage can be tested together. Never clamp it in a vice. Remove the cowling for break-in and use the specified Break-in fuel.
- Use the recommended 7×4″ propeller and follow the Starting procedure.
- Once the engine is running, open to full throttle and set a very rich mixture by opening the main needle. Let it run for 2–3 minutes, then stop it.
- Allow the engine to cool for approximately 10 minutes. Restart, set a slightly leaner mixture, run for a few minutes and stop to cool again.
- Repeat these short running and cooling cycles, leaning only gradually. The source procedures give approximately 30–40 minutes of actual running before first flight. Check that the engine can hold its full-throttle speed for about 5 minutes without fluctuation or overheating before proceeding.
- Fly with the mixture as rich as possible while retaining reliable operation and adequate power. After each flight, lean only slightly as needed. Over approximately 10 flights, establish a stable normal needle setting. Never run excessively lean.
Allow the engine to cool between runs and after flight. A lean mixture or inadequate cooling can prematurely wear or damage the piston and sleeve.
Setting the mixture
Before break-in, idle may be around 6000 rpm because the carburettor has only one mixture needle. After break-in and correct high-speed adjustment, a consistent idle around 4000–5000 rpm becomes possible.
- Start the engine, disconnect glow power and allow approximately 1 minute to warm up.
- At full throttle, carefully find peak speed, then open the needle to richen the mixture and reduce speed by 200–300 rpm. A digital tachometer helps. Do not leave the engine running excessively lean.
- With the model securely held and the propeller clear of people, carefully raise its nose to about 60°; the English source allows 60–90°. A slight speed increase is acceptable, but it must not become leaner than the peak setting. If it sags or stops, enrich the mixture. Keep a visible exhaust smoke trail.
The Czech/German manual notes a possible 10–30 % speed increase in flight. Forward movement, falling fuel level and aerobatics can lean the mixture, so retain a richer ground setting. Monitor the engine’s sound and smoke in flight; if smoke disappears or operation becomes abnormal, land and correct the setting. Make adjustments only from behind the propeller.
Lubrication and maintenance
- Avoid dusty conditions and protect the engine from dust stirred up on the ground.
- Rinse the tank with methanol or fresh model-engine fuel before installation. Fit a filter between the tank and carburettor and a pickup filter in the fuel container or at the pump inlet. Keep the container closed; inspect and clean filters regularly.
- At the end of the flying session, empty the tank and allow the engine to consume its residual fuel. Disconnect the fuel line only from a safe position behind the propeller.
- Disconnect glow power. Apply suitable after-run oil through the carburettor and glow-plug opening, then turn the engine carefully several times to distribute it. This protects internal parts against corrosion and deterioration.
- Wipe the outside of the engine dry with a soft cloth to remove deposits and prevent staining.
- Do not dismantle the engine without a reason. If you are inexperienced or cannot solve a problem, contact KAVAN service.
Appendix
Dimensions (mm)
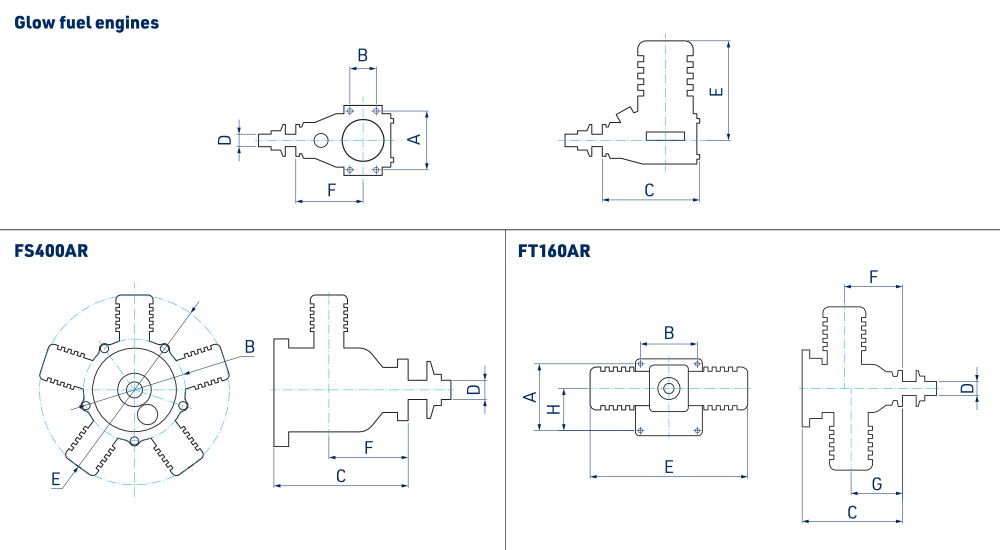
| A | B | C | D | E | F | G | H | |
|---|---|---|---|---|---|---|---|---|
| AP06A | 24 | 10 | 45 | M4 | 38.5 | 33 | ||
| AP09A | 30 | 11 | 58 | M5 | 43.5 | 41 | ||
| S15AII | 31.5 | 11 | 62 | M5 | 49.8 | 42.8 | ||
| S32AII | 38 | 15 | 74.9 | 1/4″–28 | 56.7 | 53.2 | ||
| S36AII | 38 | 15 | 74.9 | 1/4″–28 | 56.7 | 53.2 | ||
| S40AII | 44 | 17.5 | 84.3 | 1/4″–28 | 70.2 | 60.3 | ||
| S46AII | 44 | 17.5 | 85 | 1/4″–28 | 70 | 60 | ||
| S52AII | 44 | 17.5 | 85.8 | 1/4″–28 | 70.9 | 60.7 | ||
| S61AII | 52 | 25 | 97.8 | 5/16″–24 | 80.3 | 68.5 | ||
| S91A | 52 | 25 | 97.5 | 5/16″–24 | 84.7 | 67 | ||
| 108A | 58 | 25 | 105.3 | 3/8″–24 | 90 | 73.7 | ||
| 180AR | 68 | 36.5 | 133.7 | 3/8″–24 | 108 | 96.6 | ||
| FS-30AR | 36 | 14 | 64.7 | 1/4″–28 | 71 | 46.8 | ||
| FS-52AR | 44 | 17.5 | 80.6 | 1/4″–28 | 82.4 | 59.2 | ||
| FS-70AR | 50 | 21 | 89 | 5/16″–24 | 97.4 | 65.3 | ||
| FS-80AR | 50 | 21 | 90 | 5/16″–24 | 98.3 | 65.3 | ||
| FS-91AR | 52 | 25 | 90 | 5/16″–24 | 100 | 65.3 | ||
| FS-120AR | 58 | 25 | 106 | 5/16″–24 | 116.3 | 78.3 | ||
| FS-180AR | 58 | 25 | 111.8 | 3/8″–24 | 120 | 80.8 | ||
| FT-160AR | 80 | 68 | 120 | 3/8″–24 | 195.3 | 69.5 | 56.5 | 56.5 |
| FS-400AR | Ø122 | 160.5 | 3/8″–24 | Ø227 | 78 |
Spare parts
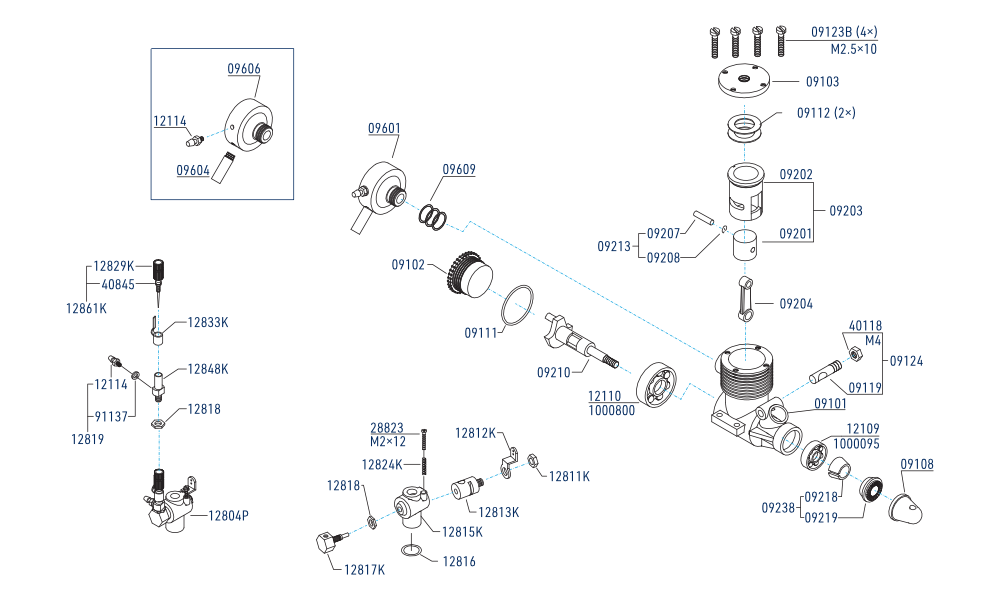
To order replacement parts, visit your nearest KAVAN dealer.
| Spare part set | Description | Part number |
|---|---|---|
| KAV28.3014 | Crankcase and back plate | 09102 + 09101 |
| KAV28.3015 | Cylinder Head | 09103 |
| KAV28.3016 | Crankshaft | 09210 |
| KAV28.3017 | Prop Drive, 2× Washer, Nut | 09238 (09218 + 09219) + 09108 |
| KAV28.3018 | Silencer Complete | 09601 (09604 + 09606 + 12114) |
| KAV28.3019 | Carburettor Complete with O-Ring | 12804P + 12816 |
| KAV28.3020 | Carburettor Pinch Clamp | 09124 (09119 + 40118) |
| KAV28.3021 | Bearing set (front/rear) | 12110 + 12109 |
| KAV28.3022 | Piston and Liner set | 09203 |
| KAV28.3023 | Conrod | 09204 |
| KAV28.3024 | Gudgeon Pin and Cap | 09213 (09207 + 09208) |
| KAV28.3025 | O-ring set (Carb body, main needle) | 40845 + 12816 |
| KAV28.3026 | Gasket set (exhaust, cylinder head, backplate) | 09111 + 09609 (3×) + 09112 (2×) |
| KAV28.3027 | Engine Bolt set (4 pcs) | 09123B (4×) |
What to do in the event of a failure?
A guide to the warranty and post-warranty repairs
Warranty Conditions
Since this engine, which requires regular maintenance and care, is intended for operation by the modeller under conditions of much higher performance and load on the model than those to which toys in the ordinary sense of the word are exposed, we cannot assume (and it cannot be supposed) any guarantee relating to how long it takes before individual parts need to be replaced due to wear. Engine parts wear out and require replacement over time. If any part of the engine appears to be damaged, defective or incorrectly installed when the engine is new, before the first start, this part will be repaired or replaced free of charge. Engines are only protected by the warranty against manufacturing defects in material, workmanship or assembly when new (before use). If any part is found to be defective, incorrectly manufactured or incorrectly assembled during the statutory warranty period, it will be repaired or replaced by the importer free of charge. If you believe that the defect in material, workmanship or assembly was not apparent when the model was new and only became apparent after the product was used, then please contact KAVAN Europe s.r.o. (e-mail: info@kavanrc.com, tel. +420 446 260 133). We firmly believe in the quality of the products we sell and will do our utmost to ensure that you are satisfied with them.
Warranty Limitations
This warranty does not cover damage caused by improper or rough handling, negligence, accidents, water or excessive humidity, damage caused by chemicals, improper or negligent maintenance, neglect of maintenance, accidents, acts of God, unauthorised changes or modifications, or use of incorrect fuel. The warranty does not cover engine parts that are considered consumables (spark plugs, oils, etc.). KAVAN Europe s.r.o. does not cover the costs of transporting defective parts from the user.
Role of the Model Shop
The shop where you have purchased the engine is the first place where you should apply for a warranty repair or complaint. The dealer can help with identifying a possible defect and communicating with the importer. Only if, for some reason, it is not possible to use the services of the shop where the model has been purchased, contact KAVAN Europe s.r.o. directly.
Limitation of Liability
KAVAN Europe s.r.o. does not provide - nor can it be assumed to provide - any other warranties. KAVAN Europe s.r.o. is not responsible for any special, incidental or consequential damages arising from the assembly or use of its products, accessories or chemicals required for the use of its products. The moment the product is used or operated, the user assumes all liability arising therefrom. In no event shall KAVAN Europe s.r.o.‘s liability exceed the actual sales price paid for the product.
How to send products for warranty or non-warranty service?
First, email or call the importer or service centre. It often happens that a product may appear defective or malfunctioning simply because it has not been used correctly or requires only a simple adjustment. One email or phone call to our experienced service technicians can solve everything quickly and easily!
When sending your product for service check/repair, please remember to include:
- A copy of your proof of purchase
- A return address
- A telephone number where you can be reached during business hours
- Your email address
- A detailed description of the problem
Preparing Your Motor for Service
The guidelines below will help you save on postage and assist our service technicians in carrying out repairs and returning products.
- Clean the engine before shipping to avoid paying an additional cleaning fee.
- Do not send fuel, batteries, accumulators, chargers, glow plug clips, and glow plug heating devices, operating instructions or other accessories that you use when operating your engine (unless the service technician requests that you send one of these items). You will save on postage and avoid the risk of loss during transportation. KAVAN Europe s.r.o. is not responsible for the loss of unwanted accessories during transportation to the service or repair.
- When sending the product to the service, ensure the product is insured for the price corresponding to the newly purchased product. KAVAN Europe s.r.o. is in no way responsible for the loss of the product during transportation to the service.
- Pack the product thoroughly and securely in a hard cardboard box of appropriate dimensions. A freely moving engine in a large box can only cause additional damage.
- If possible, avoid using shredded paper or foam padding. If this cannot be avoided, place the padding or motor in a sealed plastic bag(s).
- Include all documentation needed to repair the motor, along with as detailed and concise a description of the fault or problem as possible.
- Include a telephone number where you can be reached during the business day and an email address so that the service technician can contact you with additional questions about the repair.
- Include a note with your address. It is surprising how often this is forgotten.