KAVAN Strike DLG 1498mm – Instruction manual
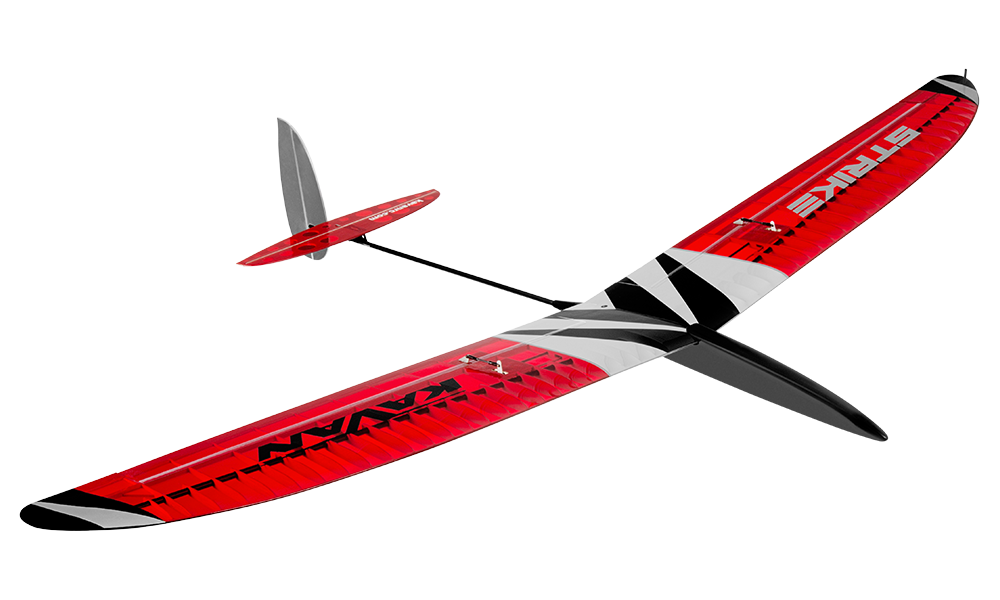
KAVAN Strike DLG – kit
Introduction
Our new Strike DLG will easily fulfil your dreams about a handy model you could fly virtually anywhere. About a model you could pack for your trips that would work with even the most basic four-channel radio – just like our Cumul DLG. Compared to the Cumul DLG, the Strike DLG is larger and features aileron control. Yet with little effort, it will still fit the 250g limit. And do not forget – this RC hand launch glider will get you in shape in no time – the thoroughly performed discus launch is quite a sporty feat as well!
An RC hand-launch glider kit is a great thing for anybody who wants to build their models by themselves the old-fashioned way with balsa, plywood, sticks and a few carbon composites. The building is easy and goes forward quite nicely. Strike DLG may not be an ideal very first model for a newcomer without any previous experience, but if you have built at least „something of balsa and sticks“, you should not have any problems. There should be no problems mastering the discus launch once your Strike DLG is ready to fly as well – we included a thorough illustrated appendix showing how it is done in the instruction manual.
Before you start
- If you are new to model aircraft, ask an experienced modeller to check your completed model and help you with the first flights. Your model shop or local model flying club can help you find an instructor.
- Build the model according to these instructions. Do not alter or modify it, as this can make it unsafe or unable to fly. Take time to build everything straight, true and strong.
- Check the kit for missing or damaged parts before starting. Familiarise yourself with each component and contact your dealer immediately if a replacement is needed.
- Trial fit every part before gluing. Check that you have the correct part and that it fits properly; extra glue cannot compensate for a poor fit.
- Set the centre of gravity (CG) and control throws as described in Pre-flight preparation before the first flight. Incorrect balance can make the model unstable or unable to fly.
Check the contents and report missing or damaged parts before starting construction.
Safety precautions
This model is not a toy. Even though it is light and slow in flight, incorrect handling can cause injury or damage. Build, test and fly it responsibly, following the instructions, applicable model flying safety rules and common sense.
Use suitable tools and accessories in good condition. Install all parts correctly and check the model before the first and every subsequent flight. Do not fly a damaged model. Beginners should fly with help from an experienced modeller.
Children under the age of 14 must operate the model under adult supervision. Fly in calm weather or a light breeze at a safe site away from obstacles.
Features
- High-performance thermal glider
- Designed and manufactured in the Czech Republic
- Discus or bungee launch
- CNC pre-cut parts
- Controlled ailerons, elevator, rudder
Specification
| Parameter | Value |
|---|---|
| Wingspan | 1498 mm |
| Length | 1030 mm |
| All-up weight | 230–260 g |
| Wing section | YA 0801 |
| CG position | 74–78 mm |
| Controls | Ailerons, rudder, elevator |
Set contents
CNC-cut balsa and liteply/plywood parts, carbon tubes for wing main spars, carbon tail boom, accessories set, sheet of stickers, full-size building plan, instruction manual.
Recommended RC equipment
Use at least a four-channel radio. A computer transmitter with independent aileron-servo adjustment allows differential, airbrake and launch mixes. Use four approximately 6g servos with a torque of 0.7–0.9 kg·cm. Check that the receiver and servos support a 1S LiPo supply.
- Aileron, rudder and elevator servos: KAVAN GO-6MG 4×
- Receiver battery: 1S LiPo 3.7 V 500–600 mAh
Recommended glues
Unless stated otherwise, use medium cyanoacrylate (CA) glue (KAV56.9952). Wing sheeting is better glued using a water-resistant white aliphatic resin, like our KAV56.9960/KAV56.9961 White Glue SUPER (alternatively, you can use this sort of glue for most of the wood-to-wood joints). The highly loaded parts (wing roots, wing main spars, fuselage formers etc.) should be glued together using 30-minute (or slower) epoxy (KAV56.9965 / KAV56.9966 / KAV56.9967) offering high strength and enough time for the correct positioning.
Recommended covering material
Lightweight iron-on films such as KAVAN Covering film, ORACOVER® or ORALIGHT® (if you want to keep the weight really down) will work the best for your Strike DLG.
Tools and accessories
- Very sharp precision knife (KAV66.770 with no. 11 blades)
- Scissors
- Electric drill with drill bits
- Wire cutter
- Long nose pliers
- Screwdrivers
- Razor saw
- Sandpaper No. 80, 100–120, 120–150, 180–220 and 360–400
- Needle files
- Soldering iron and solder
- Clothes pegs, paper clips or small clamps
- Modeller’s pins (KAV66.0355)
- Epoxy mixing stick and vessel
- Masking tape, clear sticky tape
- Rubbing alcohol (for cleaning up excessive epoxy)
- Paper tissue or soft cloth (for cleaning up excessive epoxy)
- Straightedge with scale
- Square edge
- Thin clear plastic film (for protecting the building plan)
- Permanent marker
- Modeller’s sealing iron (KAV66.8335), heat gun (for covering)
- Lightweight balsa filler (KAV56.9980 / KAV56.9981 / KAV56.9982)
- Hot melt glue gun & hot melt glue
Main section
Model assembly
Tail surfaces
- Trial fit the parts of the horizontal stabiliser, elevator, fin and rudder – no glue yet! Sand as necessary to obtain a perfect fit. (Fig. 1)
- Roughen the surface of the 3×0.5 mm R3 carbon spar using No. 120 sandpaper and glue it with medium CA to the trailing edge of the fin R1.
- Glue the T3 reinforcement plate of 3 mm poplar plywood into the horizontal stabilizer T1. Once the glue has cured, sand it flush with the stabilizer.
- Sand the entire surface of the horizontal stabiliser, elevator, fin and rudder with No. 120–150 sandpaper; round the outer edges. Bevel the leading edges of the rudder and elevator, referring to the (Detail D–D).
- Put the tail surfaces aside for now; they will be finished after the tailplane seat is installed to the tail boom.
Fuselage
- Trial fit the parts of the fuselage – no glue yet! Sand as necessary to obtain perfect fit. Be sure the tail boom F1 could be inserted easily but tightly into the openings in F10 and F8 formers.
- Glue the balsa reinforcement plate F2L (with the notch for the F14 hatch locking plate) to the inner side of the F3L fuselage left side (with the large opening for the F11 hatch); glue the plate F2R to the inner side of the F3R fuselage right side (without the hatch opening). (Fig. 2)
- Glue the F14 locking plate to the front of the F11 hatch; the locking plate has to match the position of a notch in the F2L reinforcement plate and the hatch matches the opening in the F3L fuselage side. The pair of F15 magnets will be glued with 5-minute epoxy into the F11 hatch and F2L plate only after the fuselage is covered – otherwise the high temperature of your sealing iron might demagnetize the magnets. Check their polarity before gluing: they must attract one another. (Fig. 4)+(Fig. 5)
- Epoxy the M4 aluminium captive nut into the F9 fuselage brace from below. Do not forget bevelling the edges of the fuselage formers and braces where required. (Fig. 6)+(Fig. 3)
- Use 30-minute epoxy to glue the fuselage formers and braces F10, F9, F8, F6 first into one fuselage side from the rear to the nose and then attach the other side. Put the fuselage straight bottom side onto the building plan protected by a sheet of thin clear plastic film and check the fuselage is true and straight – pin down as necessary until the glue sets.
- Epoxy the F4 former in place and bevelled F5 nose balsa block as well as the F17 and F18 cross braces.
- Epoxy the tow hook plate F7 in place. (Fig. 7)
- Partially cut (approximately 0.5–1 mm deep) and crack the fuselage sides along the F10 fuselage former (the cut line is to be soaked with thin CA before the final sanding). Slide the tail boom tube F1 onto the openings in F8 and F10 formers – do not glue yet.
- Slide the F21 liteply tail boom fairing ring onto the tail boom F1; tack glue the fuselage sides to the ring (be sure not to glue the tail boom yet). Glue the top and bottom balsa plates F20 and F19 in place. (Fig. 8)
- Glue the three piece upper F13a, F13b, F13c and F16 lower 2.5 mm balsa sheeting to the fuselage.
- Sand the entire fuselage (with the F11 hatch in place) so the tail end including the F21 ring fits smoothly the tail boom.
Wing
- The wing is to be built directly on the building plan protected by a sheet of thin clear plastic film. The wing ribs and riblets are supplied with jig tabs on the bottom side to allow building the wing with undercambered profile on a flat surface; at the same time producing the washout (the wing trailing edge is higher by 3 mm at the tips than at the root) necessary for stable flight of the model. DO NOT CUT the mounting jigs; they will be removed only after the respective wing half structure has been built, as described below. There is also the rib spacing jig to set the leading edge ends of rib and riblet mounting jigs correctly. (Fig. 12)
- Epoxy together the wing central ribs W5 and W6; insert Ø3 mm beech dowels into the holes to obtain the correct match.
Make a left and right pair of assemblies. (Fig. 9)
- Glue the plywood reinforcement plate W39 (for the W64 DLG pin) into the wing tip W35 and then the wing tip to the trailing edge W44 (left) or W45 (right) on a flat working surface; glue the W36 and W37 reinforcement plates in place creating a notch for the plywood wing tip spar W38. (Fig. 10)+(Fig. 11)
- Thread all the wing ribs and riblets W3 to W32 onto the main spar carbon tube W60; use a round file to trim the openings in the ribs to set the ribs at the required angle. Thread the auxiliary Ø3 mm carbon tube spar W61 through the respective holes in the W3 to W12 ribs. (Fig. 12)
- Put the main spar with ribs onto the building plan and insert the ends of ribs into the corresponding notches in the trailing edge W44 (W45 for the right-wing half). Insert the front ends of the rib jig tabs into the corresponding notches of the rib spacing jig. Align all the parts to the correct position over the building plan; pin down where necessary and then glue the ribs W4 to W31 to the W60 main spar tube, W61 auxiliary spar and the trailing edge. Epoxy the wing tip spar W38 into the main spar tube and to the wing tip into the notch between the W36 and W37 reinforcement plates. Glue the wing tip to the W32 rib and finally, the W32 rib to the main spar and trailing edge. Glue the balsa gusset W33 between the W32 rib and the W31 riblet.
- Glue the root rib W3 using the root rib dihedral jig in place. (Fig. 13)
- Trim the notches for the leading edge W46 (Ø3 mm beech dowel) in the ribs and riblets as necessary. Glue the leading edge with medium CA (starting from the wing tip and then rib by rib towards the wing root). (Fig. 14)
- Insert the W47 rear spar and the W48 aileron leading edge into the corresponding notches in ribs W4 to W32. Align them both flush with the upper edge of the ribs but do not glue yet.
- Glue the W51 aileron servo frame together with the W52 upper cover plate between the W12 and W14 ribs from above (the opening in the frame fits KAVAN GO-6MG servos; you might have to trim it if other servos are used). Glue the aileron W62 root and W63 tip ribs in place – to the W48 aileron leading edge and W44 (left) or W45 (right) trailing edge ONLY. Glue the W50 aileron horn block between the W12 and W14 ribs; flush with the upper edge of the ribs and the W48 aileron leading edge. (Fig. 15)+(Fig. 16)
- Glue the W34 reinforcement plate between the W30 and W32 ribs, glue the W40 and W41 reinforcements to the wing tip, and glue the two W49 gussets in place. (Fig. 17)
- Epoxy the plywood wing joiner bay plates W43 into the W3, W4 and W5/W6 ribs – be sure the bay will accommodate the W42 wing joiner nicely. (Fig. 20)
- Thoroughly check the entire wing, you are almost there; the wing sports the required 3 mm washout at the tip due to the rib mounting tabs now. Once satisfied, apply cyano to all joints.
The W47 rear spar and the W48 aileron leading edge are supposed to be glued to the ribs ONLY, not to each other!
- Now you can carefully cut the rib jig tabs using a sharp modeller’s knife.
- Soak the W51 aileron servo frame and W52 plate with thin cyano or thinned epoxy from the inside. Glue the W53 bottom aileron servo cover between the W12 and W14 ribs. (Fig. 18)
- Sand the bottom side of all ribs and riblets to shape with No. 120 sandpaper.
- Glue the bottom wing centre 1.5 mm balsa sheeting W57 (with a rectangular opening alongside W3 for the aileron servo cable) and W58 in place; glue the plywood reinforcement plate W54 on the top of W58 along the area of the wing fixing bolt. (Fig. 19)+(Fig. 20)
- Thread a thick sewing thread through rectangular openings for the aileron servo cable in the W4 to W12 ribs and W57 bottom sheeting and secure it with pieces of sticky tape – it will help you to navigate the aileron servo cable through later.
- Glue the top wing centre 1.5 mm balsa sheeting W56 and W55 in place. Sand the wing root flush with the W3 rib – the slanted position set with the root rib dihedral jig ensures the correct wing dihedral. (Fig. 21)
- Use a fine razor saw and modeller’s knife blade to cut through the ribs and trailing edge to separate the aileron from the wing. Bevel the aileron leading edge by 30° following the (Detail A–A). Finally, sand the entire aileron smooth using No. 180 sandpaper. (Fig. 23)+(Fig. 24)
- Assemble the other wing half in the same way.
- Sand both wing halves with No. 120 sandpaper. Trial fit – no glue yet – the wing halves and the W42 wing joiner in the W43 bay; insert the riblets W1 and W2 between the root ribs. Once satisfied with the fit, use 30-minute epoxy to glue the W42 wing joiner, and W1 and W2 riblets to one wing half aligned to match the W3 wing root rib. (Fig. 25)
- Put the wing half with the wing joiner glued in on your workbench (protected by a sheet of plastic film) so the alignment pin of the W1 riblet protrudes over the edge of the table; then glue the other wing panel with 30-minute epoxy. Be sure the trailing edges of both wing panels match perfectly. Double-check the correct wing halves' alignment and let the epoxy set. (Fig. 26)
- Epoxy the wing bolt plate W59 to the top of the wing centre; once the glue has cured, drill a Ø4.2 mm hole for the wing bolt through the W59. (Fig. 26)
- Now it is the time to decide which tip of the wing the discus launch pin is to be glued into – the left tip for a right-handed pilot, the right tip for a left-handed pilot. Laminate a strip of the fibreglass cloth around the hole for the discus launch pin on top and bottom of the wing tip. You can use a special low-viscosity laminating/finishing epoxy or you can use regular epoxy glue thinned slightly by an epoxy paint/dope thinner. Once the resin has cured, sand the entire wing smooth with No. 180 sandpaper.
Covering
- Thoroughly sand the surface of all parts with No. 360–400 sandpaper and carefully vacuum all the dust (the iron-on film does not stick well to a dusty surface; the dust also contains hard grains released off the sandpaper capable to ruin the smooth coating of your sealing iron quickly).
- Use as light iron-on film as you can get (KAVAN Covering film, Oracover®, Oralight® etc. – not supplied in the kit). Follow the instruction manual supplied with the covering film of your choice please.
Final assembly
Hinging the control surfaces
- Use high-quality hinging tape strips such as 3M Crystal Clear® (available in hobby shops) or strips of the same iron-on film you used for the covering. Remember to apply the tape with the control surface deflected to the limit (refer to (Detail D–D)) to get free movement of the particular control surface.
Fuselage and tail
- Using a very sharp pointed modeller’s knife, cut the covering film over the opening for the tailplane pylon in the horizontal stabilizer, over slots for the Kevlar® thread in the fin and over control horn slots in the elevator and rudder.
- Use a fine needle file to trim the pre-cut slots for the horizontal tailplane pylon, fin, and elevator and rudder push rod exits in the carbon tube tail boom. Use a fine round needle file to make a groove for the rudder push rod tube in the tailplane pylon F22. (Fig. 27)
- Insert the tailplane pylon F22 into the F1 tail boom – no glue yet. Insert the fin and rudder assembly into the notch in the end of the tail boom and tack glue it to the tail boom. Bind the fin to the tail boom with a Kevlar® thread threaded through the slots in the fin. (Fig. 28)
- Slide the horizontal stabilizer on the F22 tailplane pylon; align it square to the fin and to the longitudinal axis of the tail boom and tack glue it to the pylon. Double check the correct alignment; once satisfied, apply a generous amount of cyano along all the joints and onto the Kevlar® thread. Insert the elevator and rudder push rod outer tubes into the tail boom. Secure them with a piece of polyurethane foam soaked with epoxy that you will work into the centre of the tail boom with a thin stick. This is great for a precise, slop-free elevator and rudder control. (Fig. 29)
- The F12 servo mount supplied in the kit has been tailored for the recommended KAVAN GO-6MG servos. Whatever type of servos you use, always check if the openings don’t need trimming first. We recommend soaking the edges of the servo openings with cyano. Once satisfied, glue the F12 servo mount in place (the servos are to be fitted in the upside-down position). (Fig. 30)
- Thread the protruding ends of the elevator and rudder push rod outer tubes through the holes in the F6 former so the tubes lead directly to the horns of servos in the F12 servo mount. Insert the tail boom into the fuselage – no glue yet. (Fig. 31)
- Attach the wing to the fuselage and secure with the M4 bolt. Looking from above, front and rear check the fuselage and tail boom are straight and the wing dihedral makes a nice symmetrical „V“ in relation to the horizontal stabilizer. Once satisfied cut the push rod outer tubes to the correct length and epoxy thoroughly the tail boom into the fuselage. Double check the correct alignment before the glue sets.
- Solder the M2 brass threaded couplers on one end of the 0.8 mm piano wire push rods. Screw the ball links on and slide the push rods into the respective outer tubes. Secure the ball links to both servo arms with the M1.6 screws supplied in the kit. Insert the fibreglass control horns into the slots in the elevator and rudder – do not glue yet. Set the servos to the neutral with your radio on; attach the servo arms square to the side of the servo case. Set the elevator and rudder flush with the horizontal stabilizer resp. fin. Mark the correct length of the push rods and bend them to the right angle (you can make a „Z-bend“, but the simple L-bend usually works well enough). Insert the L-bends into the holes in control horns and cyano the horns into the elevator and rudder still set in the neutral position. Finally, secure the servos with drops of hot melt glue, silicone or MS polymer glue in the servo tray. (Fig. 29)+(Fig. 32)
- Glue the pair of F15 magnets into the F11 hatch and F2L fuselage reinforcement with 5-minute epoxy. Double-check their polarity – they have to cling to each other! For easy removal, apply a strip of folded sticky tape to the rear edge of the hatch. (Fig. 4)+(Fig. 5)
- Install your receiver into the fuselage under the wing, the receiver battery will go into the nose.
Wing
- Thoroughly epoxy the carbon discus-launch pin into the left (for a right-handed pilot) or right (for a left-handed pilot) wing tip. (Fig. 33)
- Remove the covering film over the openings for the aileron servo arms in the W52 top cover plates and in the W53 bottom cover plate. Install aileron servos with arms fitted (set them to neutral with your radio on), aileron horns and linkage the same way you did with the rudder and elevator. Finally, using a piece of sticky or iron-on film seal the opening in the W53 bottom cover plates. (Fig. 34)+(Fig. 35)
Tow hook
- Install the tow hook into one of the pre-drilled holes in the F7 tow hook plate; it should be positioned about 5 mm in front of the centre of gravity. (Fig. 36)
Pre-flight preparation
Centre of gravity and control throws
| Setting | Value |
|---|---|
| CG position | 74–78 mm |
| Rudder | ±25 mm |
| Elevator | ±10 mm |
| Ailerons | 10 mm up, 6 mm down |
| Ailerons as the airbrake | 40° down |
| Discus launch configuration | Rudder offset 1 mm opposite the direction of rotation (right-handed pilot: 1 mm right), elevator 1 mm down. |
| Airbrake → elevator mix | elevator 2 mm down at full airbrake |
Use the Discus Launch configuration for the climbing phase of the discus launch only after the model has been trimmed out properly and you’ve made yourself familiar with the controls.
Flying
Be sure you are using fully charged batteries. Now (and before any further flight again) check the correct function of the whole radio equipment and movement of the control surfaces. Be sure any part of flight equipment cannot move during flight. We strongly recommend making a range check (see your radio instruction manual for details).
The first flight
Choose calm weather or a light breeze below 3 m/s. Fly only on a safe site such as an RC club flying field. Glider will be very happy on your favourite slope on a calm day. The very light lift will allow perfect fine trimming out.
Switch your transmitter and then the receiver on and check all the working systems one more time. Facing INTO the wind hold your transmitter in one hand; grip the model in the other hand near the centre of gravity. Hold it at head level and give the model a fairly powerful push exactly into the wind; wings level, nose slightly down. An experienced helper can launch the model for you. Your model should now glide in a long, flat and straight path without needing any help from you. Use the controls gently if necessary, and adjust the trim tabs until your Strike DLG glides above the described way. Now check the position of control surfaces; set the length of pushrods to bring back trim tabs on your transmitter to a central position if necessary (do this even if your transmitter stores trim settings). Check again the gliding of your Strike DLG.
Now you are ready to make your first discus launch.
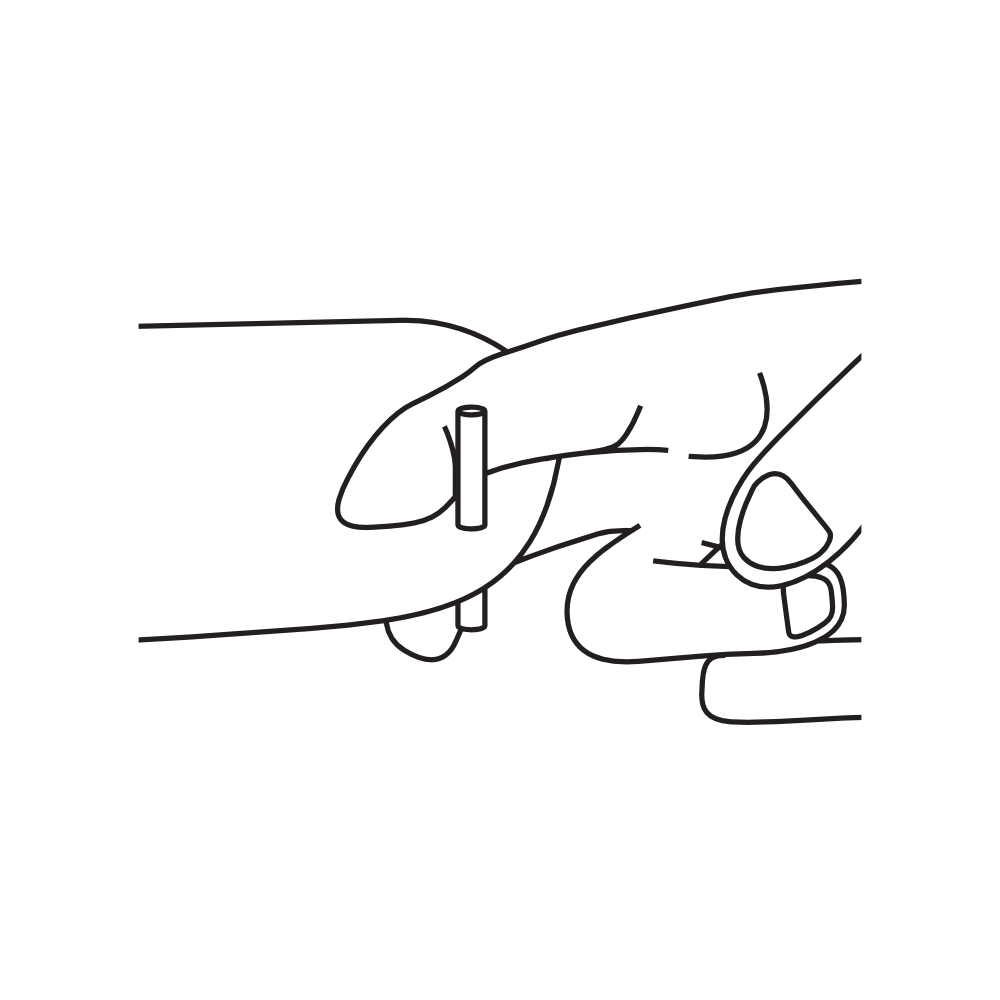
Discus launch
The discus launch allows your model to reach quite a high altitude without much effort. As it is with any „sports performance“, it will require some training to do it right – our step-by-step manual makes it easy. We will describe the procedure for a right-handed pilot; with the launching pin attached to the left wingtip. The left-handed procedure is the mirror image. Practise the complete rotation slowly without releasing the model before attempting an actual launch.
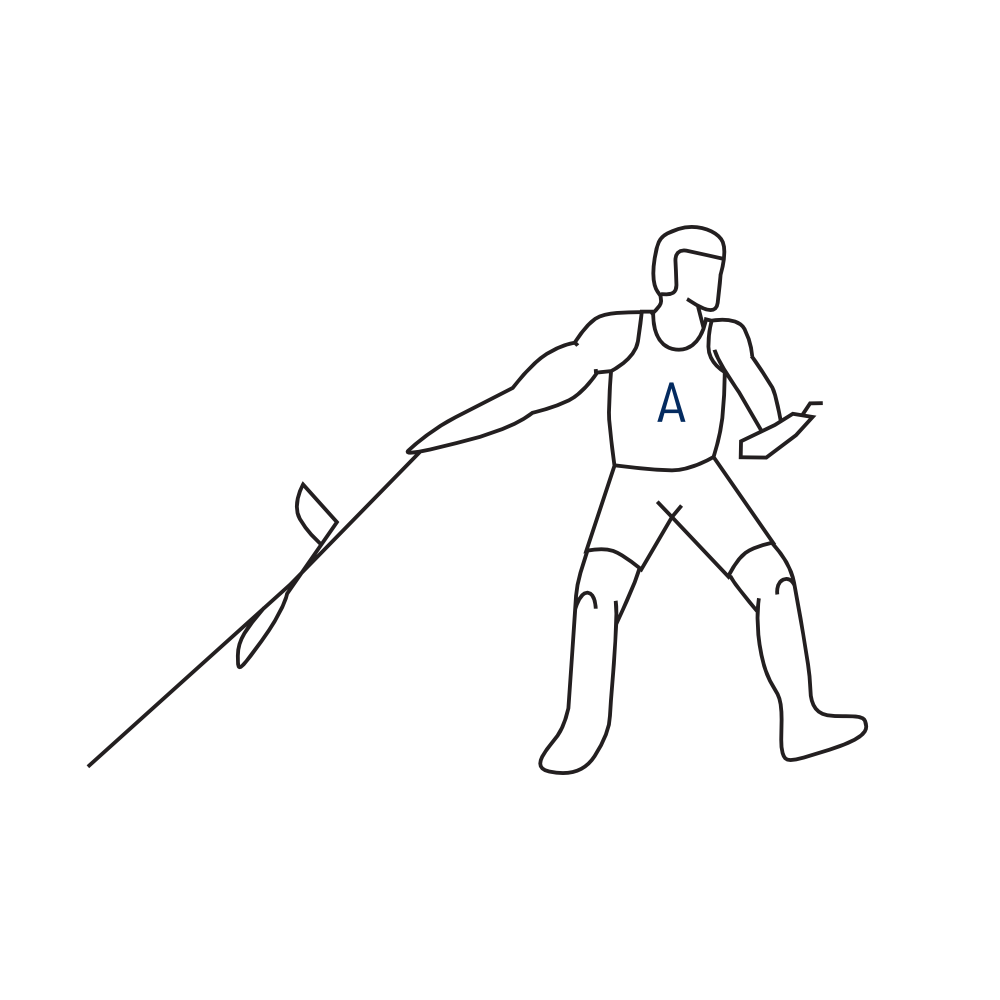
Position A – getting ready
Your right index finger and middle finger should be wrapped around the launch pin at the left wing tip. Your thumb is to be gently pressed against the leading edge of the wing. Hold the transmitter in your extended left hand. Stand with your left shoulder into the wind and the right wing tip pointing at ca 45° angle to the ground.
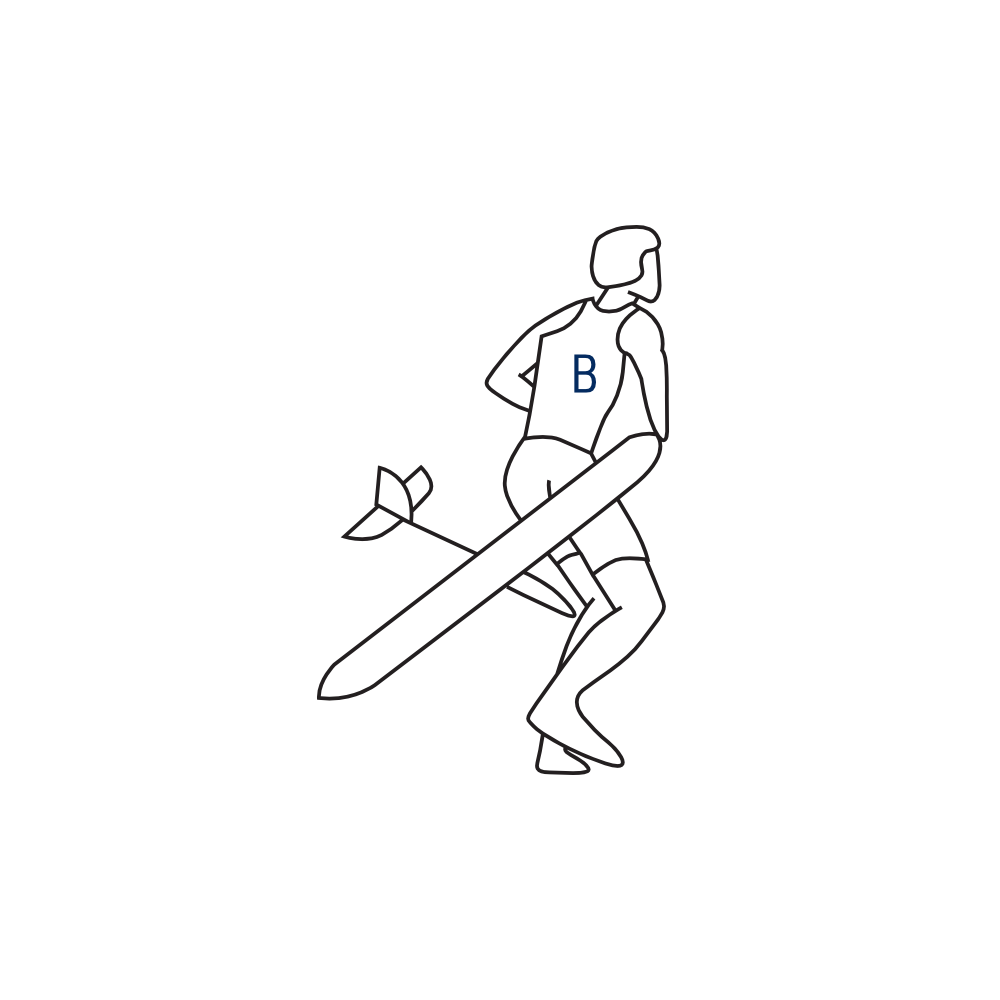
Position B – the first step
Take a long step with your left foot pulling the Strike DLG up and forward with your right arm.
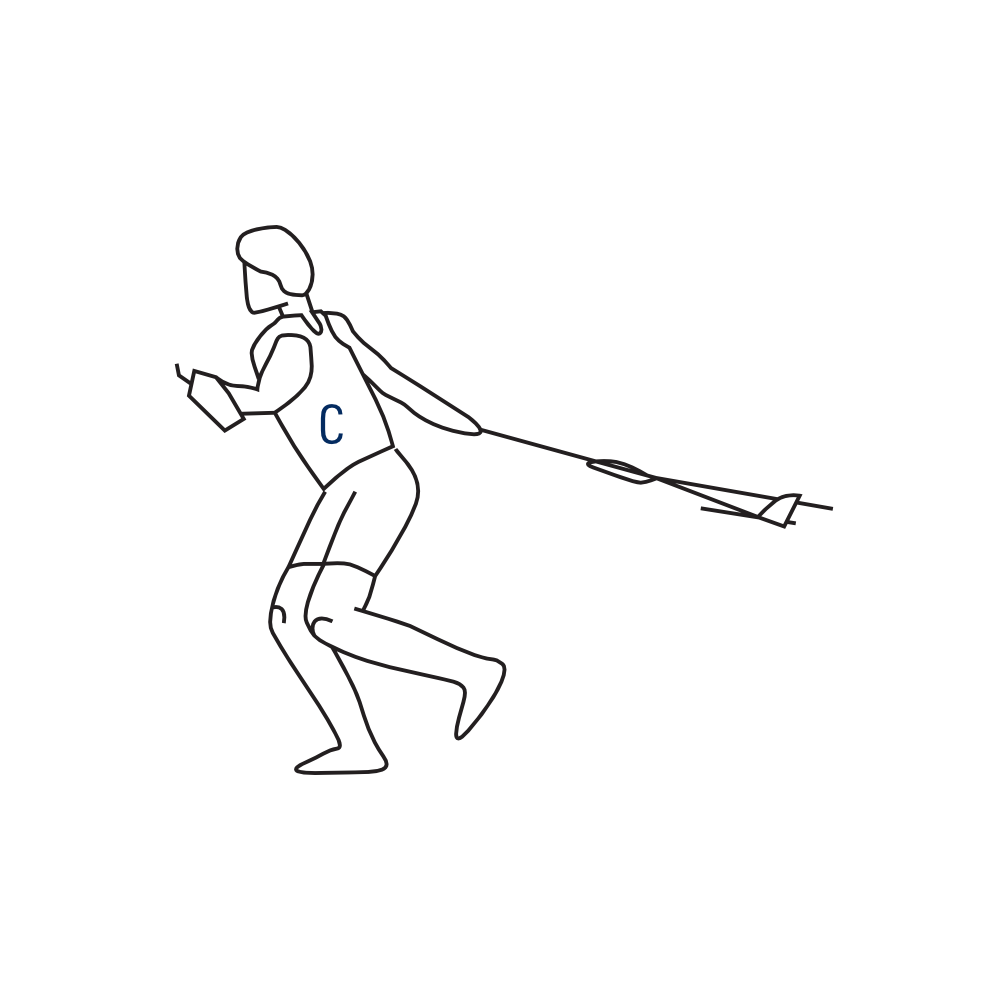
Position C – rotation
Step into an anticlockwise turn with your right foot, keeping the Strike DLG flat and your right arm extended.
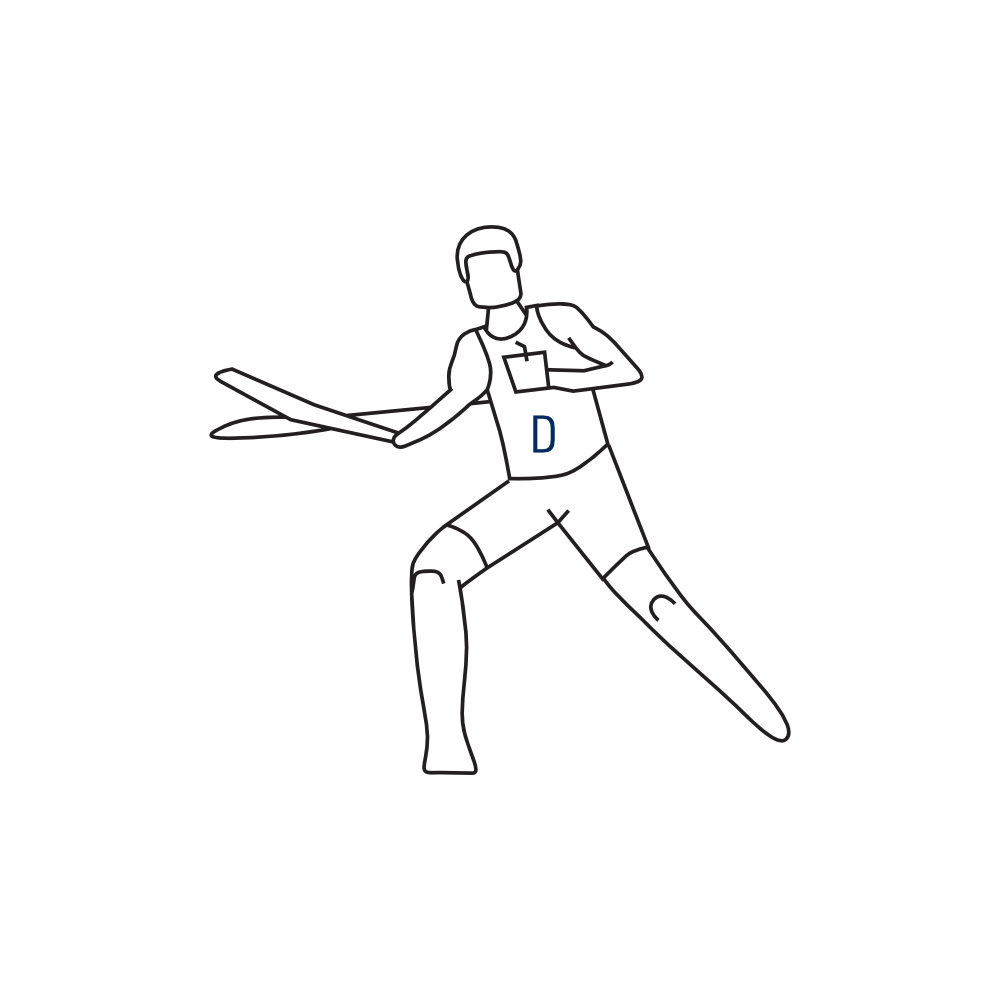
Position D – continued rotation
The second half of the rotation – the part that is most important for a good launch. Do not use too much arm in this section. Just let the swing of your torso speed the Strike DLG up.
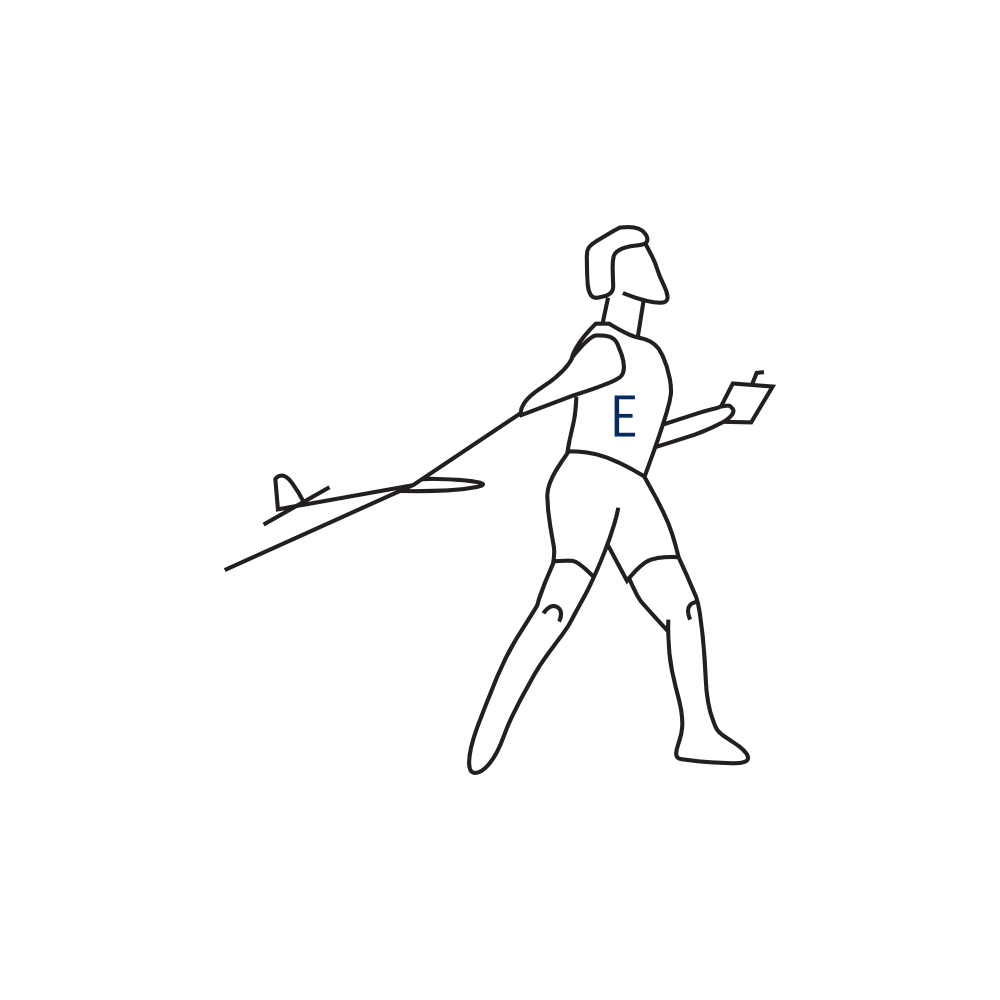
Position E – release
By this time in the launch the plane will be trying to climb on its own. Just release your fingers and let the plane fly out of your hand directly into the wind.
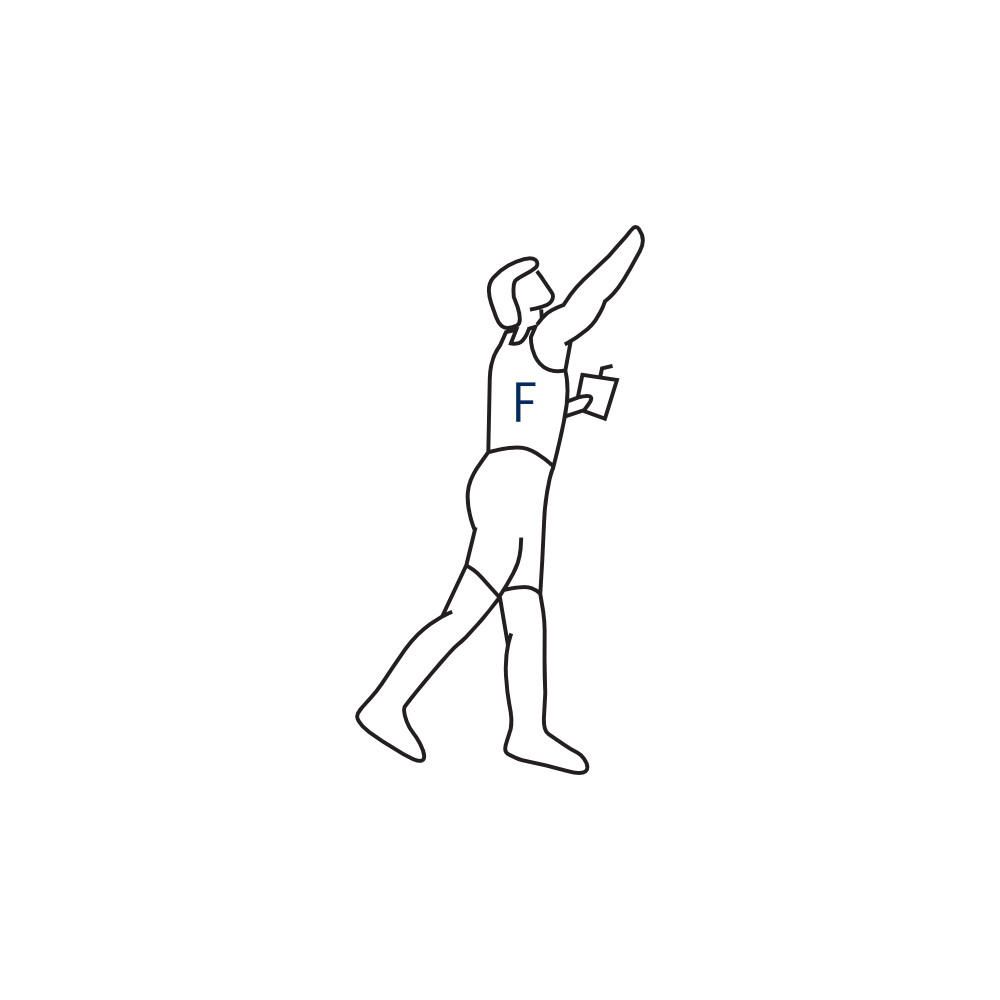
Position F – taking control
Regain your balance and immediately hold the transmitter with both hands while watching the model. Be ready to apply down-elevator if it climbs too steeply, or up-elevator if a poor release sends it towards the ground.
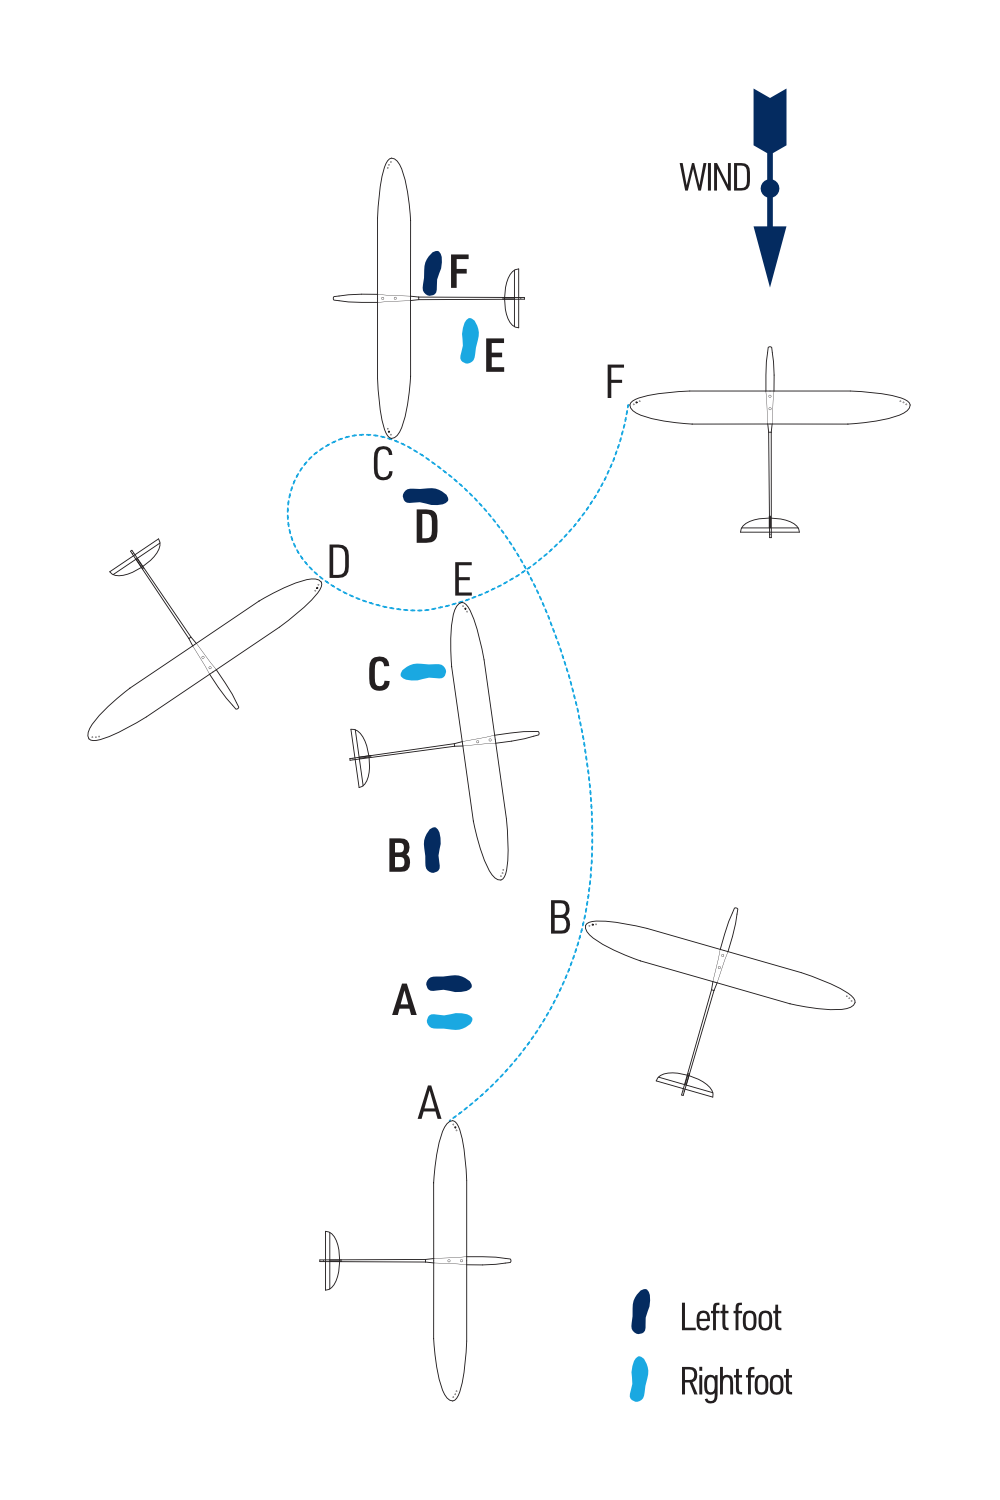
The plane will climb after release – the climb angle should be shallow at first. Once you are well acquainted with the discus launch you can use more force and increase the launch angle up to 60–80°. When completely familiar and comfortable you can add two quick steps before starting the turning sequence to get some extra speed and energy.
When the plane has slowed almost to the point of stopping promptly apply down-elevator to achieve level flight. When this is done at the right moment the plane will go into horizontal flight with just enough airspeed to maintain a gentle glide. If it is done too early the plane will pitch its nose up dangerously after a short dive. If it is done too late the plane will stall.
Congratulations, you’ve made it!
Appendix
Assembly illustrations
Please note the pictures are just for illustration only – some show our prototype that might differ slightly from the actual, regular series production kits.


Building-plan details
Consult the separate full-size kit plan for details A–A and D–D before beveling and hinging the control surfaces. Use the CG reference on that plan when balancing the model.


Parts list
Main parts
| Part | Quantity | Building plan no. | Material |
|---|---|---|---|
| Building Plan 1:1 | 1 | ||
| Instruction Manual | 1 | ||
| Sheet of Stickers | 1 | ||
| Pushrod set | 2 | Plastic tube + 0.8 mm piano wire | |
| Tail boom | 1 | F1 | Carbon tube Ø7/6 mm |
| Rib Spacing Jig | 1 | Balsa 1.5 mm |
Bag no. 1 – small parts
| Part | Quantity | Building plan no. | Material |
|---|---|---|---|
| Tow hook | 1 | Metal | |
| Magnet Ø3 mm | 2 | F15 | Neodymium |
| Wing Bolt M4 | 1 | Nylon | |
| Captive nut M4 | 1 | Aluminium | |
| Control horn | 4 | Fibreglass 1.5 mm | |
| Ball link short M2 | 4 | ||
| Threaded coupler M2/0.8 mm | 2 | Brass | |
| Rudder and elevator servo tray | 1 | F12 | Balsa 4 mm |
| Carbon pin | 1 | W64 | Ø5 mm |
| Fibreglass cloth | 1 | 110 g/m² | |
| Kevlar® Thread | 1 | ||
| Quicklink | 2 | ||
| Quicklink pin | 2 | ||
| Aileron push rod | 2 | Carbon rod Ø2 mm |
Bag no. 2
| Part | Quantity | Building plan no. | Material |
|---|---|---|---|
| Nose block | 1 | F5 | Balsa 10 mm |
| Servo hatch | 1 | F11 | Plywood 1.2 mm |
| Fuselage Former | 1 | F6 | Plywood 3 mm |
| Fuselage Formers | 1+1+1 | F4, F8, F10 | Poplar plywood 3 mm |
| Fuselage cross-brace | 1+1 | F17, F18 | Poplar plywood 3 mm |
| Fuselage hatch lock | 1 | F14 | Poplar plywood 3 mm |
| Tail boom fairing ring | 2 | F21 | Poplar plywood 3 mm |
| Wing riblet | 1 | W2 | Poplar plywood 3 mm |
| Root rib dihedral jig | 1 | Poplar plywood 3 mm | |
| Nose Shape Template | 1 | Poplar plywood 3 mm |
Bag no. 3
| Part | Quantity | Building plan no. | Material |
|---|---|---|---|
| Wing rib | 2 | W6 | Plywood 0.8 mm |
| Wing centre sheeting reinforcement | 2 | W54 | Plywood 0.8 mm |
| Wing joiner bay plate | 4 | W43 | Plywood 0.8 mm |
| Towhook plate | 1 | F7 | Plywood 2 mm |
| Wing captive nut brace | 1 | F9 | Plywood 2 mm |
| Wing bolt plate | 1 | W59 | Plywood 2 mm |
| Wing tip spar | 2 | W38 | Plywood 2 mm |
| Wing riblet | 1 | W1 | Plywood 3 mm |
| Wing joiner | 1 | W42 | Plywood 3 mm |
| Wing tip reinforcement plate | 2 | W39 | Plywood 1.5 mm |
Bag no. 4 – tail
| Part | Quantity | Building plan no. | Material |
|---|---|---|---|
| Horizontal stabilizer | 1 | T1 | Balsa 2.5 mm |
| Elevator | 1 | T2 | Balsa 2.5 mm |
| Horizontal stabilizer reinforcement plate | 1 | T3 | Poplar plywood 3 mm |
| Fin | 1 | R1 | Balsa 2.5 mm |
| Rudder | 1 | R2 | Balsa 2.5 mm |
| Carbon fin reinforcement | 1 | R3 | Carbon strip 0.5×3 mm |
| Tailplane pylon | 1 | F22 | Liteply 3 mm |
Bag no. 5
| Part | Quantity | Building plan no. | Material |
|---|---|---|---|
| Wing rib | 2 | W6, 8, 10, 12, 14, 16, 18, 20, 22, 24, 26, 28 | Balsa 1.5 mm |
| Wing riblet | 2 | W7, 9, 11, 13, 15, 17, 19, 21, 23, 25, 27, 29, 31 | Balsa 1.5 mm |
| Wing root rib | 2 | W3 | Balsa 4 mm |
| Wing tip rib | 2+2 | W30, W32 | Balsa 4 mm |
| Wing rib | 2+2 | W4, W10 | Balsa 3 mm |
| Trailing edge | 1+1 | W44, W45 | Balsa 3×15 mm |
| Leading edge | 2 | W46 | Beech dowel Ø3 mm |
| Wing tip reinforcement (bottom) | 2+2 | W36, W37 | Balsa 4 mm |
| Wing tip reinforcement (top) | 2+2 | W40, W41 | Balsa 4 mm |
| Wing tip | 2 | W35 | Balsa 1.5 mm |
| Gusset | 4 | W49 | Balsa 1.5 mm |
| Wing main spar | 2 | W60 | Carbon tube Ø6/5 mm |
| Auxiliary spar | 2 | W61 | Carbon tube Ø3 mm |
| Rear spar | 2 | W47 | Balsa 4 mm |
| Aileron leading edge | 2 | W48 | Balsa 4 mm |
| Aileron root/tip rib | 2+2 | W62, W63 | Balsa 4 mm |
| Aileron servo frame | 2 | W51 | Balsa 3 mm |
| Aileron servo top cover plate | 2 | W52 | Balsa 1.5 mm |
| Aileron servo bottom cover plate | 2 | W53 | Balsa 1.5 mm |
| Aileron horn block | 2 | W50 | Balsa 4 mm |
| Wing centre sheeting | 2+2+2+2 | W55, W56, W57, W58 | Balsa 1.5 mm |
Bag no. 6
| Part | Quantity | Building plan no. | Material |
|---|---|---|---|
| Fuselage side | 1+1 | F3L/R | Balsa 1.5 mm |
| Fuselage bottom sheeting | 1 | F16 | Balsa 2.5 mm |
| Fuselage upper sheeting | 1+1+1 | F13a, b, c | Balsa 2.5 mm |
| Fuselage side reinforcement plate | 1+1 | F2L/R | Balsa 3 mm |
| Tail boom fairing | 1+1 | F19, F20 | Balsa 2.5 mm |